Work Allocation Management System
Comprehensive guide for managing NDIS and CHSP service allocations. Select a topic below to get started.
System Overview
Learn about the system features, user roles, and permissions.
Create Work Allocation
Step-by-step guide to creating standard single allocations.
Edit Allocations
Learn how to modify existing work allocations.
Delete Allocations
Understand deletion rules and status restrictions.
Bulk Operations
Publish or delete multiple allocations at once.
Weekly Calendar
Visual interface for managing allocations across the week.
Job Board
Employee interface for accepting and rejecting work.
Email Notifications
Configure and send client notifications about scheduled care.
Timezone Management
Handle global scheduling across different timezones.
Performance Analytics
View metrics, workload distribution, and insights.
Troubleshooting
Solutions to common issues and problems.
System Overview
The Work Allocation System manages scheduling of carers to clients for NDIS (National Disability Insurance Scheme) and CHSP (Commonwealth Home Support Programme) services.
Key Features
📊 Multiple View Types
Table, Calendar, and Performance Analytics views for different workflows.
👥 Employee & Department
Support for both individual carers and department-level assignments.
⚡ Bulk Operations
Publish multiple allocations or bulk delete with one click.
📧 Email Notifications
Automated client notifications with customizable email selection.
🌍 Timezone Support
Global timezone handling for accurate scheduling worldwide.
📋 Job Board
Carer-facing interface for accepting or rejecting work assignments.
User Roles & Permissions
| Feature | Administrator | Manager | Employee |
|---|---|---|---|
| View Allocations | ✓ Full Access | ✓ Department Only | ✓ Own Only |
| Create Allocations | ✓ | ✓ | ✗ |
| Edit Allocations | ✓ | ✓ | ✗ |
| Delete Allocations | ✓ | ✓ | ✗ |
| Job Board Access | ✓ | ✓ | ✓ |
| Performance Analytics | ✓ | ✓ Department | ✗ |
| Bulk Operations | ✓ | ✓ | ✗ |
Create Work Allocation
Follow these steps to create a standard single work allocation for a client and carer.
Click the yellow [+] button in the top-right corner of the screen.
The form will open with a teal header displaying "Create Work Allocation".
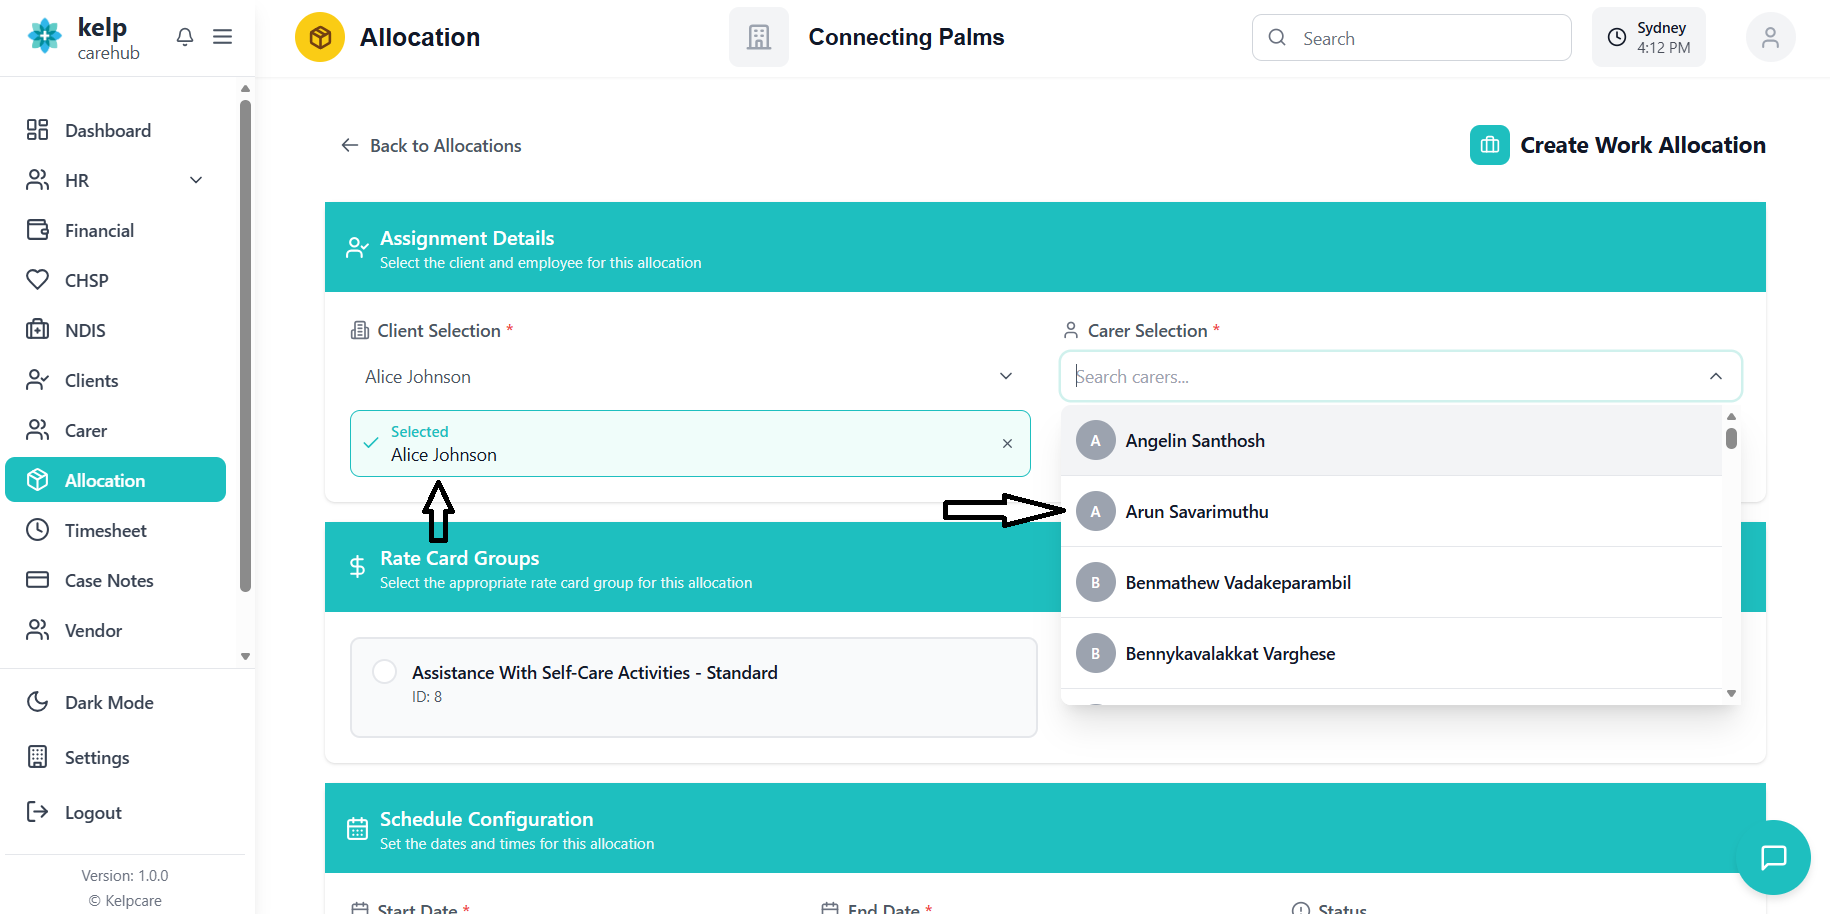
Client Selection:
- Click the "Client Selection" dropdown
- Search by client name
- Click to select client
- Selected client displays with green checkmark
Carer Selection:
- Click the "Carer Selection" dropdown
- Search by name or email
- Click to select carer
- Selected carer displays with green checkmark
After client selection, rate card groups load automatically.
- Click to select appropriate rate card group
- Selected group highlights with teal border and checkmark
- Required: Must select before proceeding

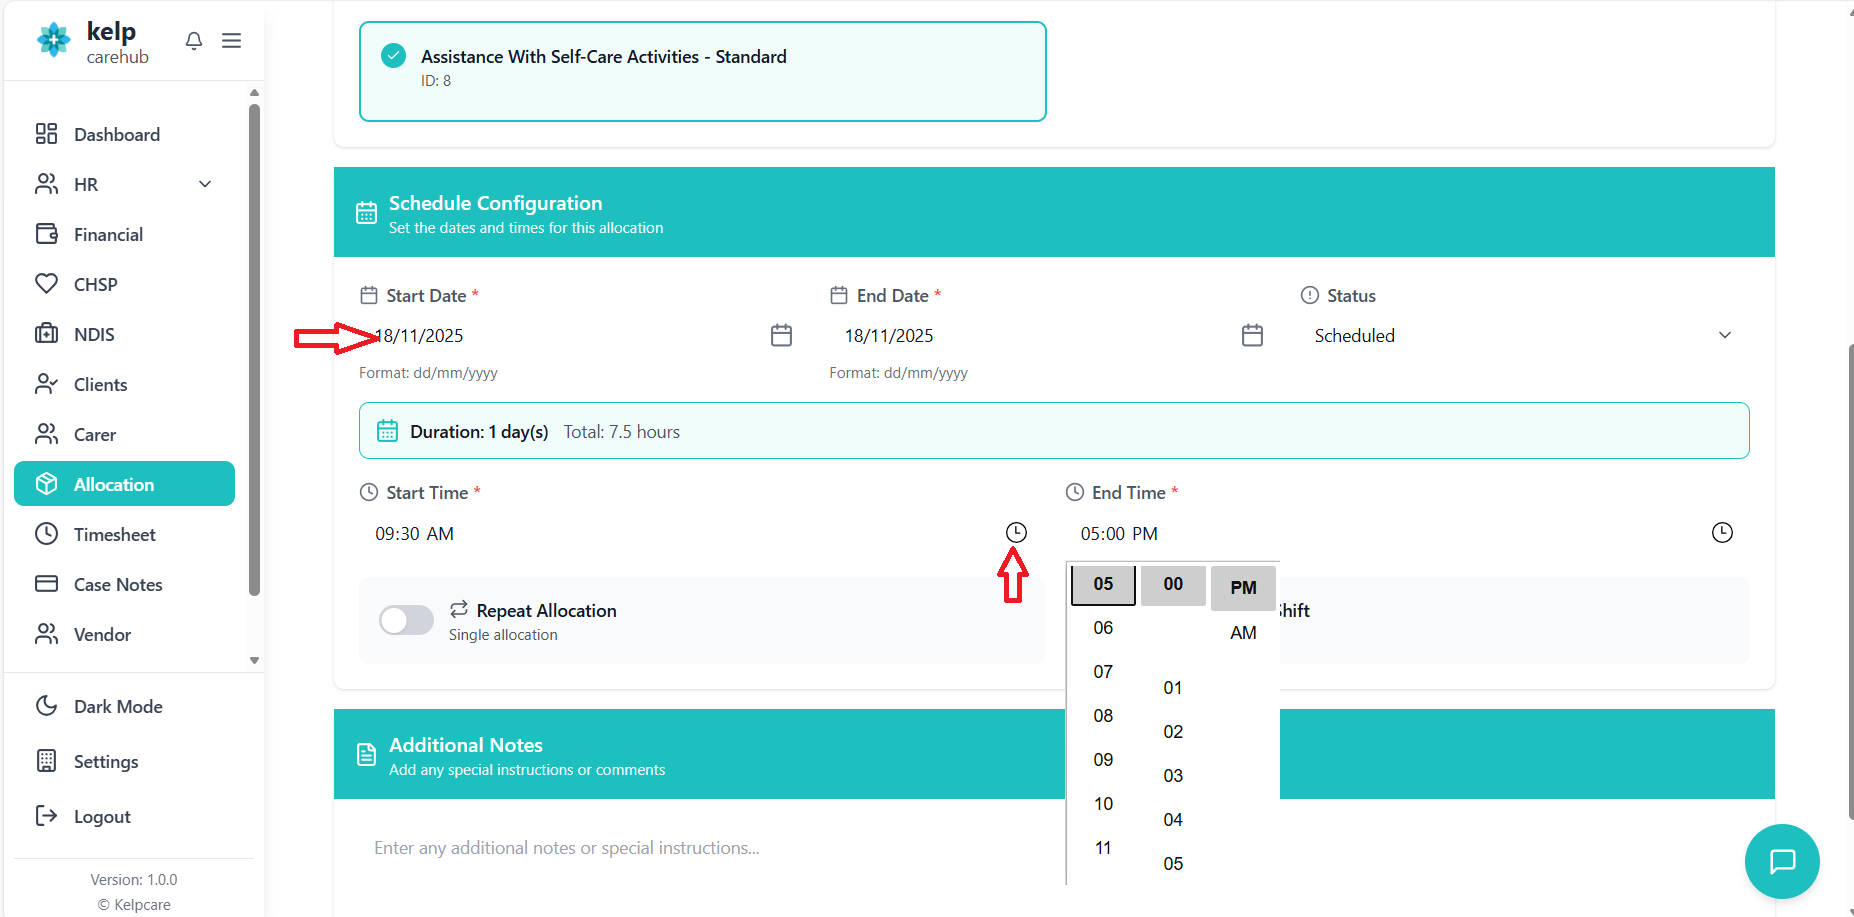
- Start Date: Click calendar icon or type DD/MM/YYYY
- End Date: Click calendar icon or type DD/MM/YYYY
- Start Time: Select from time picker (default 09:00)
- End Time: Select from time picker (default 17:00)
- Status: Leave as "NEW" (default)
Repeat Allocation: Toggle ON for recurring shifts
- Select frequency (Daily, Weekly, Monthly)
- Set "Repeat Until" date
- System shows total allocations that will be created
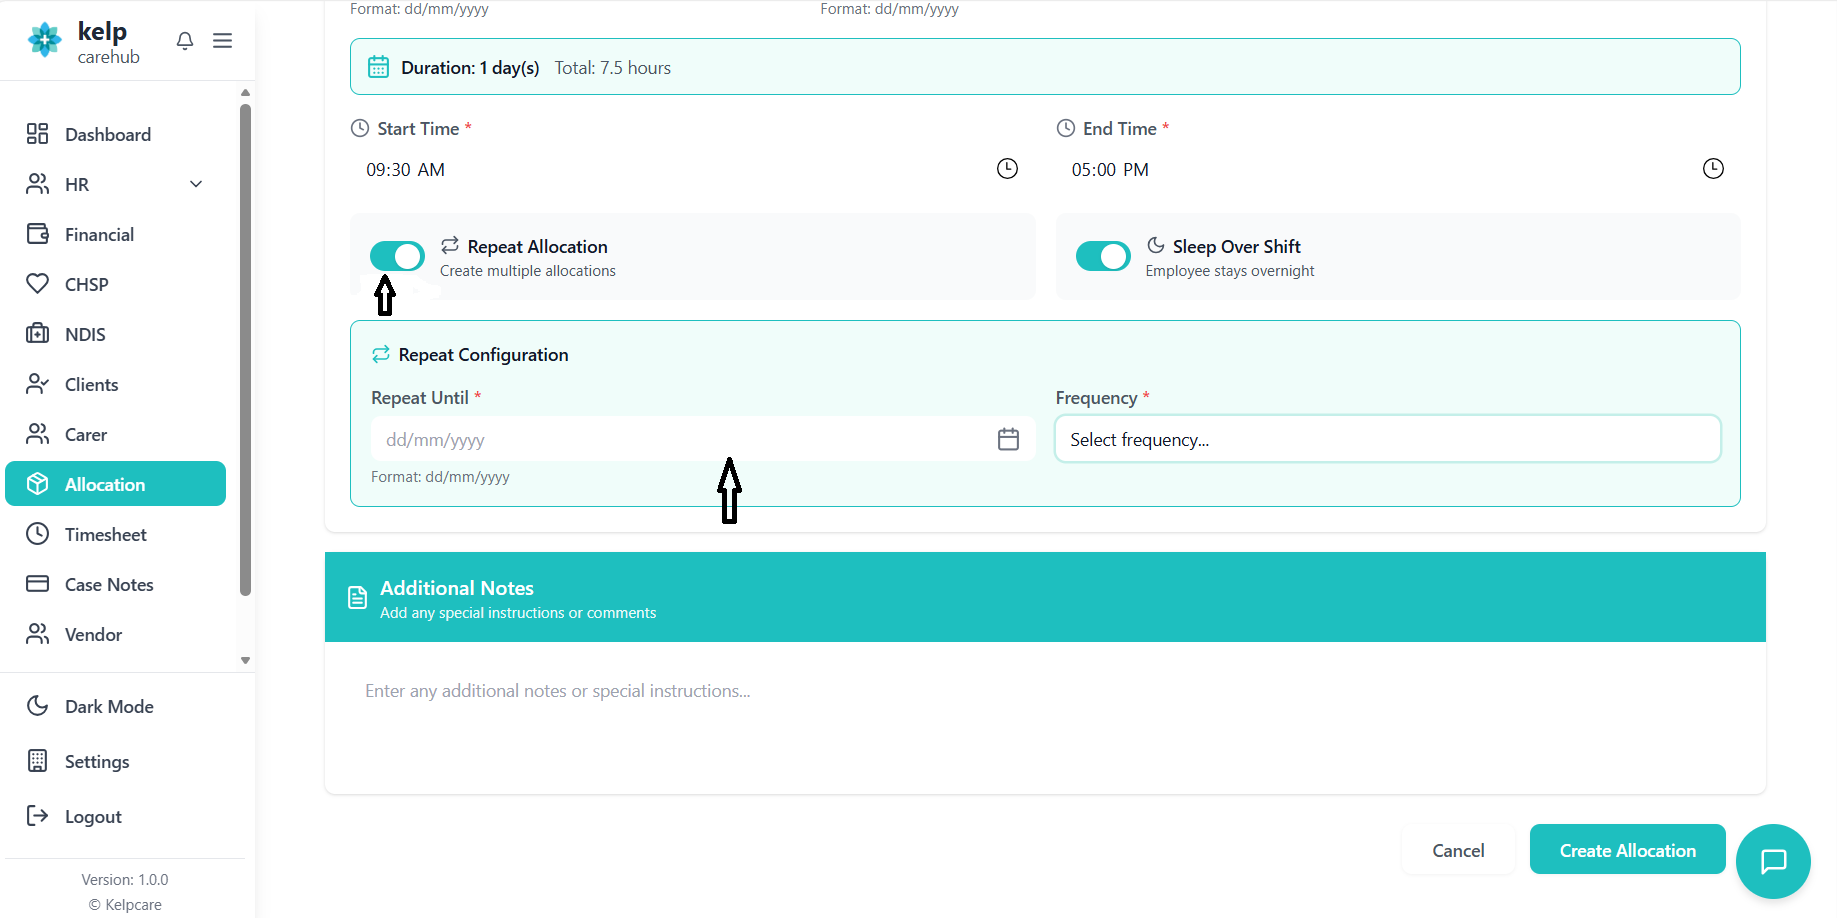
Sleep Over Shift: Toggle ON for overnight shifts
Enter any special instructions or comments in the notes field.
Notes will appear in allocation details for reference.
Click the teal "Create Allocation" button.
- System validates all required fields
- Success message displays
- Returns to allocation list
- Client must be selected
- Carer must be selected
- Rate card group must be selected
- Start date required
- End date required (cannot be before start date)
- End time must be after start time (same-day allocations)
- If repeat: frequency and end date required
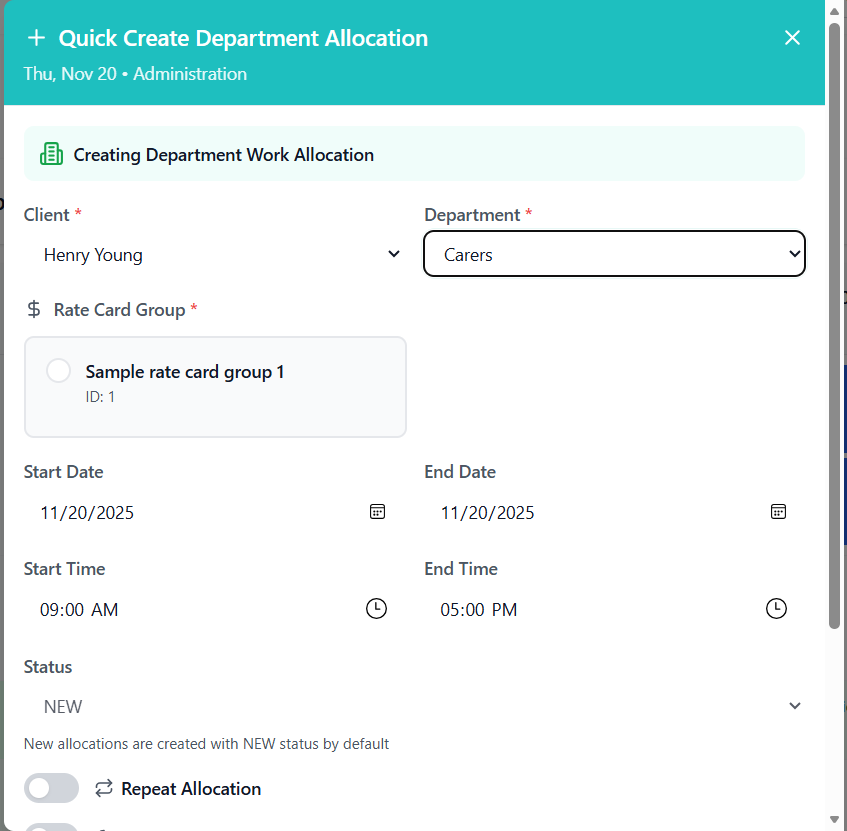
Department Allocation
Create allocations assigned to a department instead of a specific carer when the exact carer will be determined later.
- Work needs to be assigned to a department first
- Specific carer will be determined later
- Multiple carers from same department can pick up the work
Follow steps 1-3 from Standard Allocation:
- Access creation form
- Select client
- Select rate card group
In Carer Selection: Select "Department" option
- Choose department from dropdown
- Selected department displays with building icon
Configure dates, times, and optional settings as normal.
Click "Create Allocation" button to save.
Repeat/Recurring Allocations
Create multiple allocations at once for regular, repeating shifts.
Follow steps 1-4 from Standard Allocation:
- Access form and select client
- Select carer
- Select rate card group
- Configure initial schedule
Toggle "Repeat Allocation" to ON.
Form expands to show repeat options.
Frequency Options:
- Daily: Creates allocation every day
- Weekly: Creates allocation same day each week
- Monthly: Creates allocation same day each month
Repeat Until Date:
- Select end date for repeat cycle
- System calculates total allocations
System displays: "This will create X allocations"
Verify count is correct before proceeding.
Click "Create Allocation" button.
- System creates all allocations in batch
- Progress indicator shows: "Creating X of Y allocations..."
- Success message confirms total created
- Start Date: 01/01/2025
- End Date: 01/01/2025 (same day shift)
- Time: 09:00 - 17:00
- Frequency: Weekly
- Repeat Until: 31/03/2025
- Result: Creates 13 weekly allocations

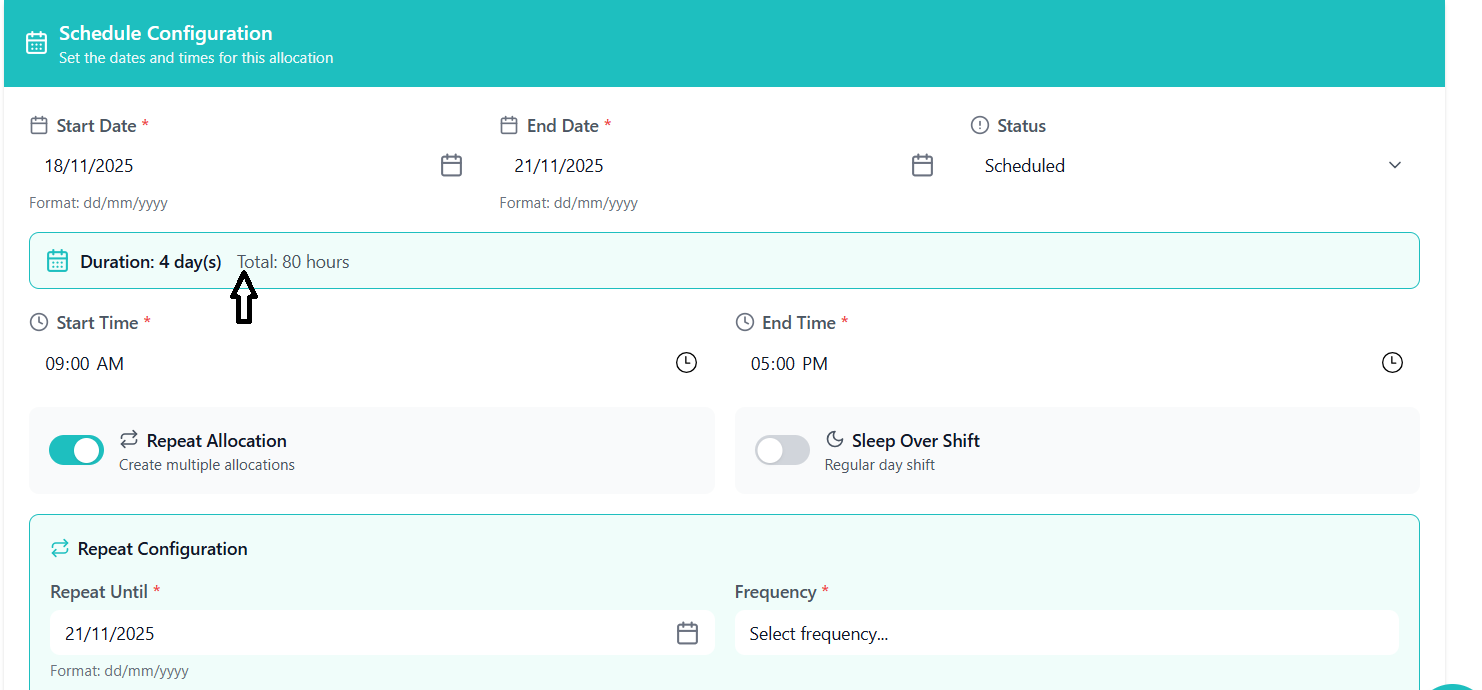
Multi-Day Allocation
Create a single continuous allocation that spans multiple consecutive days.
- 24/7 care shifts
- Multi-day residential support
- Extended support periods
Follow steps 1-3 from Standard Allocation.
- Start Date: First day of allocation
- End Date: Last day of allocation
Example: Start 01/01/2025, End 03/01/2025
- Start Time: When shift begins on first day
- End Time: When shift ends on last day
System calculates total hours across all days.
System shows:
- "Duration: 3 day(s)" (example)
- "Total: 56 hours" (example)
Complete creation as normal.
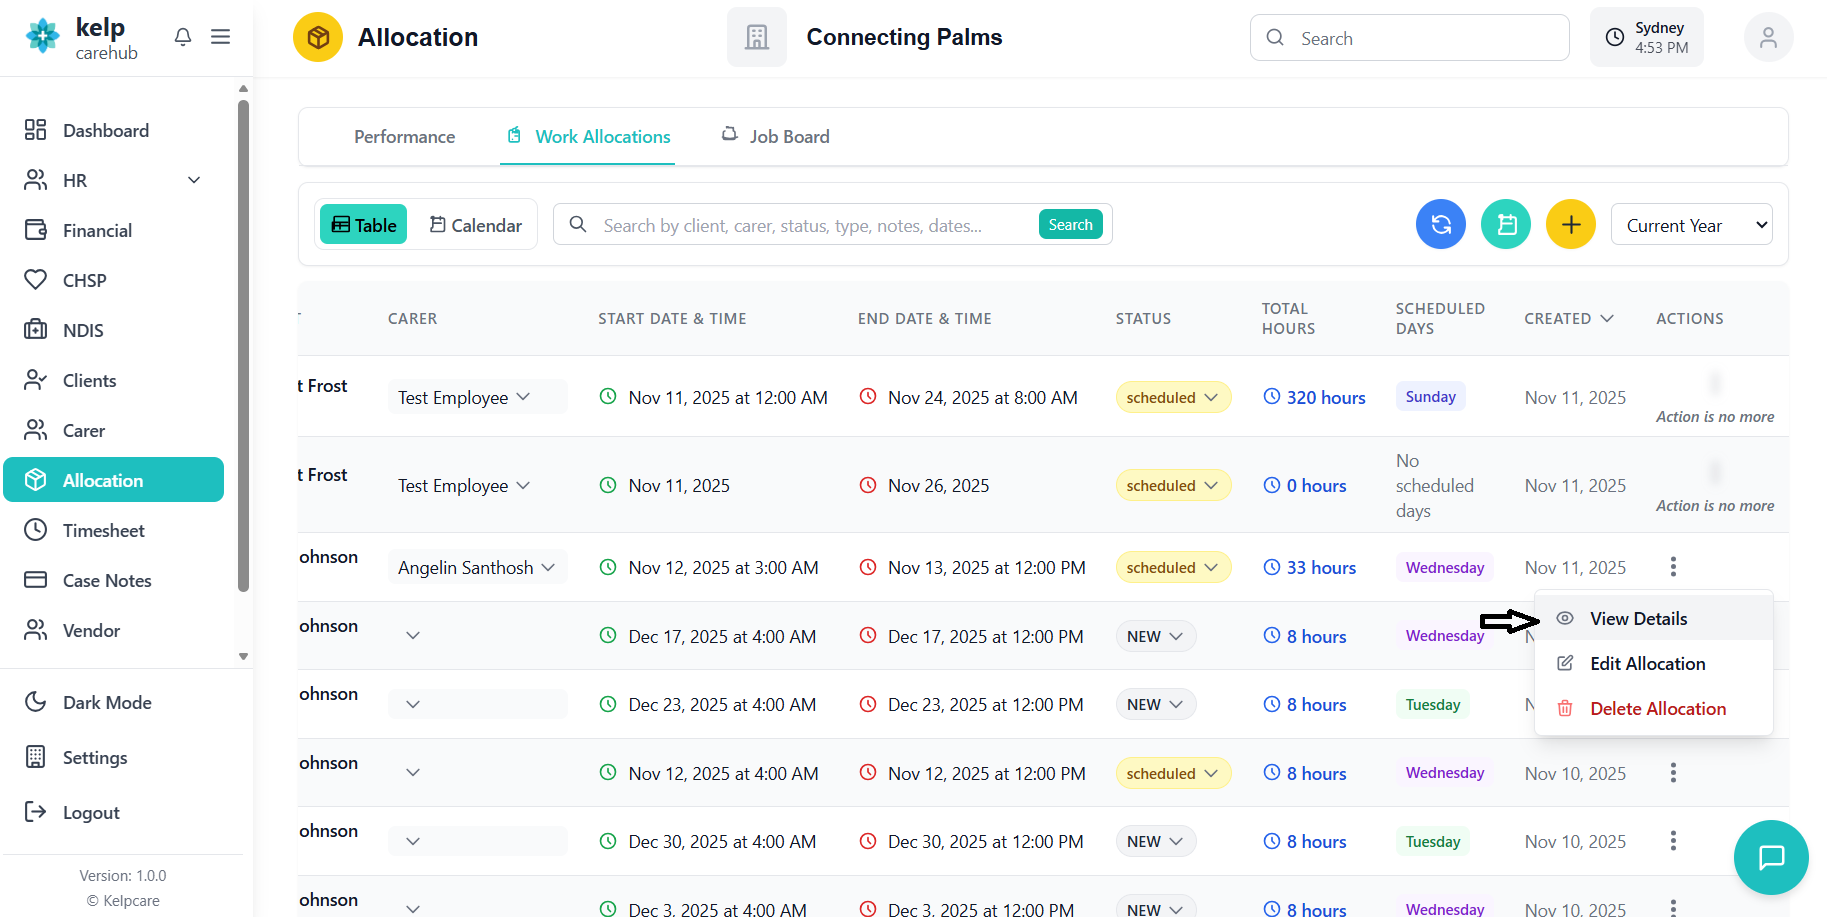
View Allocation Details
Access detailed information about any work allocation.
You can access details in three ways:
- Click client name (blue underlined text), OR
- Click action menu (⋮) → "View Details", OR
- Click "View Details" button
The details modal displays:
- Client Information: Name, ID
- Employee Information: Name, ID
- Schedule Information: Start/end dates, times
- Status Badge: Current status with color coding
- Total Duration: Calculated hours and days
- Scheduled Days: Day-of-week badges
- Additional Notes: Any special instructions
- System Information: Created date, last updated
Close the modal by:
- Click "Close" button, OR
- Click outside modal, OR
- Press ESC key

Edit Allocations
Modify existing work allocations using quick inline editing or the full edit modal.
Quick Edit (Inline)
Employee Change:
- Click employee name in table
- Dropdown opens with search
- Type to filter carers
- Click new carer to select
- System updates immediately
- Dropdown closes automatically
Status Change:
- Click status badge
- Dropdown shows status options
- Click new status
- System updates immediately
- Badge color changes to reflect new status
- Updates happen immediately (no save button)
- System prevents duplicate rapid clicks
- Loading indicator shows during update
- Only original (non-timezone-converted) data is sent to backend
Full Edit (Edit Modal)
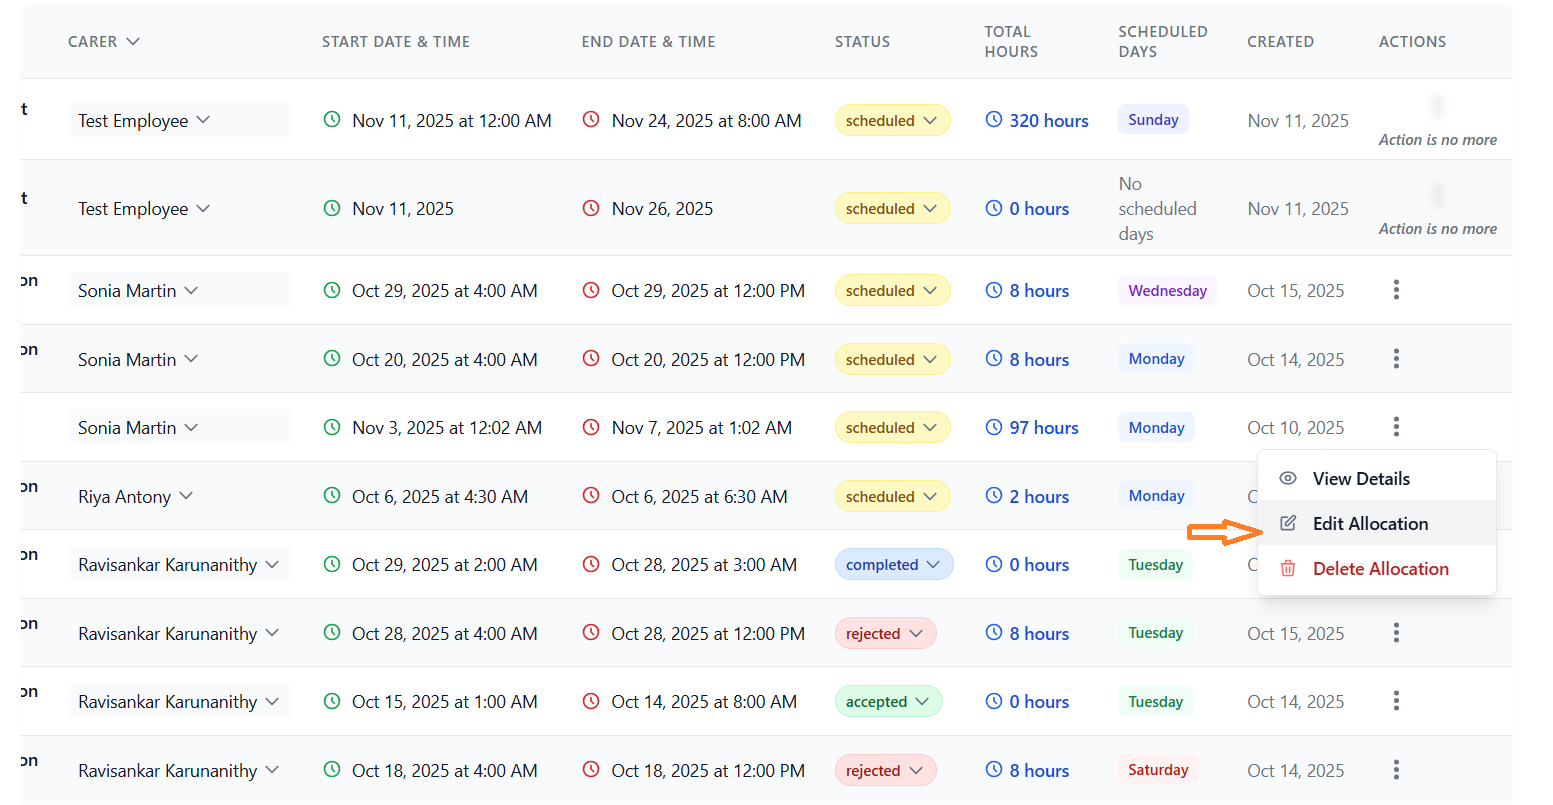
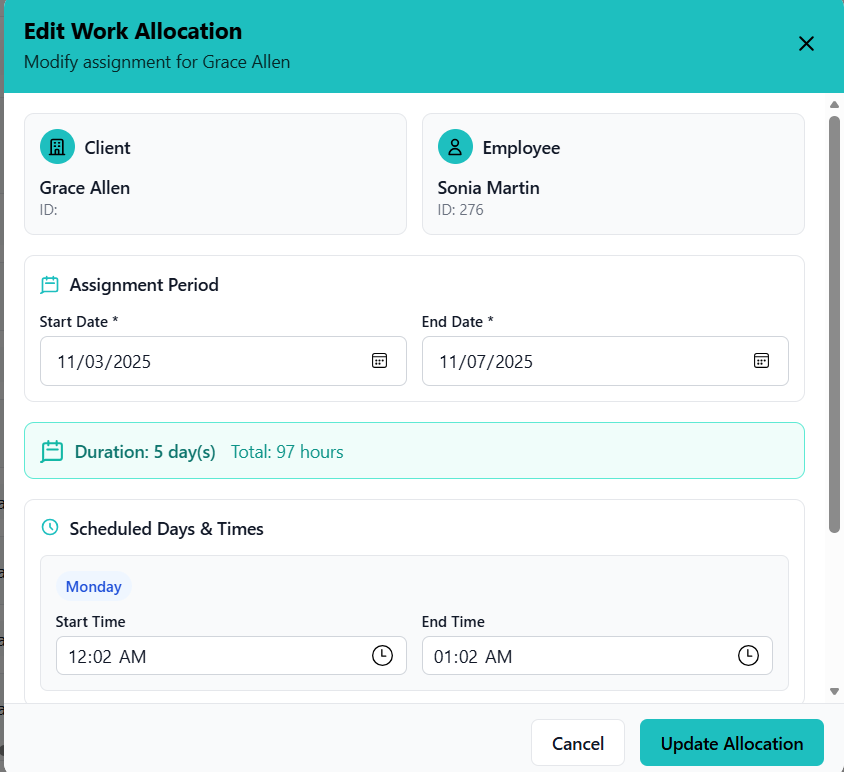
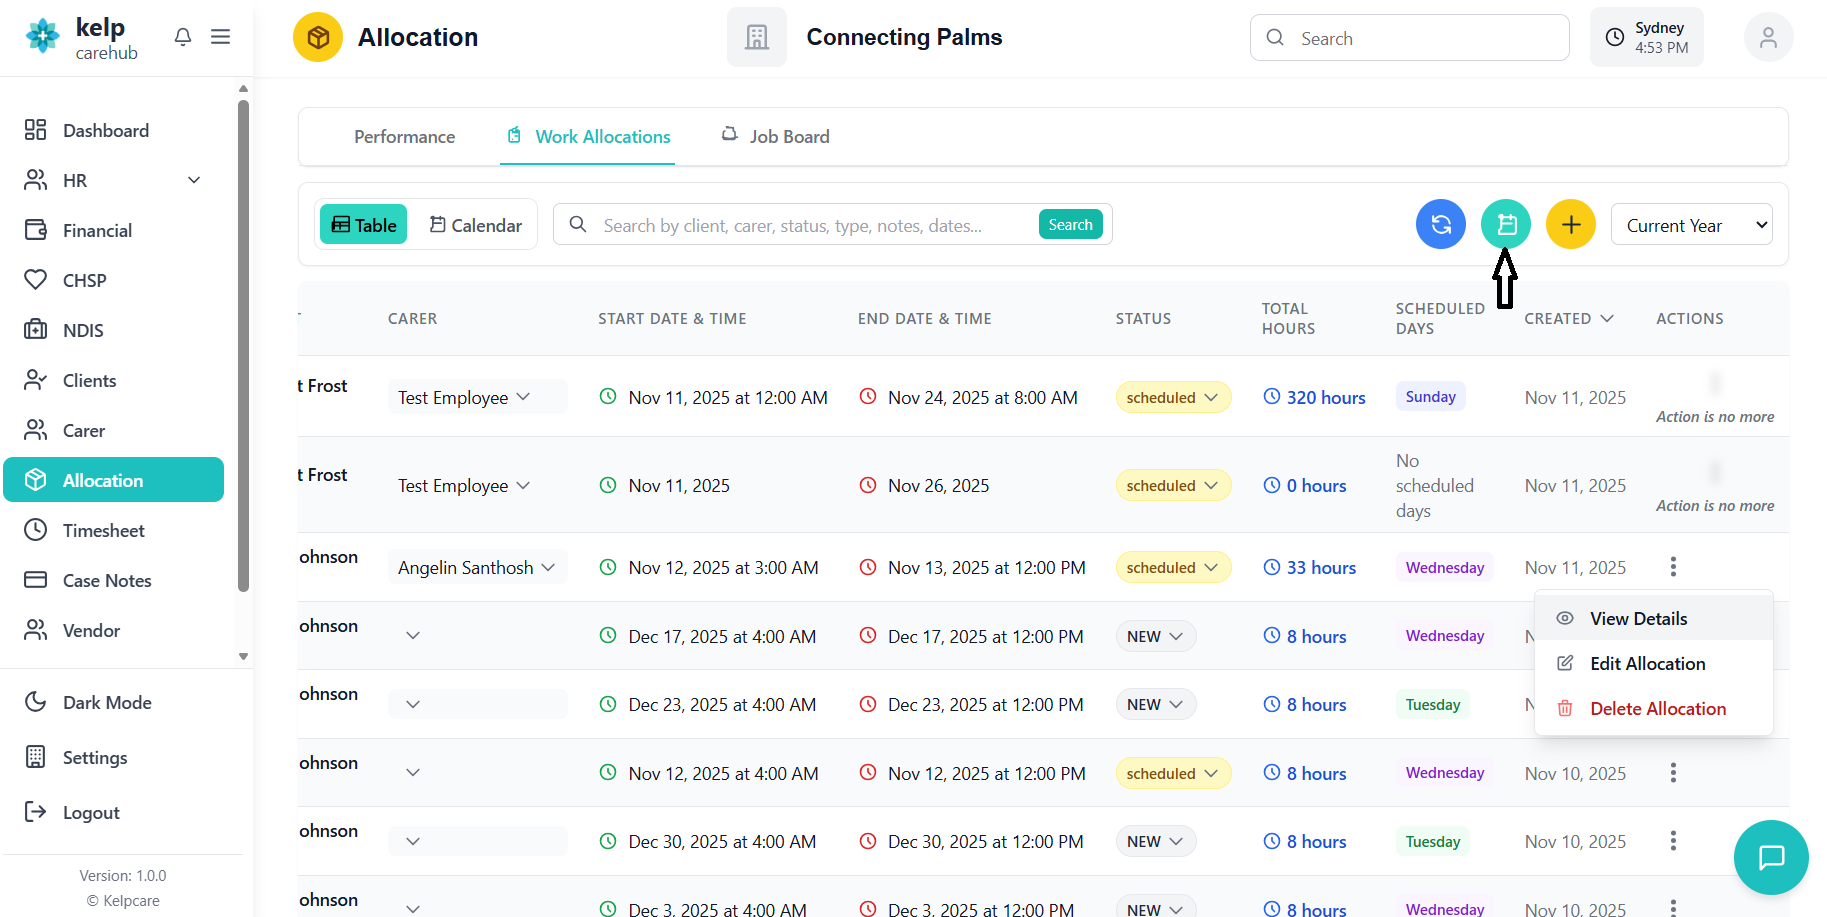
Click action menu (⋮) → "Edit Allocation"
Edit modal opens with teal header.
- Client: Read-only
- Employee: Read-only
- Current schedule details: Editable
Assignment Period:
- Start Date (date picker)
- End Date (date picker)
Scheduled Days & Times:
- Each day shows day of week badge
- Start Time (time picker)
- End Time (time picker)
- System validates times real-time
Status:
- Dropdown: NEW, Scheduled, Completed, Cancelled, Accepted, Rejected
Notes:
- Free text area for comments
- Red border indicates errors
- Error messages display below invalid fields
- Duration calculates automatically
- Total hours updates in real-time
Click teal "Update Allocation" button.
- System validates all fields
- Loading indicator during save
- Success message confirms update
- Modal closes automatically
- Table refreshes to show changes
Click "Cancel" button to discard changes and close modal.
- End date cannot be before start date
- End time must be after start time (same-day)
- Multi-day allocations: total duration ≤ 168 hours (7 days)
- All required fields must be filled
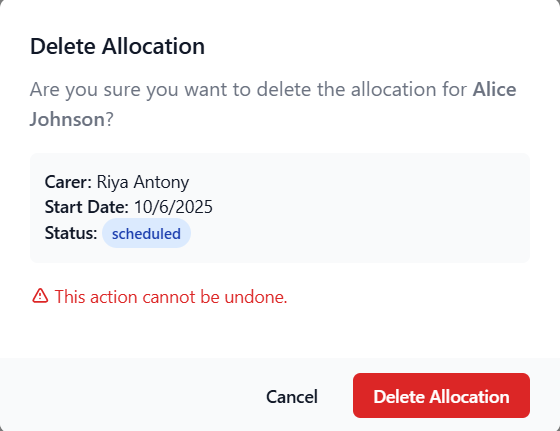
Delete Allocations
Remove work allocations with proper validation and status-based restrictions.
Single Delete
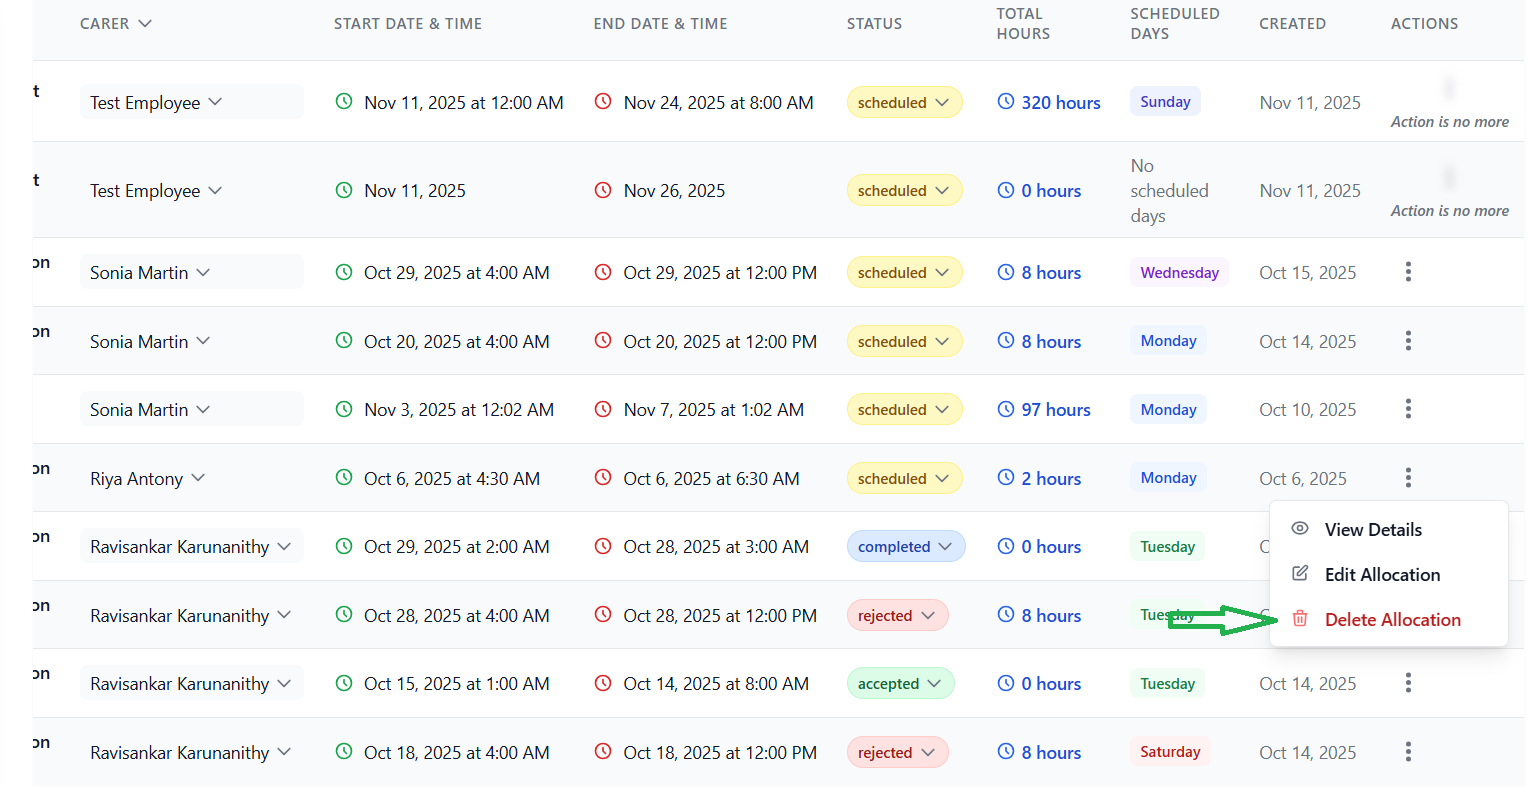
Click action menu (⋮) → "Delete Allocation"
Confirmation modal appears.
Modal displays:
- Client name
- Carer name
- Start date
- Current status
- Warning: "This action cannot be undone"
- ⚠️ Direct deletion BLOCKED
- Amber warning banner displays: "Deletion Restricted"
- Message: "This allocation has 'accepted/completed' status and may have associated timesheets"
- Solution: Status must be changed first (to Cancelled/Rejected)
- Direct deletion allowed
- Red "Delete Allocation" button enabled
Click red "Delete Allocation" button.
- Loading indicator: "Deleting..."
- System processes deletion
- Success message displays
- Modal closes
- Table refreshes (allocation removed)
Click "Cancel" button to close modal without deleting.
Delete Workflow for Protected Allocations
For ACCEPTED/COMPLETED allocations, you must change the status first:
- Edit allocation (see Edit Allocations)
- Change status to "Cancelled" or "Rejected"
- Save changes
- Now delete following standard steps
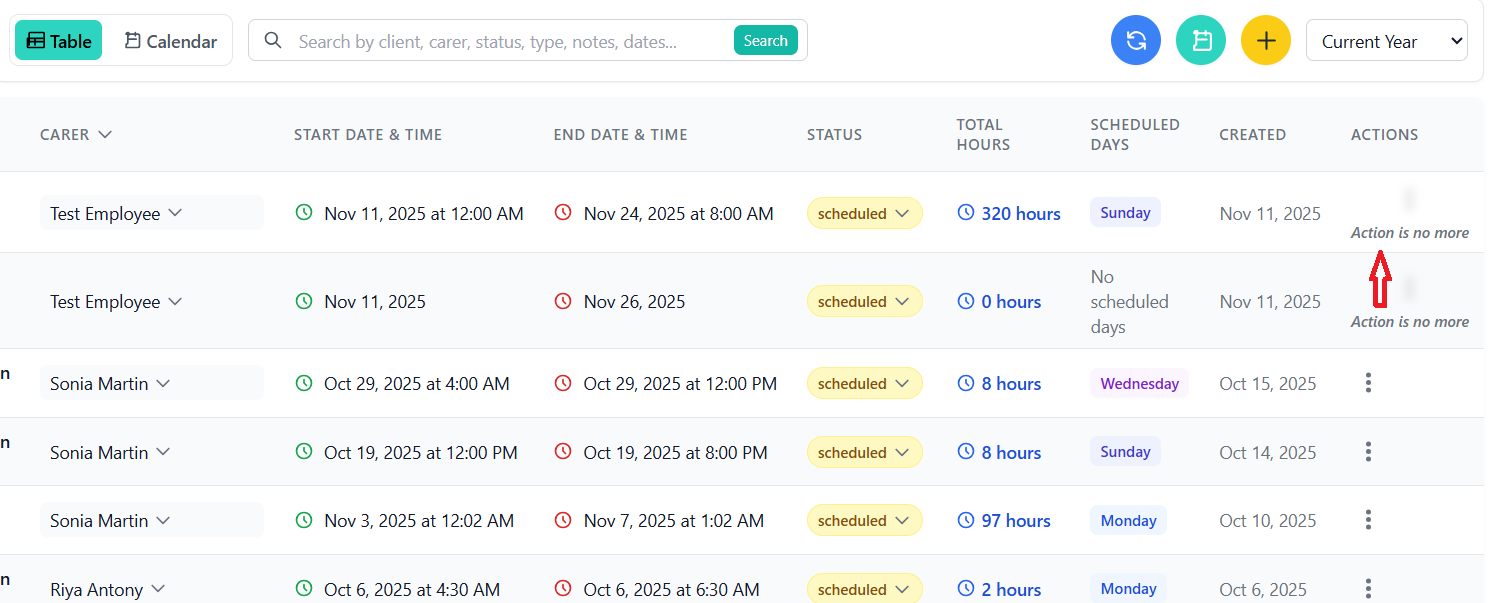
CHSP Type Restrictions
- ⚠️ Actions menu appears blurred/disabled
- Text displays: "Action is no more"
- Reason: CHSP allocations have special handling rules
- Cannot: Edit or delete through standard interface
- Contact: System administrator for CHSP modifications
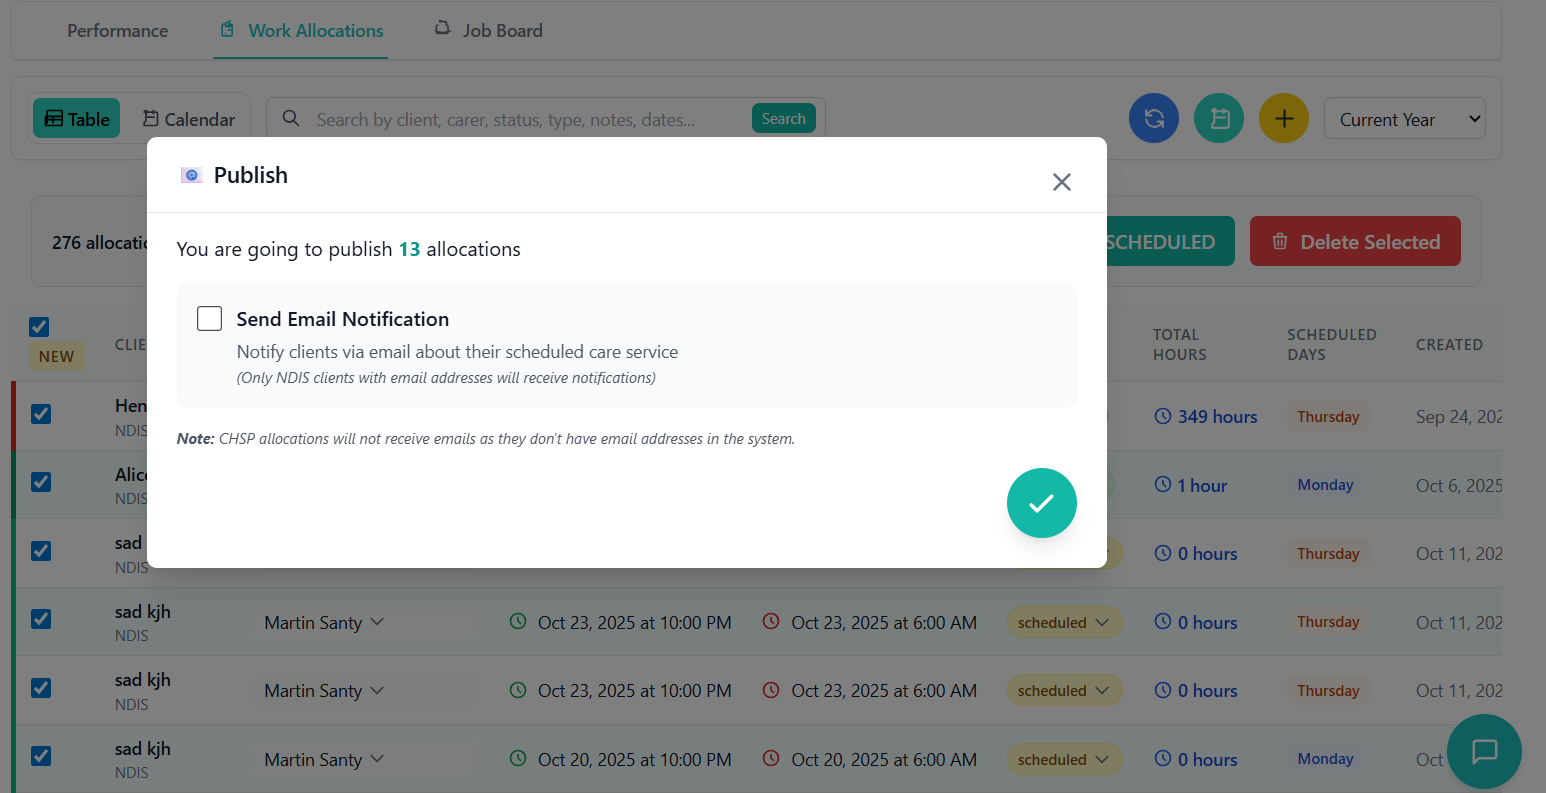
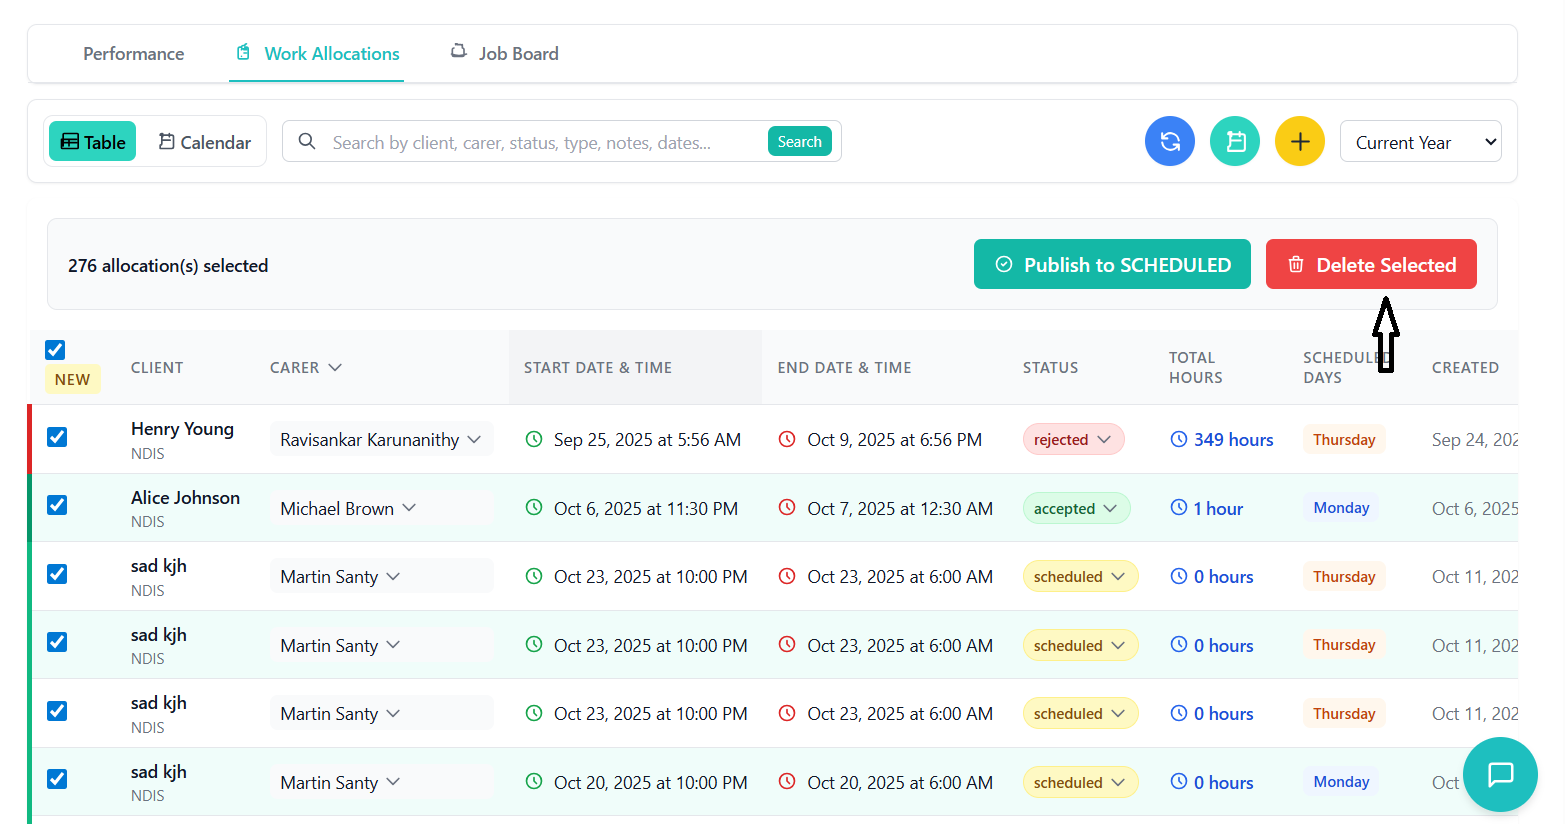
Bulk Publish (NEW → SCHEDULED)
Change multiple NEW allocations to SCHEDULED status with optional email notifications to clients.
Use checkbox selection methods:
- Method 1: Check individual checkboxes
- Method 2: Check header checkbox for all visible
- Method 3: Click "NEW" button to select all NEW status
Selection banner appears showing count.
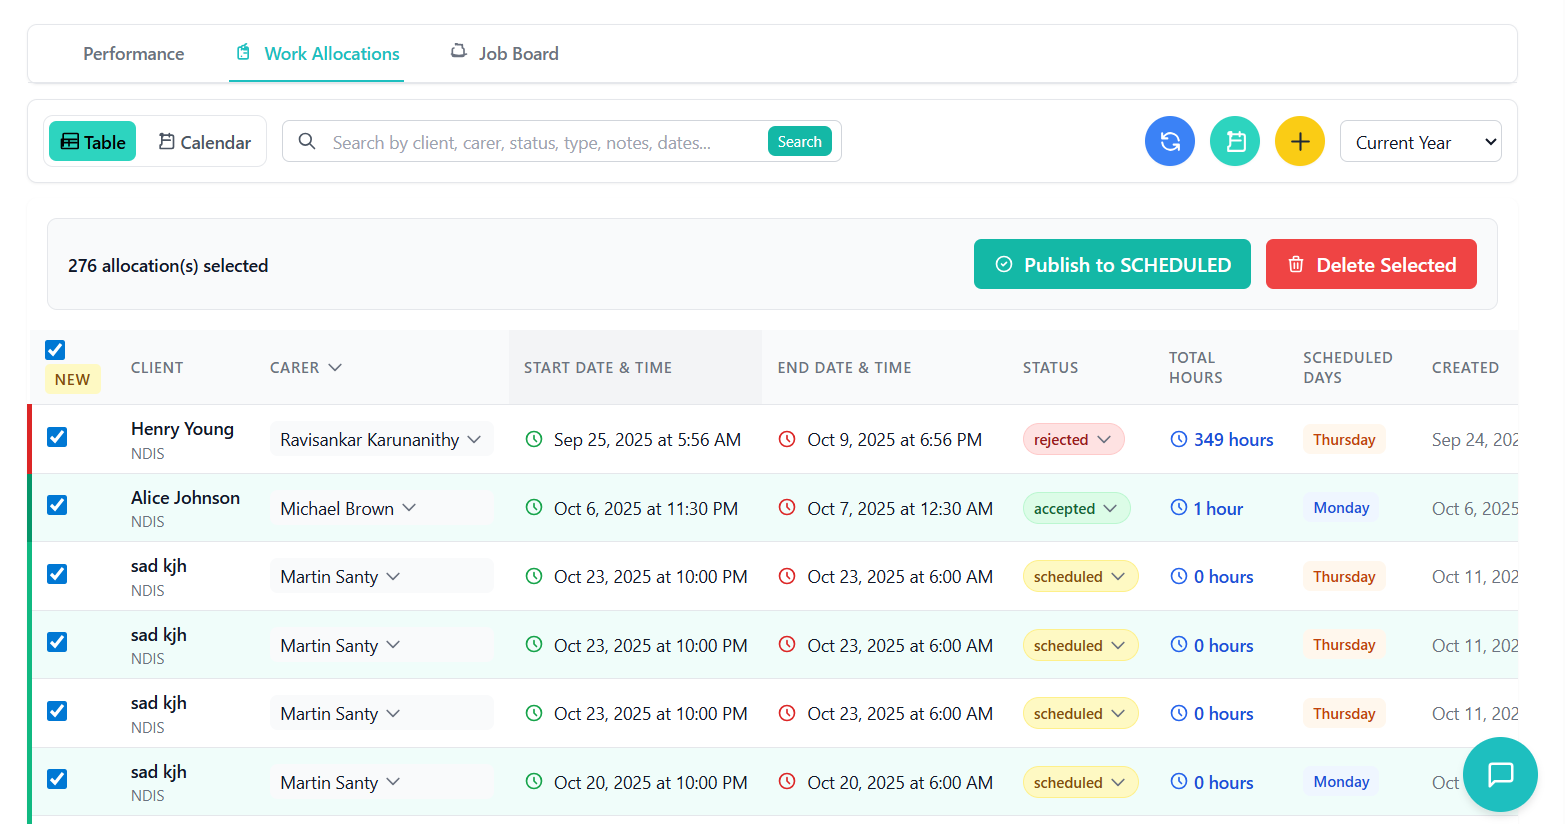
Green button with checkmark icon shows selected count.
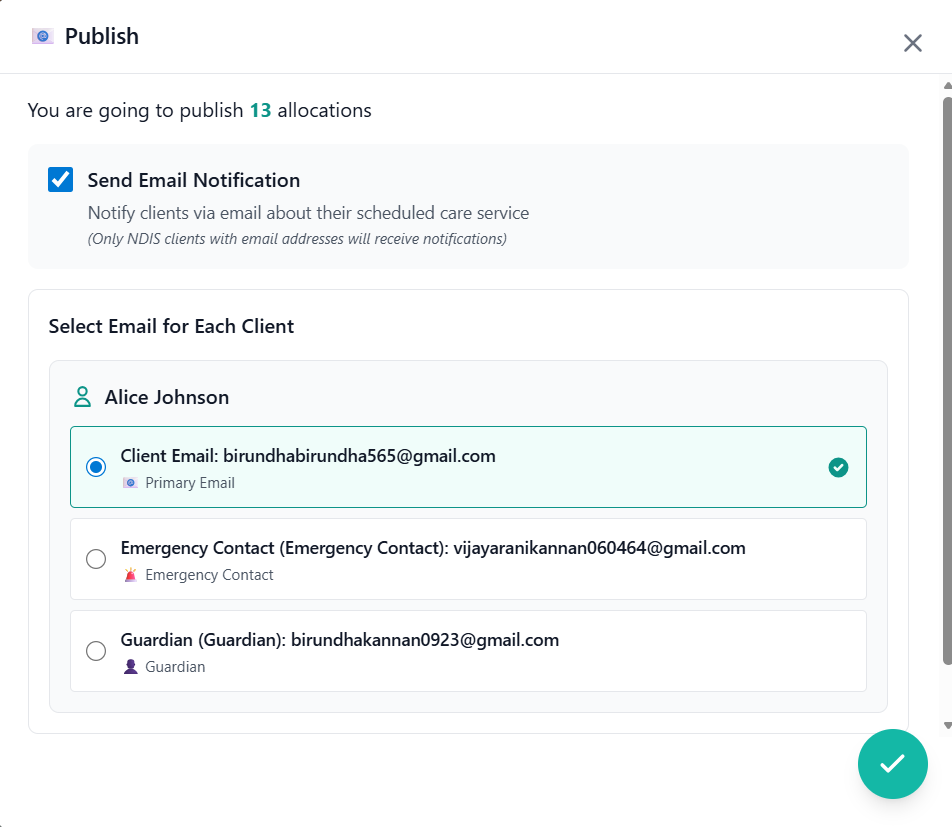
Email configuration modal opens.
Email Modal Header: "📧 Publish"
- Shows total allocation count
- Close button (X) in top-right
Email Notification Checkbox:
- ☐ "Send Email Notification"
- Description: "Notify clients via email about their scheduled care service"
- Note: "(Only NDIS clients with email addresses will receive notifications)"
Loading indicator: "Loading email options..."
Email Selection Interface:
- Lists each client with available emails
- Radio button options per client:
- 📧 Primary Email
- 🚨 Emergency Contact
- 👤 Guardian
- Email addresses shown
- Default selection: Primary email
Warning displays: "No clients with email addresses found"
Explains: "Status will be changed but no emails will be sent"
Review selections, then click circular green confirm button (bottom-right).
System processes:
- Changes status to SCHEDULED
- Sends emails (if selected)
- Shows progress: "Creating X of Y..."
Toast notification displays:
- "Successfully changed X allocation(s) to SCHEDULED"
- If emails sent: "📧 X email notification(s) sent"
Selections cleared, table refreshes.
- Only NDIS allocations send emails
- CHSP allocations skip email step
- Can publish without email notification
- Email selection per client allows flexible communication
- ⚠️ Cannot undo bulk status change
Bulk Delete
Delete multiple allocations at once with proper validation.
Check boxes for allocations to delete.
- Can select across different statuses
- Selection count displays in banner
Red button with trash icon shows selected count.
Confirmation modal appears.
Modal displays:
- Lists total count
- Warning: Operation cannot be undone
- Note: Protected allocations (ACCEPTED/COMPLETED) may fail
Click red "Delete" button.
- Progress indicator shows
- System processes each deletion
Toast notifications display:
- Success: "Successfully deleted X allocation(s)"
- If failures: "Failed to delete X allocation(s)"
Table refreshes, selections cleared.
- ACCEPTED/COMPLETED allocations may fail
- Partial success possible (some delete, others fail)
- Failed items remain selected for retry
- Check status before bulk delete
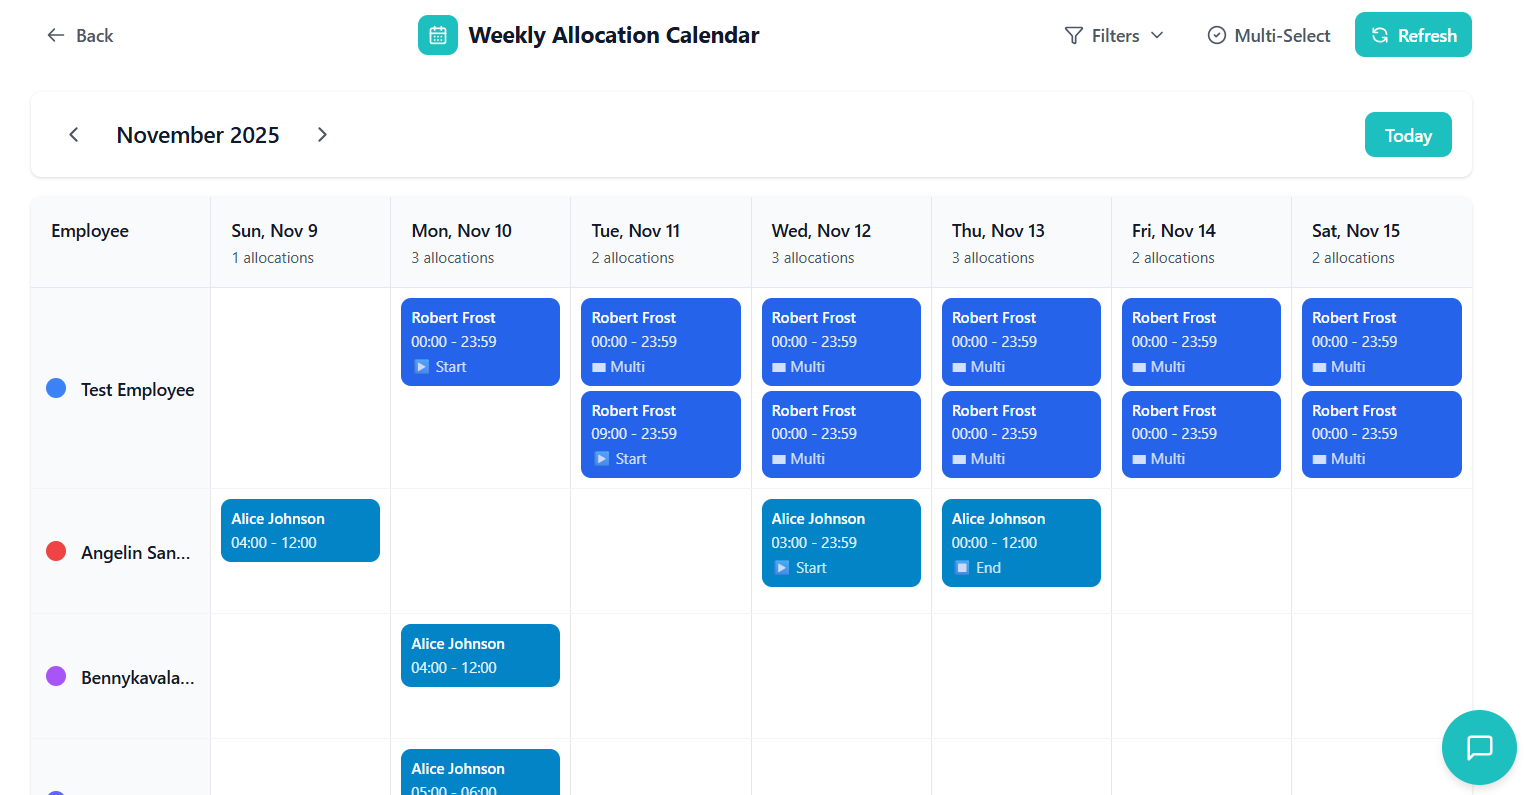
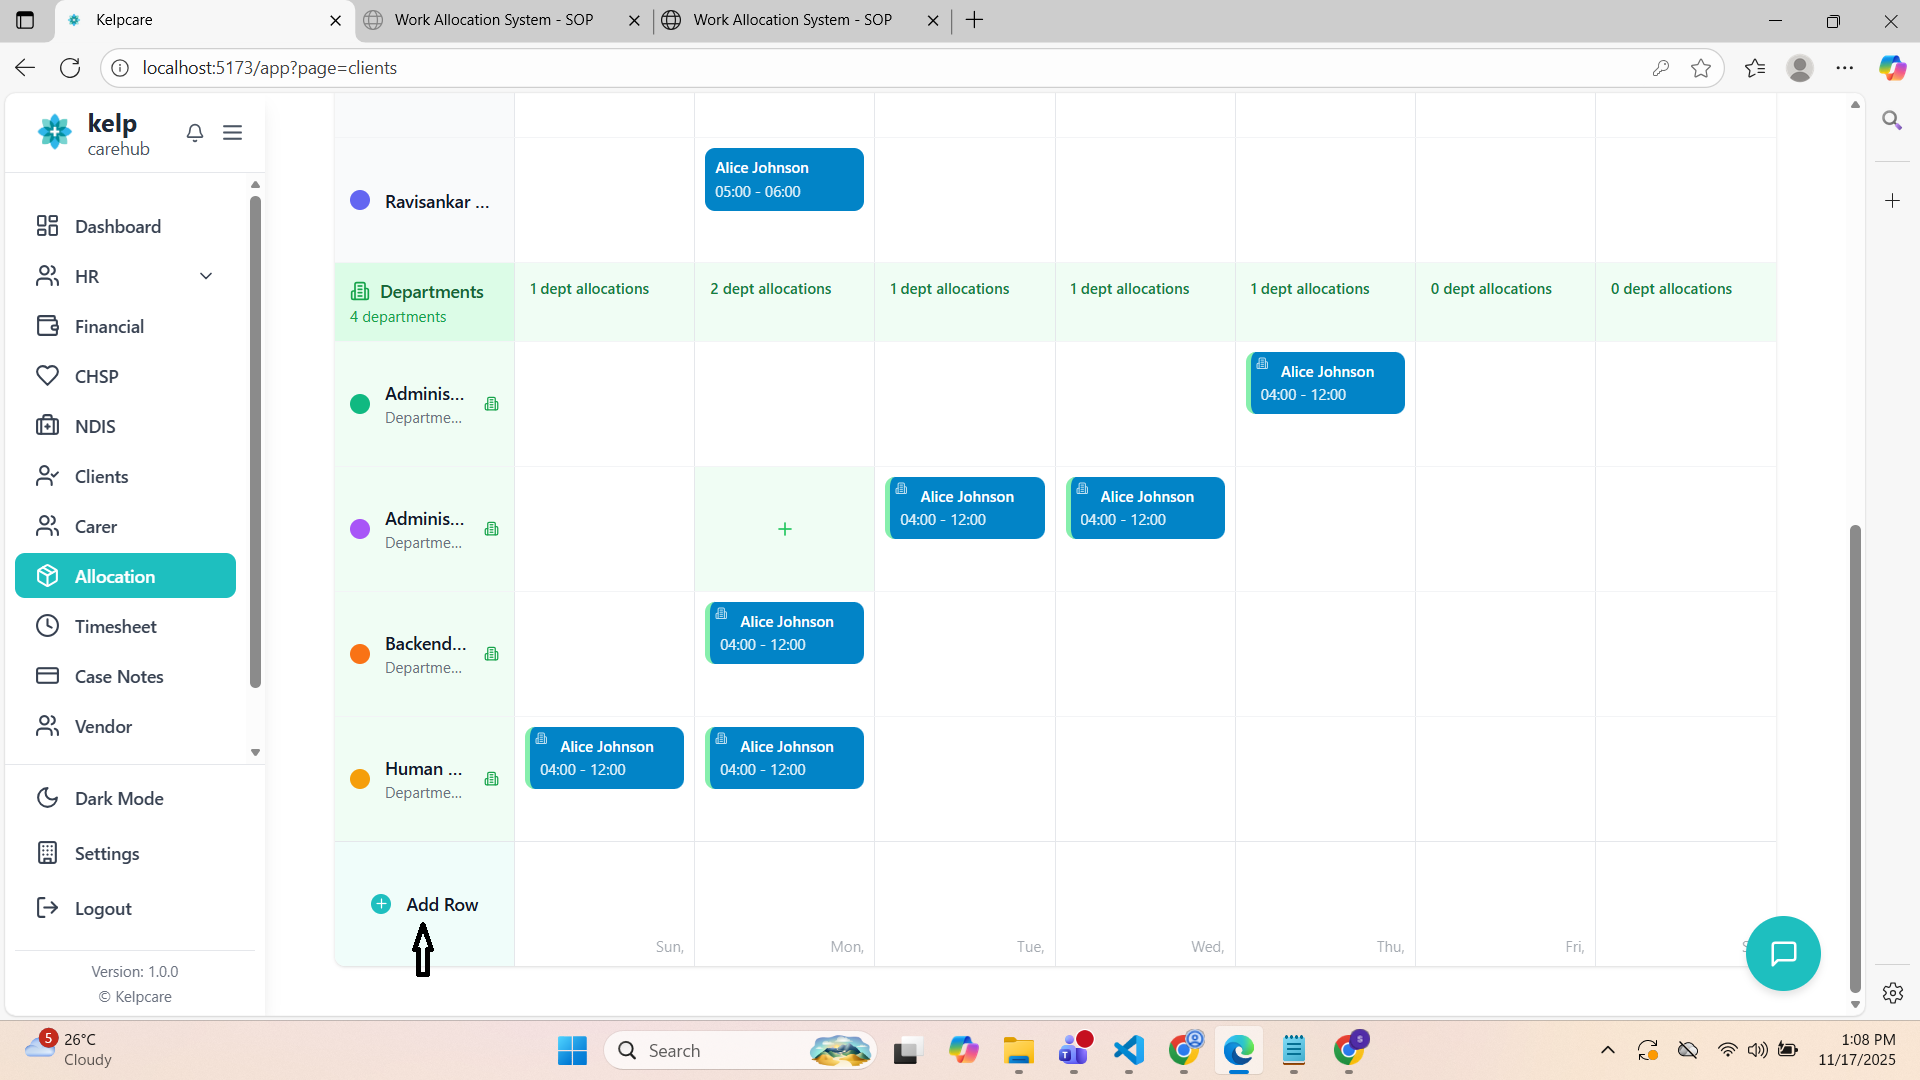
Weekly Calendar View
Visual drag-and-drop style interface for managing allocations across a week.
Click the teal calendar button in the top-right corner of the Work Allocations tab.
The calendar view opens with a 7-day week layout (Sunday - Saturday).
Week Controls:
- ← Previous Week: Go back 7 days
- Today: Jump to current week
- Next Week →: Go forward 7 days
- Current Month/Year: Displays at top
View Toggle:
- Show All / Allocated Only: Filter employee rows
- Shows count: "Showing X rows with allocations"
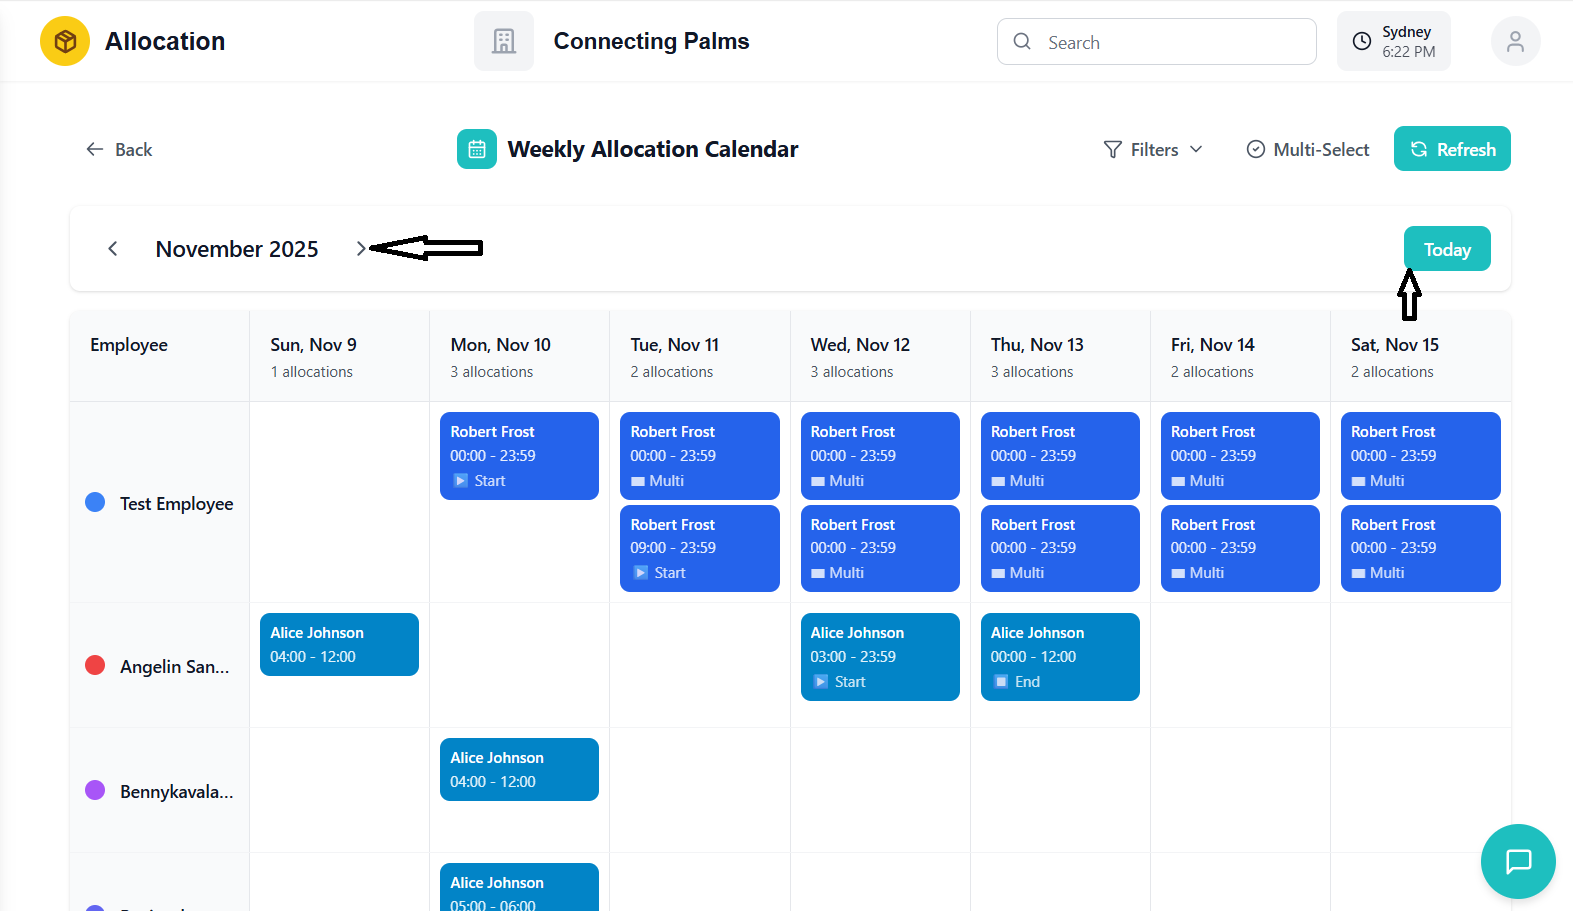
Left Column: Employee/Department names with color dot
7 Columns: Days of the week
Rows: Each employee/department
Allocation Blocks:
- Color: Client-specific color (consistent across calendar)
- Content: Client name (bold), Time range (HH:MM - HH:MM)
- Multi-day indicator: ▶ Start (first day), ▬ Multi (middle days), ⏹ End (last day)
- Sleep icon: 🌙 (if sleepover shift)
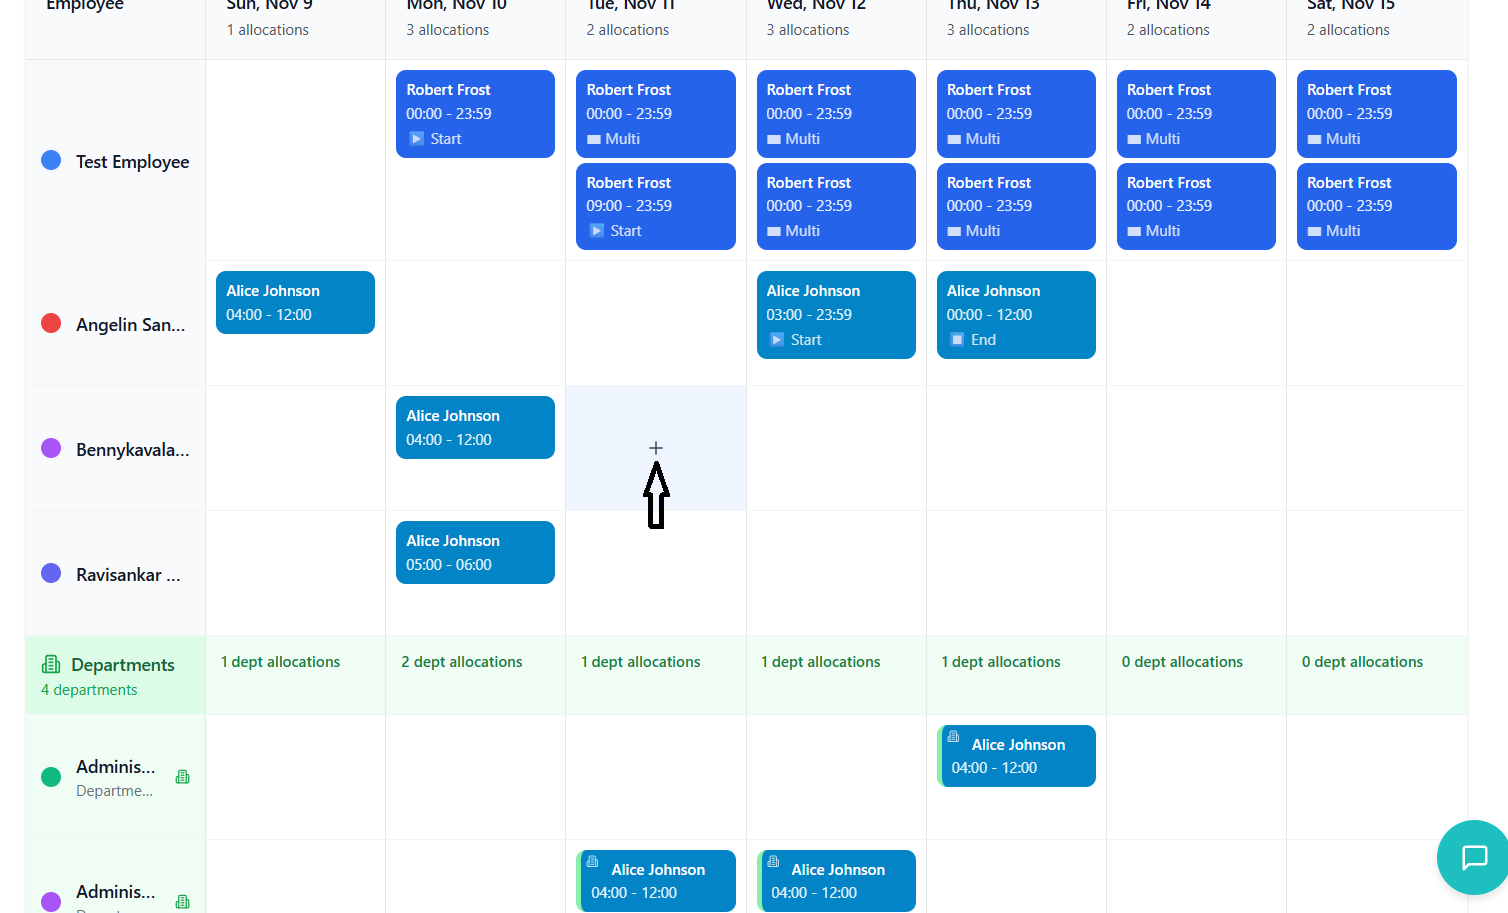
- Hover over empty cell (shows + icon)
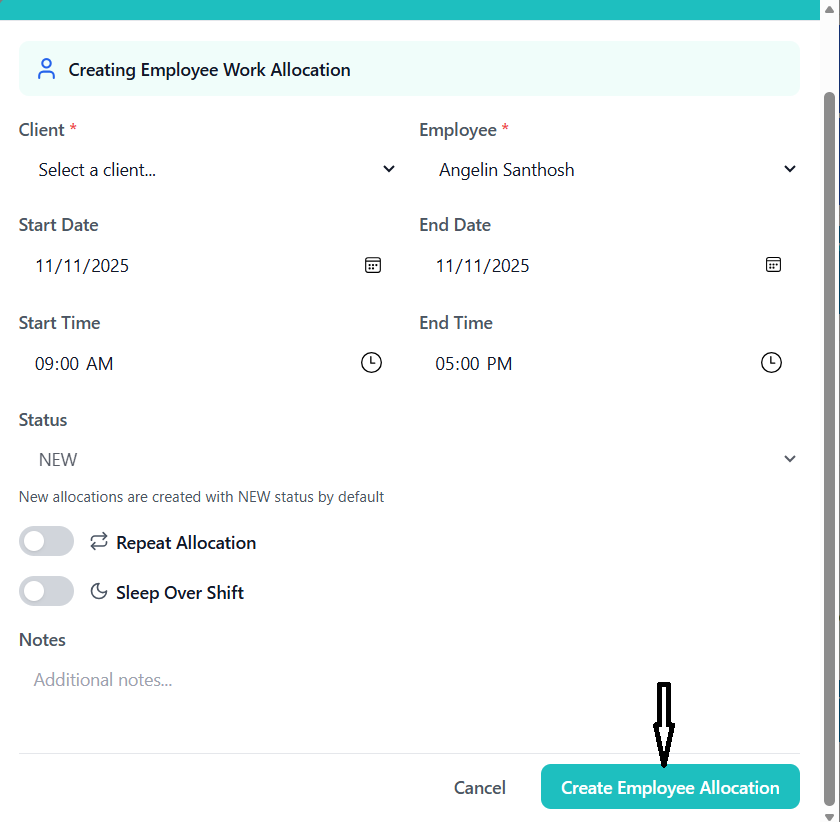
- Click cell to open quick create modal
- Modal pre-fills employee name and date
- Select client and rate card group
- Adjust dates/times if needed
- Click "Create Employee Allocation"
Enable Multi-Select:
- Click "Multi-Select" toggle (top-right)
- Button turns teal: "Multi-Select ON"
- Selected cell counter appears
Select Cells:
- Click and drag across cells for one employee
- Cells highlight in teal
- Can only select within same employee row
- Counter updates: "X selected"
Configure Batch:
- Quick create modal opens with selected dates
- Shows "Selected Dates" section with day chips
- Single client/rate card applies to all
- Same times for all days
- Click "Create X Allocations"
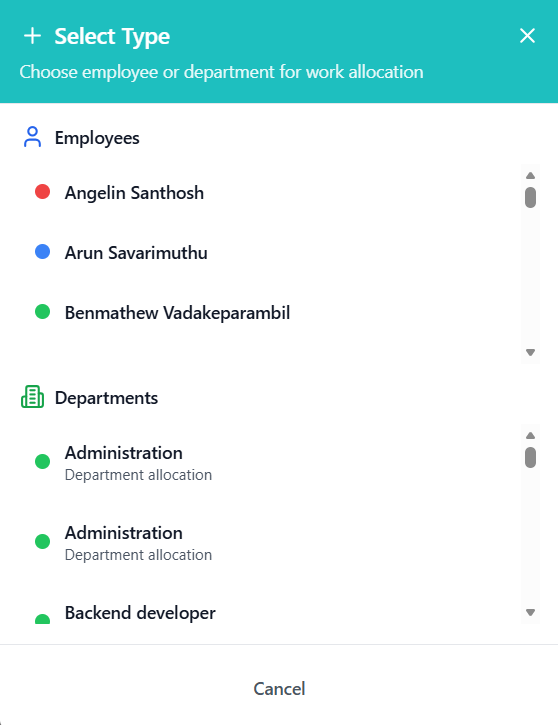
Create allocation without pre-selecting employee:
- Click "Add Row" button at bottom of calendar
- Selection modal opens with two sections:
- Employees (with user icons)
- Departments (with building icons)
- Click employee or department name
- Modal closes, quick create opens
- Complete as normal
- Department rows have green background
- Section header: "Departments" with building icon
- Allocation blocks show building icon (🏢) in corner
- Green left border on allocation blocks
Job Board
Employee-facing interface to view and accept/reject work assignments.
Click "Job Board" tab in main navigation.
Who Sees What:
- Employees: Only their own department's allocations
- Managers: Department filter available
- Admins: All departments with filter
Available Filters:
- Client: Search by client name
- Employee: Search by carer name
- Department: Select from dropdown (if permissions allow)
- Status: All, NEW, Scheduled, Accepted, Rejected, Completed
- Date Range: Dropdown options
- Last 6 Months
- Last 3 Months
- Current Year
- Last Year
- Last 5 Years
- Custom Range (with date pickers)
Click "Search" button to apply filters.
Columns:
- Client name
- Employee name
- Start Date & Time
- End Date & Time
- Status (badge)
- Scheduled Days
- Created date
- Actions
Color Coding:
- Each employee has unique color dot
- Consistent throughout table
- Legend at bottom shows employee colors
Automatic Filtering:
- System detects employee ID from login
- Only shows allocations from employee's department
- Department filter is locked/fixed
- Cannot see other departments
Restrictions:
- Cannot create allocations
- Cannot edit allocations
- Cannot delete allocations
- Can only accept/reject SCHEDULED work
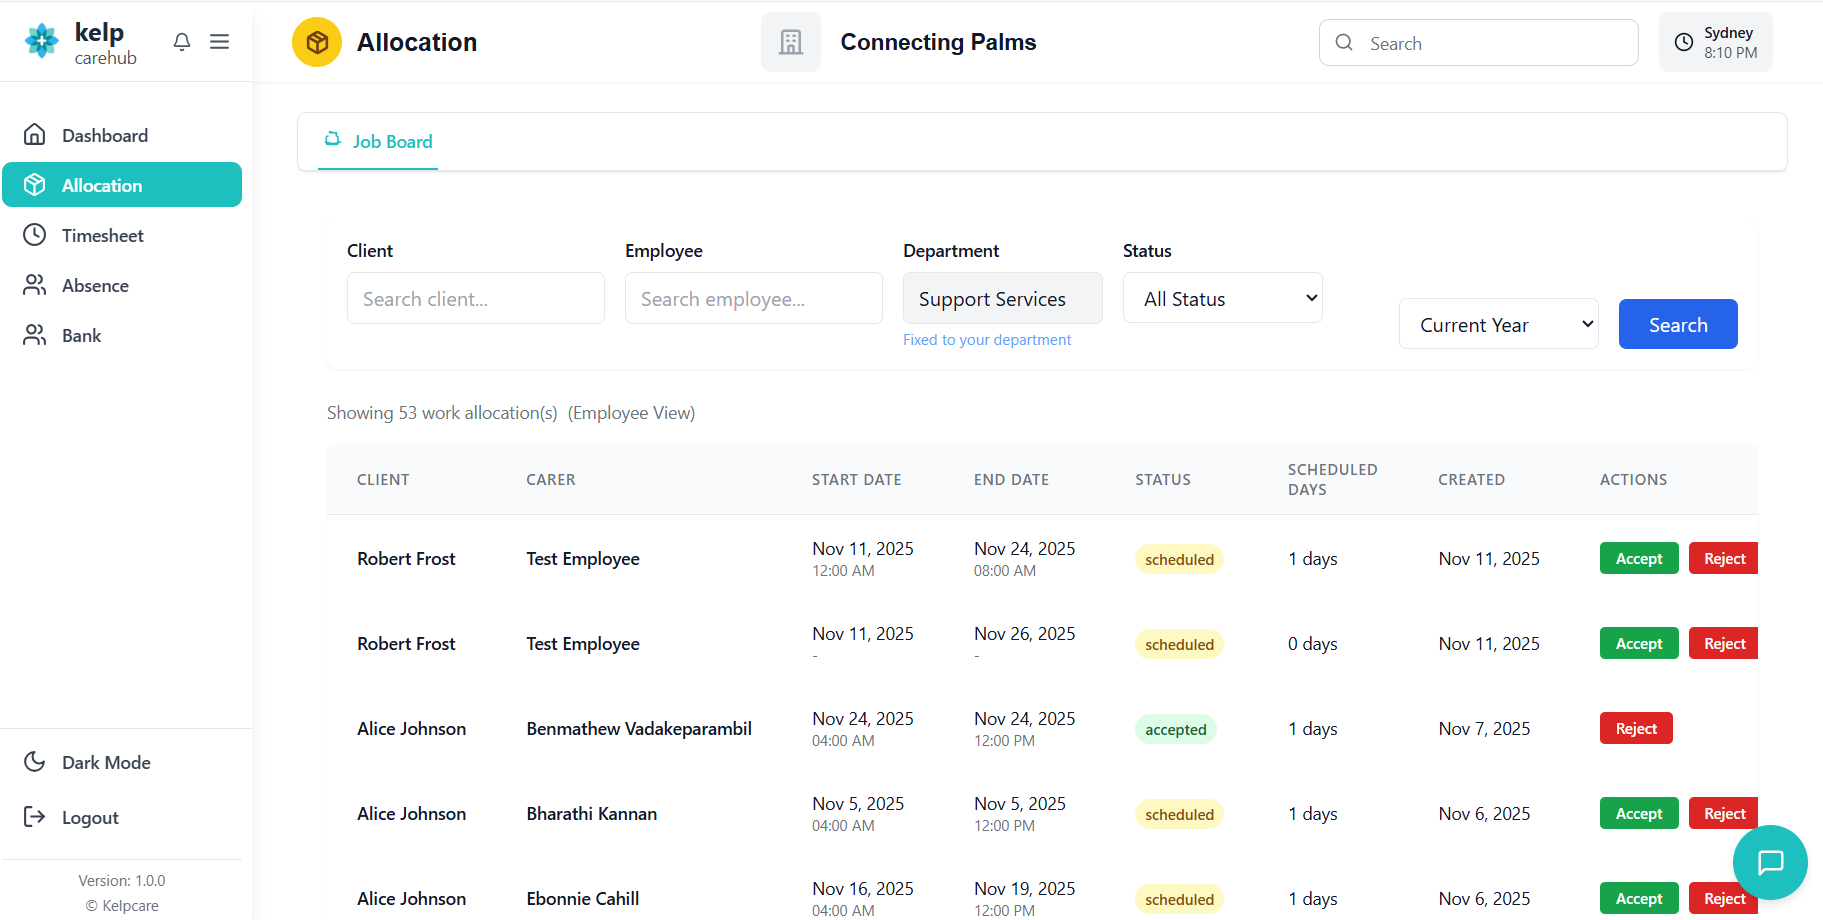
Accepting Work
Accept work assignments through the Job Board interface.
- Status shows yellow "Scheduled" badge
- Actions column shows "Accept" and "Reject" buttons
- Only SCHEDULED allocations can be accepted
Click green "Accept" button.
Confirmation modal opens: "Accept Work Allocation"
Modal shows allocation details:
- Client name
- Current carer
- Date range
Option 1: Accept Only
- Keep current carer
- Just update status to ACCEPTED
- Disabled if no carer assigned
Option 2: Accept & Assign to Me
- Assigns work to you (logged-in employee)
- Changes status to ACCEPTED
- Requires valid employee ID
Click chosen option button.
- Processing indicator shows
- Success toast: "Work allocation accepted successfully!"
- Status badge changes to green "Accepted"
- Table refreshes
Click "Cancel" button to close modal without accepting.
No changes made to allocation.
- ✓ Only SCHEDULED allocations can be accepted
- ✓ Option 2 useful for picking up unassigned work
- ✓ Option 1 for confirming existing assignment
- ⚠️ Cannot undo accept without admin help

Rejecting Work
Reject work assignments through the Job Board interface.
- Status shows yellow "Scheduled" or green "Accepted" badge
- Actions column shows "Reject" button
- Can reject even after accepting
Click red "Reject" button.
Confirmation dialog appears (browser default).
Message: "Are you sure?"
Click "OK" to confirm rejection.
- Loading indicator shows
- Status changes to red "Rejected" badge
- Success toast: "Work allocation rejected successfully!"
- Table refreshes
Click "Cancel" in confirmation dialog.
No changes made to allocation.
- ⚠️ Rejected work must be manually reassigned by admin
- ✓ Can reject even after accepting
- ✓ Reason can be added in notes (if edited by admin later)
- ⚠️ Consider impact on client care before rejecting

Email Notifications
Configure and send client notifications about scheduled care.
Purpose:
- Notify clients when care shifts are scheduled
- Provide service details
- Enable communication workflow
Trigger Points:
- Bulk publish NEW → SCHEDULED
- Individual status change (if enabled)
Supported Client Types:
- NDIS: Full email support
- CHSP: No email support (system limitation)
Primary Email:
- Client's main email address
- Default selection in system
- Field:
client.email
Emergency Contact:
- Designated emergency contact email
- Secondary option
- Field:
client.emergencyContactEmail
Guardian Email:
- Legal guardian or representative
- Third option
- Field:
client.guardianEmail
Subject Line:
Care Service Scheduled - [Client Name]
Body Content:
- Header: Service details
- Client Information: Client name, Service type (NDIS)
- Scheduling Details: Carer name, Start/end dates and times, Duration
- Service Information: Days scheduled, Shift times per day, Special notes
- Footer: Contact information, Organization details
Before Sending:
- ✓ Verify email selections are appropriate
- ✓ Check for CHSP allocations (won't receive emails)
- ✓ Confirm dates and times are correct
- ✓ Review client preferences
- ✓ Consider timing of emails (avoid late night)
Email Selection Guidelines:
- Primary Email: Use for routine notifications
- Emergency Contact: Use for urgent changes
- Guardian Email: Use for dependents/minors
- Validation: Check email format, verify client exists
- Template Population: Merge allocation data, format dates/times
- Delivery: Send via email service, log attempt
- Response: Success increments sent count, failures logged
Timezone Management
Handle global scheduling across different timezones.
Backend Storage: UTC timezone (all dates/times)
Frontend Display: Converted to selected timezone
User Selection: Persistent via localStorage
Default Behavior:
- First visit: Detects browser timezone
- Falls back to Australia timezone if detection fails
- Saved selection persists across sessions
- Click timezone selector in system settings
- Dropdown shows common timezones
- Search or scroll to find timezone
- Click to select
- System saves to localStorage
- All displayed times update immediately
What Gets Converted:
- Start date & time
- End date & time
- Shift times (shiftStartTime, shiftEndTime)
- Display shows: "[Original Time] ([Timezone])"
What Stays the Same:
- Allocation IDs
- Client names
- Employee names
- Status values
- Notes content
Important: System sends times to backend in selected timezone
Process:
- User creates allocation in their timezone
- Backend receives times with timezone metadata
- Stores with timezone information
- UTC conversion happens server-side
- Other users see times in their selected timezone
Critical Rule: Always use original backend data when updating
How It Works:
- User views allocation in their timezone
- User clicks edit
- System fetches original allocation data (not converted)
- Edit form shows times in original timezone
- User updates fields
- System sends original times + timezone to backend
- Backend preserves timezone integrity
- System automatically adjusts for DST
- Uses IANA timezone database
- Transitions handled seamlessly
- No manual adjustment needed
- Historical allocations show correct times for that period
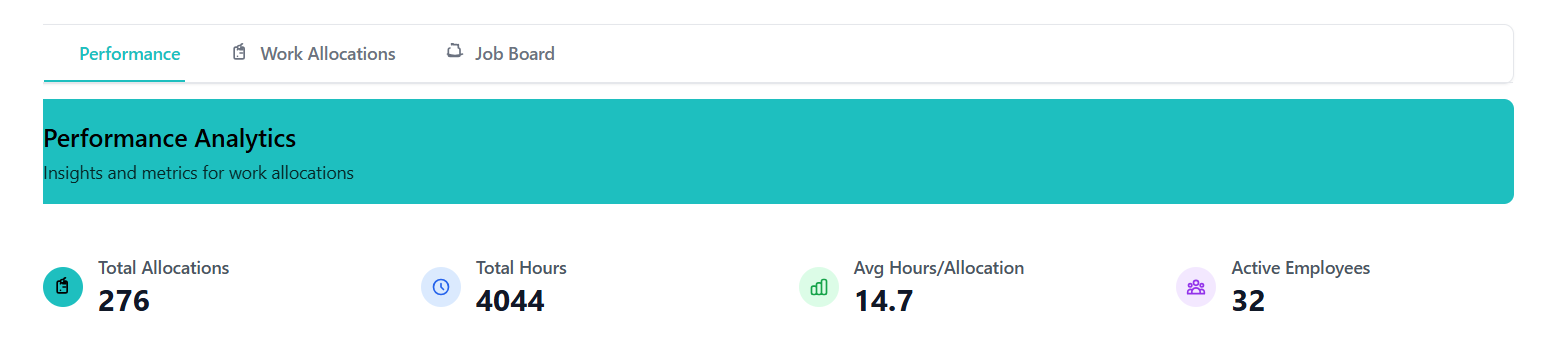
Performance Analytics
View metrics, workload distribution, and insights.
- Click "Performance" tab in main navigation
- Dashboard loads with current data
- Metrics calculate based on active filters
Data Source:
- Uses same filtered allocations as Work Allocations tab
- Respects date range selection
- Updates when filters change
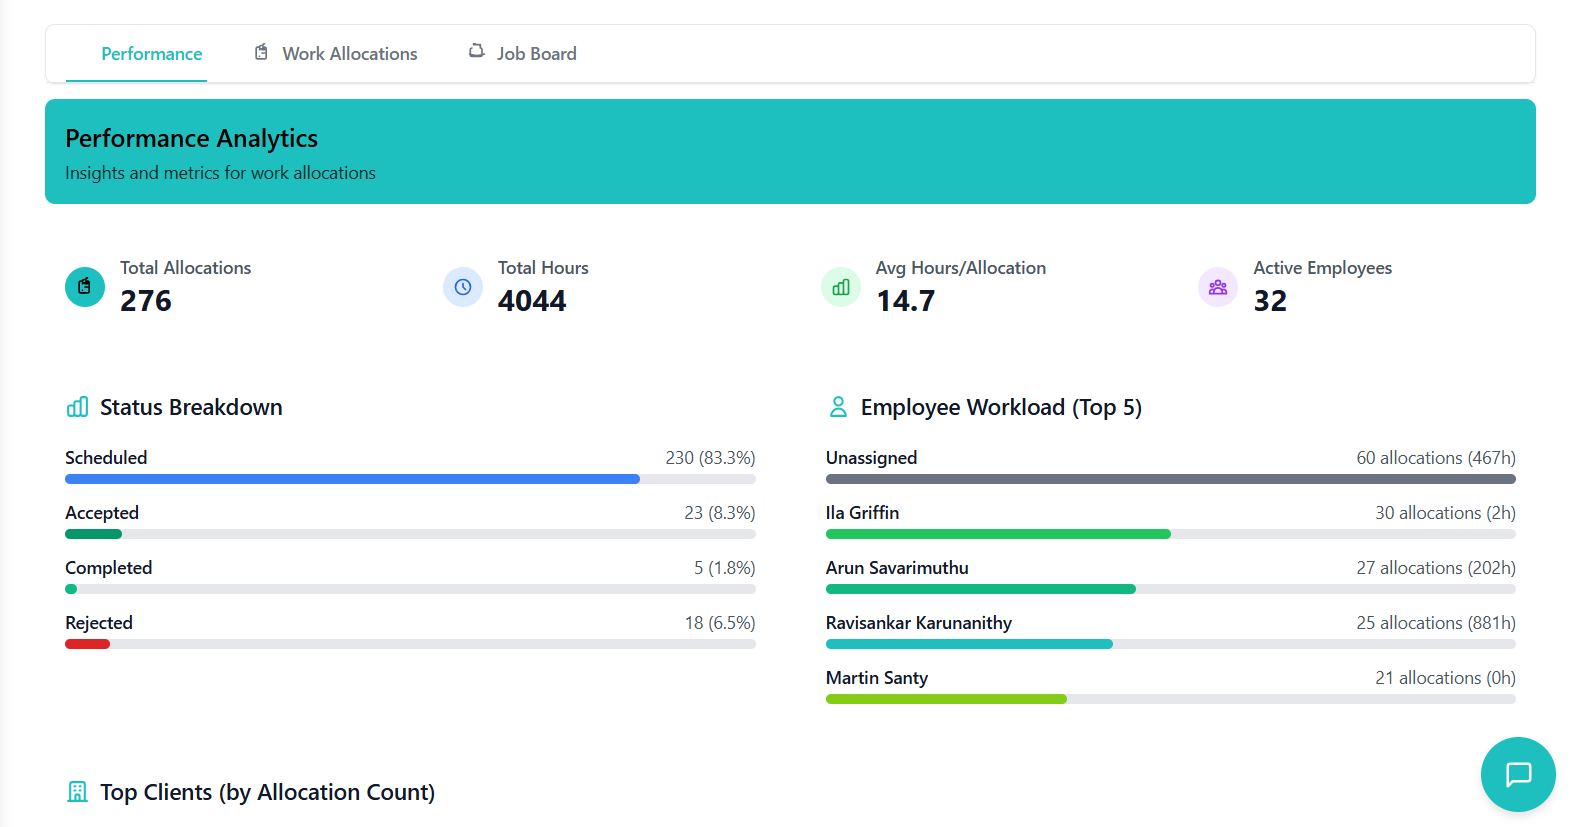
Card 1: Total Allocations
- Icon: Clipboard (teal background)
- Value: Count of all allocations in filtered range
- Purpose: Quick overview of workload volume
Card 2: Total Hours
- Icon: Clock (blue background)
- Value: Sum of all allocation hours
- Purpose: Resource capacity planning
Card 3: Avg Hours/Allocation
- Icon: Bar chart (green background)
- Value: Average hours per allocation
- Calculation: Total Hours ÷ Total Allocations
Card 4: Active Employees
- Icon: People (purple background)
- Value: Count of unique employees with allocations
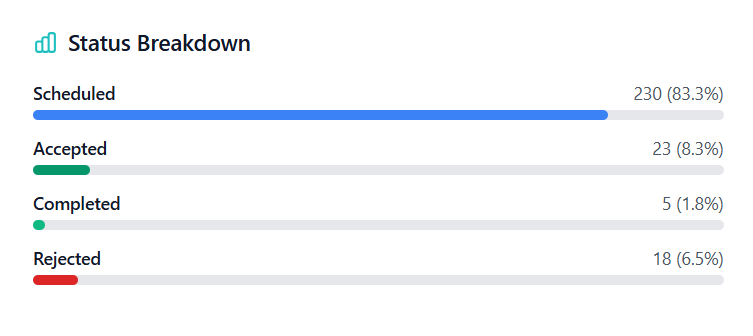
Purpose: Visualize allocation distribution by status
Display:
- Horizontal progress bars
- Each status shows count and percentage
- Colored progress bar
- Clickable status name
Color Coding:
- Scheduled: Blue
- Accepted: Green
- Completed: Gray
- Cancelled: Red
- Rejected: Yellow
- NEW: Purple
Interactive Feature:
- Click status name to filter Job Board
- Example: Click "Scheduled (15, 45%)"
- System navigates to Job Board tab
- Auto-applies status filter
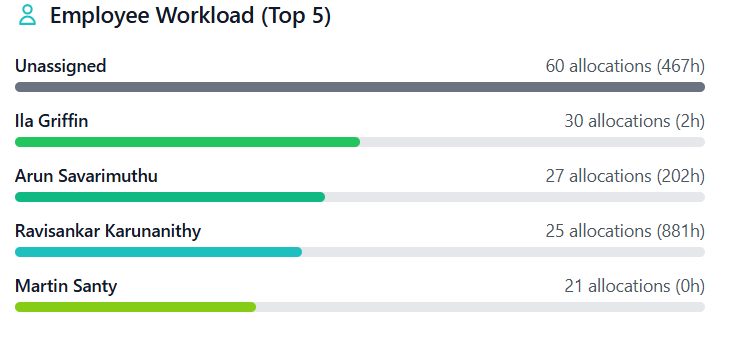
Purpose: Identify busiest carers
Display:
- Shows top 5 employees by allocation count
- Each employee row shows name, count, total hours
- Colored progress bar (employee's unique color)
- Bar width represents relative workload
Usage:
- Identify overworked employees
- Balance workload distribution
- Recognize high performers
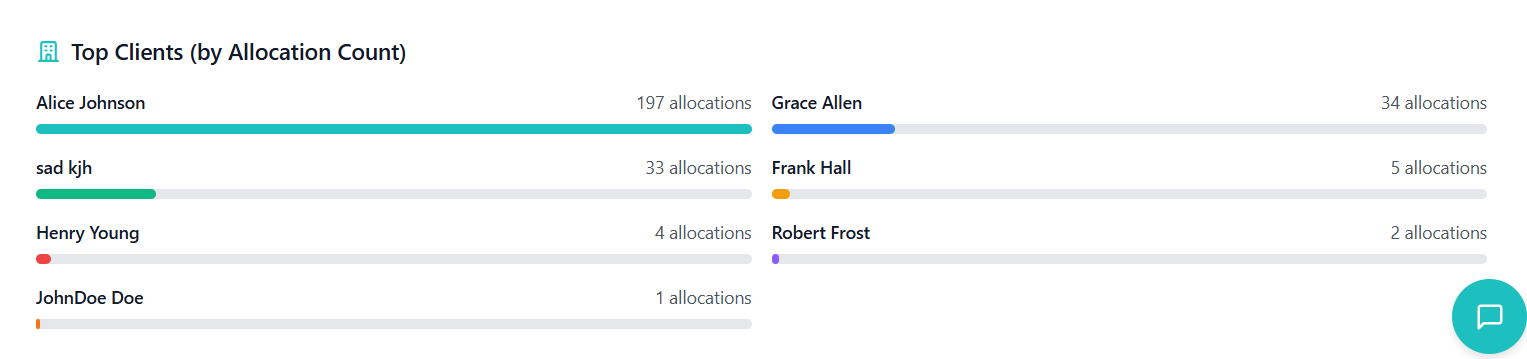
Purpose: Show most active clients
Display:
- Top 10 clients by allocation count
- Grid layout (2 columns on desktop)
- Each client shows name, count, colored progress bar
- Unique color per client
Use Cases:
- High-value client identification
- Service frequency analysis
- Resource allocation priority
- Refresh Behavior: Updates automatically when date range changes, filters applied, or allocations modified
- Empty State: Shows "No data for analytics" message if no data available
- Permission Based: Managers see department data only, admins see all data
Troubleshooting Guide
Solutions to common issues and problems you may encounter.
Common Issues
Symptoms: Create allocation successfully, toast shows success, but allocation doesn't appear in list.
Solutions:
- Check Date Range: Verify allocation date is within selected range. Change to "Custom Range" and include the date, or select "Current Year".
- Clear Filters: Clear search box, reset status filter, check all dropdown filters.
- Manual Refresh: Click refresh button (blue circular arrow) or reload page (Ctrl+R / Cmd+R).
Symptoms: Click dropdown to change, dropdown doesn't open or doesn't update.
Solutions:
- Wait for Current Operation: Look for loading indicator, wait 2-3 seconds, try again.
- Check Permissions: Verify you have edit rights, contact administrator if needed.
- Refresh Page: Save any work elsewhere, reload page, try operation again.
- Use Edit Modal: If inline edit fails, use action menu → "Edit Allocation".
Symptoms: Click delete, modal shows but delete button grayed out with "Delete Blocked" message.
Cause: Allocation has ACCEPTED or COMPLETED status with associated timesheets.
Solutions:
- Change Status First: Edit allocation, change status to "Cancelled" or "Rejected", save changes, then delete.
- Contact Administrator: If force delete needed, admin has override capabilities. Provide allocation ID.
Symptoms: Bulk publish completes, status changes to SCHEDULED, toast shows "0 email notification(s) sent".
Solutions:
- Verify Client Type: Check if allocations are NDIS (CHSP doesn't support emails).
- Check Email Addresses: View client details, verify email fields populated, update client records if needed.
- Confirm Email Option Selected: When publishing, check "Send Email Notification" and select appropriate email per client.
- Contact IT Support: If technical issue, provide timestamp and allocation IDs, check email service status.
Symptoms: Times display incorrectly, shift times don't match expected.
Solutions:
- Verify Timezone Setting: Check current timezone selection, change to correct timezone, system updates immediately.
- Understand Timezone Display: System shows times in YOUR selected timezone, check timezone indicator on times.
- For Editing: Original times preserved, edit modal uses original timezone, don't recalculate times.
- Reset Timezone: Clear browser cache, log out and log back in, re-select timezone.
Getting Help
📚 Internal Resources
User Manual, Quick Start Guide, Video Tutorials, FAQ Document
💬 Help Desk
Email: support@[yourdomain].com
Phone: [Support number]
Hours: [Business hours]
💻 In-App Support
Help icon (?) in top-right, Submit ticket directly, Chat support
👨💼 Administrator
Department admin, IT department, System administrator
- Your username
- Screenshot of issue
- Steps to reproduce
- Error messages (exact text)
- Allocation ID (if applicable)
- Date/time of issue
- Browser and version
- What you were trying to do