Timesheet Management System
Complete guide for carer timesheet management. Select a topic below to get started.
System Overview
Learn about the system features, user roles, and permissions.
Accessing the System
How to login and navigate to the timesheet module.
Carer Timesheet View
Understanding the employee interface for timesheet management.
Editing Timesheet Entries
How to enter and modify timesheet data.
Submitting Timesheets
Process for submitting timesheets for approval.
Managing Client Limits
Setting and managing client expense and mileage limits.
Creating Case Notes
Documenting client interactions and observations.
Reporting Incidents
How to report and document incidents.
Admin Report View
Administrator interface for timesheet management.
Approving/Rejecting Timesheets
Process for reviewing and approving timesheets.
Timezone Management
Handling timezone differences in timesheet entries.
Troubleshooting
Solutions to common issues and problems.
System Overview
The Timesheet Management System enables carers to record their working hours, expenses, and mileage for client visits, while allowing administrators to review and approve these entries.
Key Features
🌍 Multi-timezone Support
Accurate time tracking across different timezones.
⏱️ Scheduled vs. Actual Time Tracking
Compare planned vs. actual work hours.
💰 Client-Specific Limits
Set and manage expense and mileage limits per client.
📝 Integrated Case Notes
Document client interactions and observations.
⚠️ Incident Reporting
Report and track incidents with detailed documentation.
📊 Status-Based Workflow
Draft → Submitted → Approved/Rejected workflow.
User Roles & Permissions
| Feature | Carer (Employee) | Administrator/Manager |
|---|---|---|
| View Own Timesheets | ✓ | ✓ |
| Edit Own Timesheets | ✓ | ✓ |
| Submit Timesheets | ✓ | ✓ |
| Recall Submitted Timesheets | ✓ | ✓ |
| View All Timesheets | ✗ | ✓ |
| Approve/Reject Timesheets | ✗ | ✓ |
| Set Client Limits | ✗ | ✓ |
| Generate Reports | ✗ | ✓ |
Timesheet Status Workflow
Accessing the Timesheet System
How to login and navigate to the timesheet management module.
- Navigate to the application URL
- Enter your credentials
- System automatically detects your employee status and permissions

- Click on "Timesheets" in the main navigation menu
- System loads your timesheet view based on your role
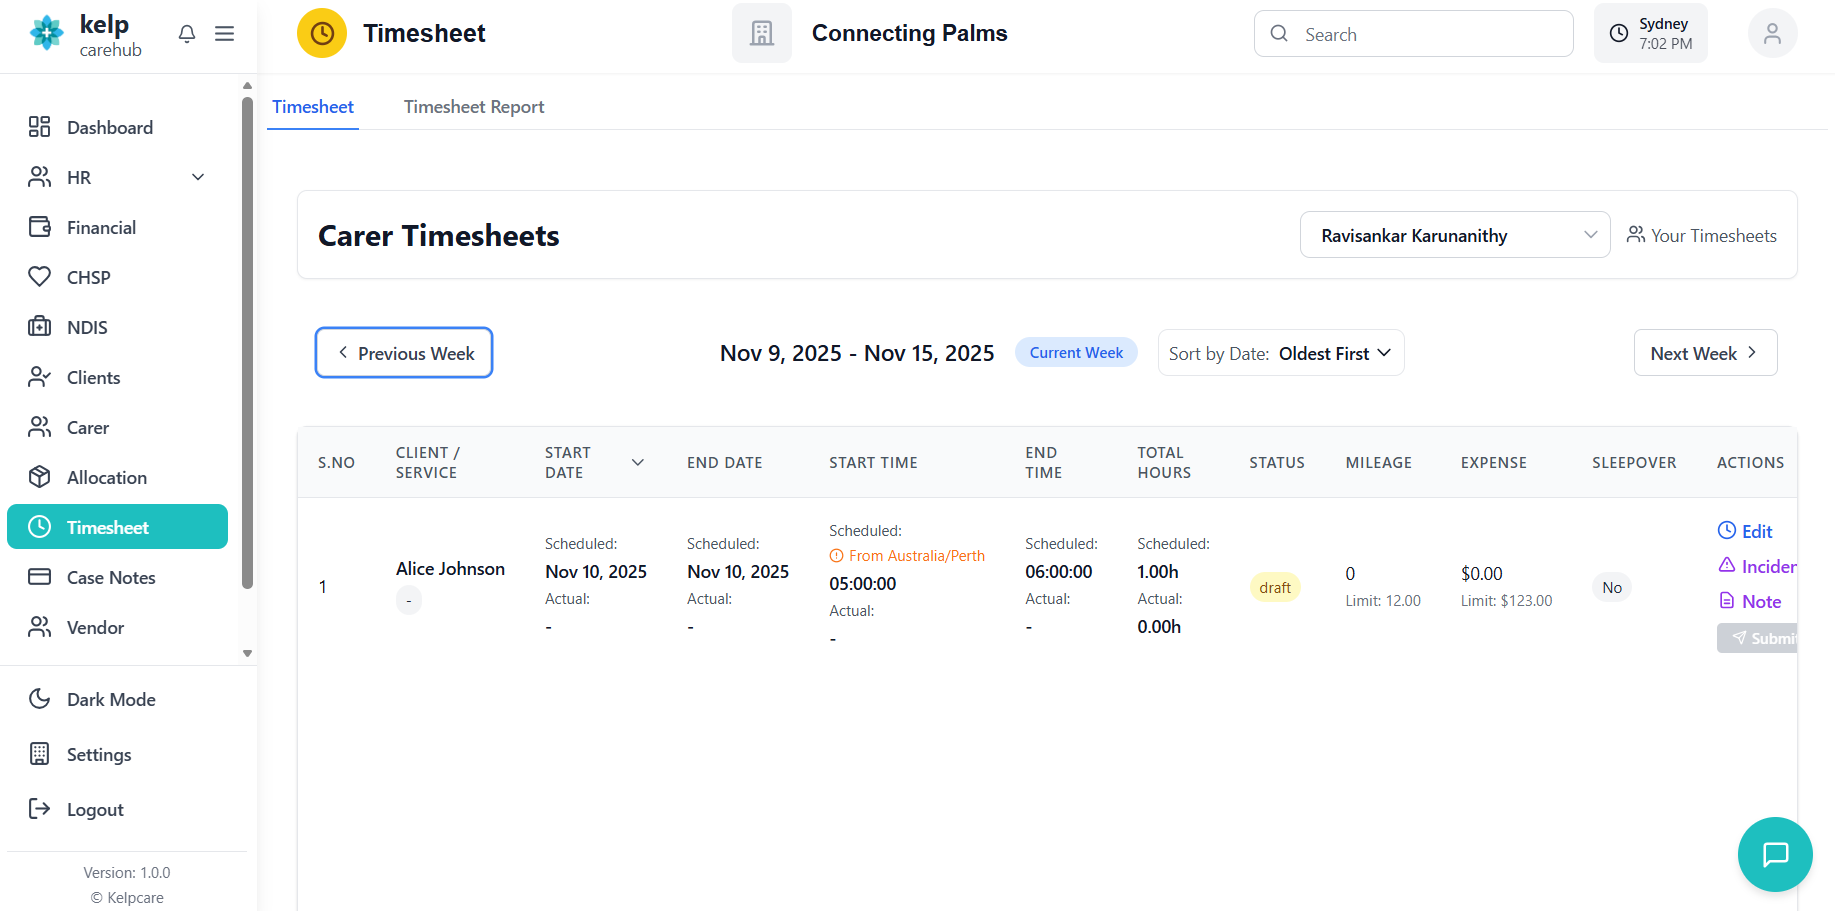
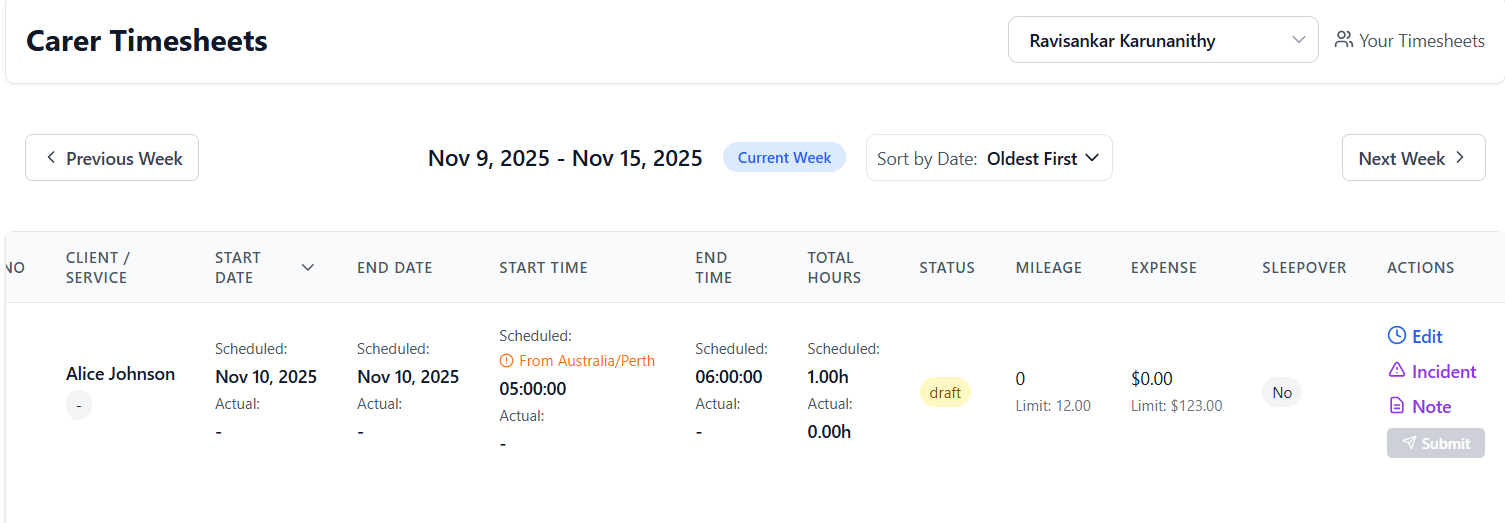
Carer Timesheet View (Employee)
Understanding the employee interface for timesheet management.
Understanding the Timesheet Interface
- Title: "Carer Timesheets"
- Employee Dropdown: Shows your name (disabled if you only have access to your own timesheets)
- Your Timesheets Indicator: Displays when viewing your own entries

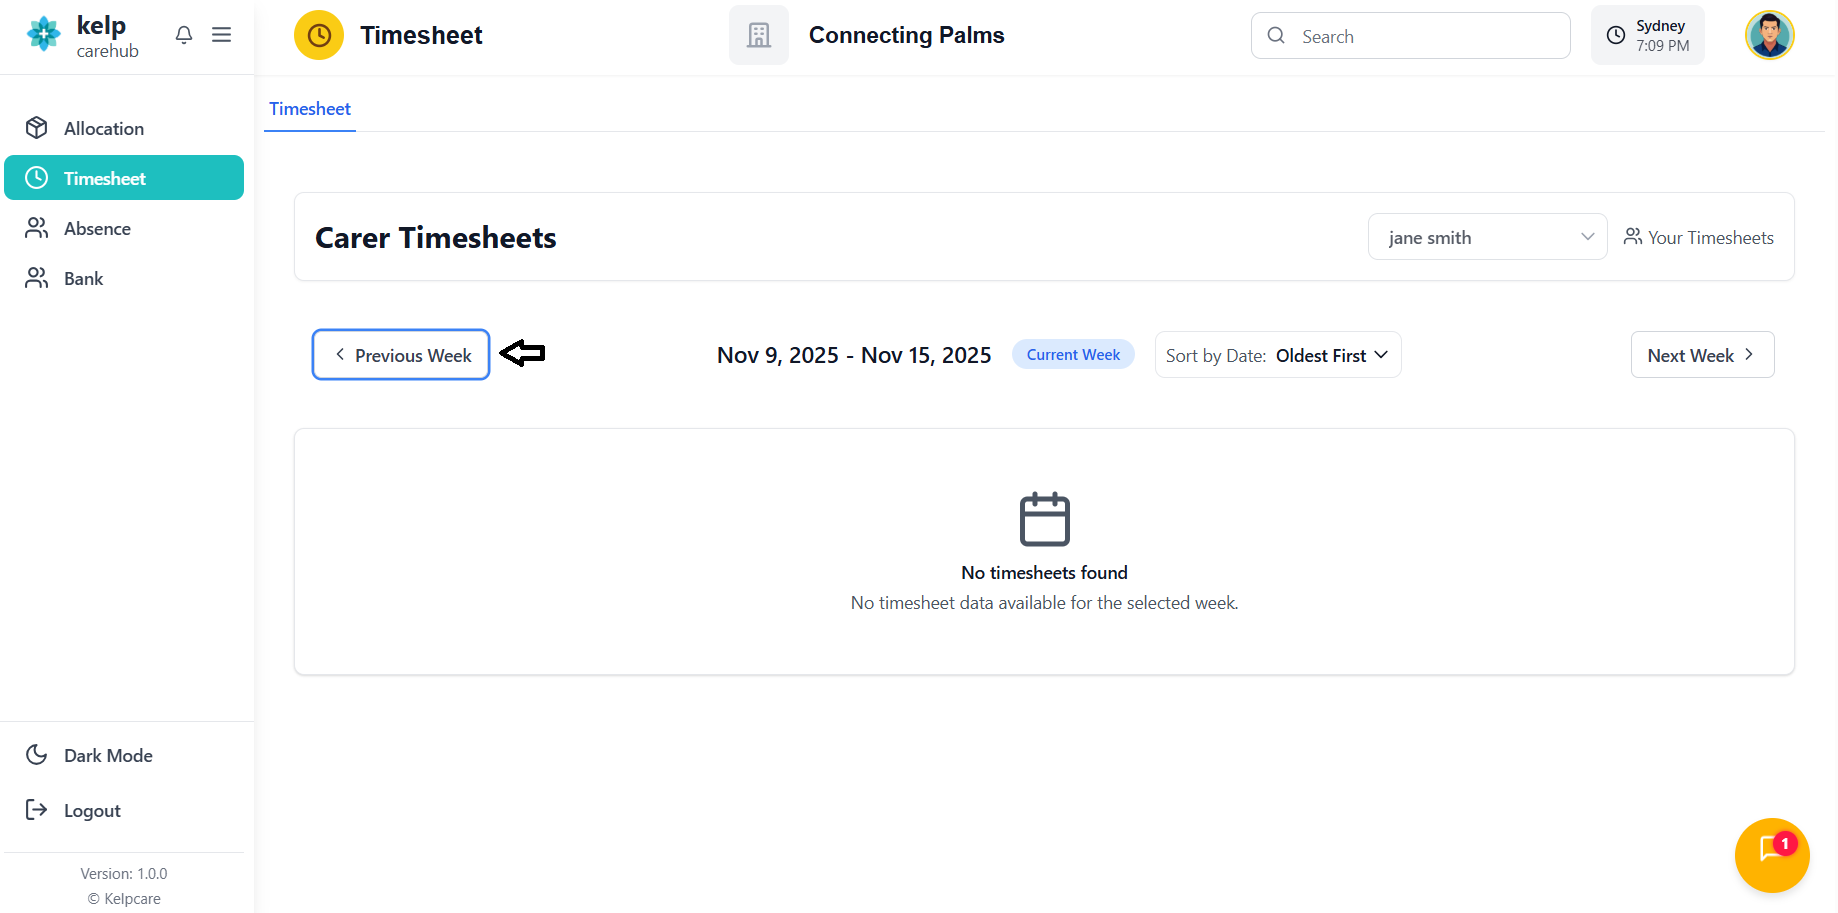
- Previous Week: Button to view previous week's timesheets
- Current Week Display: Shows date range (e.g., "Nov 13, 2025 - Nov 19, 2025")
- Current Week Button: Quick return to current week
- Next Week: Button to view next week's timesheets
- Sort Toggle: Switch between "Oldest First" and "Newest First"
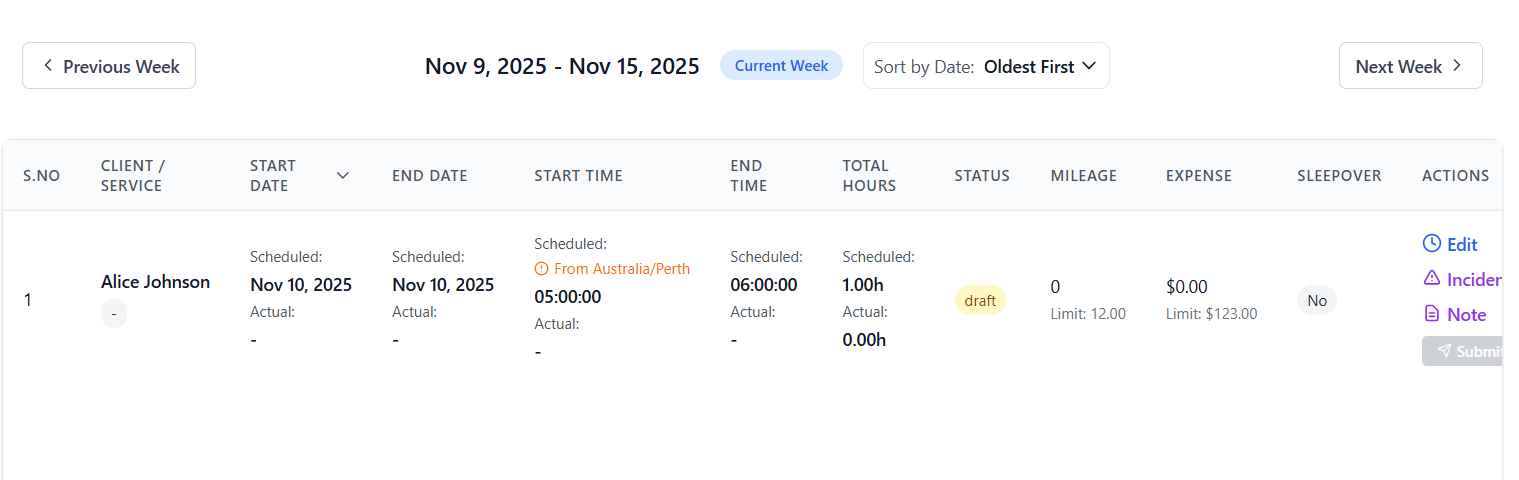
Timesheet Table Columns
| Column | Description |
|---|---|
| S.No | Serial number of the entry |
| Client / Service | Client name and rate card/service information (for NDIS clients) |
| Start Date | Scheduled and Actual start dates |
| End Date | Scheduled and Actual end dates |
| Start Time | Scheduled and Actual start times |
| End Time | Scheduled and Actual end times |
| Total Hours | Calculated hours (Scheduled and Actual) |
| Status | Current status badge (Draft/Submitted/Approved/Rejected/Recall) |
| Mileage | Mileage claimed with client limit shown below |
| Expense | Expense amount with client limit shown below |
| Sleepover | Yes/No indicator for sleepover shifts |
| Actions | Edit, Submit, Recall, Case Note, and Incident buttons |
Understanding Scheduled vs. Actual Times
Editing Timesheet Entries
How to enter and modify timesheet data.
Prerequisites for Editing
- Look for the "Add Limits" button in the Actions column
- If visible, limits haven't been set yet
- If not visible, limits are already configured
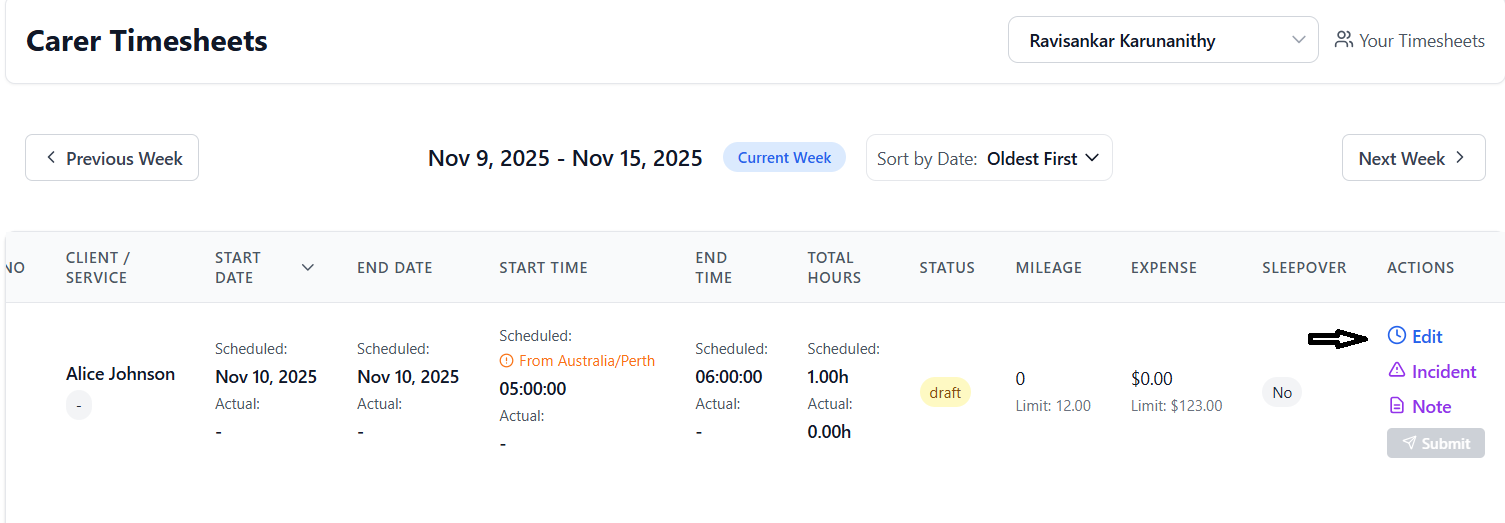
Editing Process
- Locate the timesheet entry you want to edit
- Click the "Edit" button in the Actions column
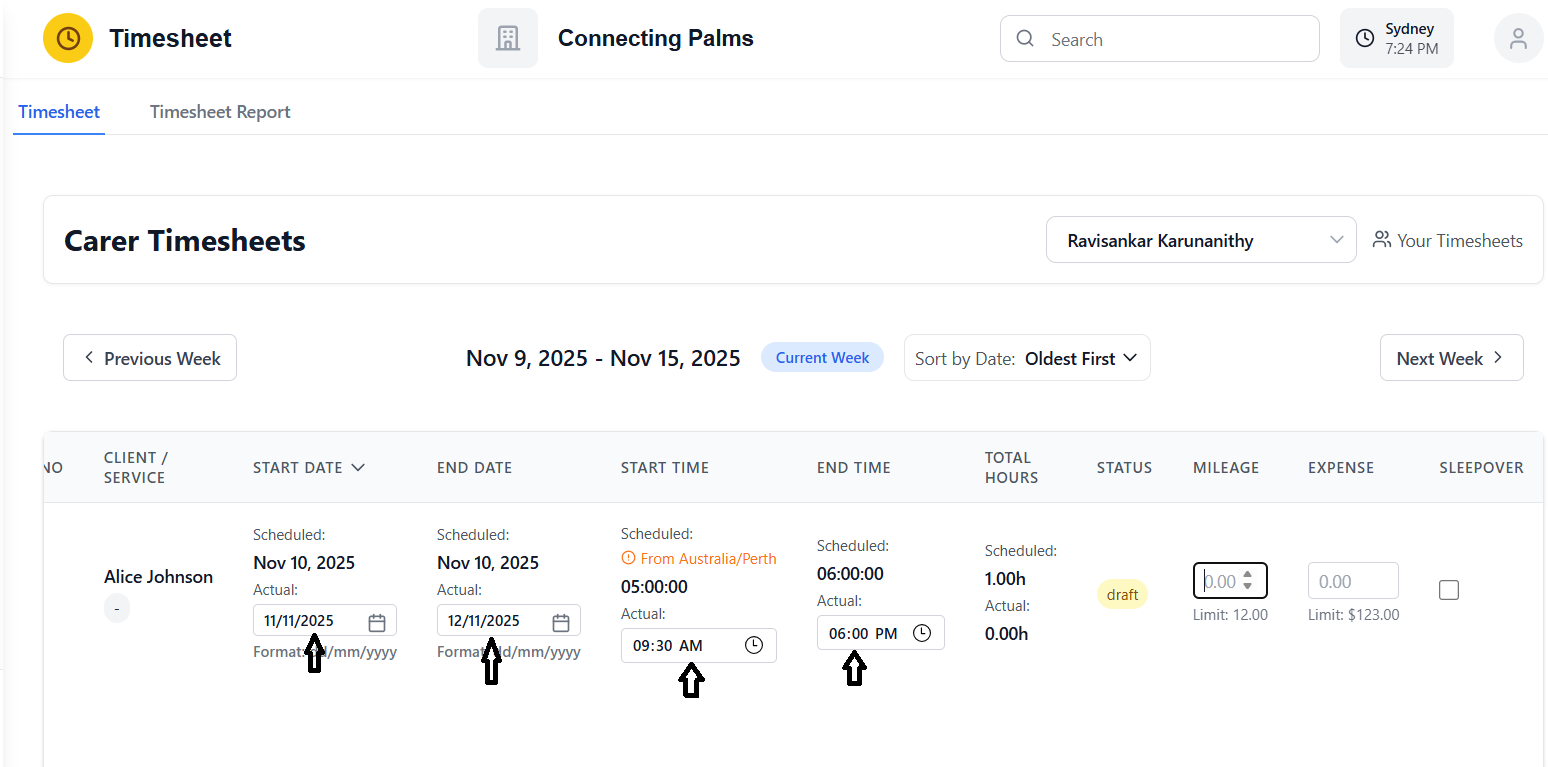
- The row expands to show editable fields
- Click in the Actual Start Date field
- Type the date in dd/mm/yyyy format (e.g., 15/11/2025)
- OR click the calendar icon to use the date picker
- System auto-formats as you type (adds slashes automatically)
- Click in the Actual End Date field
- Enter date in dd/mm/yyyy format
- OR use the calendar icon
- End date must be equal to or after start date
- Click in the Actual Start Time field
- Use the time picker to select hours and minutes
- Time is displayed in 24-hour format (HH:MM)
- Select the actual end time of your shift
- System automatically calculates total hours
- Hours calculation accounts for overnight shifts
- Enter the mileage traveled for this shift
- Use decimal format (e.g., 15.50)
- Client mileage limit is displayed below the field
- System validates against the limit on save
- Enter any expenses incurred during the shift
- Enter as decimal currency (e.g., 25.00)
- Client expense limit is displayed below
- System validates against the limit
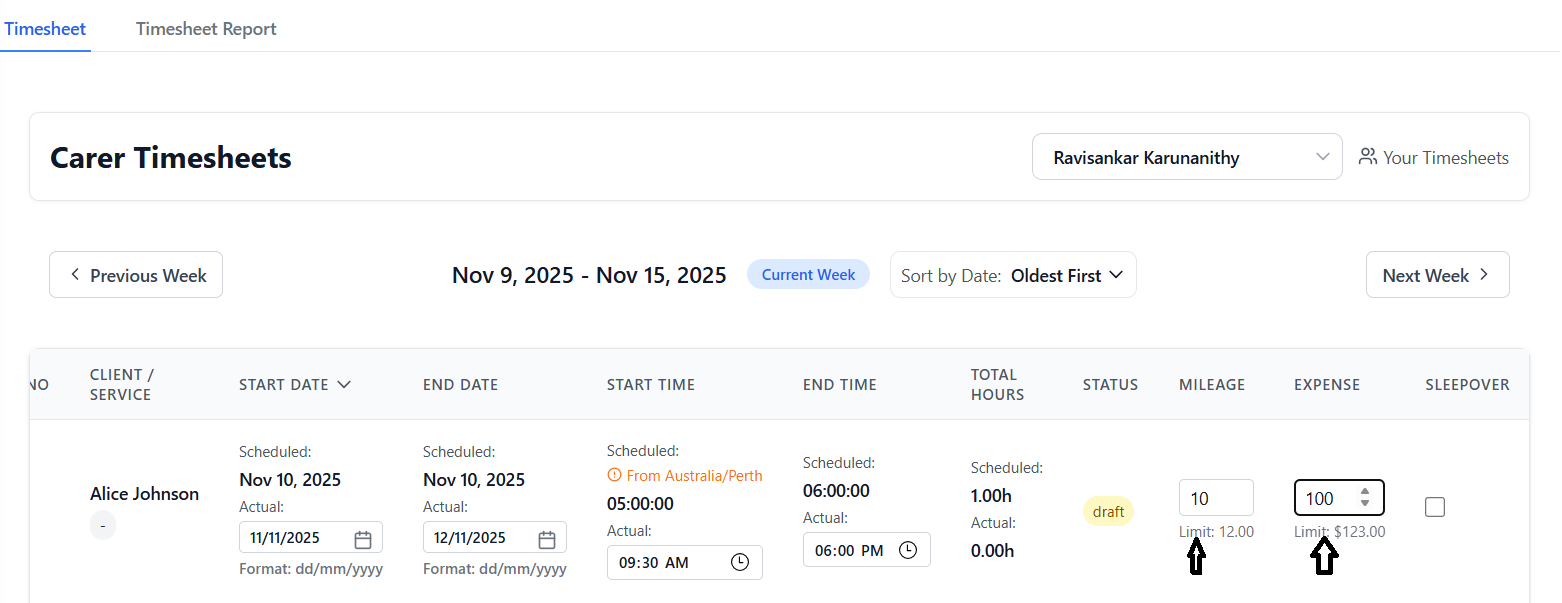
- Check the sleepover checkbox if applicable
- Leave unchecked for regular shifts
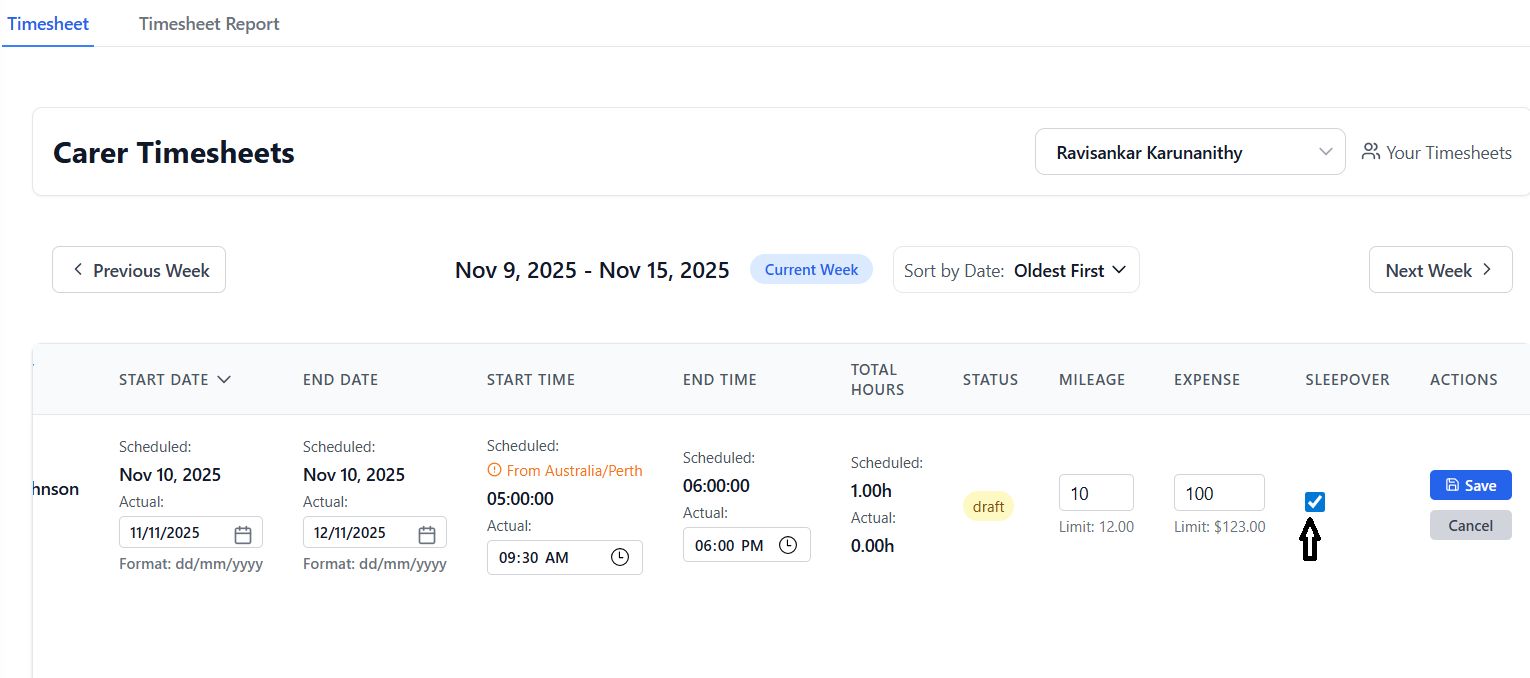
Saving Changes
- Review all entered information
- Click the green "Save" button
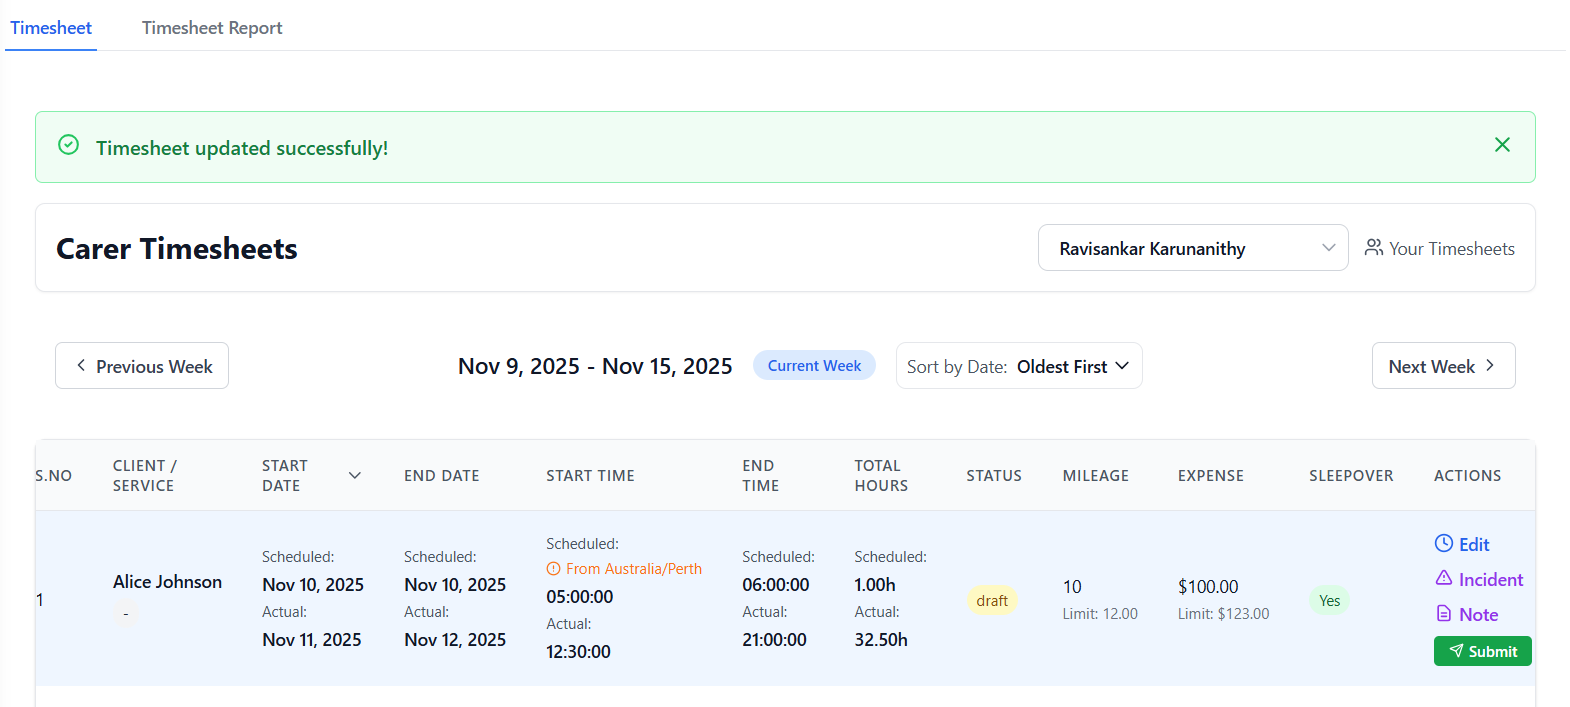
- System performs validation checks
- Green success message appears at top: "Timesheet updated successfully!"
- Entry returns to view mode
- Changes are saved to the database
- Success message auto-dismisses after 5 seconds
Edit Restrictions
- Status is "Submitted" - timesheet is under review
- Status is "Approved" - timesheet has been finalized
- Client limits are not set - must add limits first
In these cases, the Edit button will be disabled and grayed out.
Submitting Timesheets
Process for submitting timesheets for approval.
Prerequisites for Submission
- Actual start and end times must be entered
- Actual start and end dates must be entered
- At least one time slot must have actual hours recorded
- Mileage and expenses must not exceed client limits
- Status must be "Draft" or "Recall"
Submission Process
- Check that all actual times are filled in
- Verify dates are correct
- Confirm mileage and expenses are within limits
- Review total hours calculation
- Find the green "Submit" button in the Actions column
- Button is only visible for Draft or Recall status entries
- Button is disabled if actual hours are not recorded
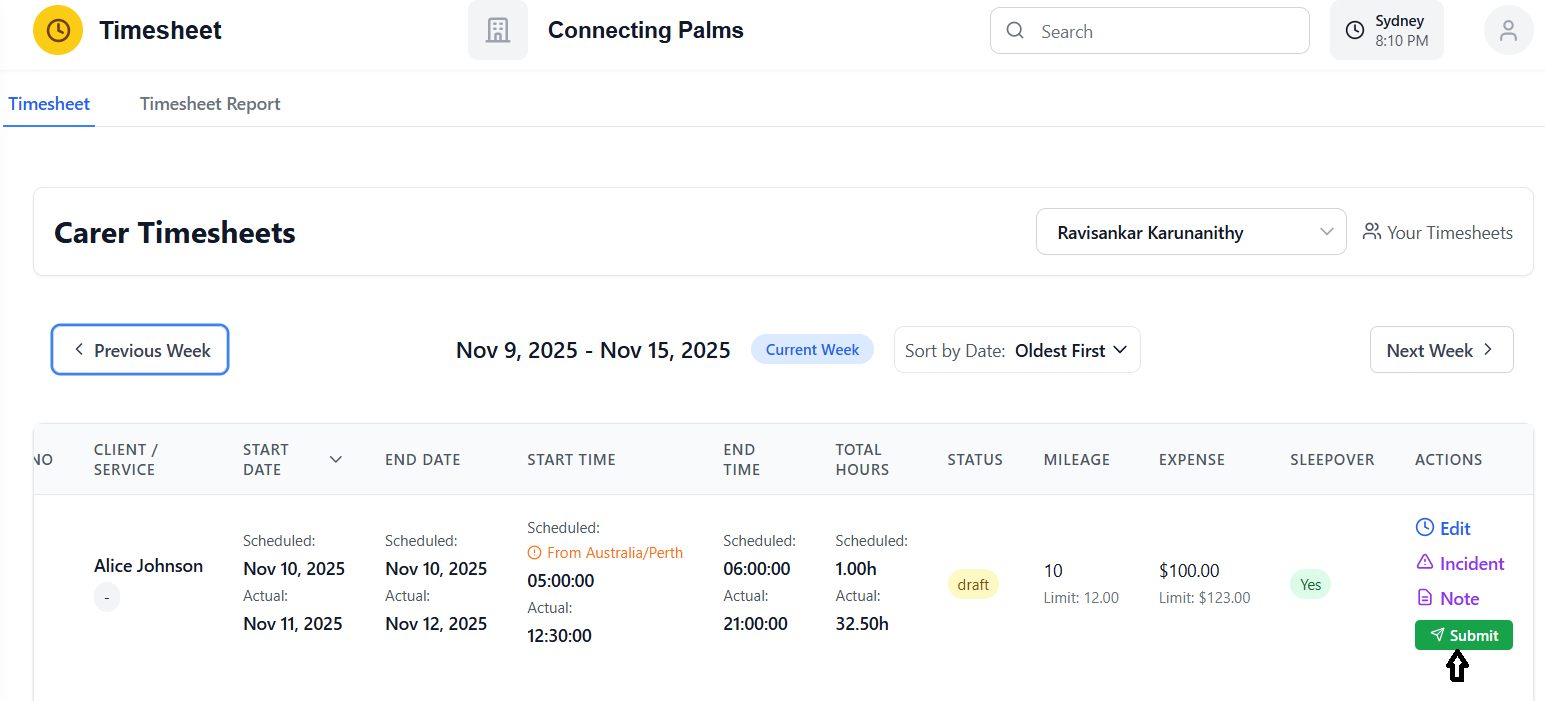
- Click the "Submit" button
- System performs final validation
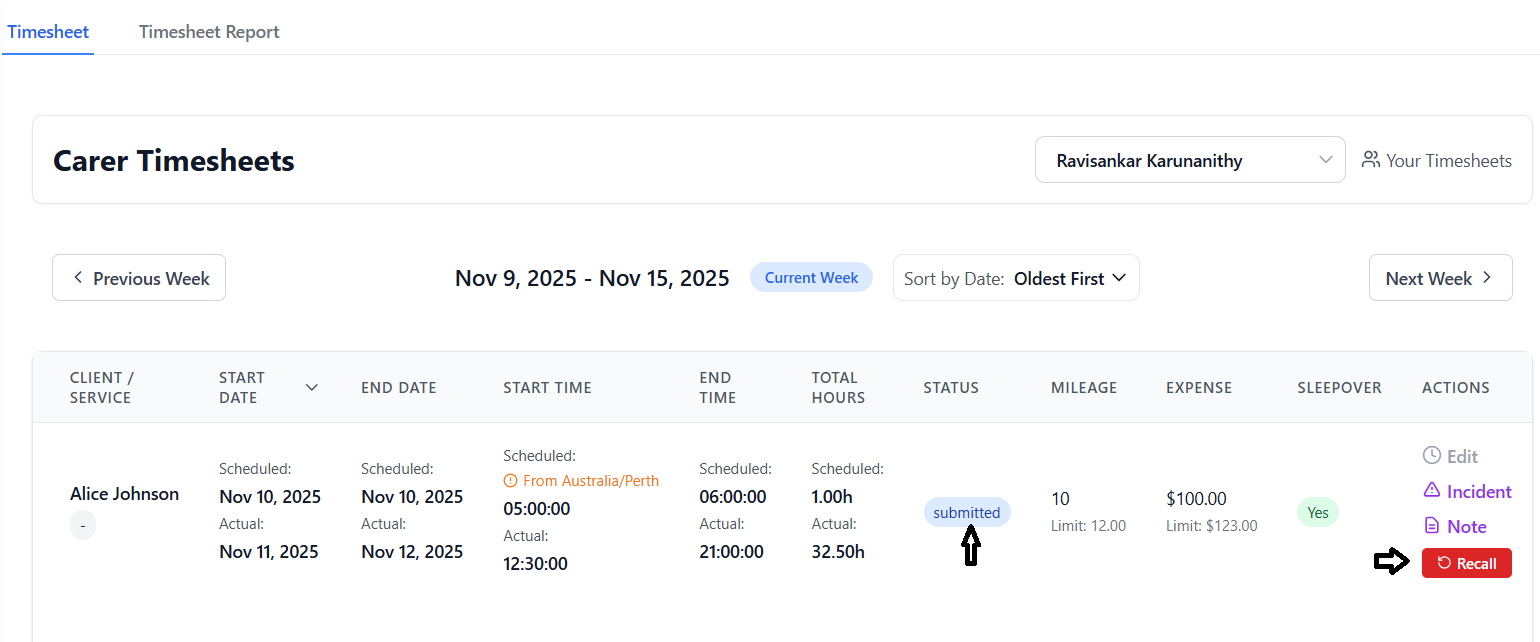
- Status changes from "Draft" to "Submitted"
- Timesheet becomes locked for editing
- Status badge changes to yellow "Submitted"
- Edit button becomes disabled
- Recall button appears
- Timesheet is now visible to administrators for approval
Validation Errors
- "Cannot submit: No actual hours recorded" - Fill in actual times first
- "Mileage exceeds limit" - Reduce mileage or contact admin
- "Expense exceeds limit" - Reduce expense or contact admin
- "End date must be after start date" - Correct the dates
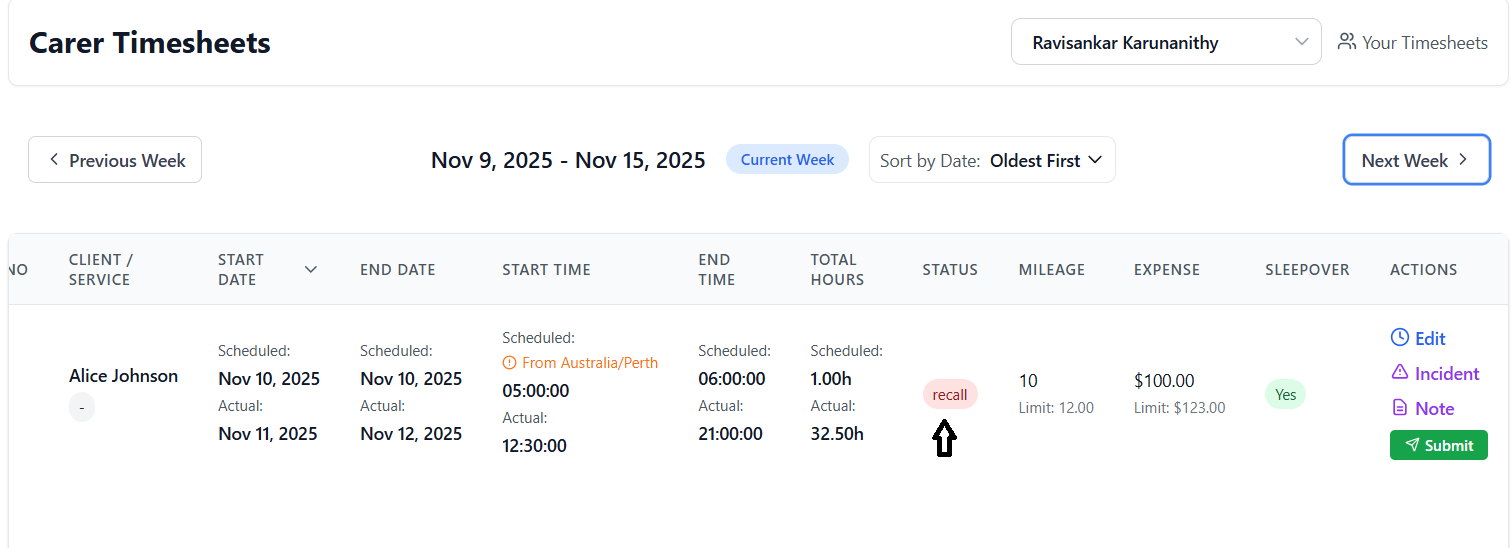
Recalling Submitted Timesheets
- You discover an error after submission
- Need to update information before approval
- Forgot to add mileage or expenses
- Locate the red "Recall" button (visible only on Submitted entries)
- Click to recall the timesheet
- Status changes from "Submitted" to "Recall"
- Edit button becomes enabled again
Managing Client Limits
Setting and managing client expense and mileage limits.
Understanding Client Limits
Client limits define the maximum mileage and expense amounts that can be claimed for a specific client within a date range. These limits ensure compliance with client agreements and funding allocations.
Adding Client Limits
- Look for the orange "Add Limits" button in the Actions column
- This button appears only when limits are not configured
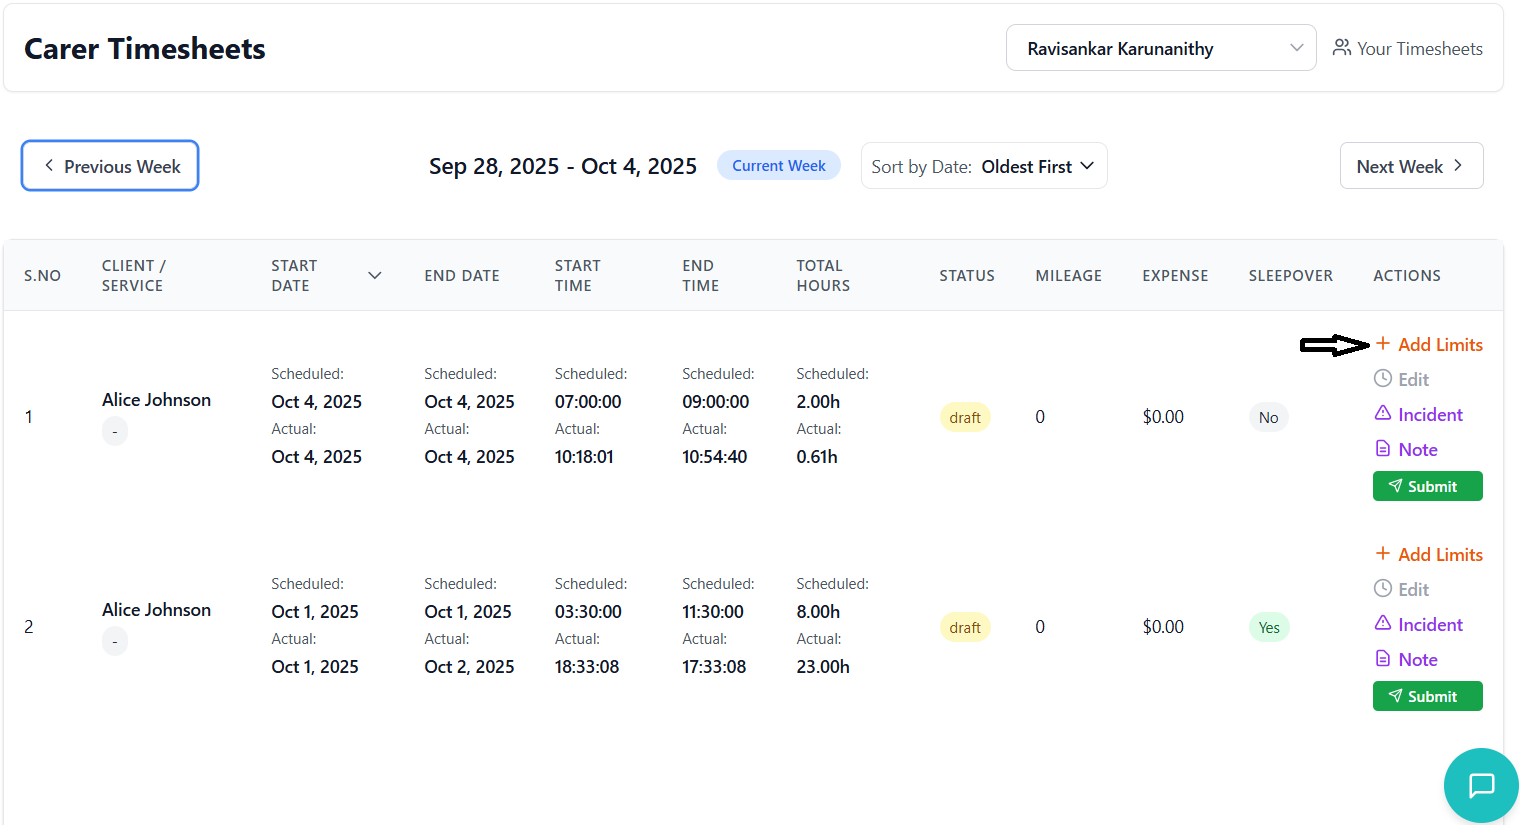
- Click the "Add Limits" button
- Side panel slides in from the right
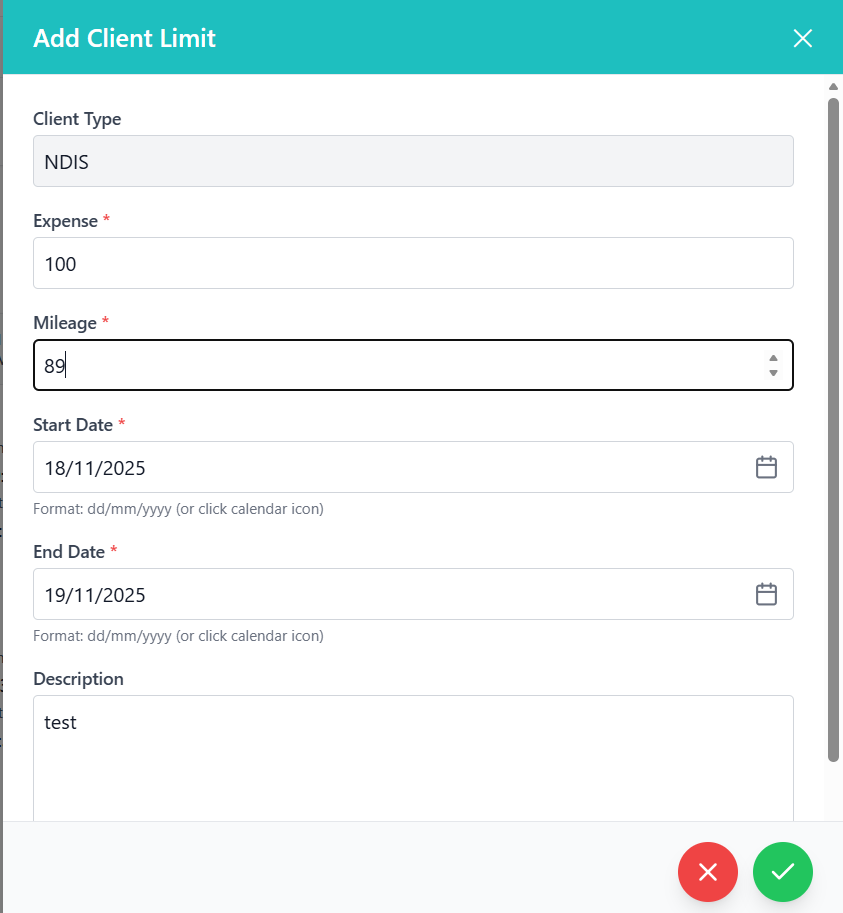
- Form displays with teal header "Add Client Limit"
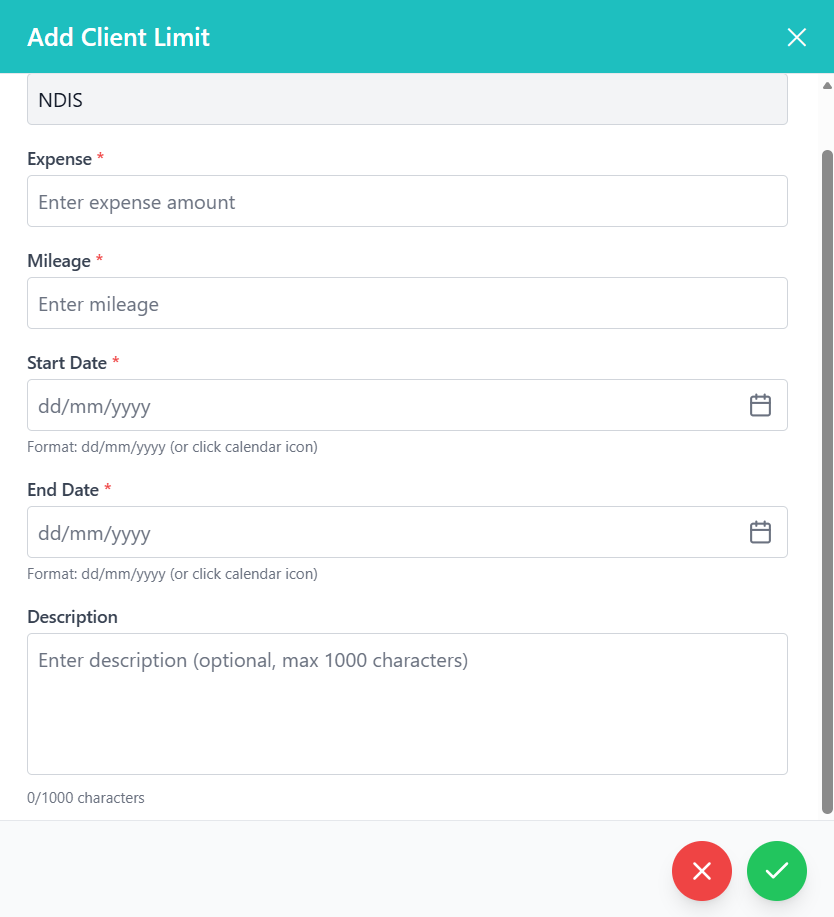
Client Type (Read-only)
- Automatically populated (NDIS, CHSP, or CHSP_V1)
- Cannot be changed
Expense Amount *
- Enter maximum expense amount in dollars
- Use decimal format (e.g., 100.00)
- Must be greater than or equal to 0
Mileage *
- Enter maximum mileage in kilometers
- Use decimal format (e.g., 50.00)
- Must be greater than or equal to 0
Start Date *
- Type date in dd/mm/yyyy format
- OR click calendar icon to use date picker
- System auto-formats as you type
- Defines when the limit period begins
End Date *
- Enter limit period end date
- Must be equal to or after start date
- Use same format as start date
Description (Optional)
- Add notes about the limit (max 1000 characters)
- Character counter displays below field
- Useful for explaining special circumstances
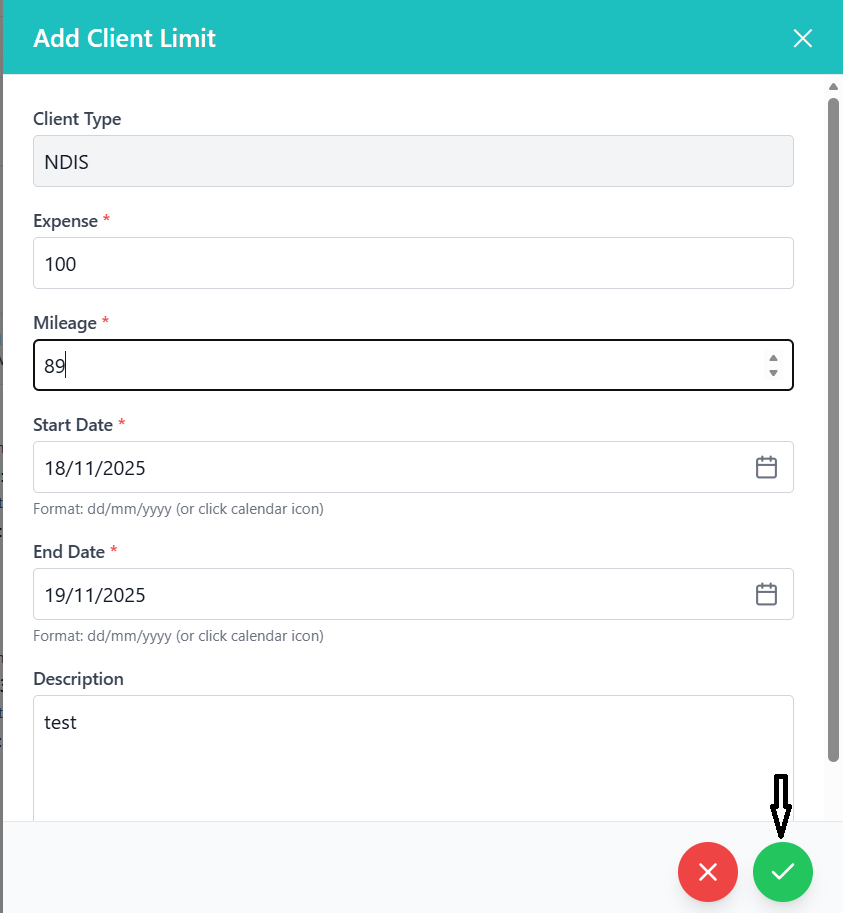
- Review all entered information
- Click the green circular checkmark button at bottom right
- System validates all fields
- Success message appears if saved successfully
- Panel closes automatically
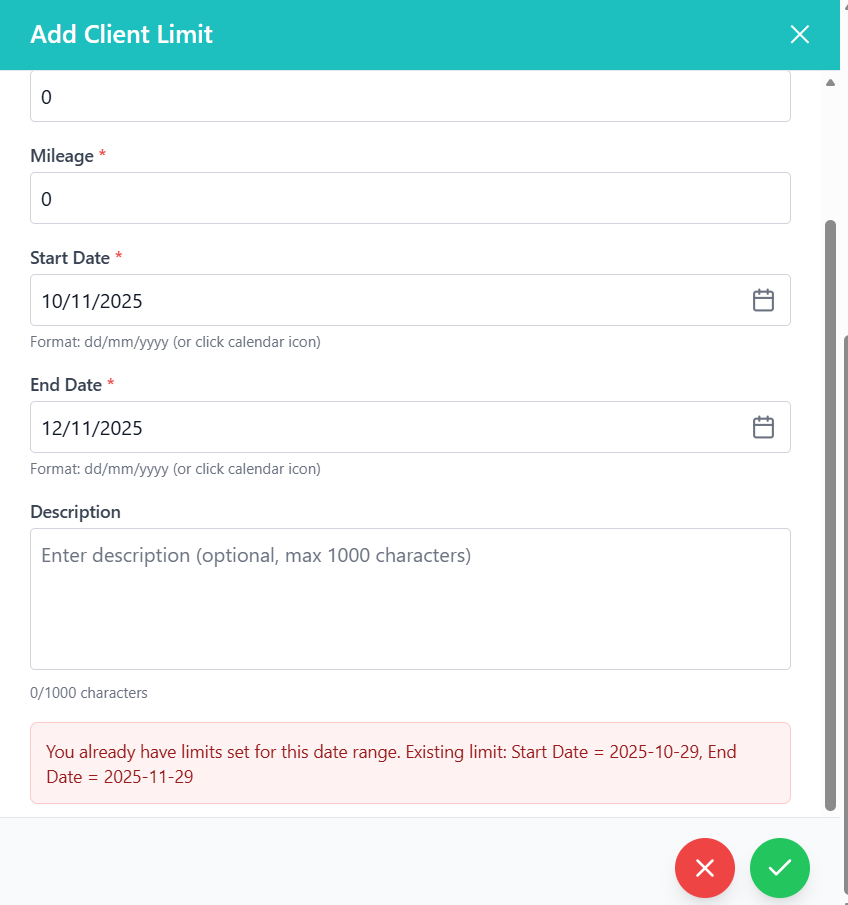
Validation Rules for Client Limits
| Field | Validation Rule | Error Message |
|---|---|---|
| Expense | Must be ≥ 0 | "Please enter a valid expense amount (must be >= 0)" |
| Mileage | Must be ≥ 0 | "Please enter a valid mileage (must be >= 0)" |
| Start Date | Valid dd/mm/yyyy format | "Please enter a valid start date (dd/mm/yyyy)" |
| End Date | Valid date, ≥ start date | "End date must be after or equal to start date" |
| Description | Max 1000 characters | "Description must not exceed 1000 characters" |
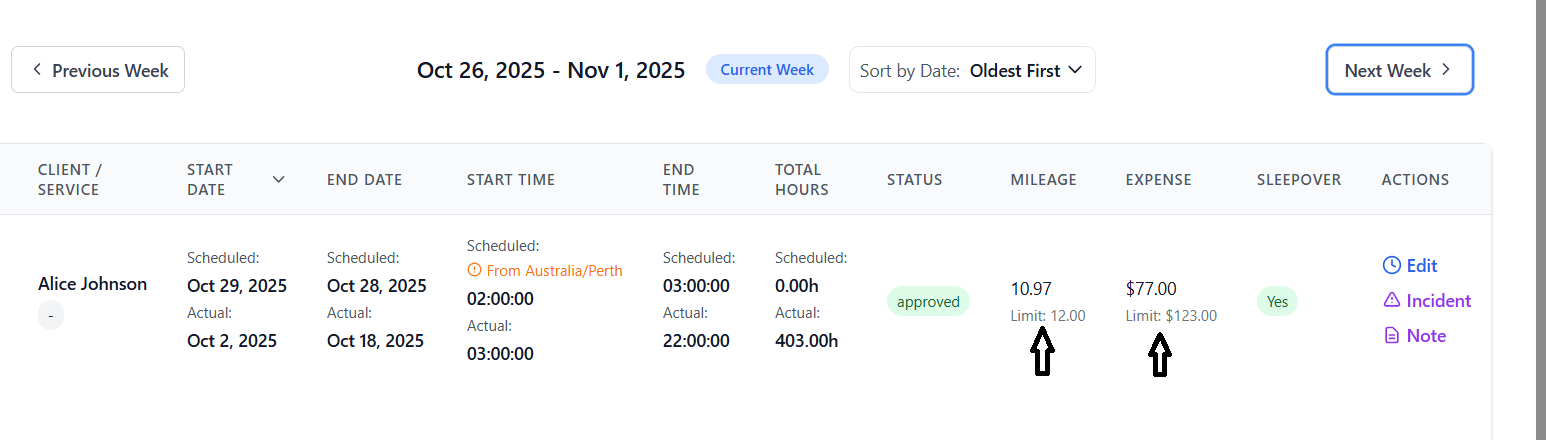
Viewing Applied Limits
Once client limits are set, they appear in the timesheet table:
- Below the mileage input field
- Below the expense input field
- Displayed as "Limit: X" in smaller gray text
Creating Case Notes
Documenting client interactions and observations.
When to Create Case Notes
- Documenting client interactions during shifts
- Recording significant events or observations
- Noting changes in client condition or behavior
- Documenting service delivery details
- Communication with family members or other carers
Creating a Case Note from Timesheet
- Locate the timesheet entry for which you want to create a note
- Find the purple "Note" button in the Actions column
- This button is only visible if you have CaseNote_Create permission
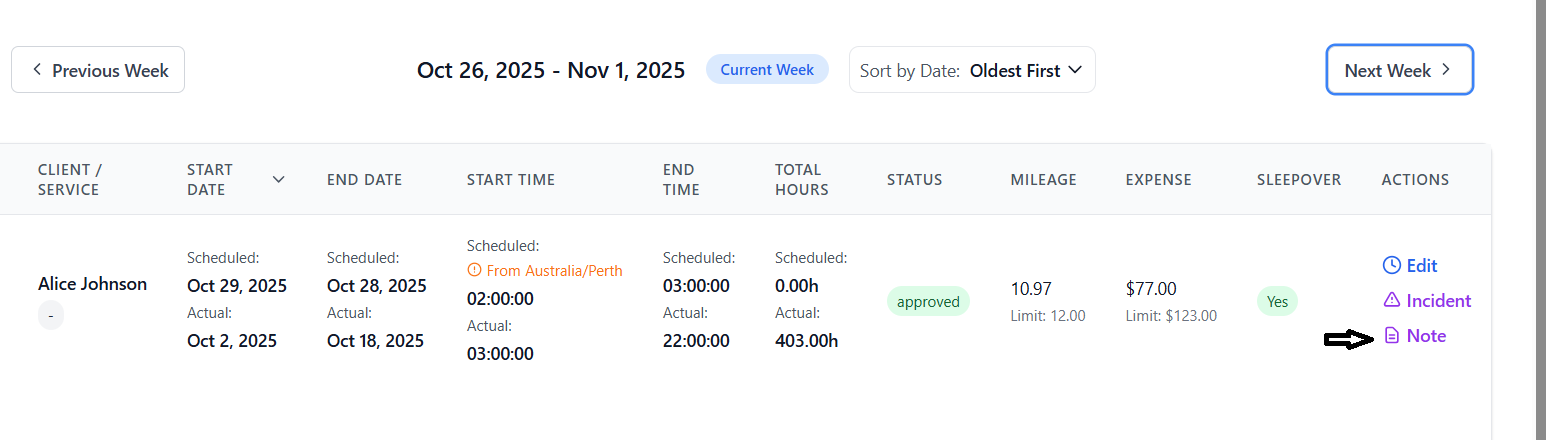
- Click the "Note" button
- Side panel opens from the right
- Client information is pre-populated from the timesheet
- Timesheet ID is automatically linked
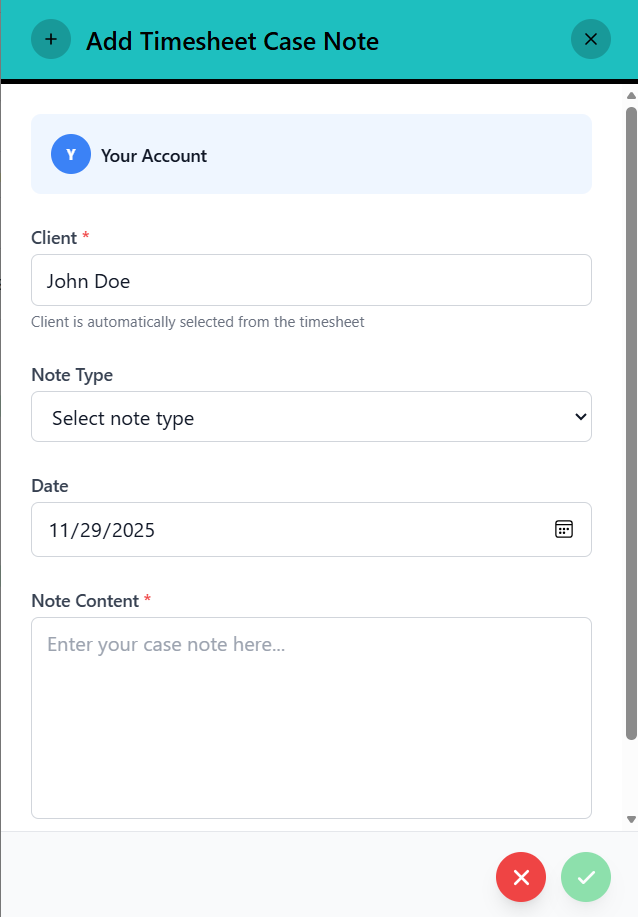
- Client Name: Automatically filled (read-only)
- Client ID: System tracks in background
- Timesheet Link: Case note is linked to this timesheet
- Fill in note title/subject
- Write detailed case note content
- Add any relevant observations
- Include date/time specific information
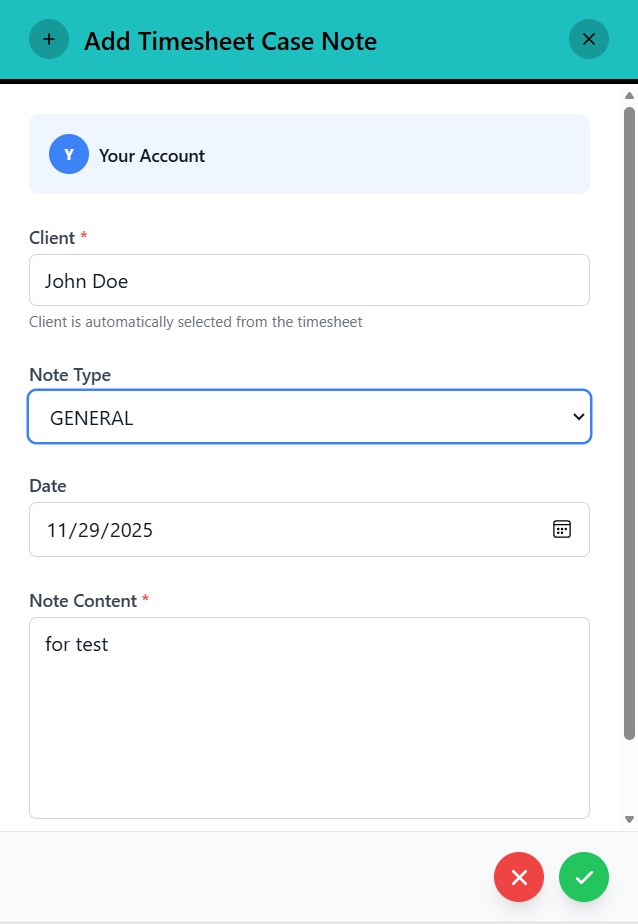
- Click "Save" or "Create" button
- System validates the form
- Case note is saved to client's record
- Link to timesheet is maintained
- Success message appears
- Panel automatically closes on successful save
- Return to timesheet view
- Case note is now accessible from client records
Reporting Incidents
How to report and document incidents.
Understanding Incident Reporting
- Client falls or injuries
- Medication errors
- Equipment failures or safety concerns
- Behavioral incidents
- Property damage
- Any unusual or concerning events
Creating an Incident Report
- Locate the timesheet entry related to the incident
- Find the purple "Incident" button in Actions column
- Button shows a warning triangle icon
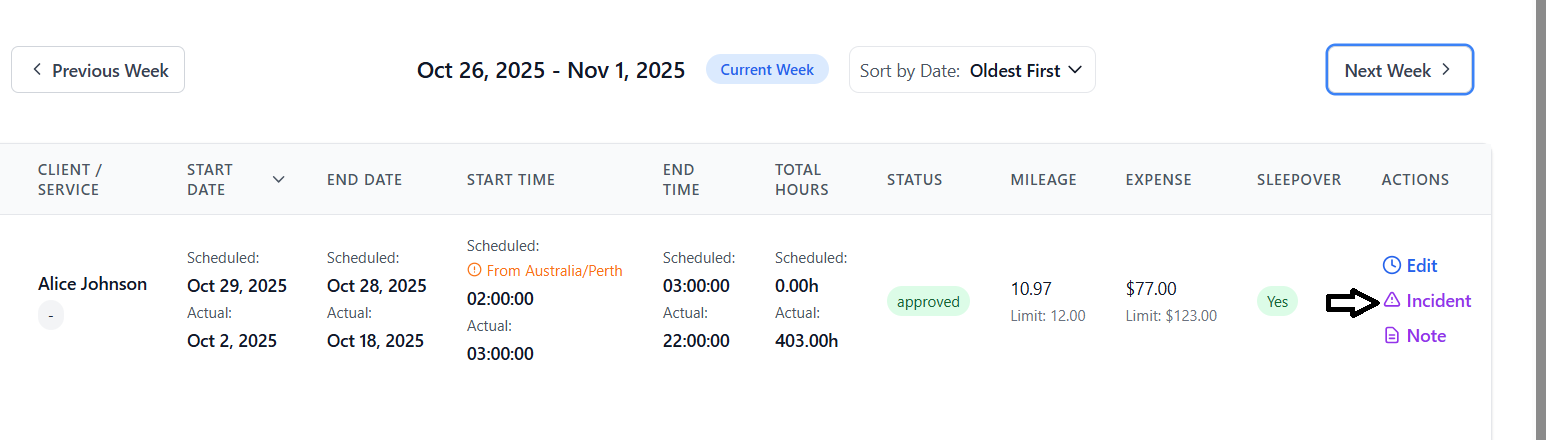
- Click "Incident" to open the reporting panel
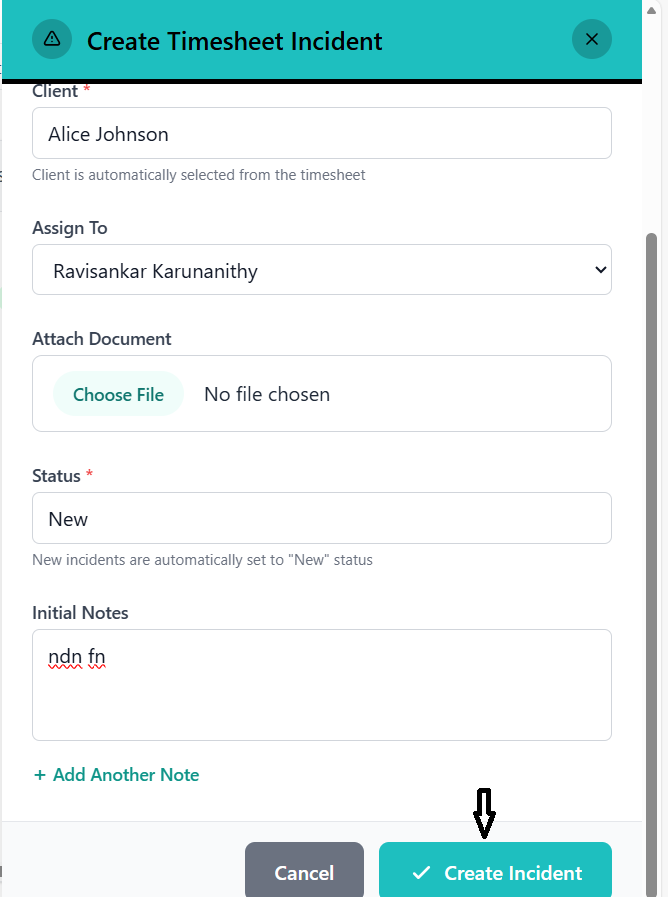
- Panel slides in from the right with teal header
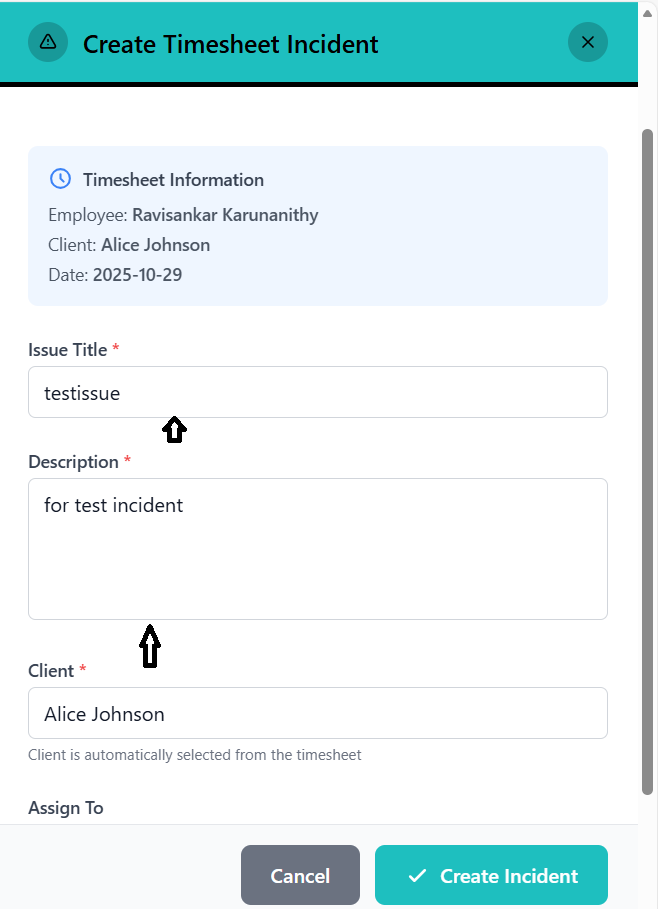
- Title: "Create Timesheet Incident"
- Blue information box at top shows:
- Employee name (the carer)
- Client name (automatically populated)
- Shift date
- This information is read-only
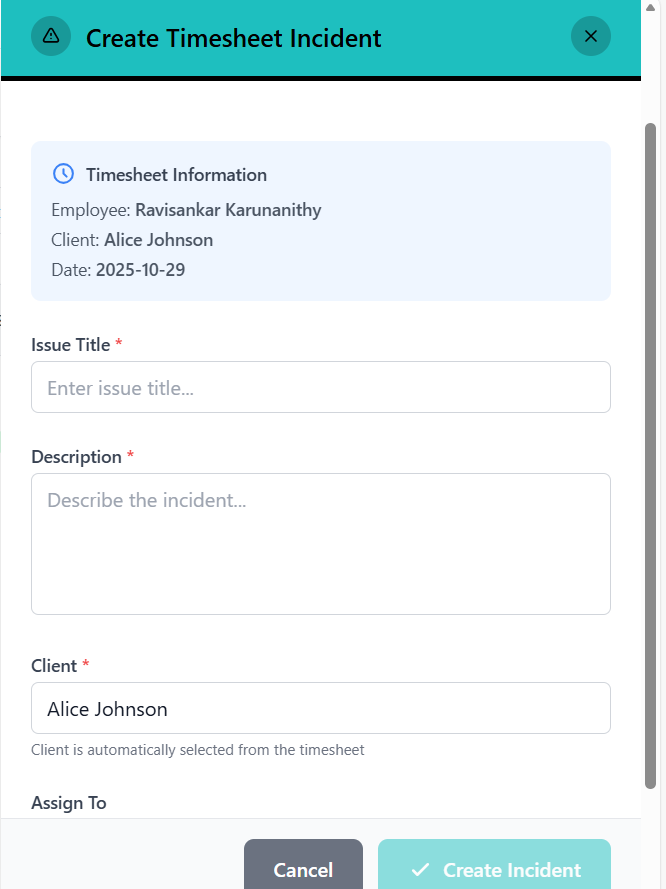
- Provide a brief, clear title for the incident
- Examples: "Client Fall in Bathroom", "Medication Administration Error"
- Required field
- Provide comprehensive incident details
- Include: What happened, When, Where, Who was involved
- Describe immediate actions taken
- Be factual and objective
- Required field
- Shows client name from timesheet
- Field is read-only and grayed out
- Client ID is tracked in background
- Note states: "Client is automatically selected from the timesheet"
- Select employee to assign incident follow-up to
- Dropdown shows all organization employees
- Leave blank if no specific assignment needed
- Can be updated later by administrators
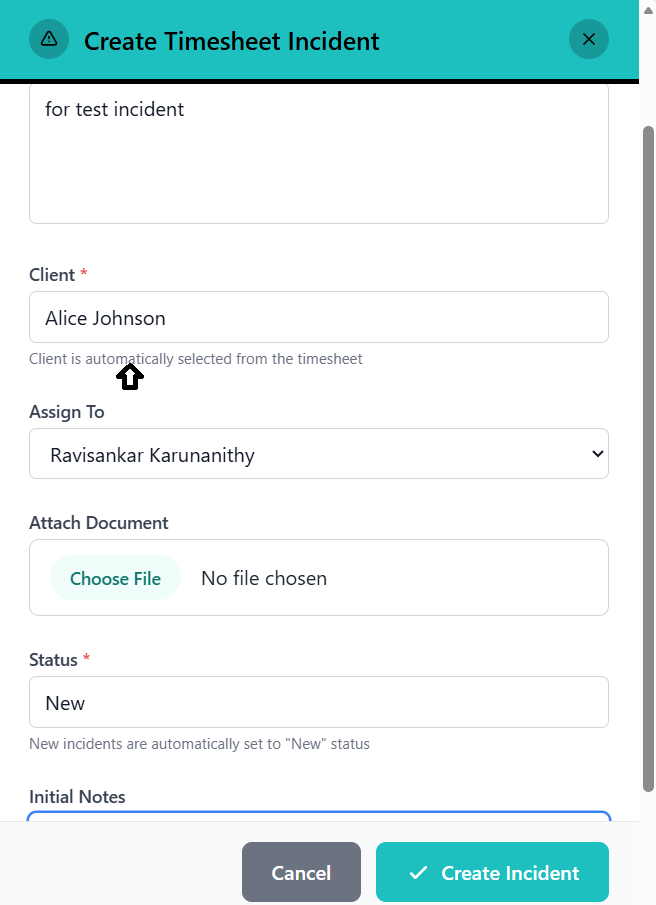
- Click "Attach Document" button
- Select file from your device
- Supported: Photos, PDFs, documents
- File name displays after selection
- Useful for photos of injuries, damage, etc.
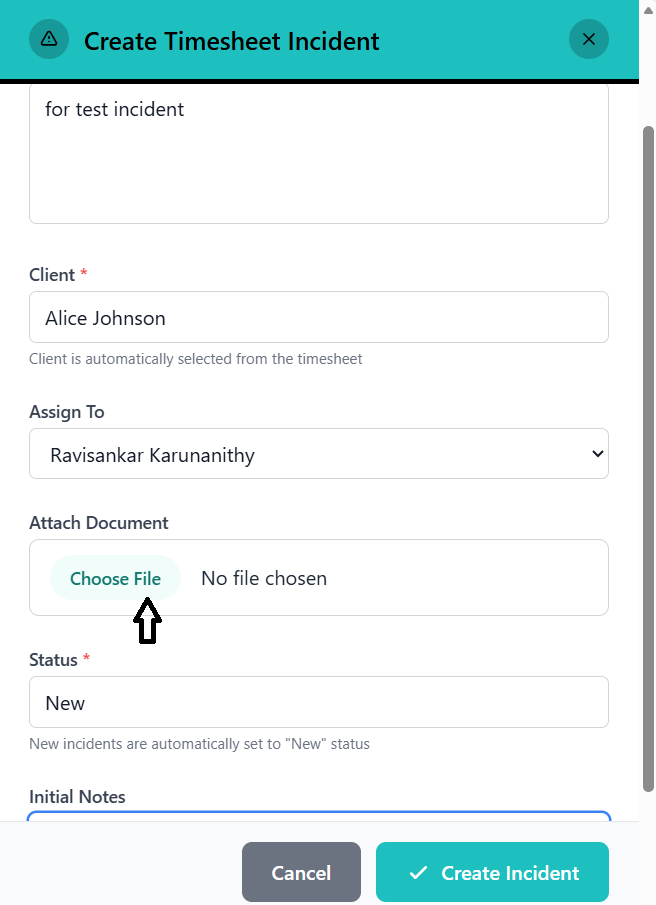
- Shows "New" status (grayed out)
- All new incidents automatically set to "New"
- Cannot be changed during creation
- Note: "New incidents are automatically set to 'New' status"
- Enter additional notes in text area
- Can add multiple notes using "+ Add Another Note" button
- Remove notes using trash icon if needed
- Notes can include follow-up actions, observations, etc.

- Review all entered information
- Ensure issue title and description are complete
- Click green "Create Incident" button at bottom right
- System validates required fields
- Panel closes automatically
- Success notification displays for 5 seconds
- Incident is immediately routed to administrators
- Return to timesheet view

Incident Report Validation
- Issue Title: Cannot be empty
- Description: Cannot be empty
- Client: Must be associated with timesheet
If any required field is missing, you'll see an error message and cannot submit.
After Incident Submission
- Incident is logged with timestamp and your employee ID
- Administrators are notified
- Assigned employee receives notification (if assigned)
- Incident tracking begins
- You can view incident status in the Incidents module
- Follow-up actions will be tracked separately
Admin Timesheet Report View
Administrator interface for timesheet management.
Accessing Admin Report
- Login with administrator credentials
- Navigate to Timesheets section
- Select "Timesheet Report" view
- System displays all organization timesheets
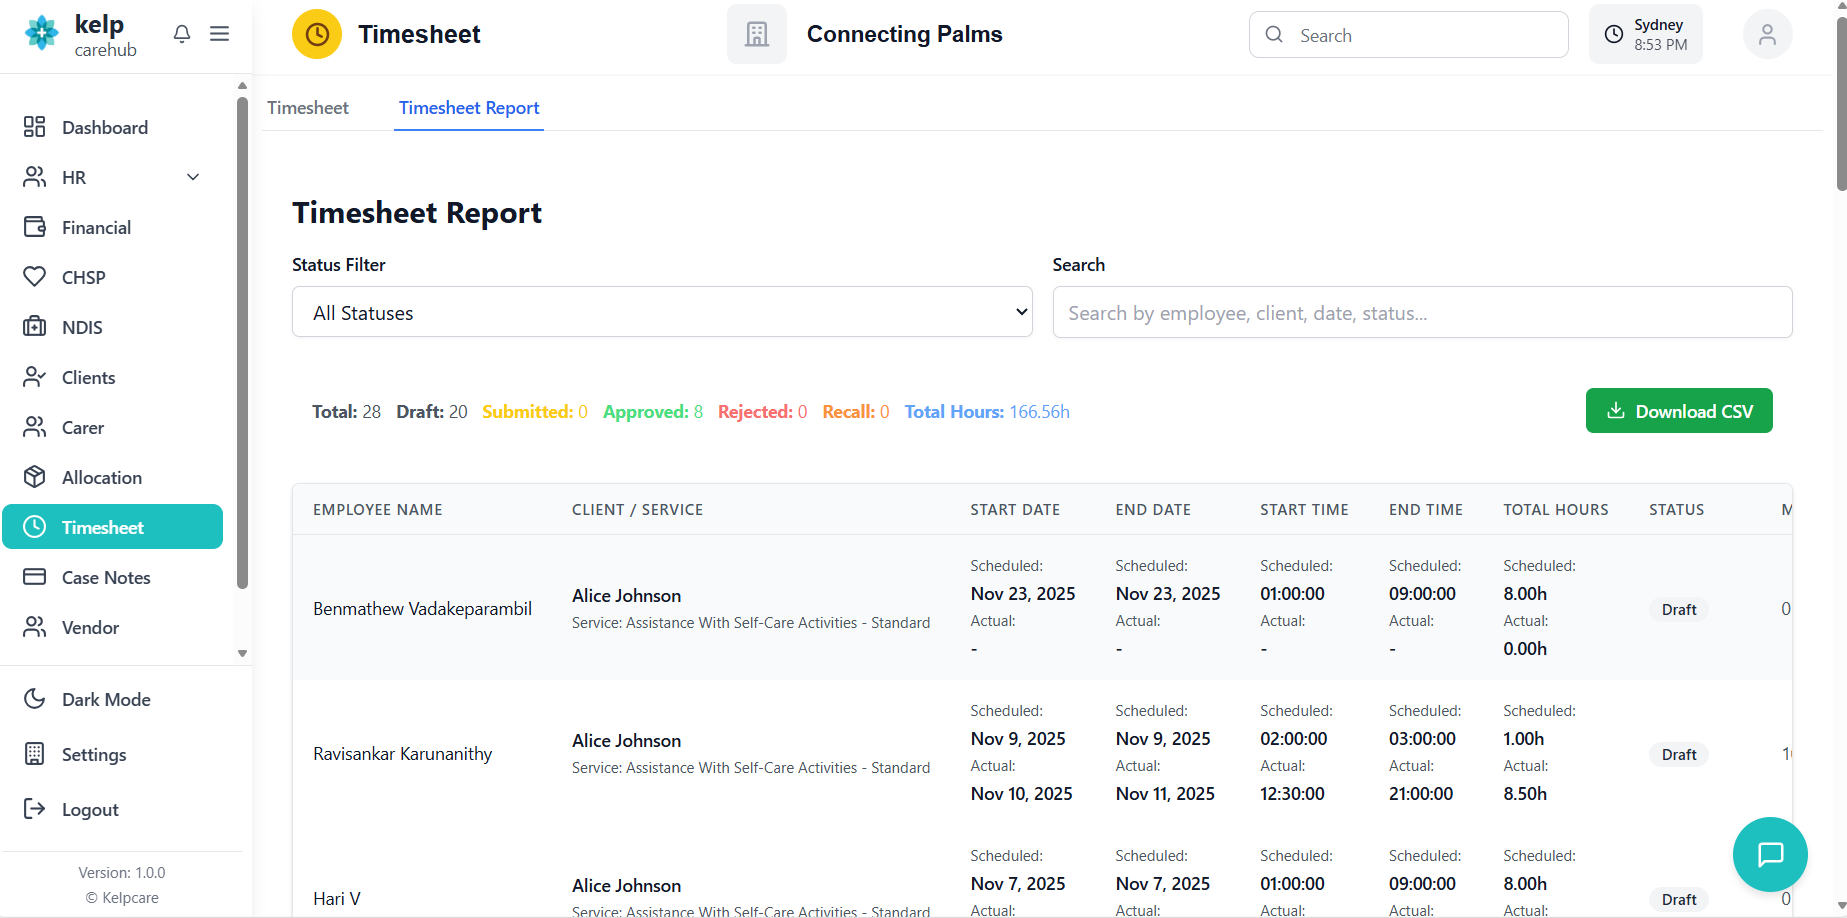
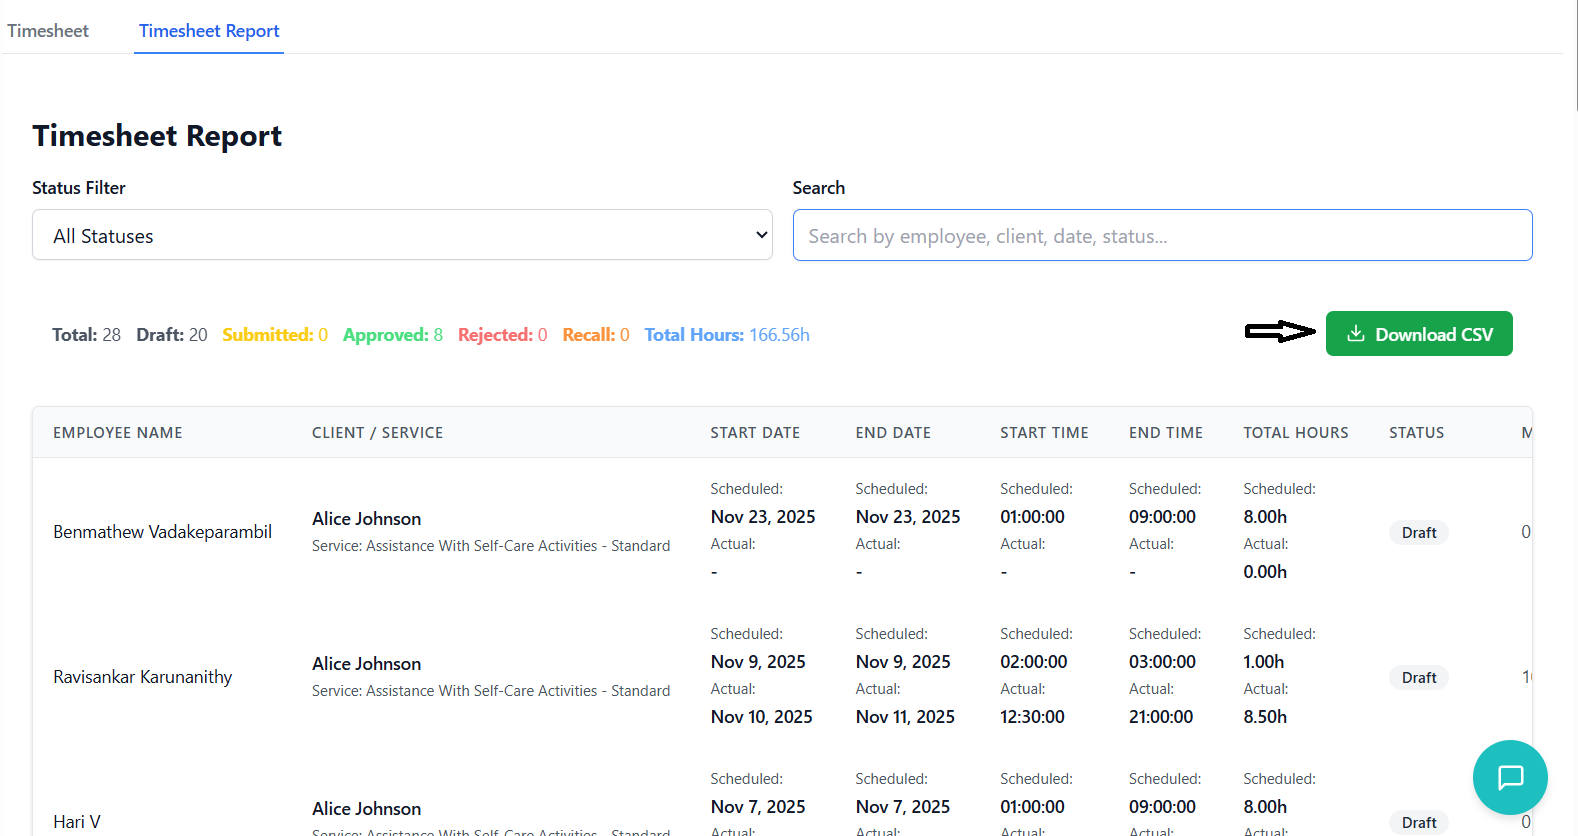
Report Interface Components
- Title: "Timesheet Report"
- Timezone indicator (if not UTC)
- Shows current timezone for time conversion
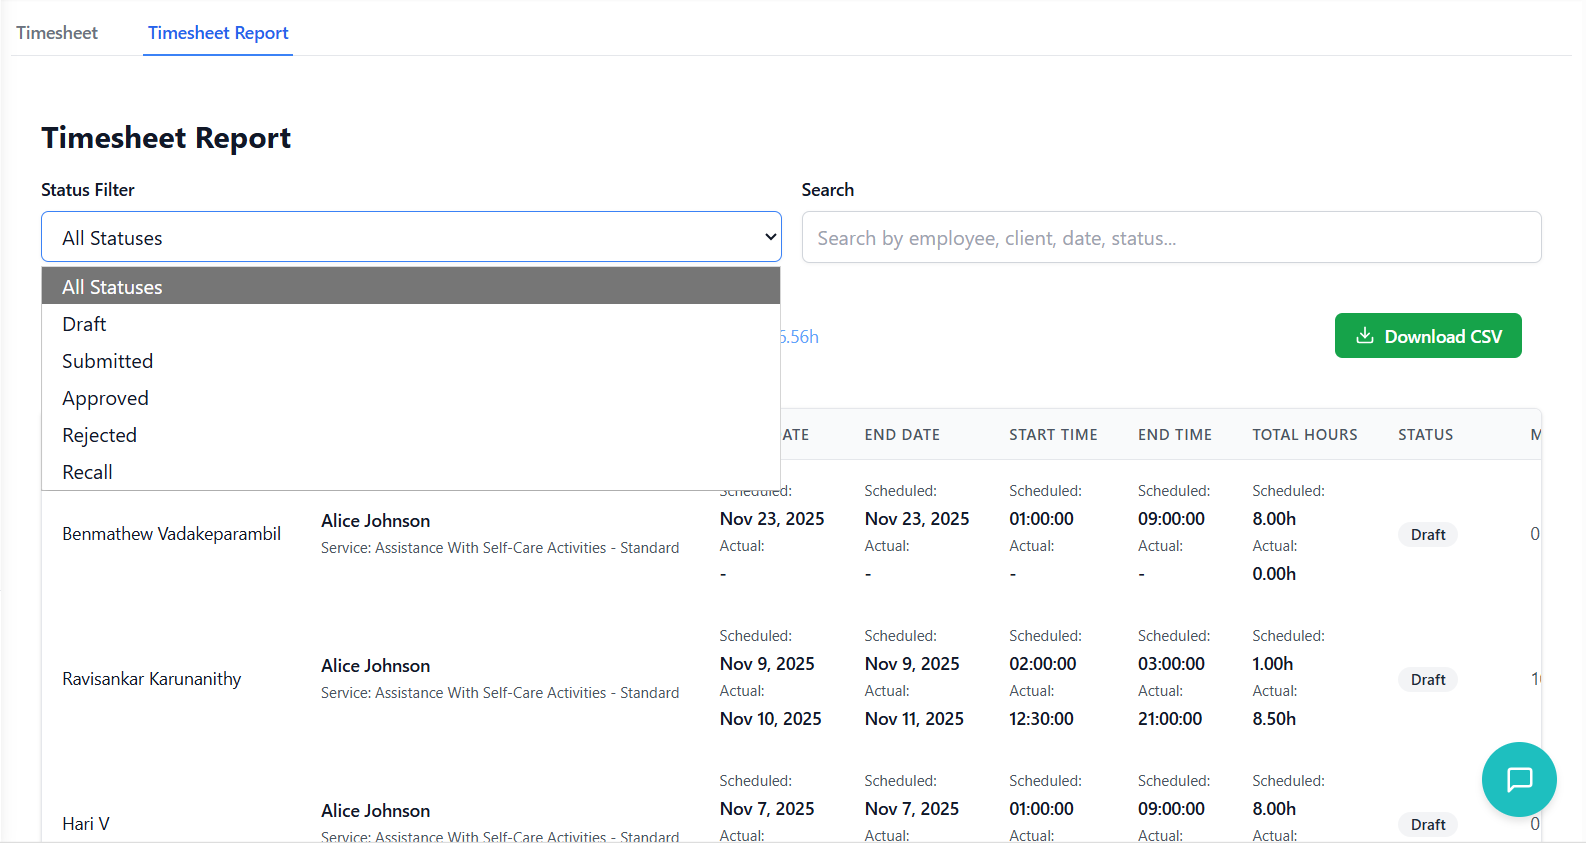
- Filter options:
- - All Statuses (default)
- - Draft
- - Submitted
- - Approved
- - Rejected
- - Recall
- Changes table content immediately
- Search across all timesheet data
- Searches: Employee names, client names, dates, times
- Also searches: Status, mileage, expense, sleepover, notes
- Real-time filtering as you type
- Placeholder: "Search by employee, client, date, status..."
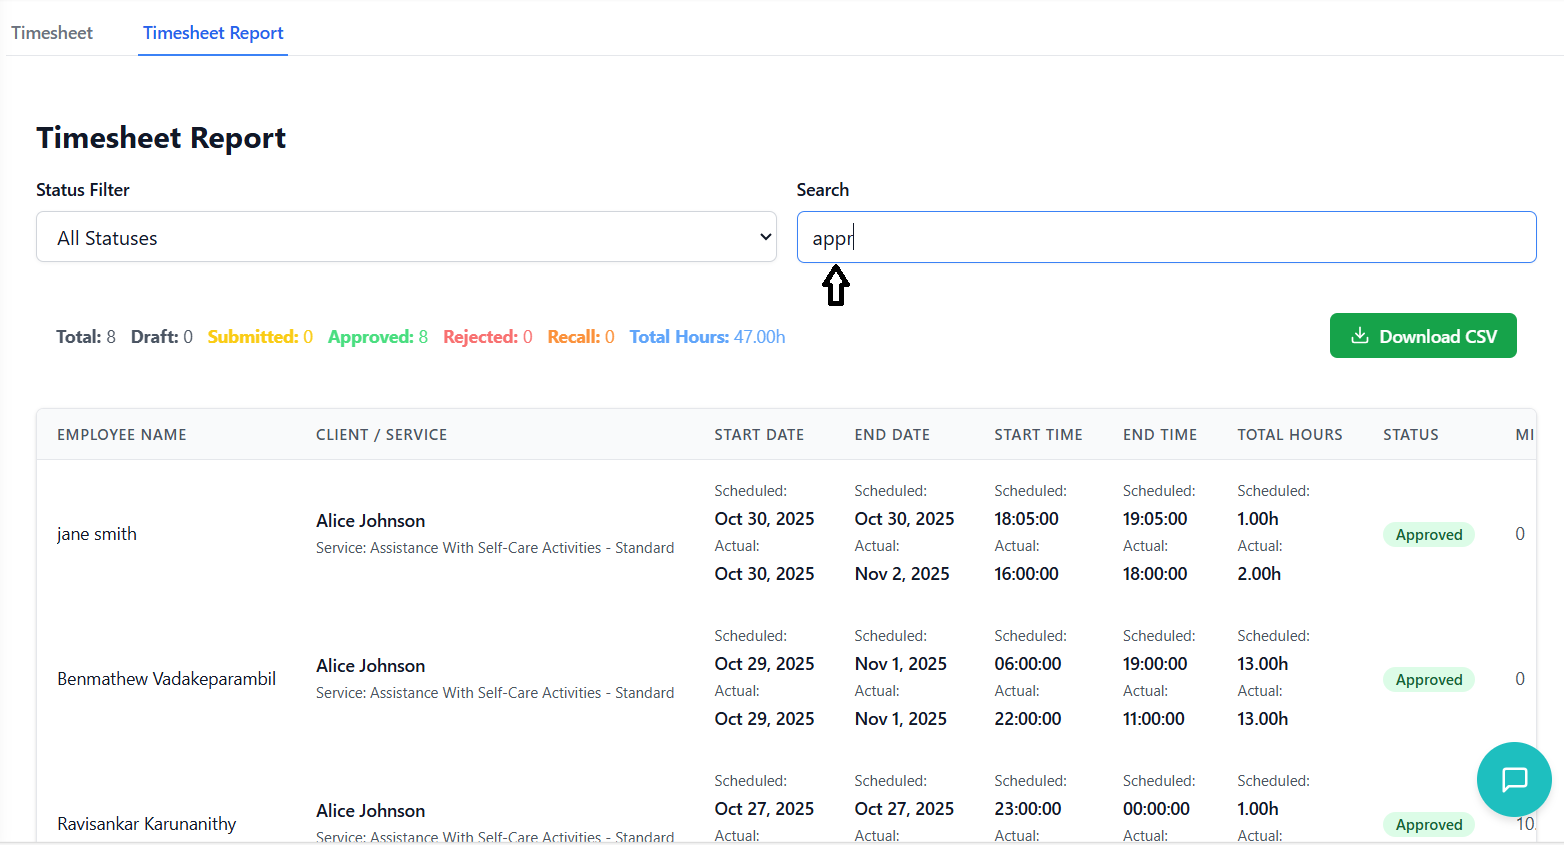
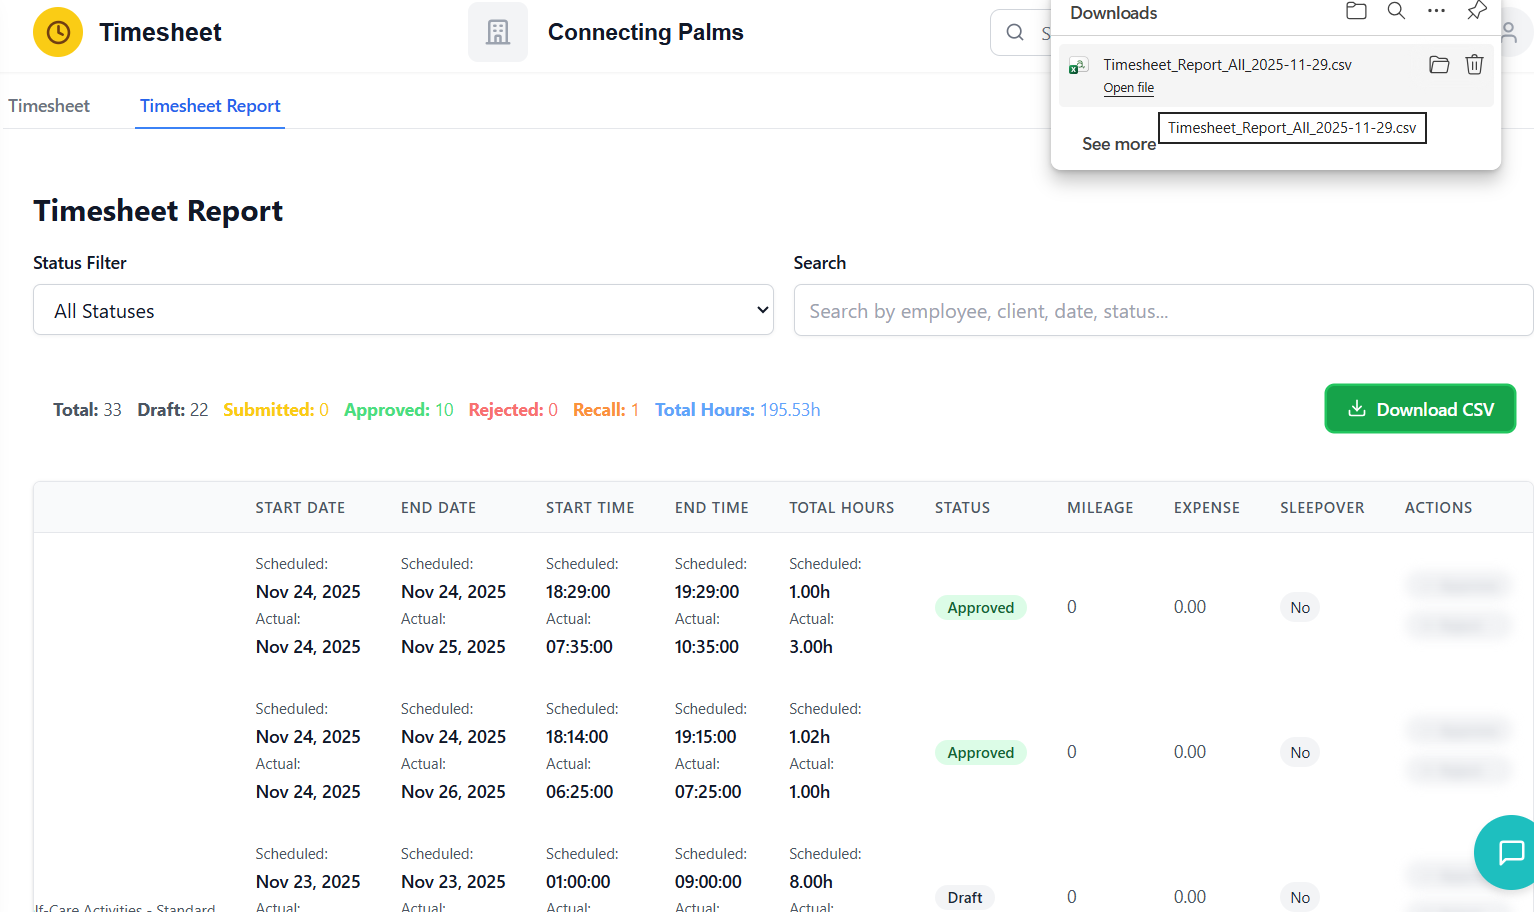
Summary Statistics Bar
- Total: Total number of timesheets (all filtered results)
- Draft: Count of draft entries (gray text)
- Submitted: Count awaiting approval (yellow text)
- Approved: Count of approved entries (green text)
- Rejected: Count of rejected entries (red text)
- Recall: Count of recalled entries (orange text)
- Total Hours: Sum of all actual hours (blue text)
- Located on right side of summary bar
- Green button with download icon
- Downloads filtered results as CSV
- Disabled if no data to export
- Filename format: "Timesheet_Report_[Status]_[Date].csv"
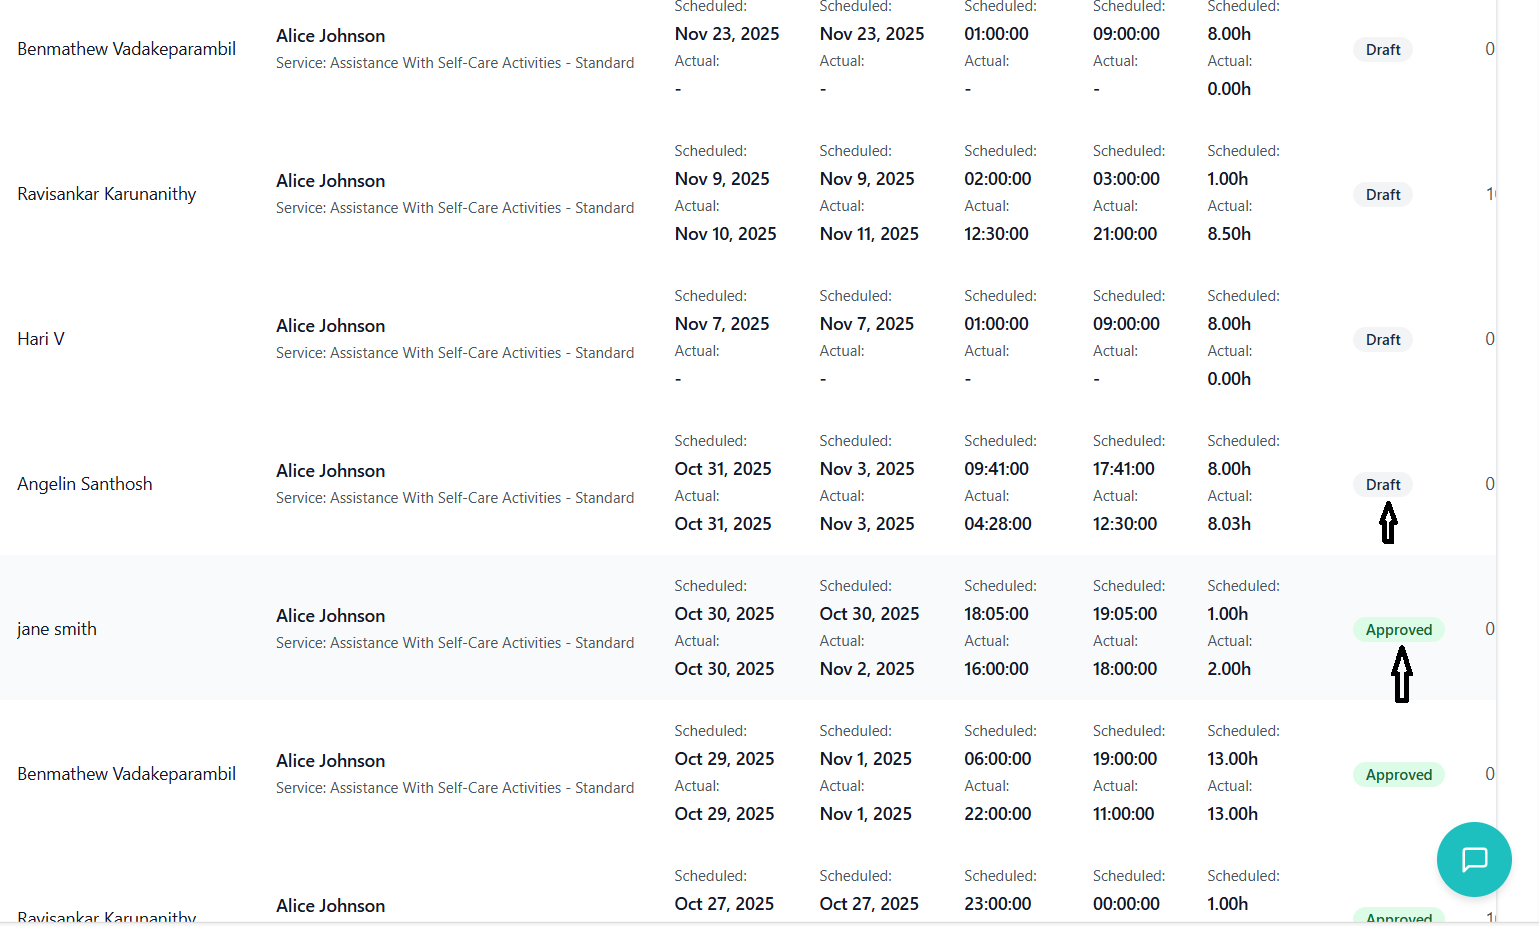
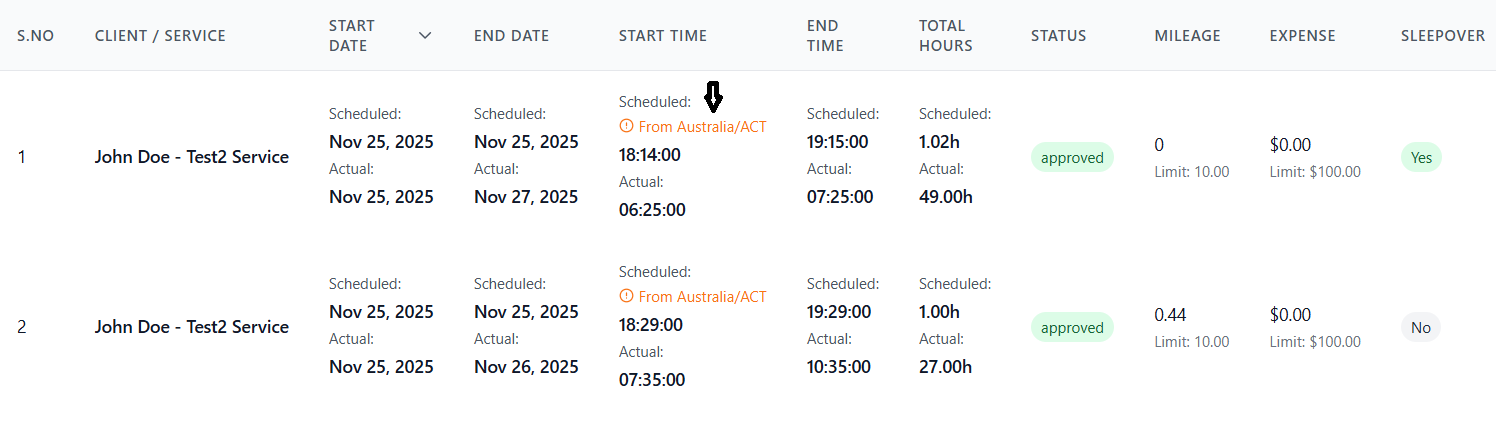
Admin Report Table
| Column | Description |
|---|---|
| Employee Name | Name of the carer who worked the shift |
| Client / Service | Client name and service/rate card information |
| Start Date | Scheduled and Actual start dates |
| End Date | Scheduled and Actual end dates |
| Start Time | Scheduled and Actual start times with timezone notes |
| End Time | Scheduled and Actual end times |
| Total Hours | Calculated scheduled and actual hours |
| Status | Color-coded status badge |
| Mileage | Kilometers claimed |
| Expense | Dollar amount claimed |
| Sleepover | Yes/No badge |
| Actions | Approve and Reject buttons |
CSV Export Details
- All visible columns from the table
- Plus additional hidden fields:
- - Timesheet ID
- - Employee ID
- - Client ID
- - Work Allocation ID
- - Rate Card Group ID
- - Time Slot ID
- - Notes
- - Rejection Reason
- - Approved By Name
- Click "Download CSV" button
- Browser downloads file automatically
- File opens in Excel by default
- All data is properly formatted with commas as separators
- Special characters are escaped
Approving/Rejecting Timesheets
Process for reviewing and approving timesheets.
Review Process
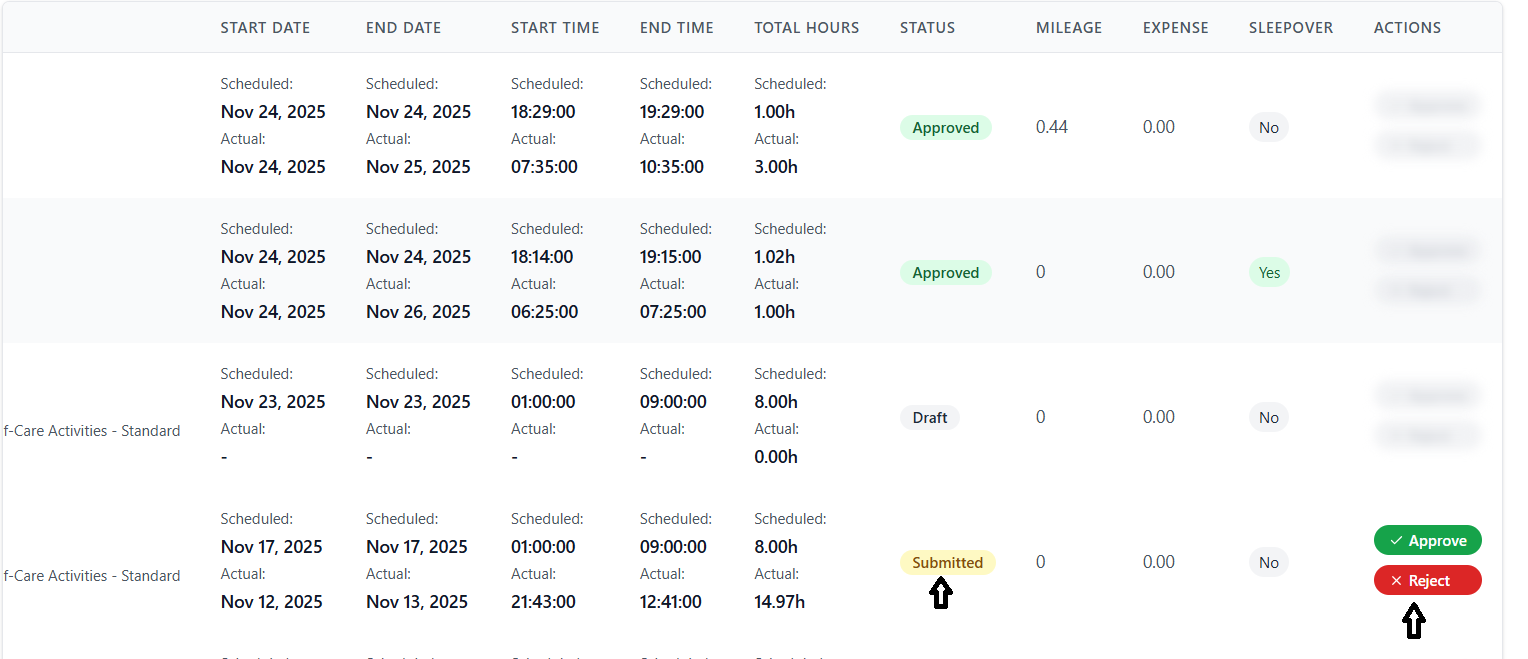
- In admin report view, select "Submitted" from status filter
- Table shows only timesheets awaiting approval
- Yellow "Submitted" badges indicate pending items
- Check employee name and client
- Verify actual times match reasonable expectations
- Compare scheduled vs actual hours
- Review mileage and expense amounts
- Check sleepover status if applicable
- Verify dates are correct
- ✓ Are actual times within reasonable range of scheduled times?
- ✓ Do dates make sense?
- ✓ Are expenses justified and within limits?
- ✓ Is mileage reasonable for the client location?
- ✓ Are there any anomalies or red flags?
Approving Timesheets
- Find green "Approve" button with checkmark icon
- Button is only enabled for "Submitted" status entries
- Disabled (grayed and blurred) for other statuses
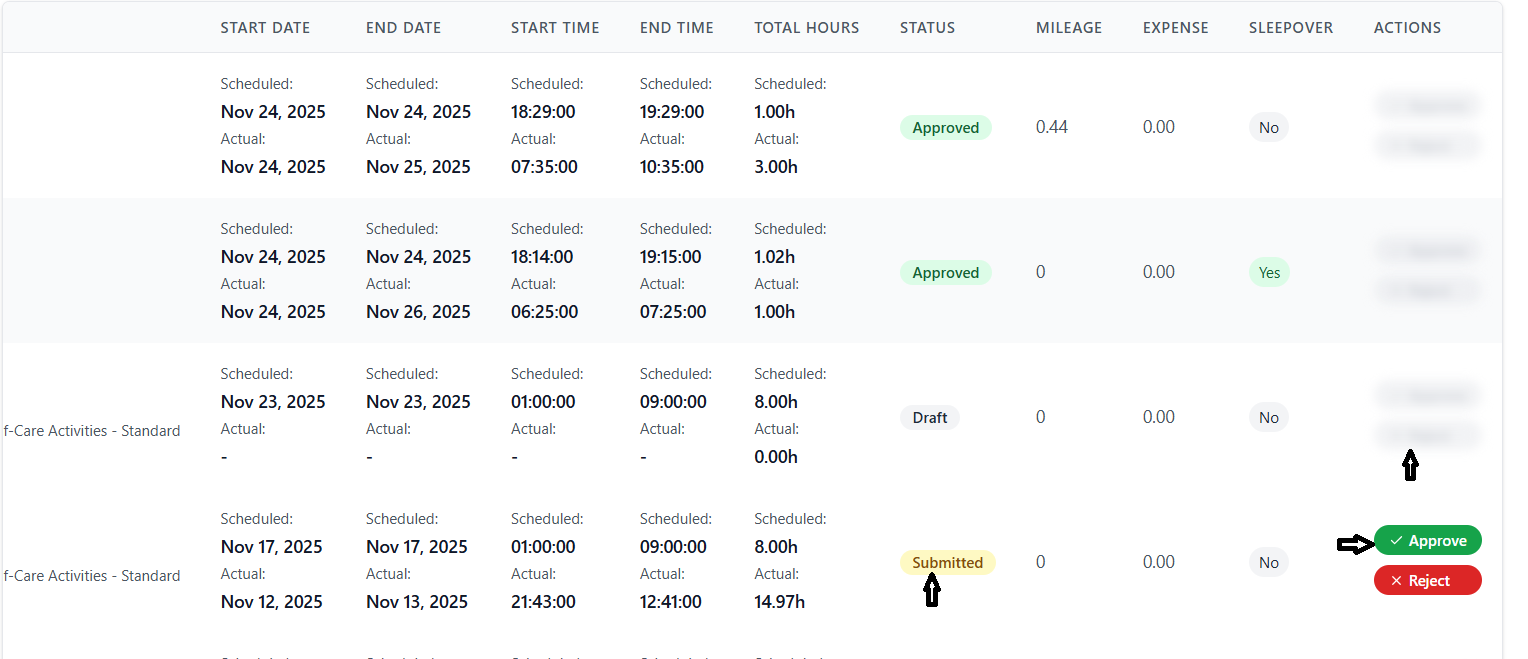
- Click the green "Approve" button
- System processes approval immediately
- Loading spinner appears briefly
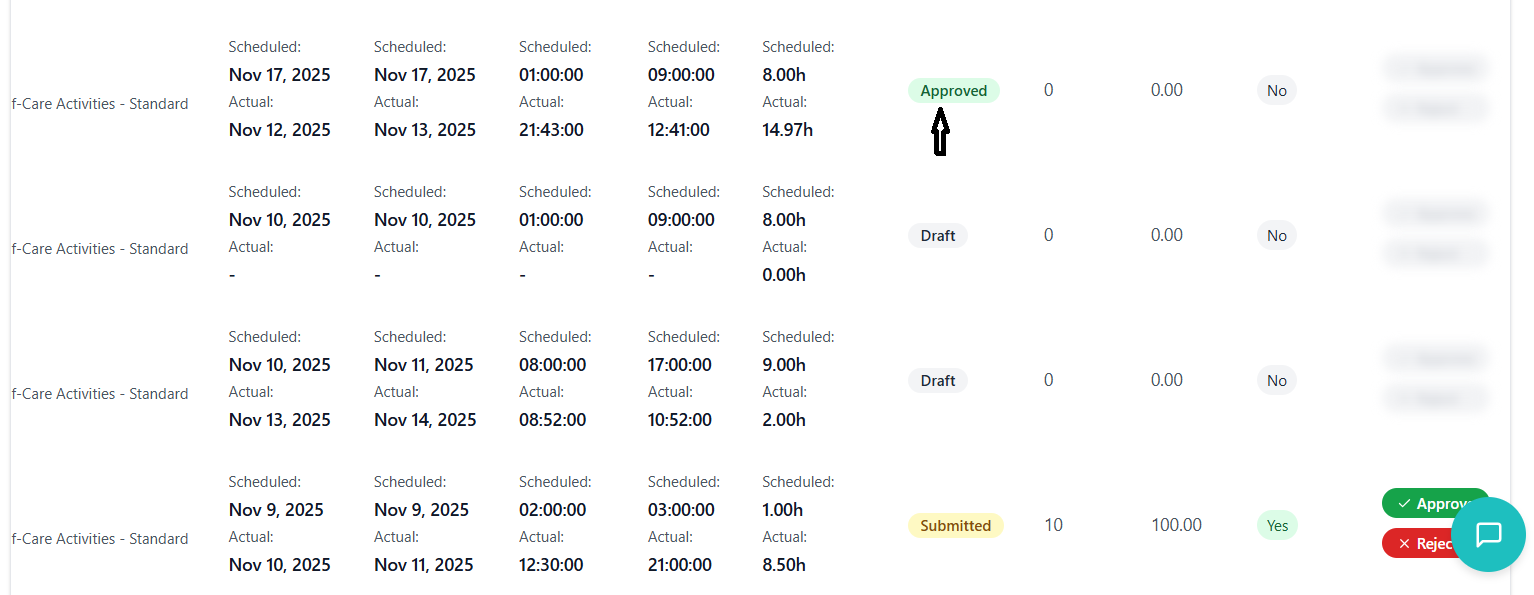
- Status changes to "Approved"
- Status badge changes to green "Approved"
- Both Approve and Reject buttons become disabled
- Approval timestamp is recorded
- Your name is logged as approver
- Employee receives notification (if configured)

Rejecting Timesheets
- Times don't match scheduled allocation
- Suspicious or unrealistic entries
- Missing or incomplete information
- Expenses exceed limits without justification
- Dates are incorrect
- Duplicate entries detected
- Find red "Reject" button with X icon
- Only enabled for "Submitted" timesheets
- Click to reject the entry
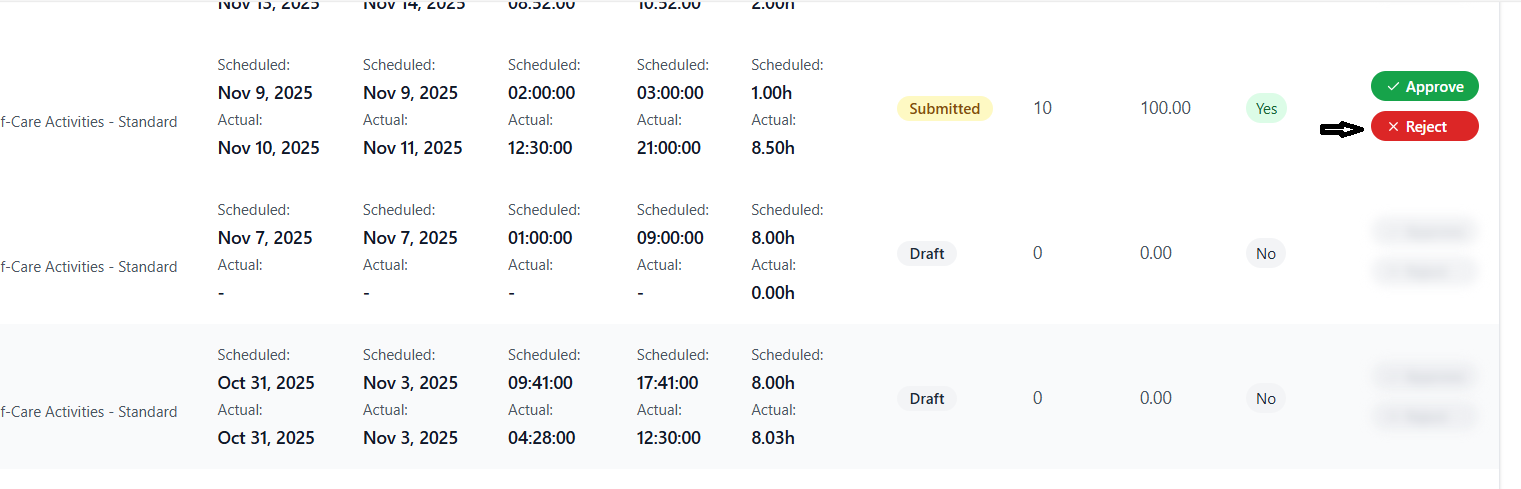
- System immediately processes rejection
- Status changes to "Rejected"
- Status badge turns red
- Employee receives rejection notification
- Both action buttons become disabled
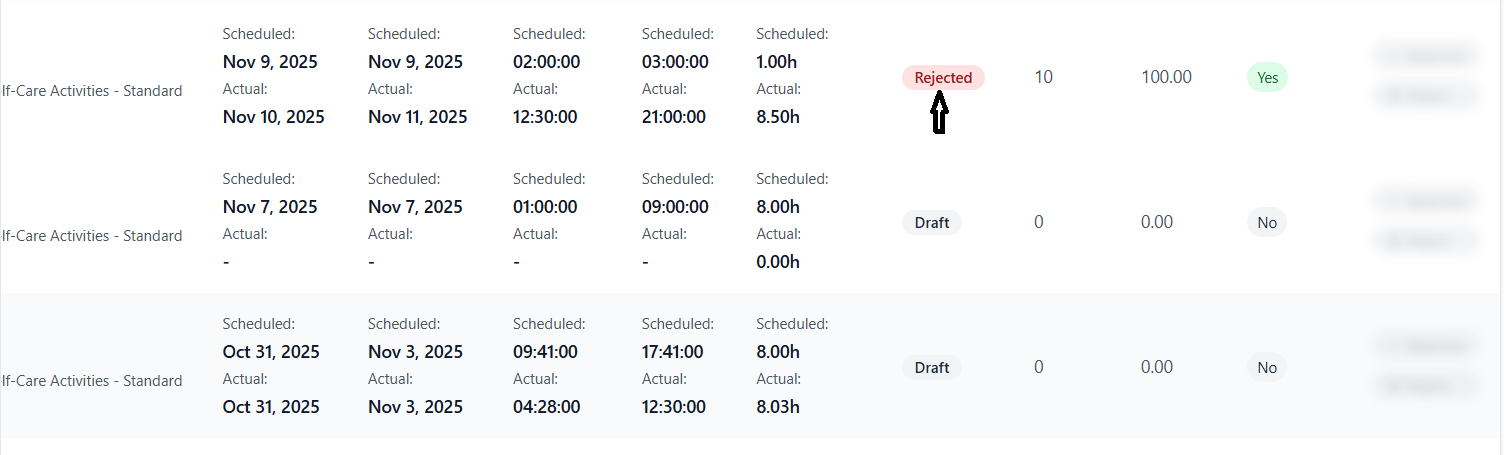
Action Button States
| Status | Approve Button | Reject Button |
|---|---|---|
| Draft | Disabled (blurred) | Disabled (blurred) |
| Submitted | Enabled (green) | Enabled (red) |
| Approved | Disabled (blurred) | Disabled (blurred) |
| Rejected | Disabled (blurred) | Disabled (blurred) |
| Recall | Disabled (blurred) | Disabled (blurred) |
Timezone Management
Handling timezone differences in timesheet entries.
Understanding Timezone Functionality
- Carers may work across different timezones
- Accurate time recording for payroll
- Compliance with work hour regulations
- Correct calculation of overnight shifts
How Timezone Conversion Works
- Each timesheet stores its original timezone
- Timezone is set when work allocation is created
- Typically matches client location or carer location
- System detects your browser timezone
- Defaults to Australia timezone if detection fails
- You can change display timezone in settings
- Timezone preference is saved locally
- All times are automatically converted for display
- Dates adjust if time crosses midnight boundary
- Calculations use converted times
- Original times preserved in database
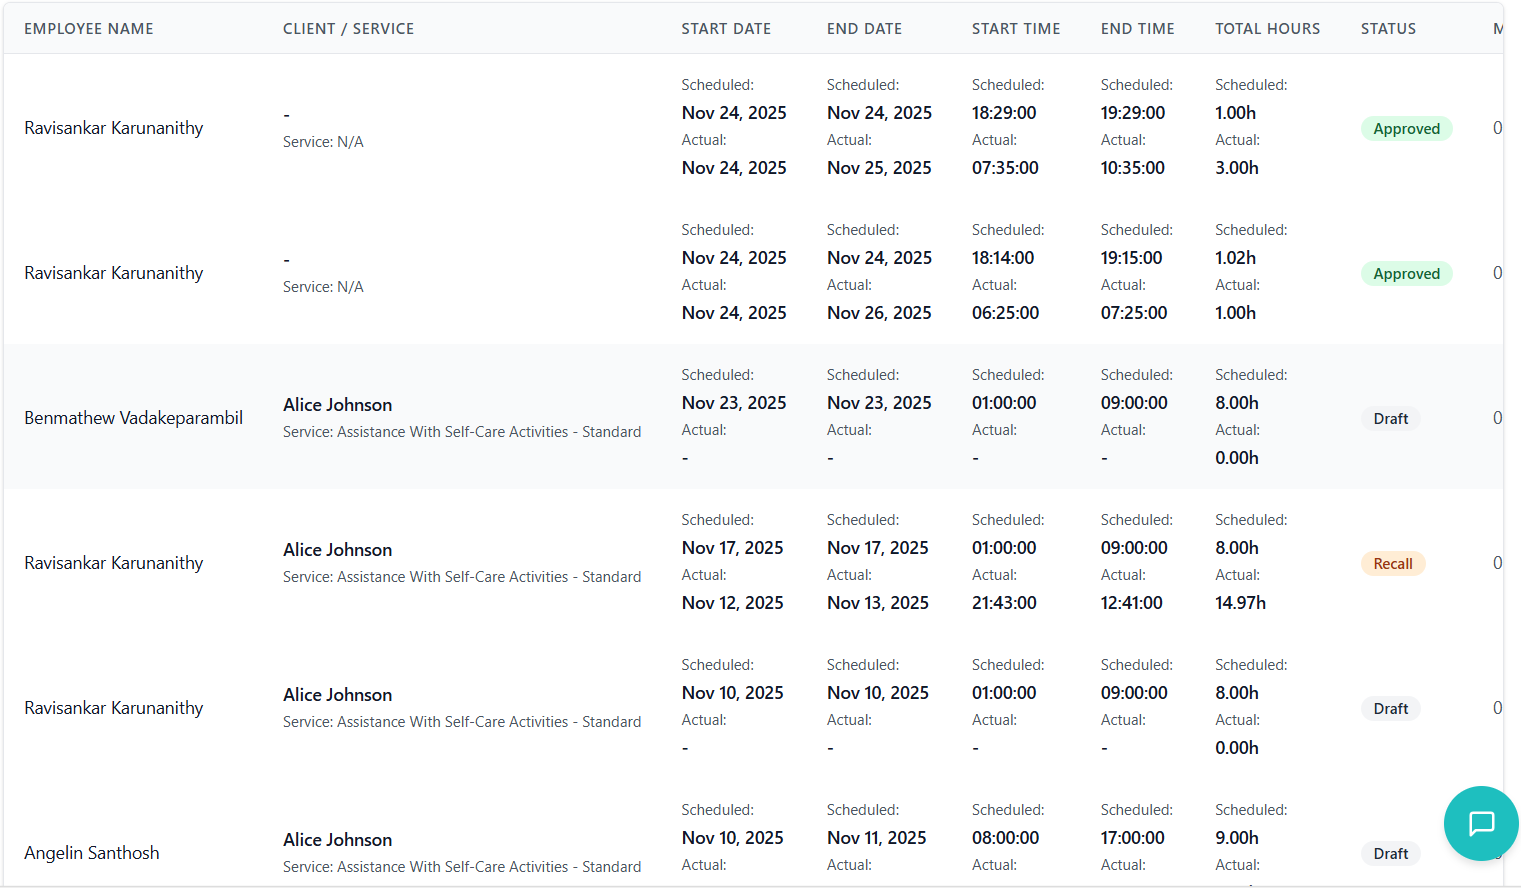
Timezone Indicators
- Appears when timesheet timezone differs from display timezone
- Small orange alert icon with text "From [Original Timezone]"
- Shown in Start Time column
- Helps identify converted entries
- Admin report shows current display timezone
- Format: "Timesheet Report (Timezone: Australia/Sydney)"
- Reminds administrators of active timezone
Timezone Best Practices
- Keep your timezone setting consistent with your work location
- Pay attention to timezone indicators when reviewing
- Verify calculated hours when timezones differ
- Contact support if hours seem incorrect after conversion
- Be aware of daylight saving time transitions
Timezone Edge Cases
- Overnight Shifts: May span two dates after conversion
- DST Transitions: Hours may be adjusted during DST changes
- International Shifts: Large timezone differences may shift dates significantly
Troubleshooting Guide
Solutions to common issues and problems you may encounter.
Common Issues
Possible Causes:
- Timesheet status is "Submitted", "Approved", or "Rejected"
- Client limits are not configured
- Another user is editing the timesheet
Solutions:
- Check status - if submitted, use Recall first
- Click "Add Limits" button to configure client limits
- Wait and try again if locked by another user
Possible Causes:
- Actual times not entered
- Actual dates missing
- No actual hours recorded
- Validation errors present
Solutions:
- Fill in all actual start/end times
- Complete actual start/end dates
- Ensure hours are greater than 0
- Read error message and correct the specified issue
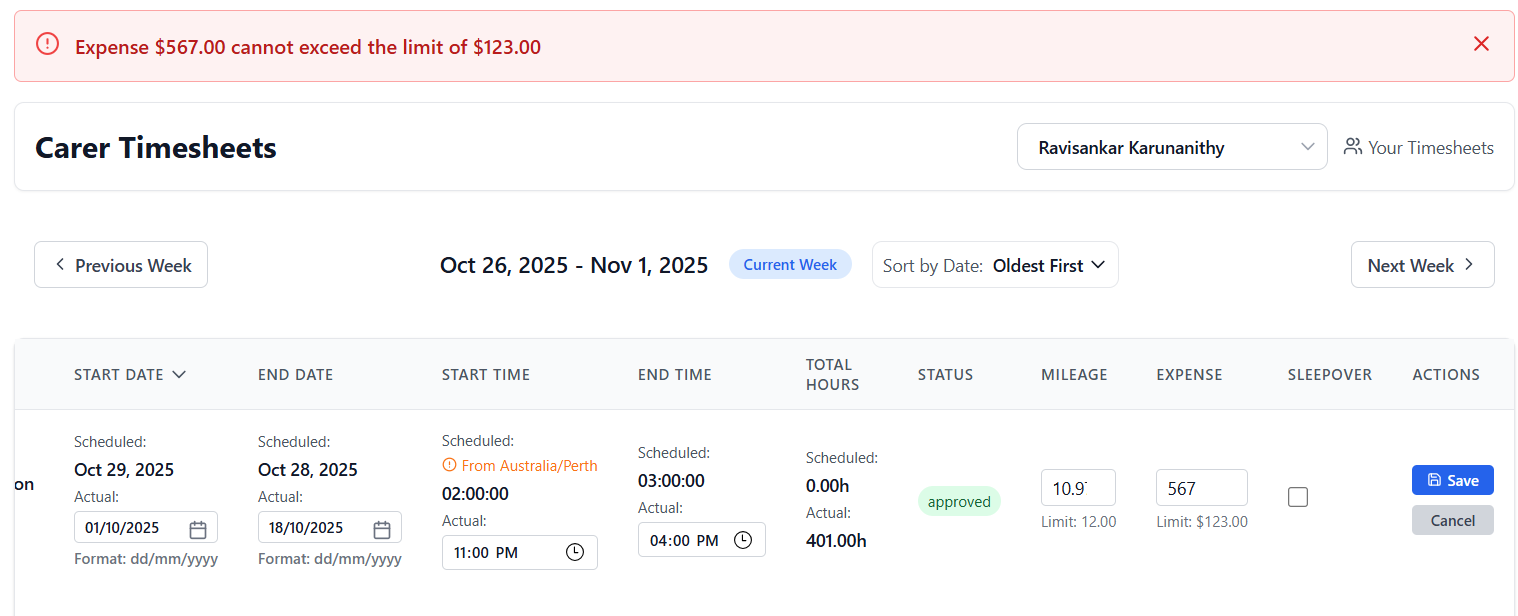
Error Message:
"Mileage X cannot exceed the limit of Y" or "Expense $X cannot exceed the limit of $Y"
Solutions:
- Reduce mileage/expense to within limit
- Contact supervisor to increase client limit if justified
- Verify you entered correct amount (check for typos)
- Split claim across multiple periods if applicable
Possible Causes:
- Wrong employee selected in dropdown
- Viewing another employee's timesheets (admin)
Solutions:
- Check employee dropdown selection
- If dropdown is disabled, you're seeing your own timesheets
- Admins can select different employees from dropdown
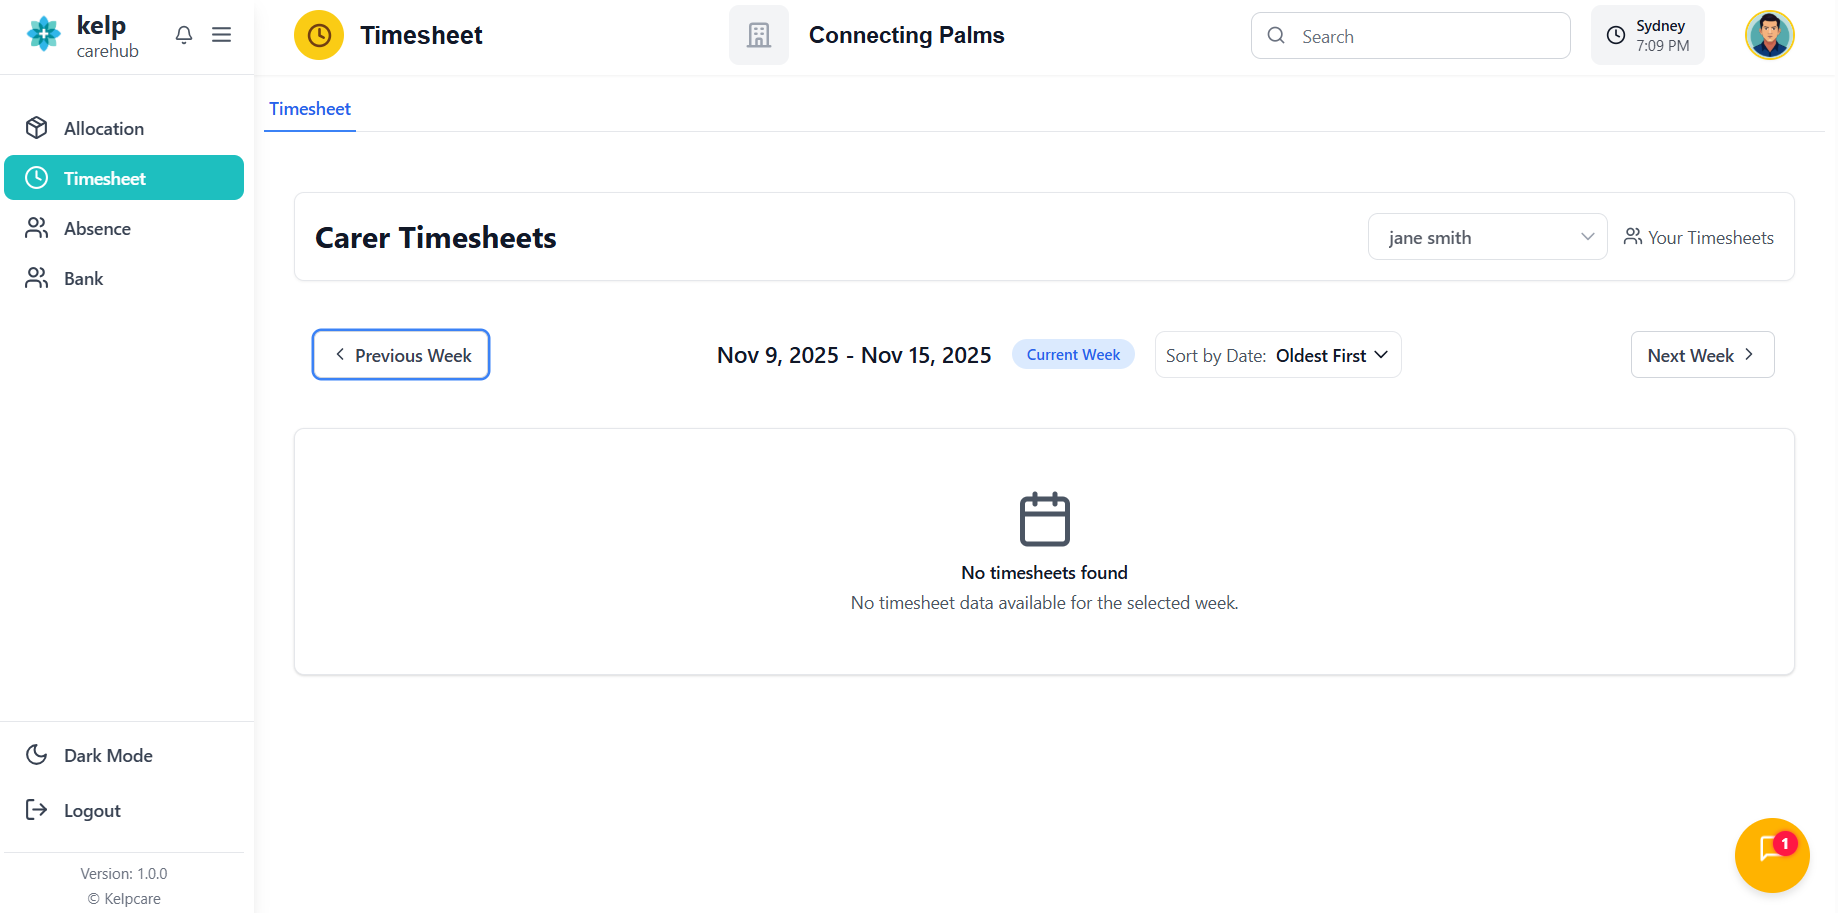
Possible Causes:
- Network connection issue
- Server error
- No timesheets for selected week
Solutions:
- Check internet connection
- Refresh the page (F5)
- Try different week using navigation buttons
- Clear browser cache and reload
- Contact IT support if issue persists
Error Message Reference
| Error Message | Meaning | Solution |
|---|---|---|
| "No client limits set" | Client expense/mileage limits not configured | Click "Add Limits" button |
| "Cannot submit: No actual hours" | Actual times not entered | Fill in actual start and end times |
| "Mileage exceeds limit" | Entered mileage > client limit | Reduce mileage or update limit |
| "Expense exceeds limit" | Entered expense > client limit | Reduce expense or update limit |
| "End date must be after start" | Invalid date range | Correct the dates |
| "Please enter valid date" | Date format incorrect | Use dd/mm/yyyy format |
| "Cannot edit submitted" | Timesheet under review | Recall before editing |
Contact Support
- Persistent errors after trying solutions
- Data appears incorrect or corrupted
- Cannot access timesheets at all
- Permission issues
- System performance problems
- Need to reverse approved/rejected timesheet
Information to Provide:
- Your employee ID and name
- Screenshot of the error
- Steps you took before error occurred
- Browser and operating system
- Date and time of issue
- Timesheet ID if applicable