Teams Management System
Complete guide for teams and department management. Select a topic below to get started.
System Overview
Learn about the system features, user roles, and permissions.
Accessing the System
How to login and navigate to the teams management module.
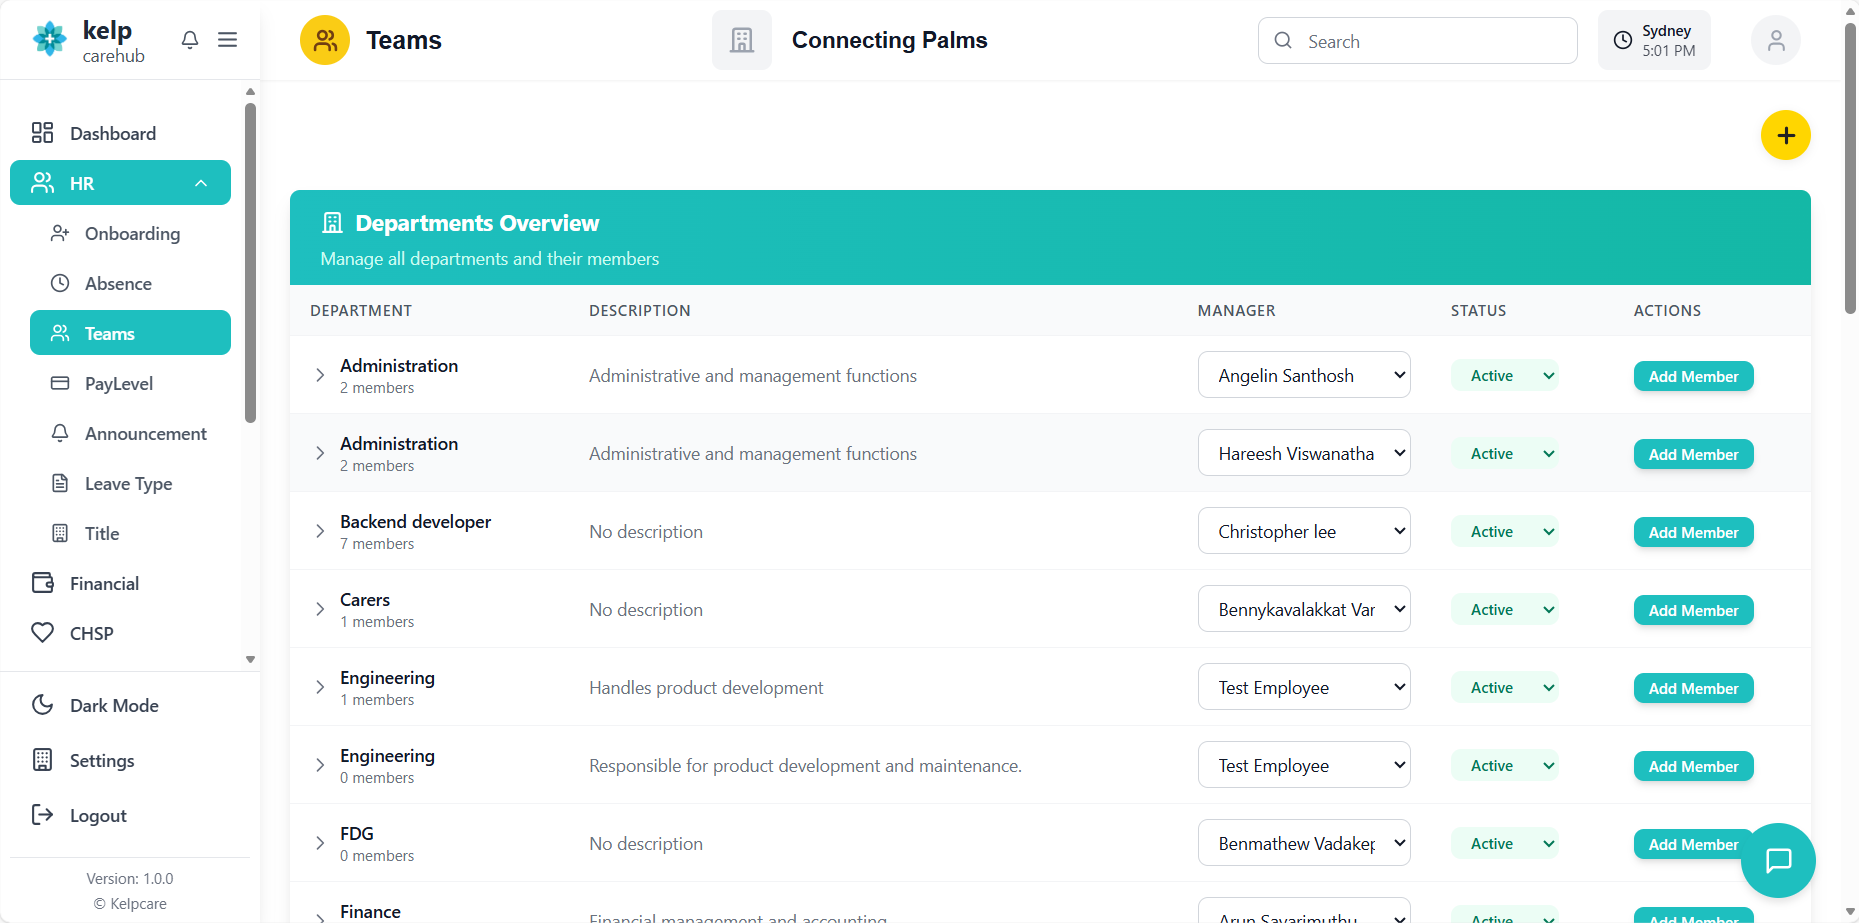
Departments View
Understanding the departments interface and functionality.
Creating Departments
Process for creating new departments in the system.
Expanding Departments
How to expand department rows to view members.
Managing Members
Adding and removing members from departments.
Assigning Managers
How to assign and change department managers.
Status Management
Managing department status (active, inactive).
Bulk Operations
Bulk adding and updating department members.
Permissions & Roles
Understanding user permissions and role-based access.
Troubleshooting
Solutions to common issues and problems.
System Overview
The Teams Management System enables organizations to manage departments, assign managers, and organize team members in a centralized platform.
Key Features
🏢 Department Management
Create, edit, and manage organizational departments with custom names and descriptions.
👑 Manager Assignment
Assign managers to departments with role-based permissions and access control.
👥 Member Management
Add and remove team members from departments with bulk operation support.
📊 Expandable Views
Expand department rows to view all members and perform member-level actions.
🔄 Status Control
Activate or deactivate departments with automatic member handling.
🔐 Role-Based Access
Control access based on user roles and permissions for department operations.
📱 Responsive Design
Fully responsive interface with dark mode support for different user preferences.
⚡ Real-time Updates
Real-time updates and loading states for all department operations.
Technical Architecture
- React: Modern React with functional components and hooks
- Redux: State management for departments, employees, and roles
- Tailwind CSS: Utility-first CSS framework for styling
- Lucide React: Icon library for consistent UI elements
- Redux Slices: Separate slices for departments, organization, and roles
- Async Actions: Thunk-based async actions for API calls
- Loading States: Comprehensive loading state management
- Error Handling: Centralized error handling and user feedback
- Component Props: Organization ID and dark mode preference
- API Integration: RESTful API calls for all CRUD operations
- Real-time Updates: Immediate UI updates after successful operations
- Validation: Client-side validation for all user inputs
Department Status Workflow
Accessing the Teams System
How to login and navigate to the teams management module.
- Navigate to the application URL
- Enter your username and password
- Click "Login" to access the system
- System automatically detects your permissions based on your role
- From the main navigation menu, click on "Teams" or "Departments"
- System loads the teams management view based on your permissions
- If you have limited permissions, you may only see specific departments
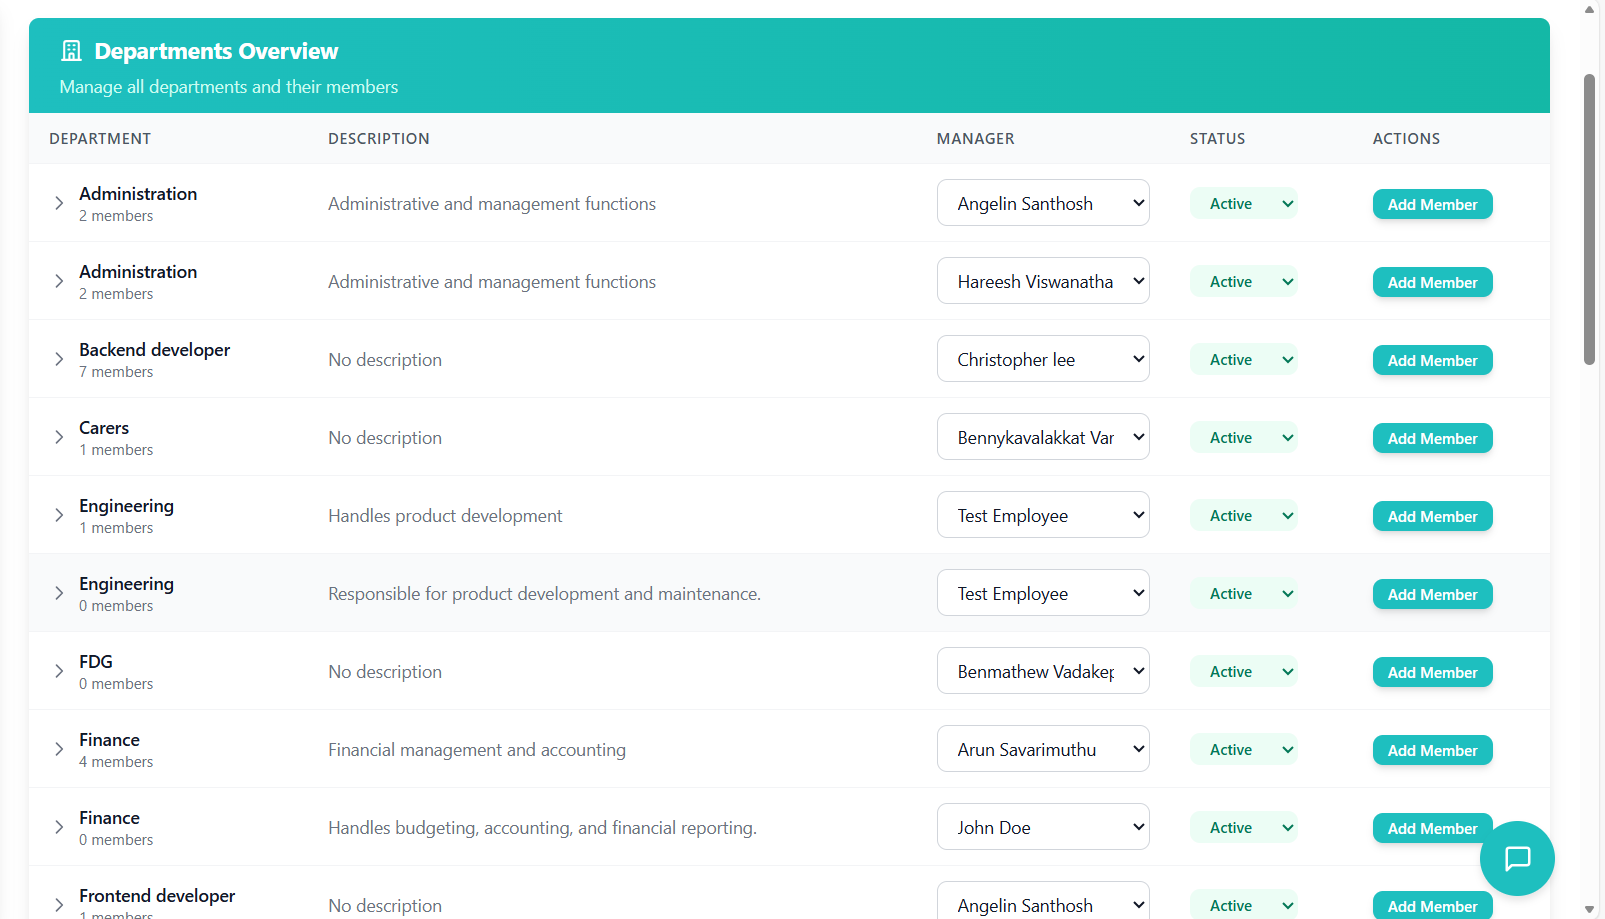
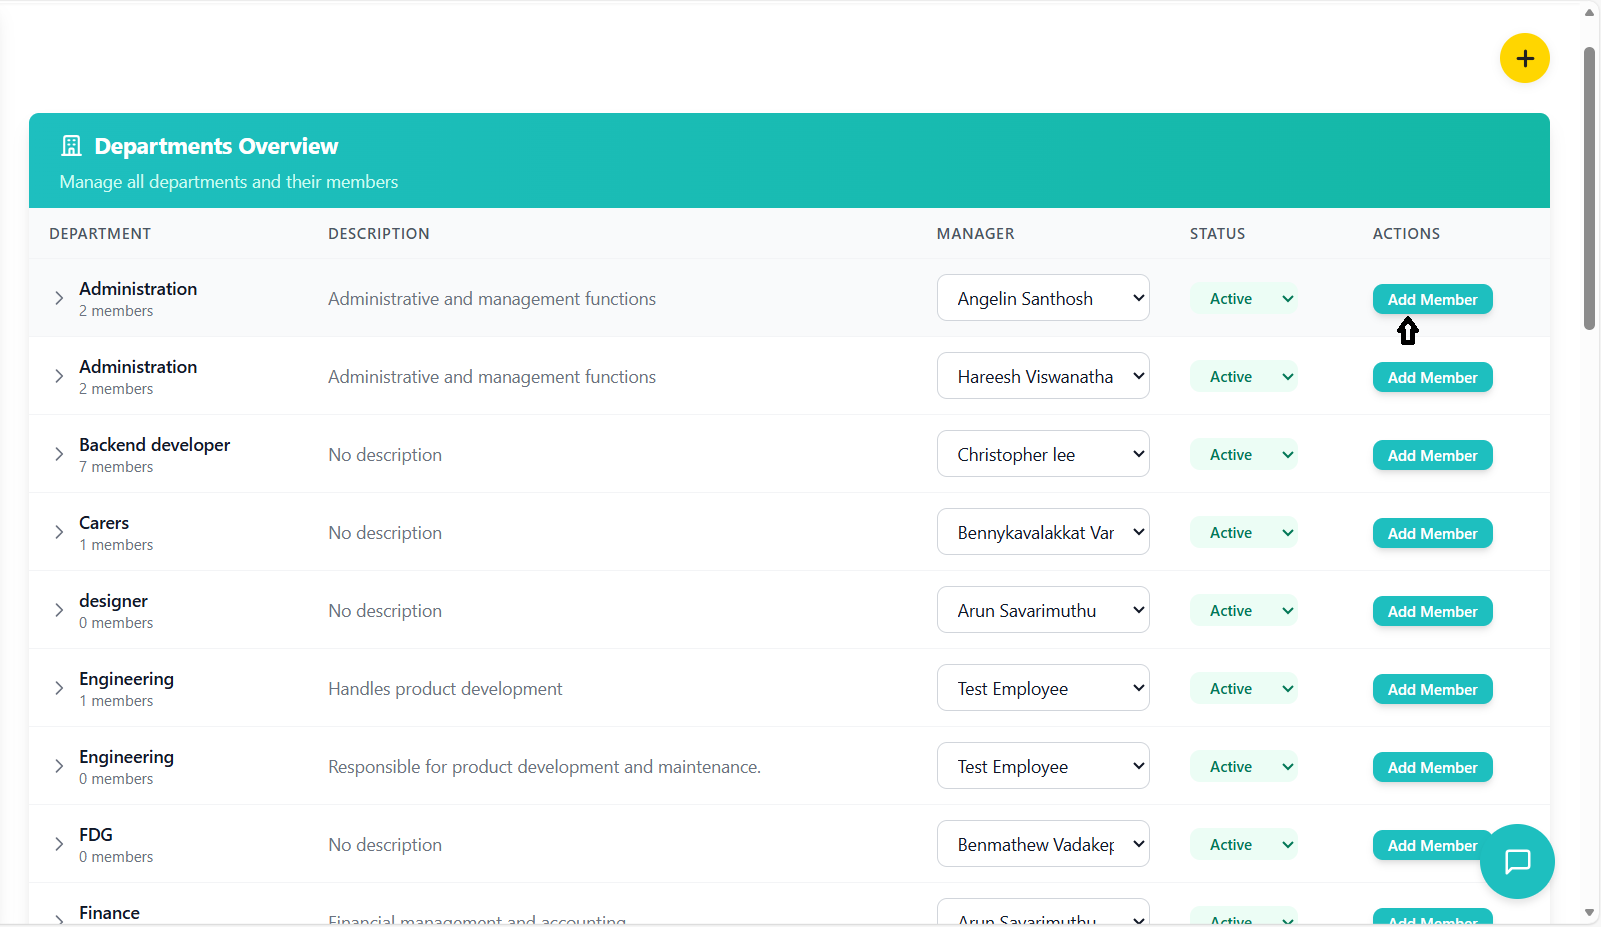
Departments View
Understanding the departments interface and functionality.
Understanding the Departments Interface
- Add Department Button: Yellow circular button with plus icon in top-right corner
- Page Title: "Departments Overview" with description
- Gradient Header: Teal gradient background with white text
| Column | Description |
|---|---|
| Department | Department name with expand/collapse arrow and member count |
| Description | Department description or "No description" if empty |
| Manager | Dropdown to select department manager from available employees |
| Status | Current status with color-coded badge and dropdown |
| Actions | Add Member button (disabled for inactive departments) |
Status Indicators
- Active - Green: Department is currently active and operational
- Inactive - Gray: Department is not currently active
Loading States
- Loading flower animation appears during initial data fetch
- Centered on screen with 80vh height
- Disappears when departments and employees data is loaded
- Spinner appears during department creation
- Loading states during member addition/removal
- Disabled buttons during processing to prevent duplicate actions
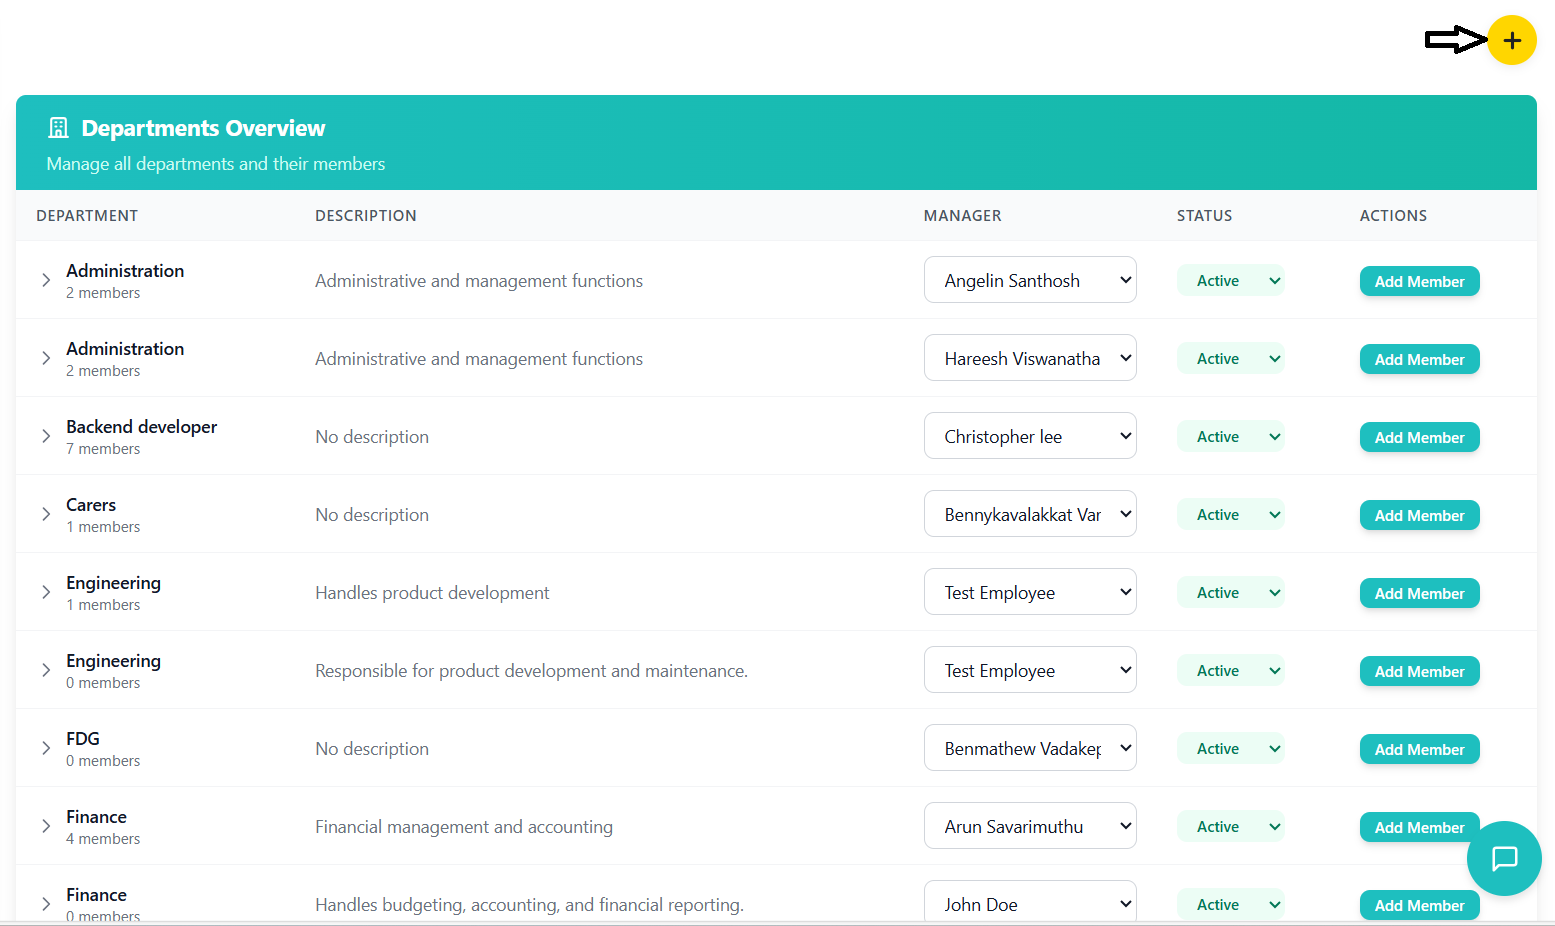
Creating Departments
Process for creating new departments in the system.
Prerequisites for Creating Departments
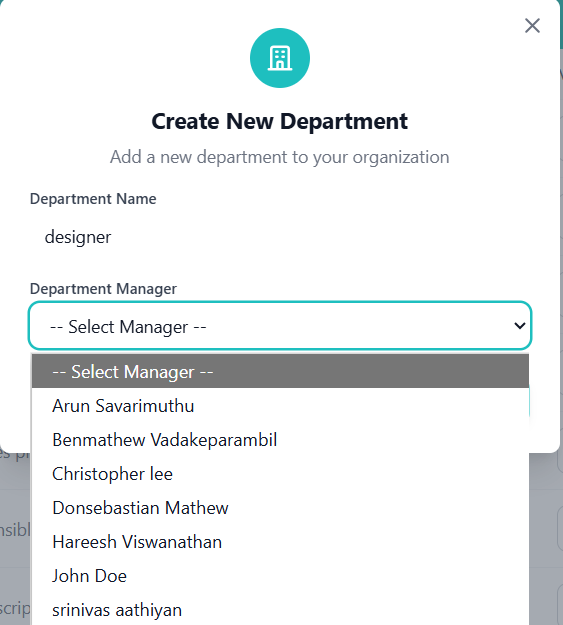
- Click the yellow circular "Add" button with plus icon in the header
- Modal popup appears with department creation form
- Dark overlay background focuses attention on the form
- Field Label: "Department Name"
- Input Type: Text input
- Validation: Required field, duplicate name check
- Placeholder: "Enter department name"
- Field Label: "Department Manager"
- Input Type: Dropdown select
- Options: Filtered list of employees with manager role
- Default: "-- Select Manager --"
- Validation: Required field
Validation and Error Handling
- System checks for existing departments with same name
- Case-insensitive comparison
- Error message: "Department name already exists in this organization."
- Red error box appears above form fields
- Both department name and manager are required
- Create button is disabled until all required fields are filled
- Visual feedback with button state changes
Saving the New Department
- Click the "Create Department" button at the bottom of the form
- System validates all fields
- API call to create department with provided data
- Loading state during creation process
- Form closes automatically on success
- New department appears in the departments list
- Success message appears: "Department created successfully"
- Departments list refreshes to include the new entry
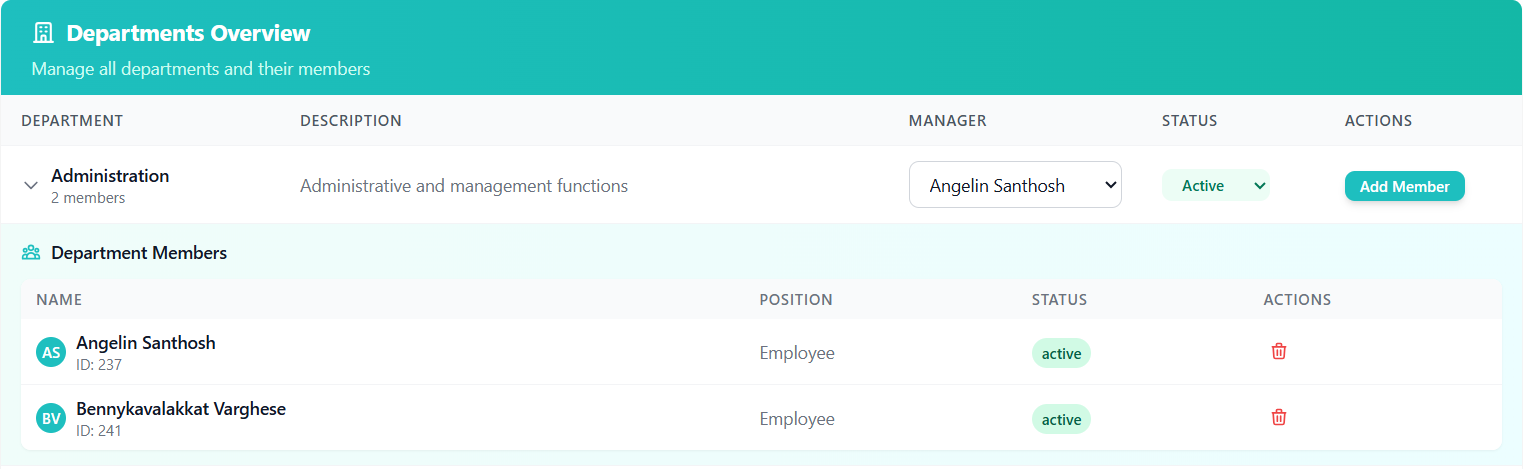
Expanding Departments
How to expand department rows to view members and perform member-level actions.
Accessing Department Details
- Locate the department you want to expand in the list
- Click on the department name or the expand arrow
- The row expands downward to show member details
- Arrow icon rotates 90 degrees to indicate expanded state

- Section Header: "Department Members" with icon
- Gradient Background: Light teal/blue gradient for visual distinction
- Member Table: Nested table showing all department members
- Member Count: Shows total number of members in the department

Member Table in Expanded View
| Column | Description |
|---|---|
| Name | Member name with avatar and employee ID |
| Position | Member's position or "Employee" if not specified |
| Status | Active status badge |
| Actions | Remove member button (trash icon) |
- Avatar: Circular avatar with member initials
- Name: Full name in bold
- ID: Employee ID in smaller text below name
- Position: Job title or default "Employee" text
- Status Badge: Green "Active" badge
Empty State
When a department has no members:
- Centered empty state with user group icon
- Message: "No members in this department yet"
- Clean, minimal design that doesn't take up unnecessary space
Collapsing Departments
- Click on the department name or expand arrow again
- The expanded section collapses back to normal row view
- Arrow icon returns to original position
- No data loss - member information is preserved
Managing Members
Adding and removing members from departments.
Adding Members to Departments
- Locate the department in the departments list
- Click the "Add Member" button in the Actions column
- Button is disabled for inactive departments
- Modal popup appears for member selection
- Header: "Add Members to [Department Name]" with selected count
- Employee Grid: Responsive grid of available employees
- Selection: Checkbox selection for multiple employees
- Pagination: Page navigation for large employee lists
- Actions: Cancel and Add buttons at the bottom
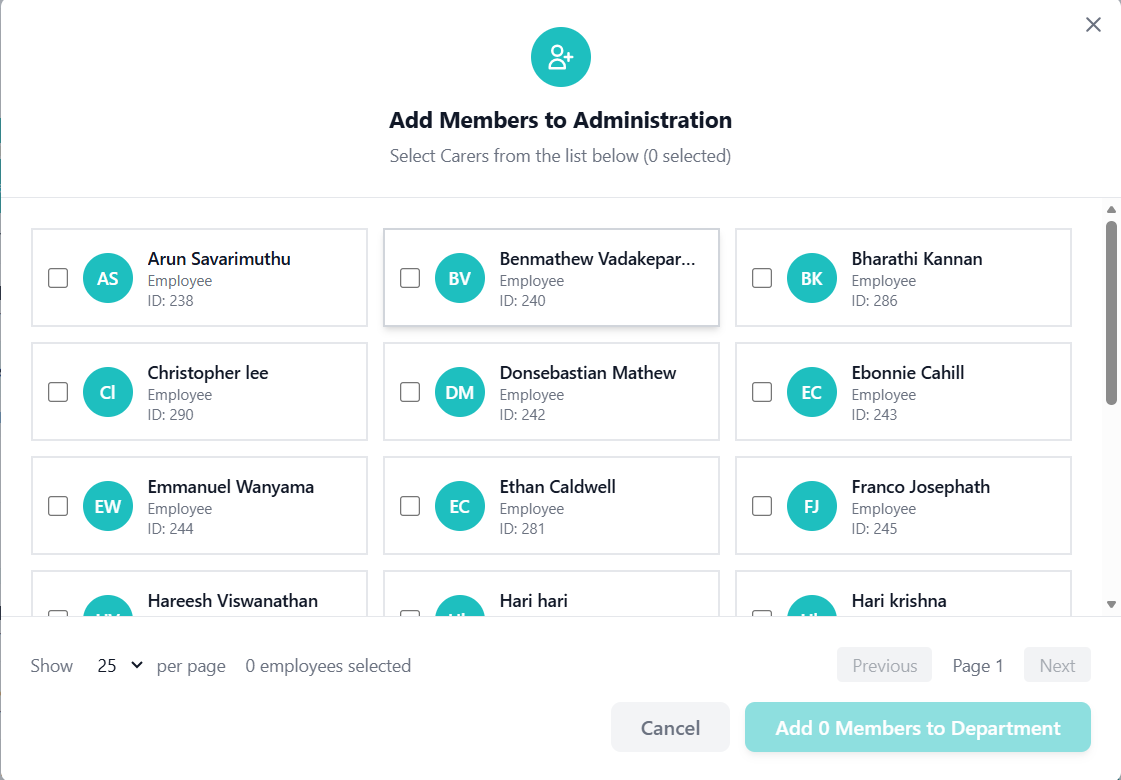
Member Selection Process
- System shows employees not currently in the selected department
- Only active employees are displayed
- Employees are filtered by organization and status
- Grid layout with employee cards
- Checkbox: Selection toggle in top-left
- Avatar: Circular avatar with employee initials
- Name: Full name in bold text
- Position: Job title below name
- ID: Employee ID in small text
- Visual Feedback: Border and background change on selection
- Click anywhere on employee card to select/deselect
- Selected count displayed in header and footer
- Multiple selection supported
- Visual feedback with border color and background
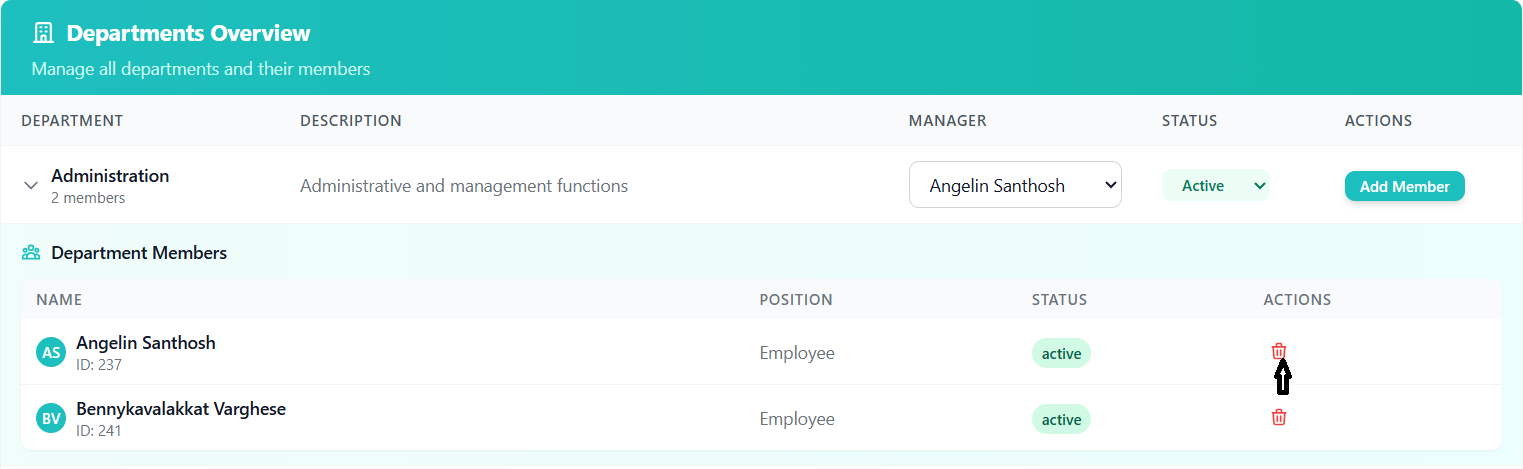
Removing Members from Departments
- Expand the department to view members
- Locate the member you want to remove
- Click the red trash icon in the Actions column
- Member is immediately removed from the department
- Success message appears confirming removal
- Use the "Add Member" modal to manage multiple members
- Currently no direct bulk remove feature
- Remove members individually through expanded view
Confirmation and Warnings
- System detects if selected employees are in other departments
- Warning message appears with employee names
- Confirmation required to move employees between departments
- Warning includes both cancel and proceed options
- Success message appears after member operations
- Message includes count of members added/removed
- Department view updates immediately
- Member count in department header updates
Assigning Managers
How to assign and change department managers.
Manager Role Requirements
The system automatically filters employees who have the "Manager" role assigned to them. Only these employees can be assigned as department managers.
- Located in the "Manager" column of the departments table
- Dropdown shows all available managers in the organization
- Current manager is pre-selected
- Empty state shows "-- Select Manager --"
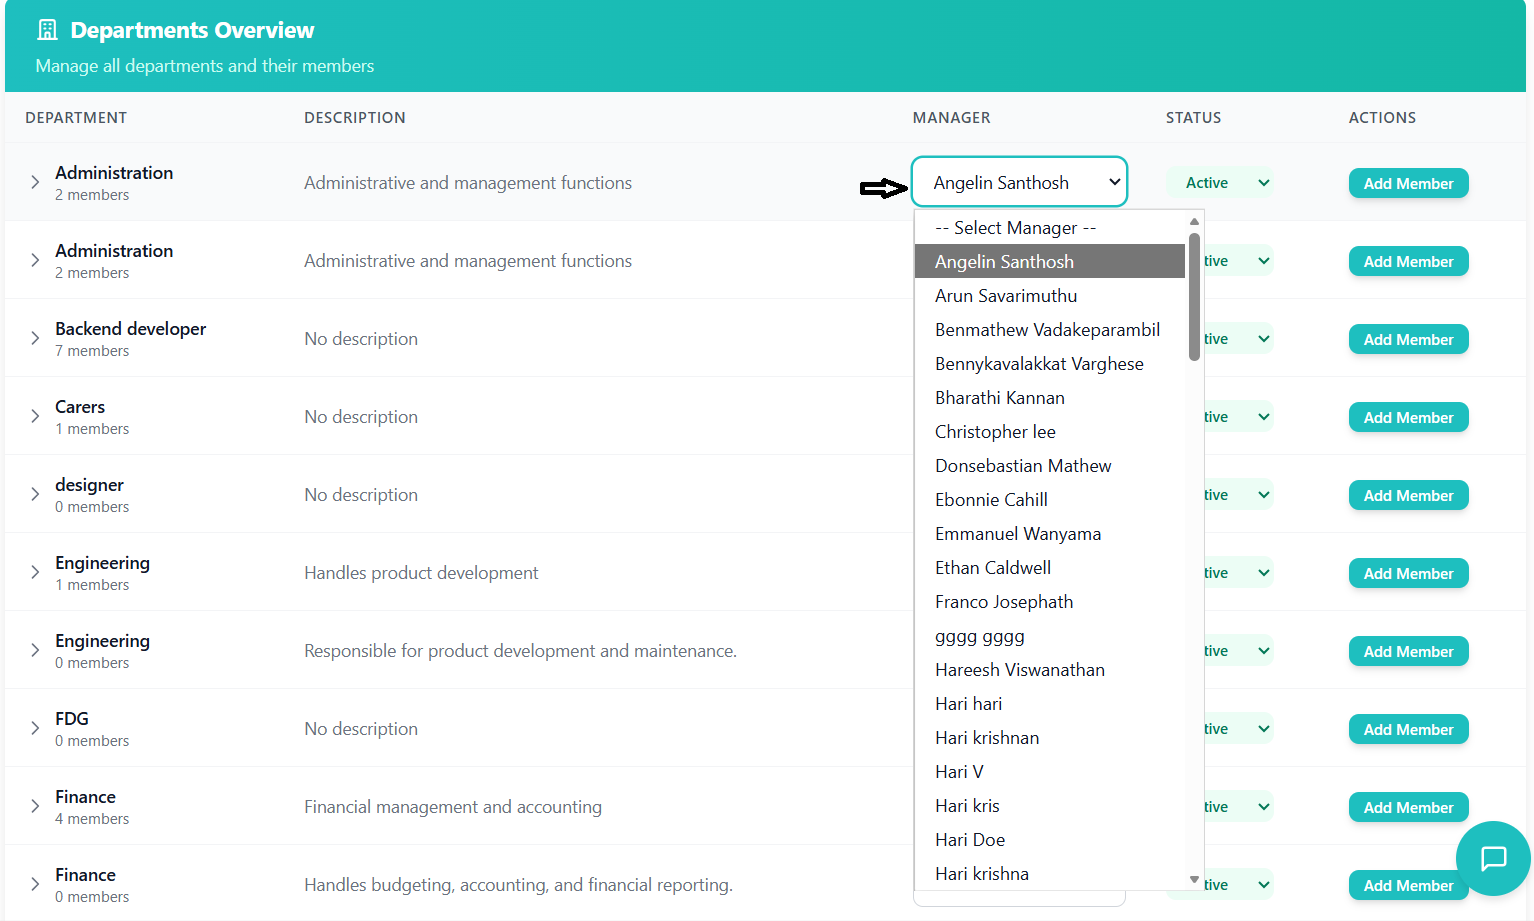
- Click the dropdown to see available managers
- Managers are displayed with their full names
- "(Manager)" suffix indicates their role
- Select a new manager from the list
Manager Assignment Process
- Manager change happens immediately upon selection
- No separate save button required
- API call is made automatically
- Success message appears: "Department manager updated successfully!"
- System validates that selected employee has manager role
- Only employees with manager role appear in dropdown
- No validation errors for manager assignment
Manager Permissions and Access
- View all department members
- Add new members to their department
- Remove members from their department
- Access department-specific reports and analytics
- Cannot create new departments
- Cannot change department status
- Cannot assign managers to other departments
- Access limited to their assigned department only
Removing a Manager
- Select "-- Select Manager --" from the dropdown
- Department will have no assigned manager
- "Add Member" button remains active for department
- Department operations continue without manager
Status Management
Managing department status (active, inactive).
Understanding Department Statuses
- Active - Department is currently operational and can have members
- Inactive - Department is not currently active and cannot have members
Changing Department Status
- Find the status badge in the departments table
- It appears as a colored badge with the current status
- The dropdown is available for all statuses
- Click the badge to open the dropdown
- Click on the status badge to open the dropdown
- Select the new status from available options
- System immediately processes the status change
- Visual feedback with badge color change
- Status badge updates immediately with new color and text
- Success message appears: "Department status changed to [status]"
- Status change is saved to the database
- UI updates to reflect new status restrictions
Status Change Implications
- Changing status to inactive automatically removes all members from the department
- "Add Member" button becomes disabled for inactive departments
- Department remains in the list but cannot be modified
- Historical data and reports still include inactive departments
Reactivating Departments
- Locate the inactive department in the list
- Click the status badge and select "Active"
- Department becomes active immediately
- "Add Member" button becomes enabled
- Previous members are not automatically restored
- You need to manually add members back to the department
- Use the "Add Member" function to repopulate the department
- Member history is preserved in the system
Bulk Operations
Bulk adding and updating department members.
Bulk Add Members
- Click "Add Member" for any active department
- Modal opens with available employees grid
- Select multiple employees using checkboxes
- Selected count displayed in header and footer
- Click employee cards to select/deselect
- Multiple selection supported
- Visual feedback with border and background changes
- Selected count updates in real-time
- Page size selector: 10, 25, or 50 employees per page
- Previous/Next buttons for navigation
- Current page indicator
- Selection persists across page changes
Bulk Update Process
- System checks if selected employees are in other departments
- Warning appears with list of affected employees
- Confirmation required to proceed with department transfer
- Option to cancel or proceed with the update
- Click "Add [X] Members to Department" to proceed
- Bulk API call updates all selected employees
- Loading state during processing
- Success message with count of members added
- Modal closes automatically on success
- Department view updates with new members
- Member count in department header updates
- Expanded view shows all new members immediately
Bulk Remove Members
- No direct bulk remove feature in the UI
- Members must be removed individually through expanded view
- Use department status change to inactive for bulk removal
- API supports bulk operations but UI doesn't expose them
- Change department status to "Inactive"
- All members are automatically removed
- Change status back to "Active" when needed
- Manually add back required members
Performance Considerations
- Pagination prevents performance issues with large employee lists
- Loading states provide feedback during operations
- Optimized API calls for bulk operations
- Efficient re-rendering with React optimization
- Partial success handling for bulk operations
- Clear error messages for failed operations
- Rollback mechanisms for failed updates
- Detailed logging for troubleshooting
Permissions & Roles
Understanding user permissions and role-based access.
Permission System Overview
The teams management system uses a role-based permission system where:
- Users are assigned to roles (Standard User, Manager, Administrator)
- Roles have specific permissions for different features
- Permissions are checked before allowing actions
- UI elements are shown/hidden based on user permissions
User Roles and Capabilities
| Feature | Standard User | Department Manager | Administrator |
|---|---|---|---|
| View Departments | ✓ | ✓ | ✓ |
| View Department Members | ✓ | ✓ | ✓ |
| Create Departments | ✗ | ✗ | ✓ |
| Add Members to Department | ✗ | ✓ | ✓ |
| Remove Members from Department | ✗ | ✓ | ✓ |
| Assign Department Manager | ✗ | ✗ | ✓ |
| Change Department Status | ✗ | ✗ | ✓ |
| View All Departments | ✗ | ✗ | ✓ |
Manager Role Assignment
- Employees must have the "Manager" role assigned in the system
- Role assignment is managed through the roles management system
- Only employees with manager role appear in manager dropdowns
- Role-based filtering happens automatically
- Department managers can only manage their assigned department
- Cannot access or modify other departments
- Can view all members in their department
- Can add/remove members from their department only
User Experience with Limited Permissions
- Users without edit permissions can view department information
- Action buttons are disabled or hidden
- Manager dropdowns are read-only
- Status dropdowns are read-only
- Clear visual indicators for restricted features
- Disabled buttons with appropriate styling
- Tooltips or messages explaining permission restrictions
- Consistent experience across all restricted features
Requesting Additional Permissions
If you require additional permissions to perform your duties:
- Contact your system administrator
- Specify which features you need access to
- Explain the business need for the additional permissions
- Administrators can modify role permissions in the system settings
Troubleshooting Guide
Solutions to common issues and problems you may encounter.
Common Issues
Possible Causes:
- Missing required permissions for department creation
- User role restrictions
- System configuration issue
Solutions:
- Contact administrator to verify permissions
- Check if you're logged in with the correct account
- Verify your role has department creation privileges
Possible Causes:
- Department status is inactive
- Missing permissions for member management
- User is not the department manager
Solutions:
- Check department status and activate if necessary
- Verify you have appropriate permissions
- Contact administrator if you believe you should have access
Possible Causes:
- All employees are already assigned to departments
- Filter applied showing only specific employees
- No active employees in the organization
- Network or data loading issue
Solutions:
- Check if employees are assigned to other departments
- Verify employee status is active
- Refresh the page and try again
- Contact IT support if issue persists
Possible Causes:
- No employees have manager role assigned
- Manager role not properly configured
- Data loading issue
Solutions:
- Check role assignments in the system
- Ensure manager role exists and is assigned to employees
- Refresh the page and try again
- Contact administrator to configure manager roles
Possible Causes:
- Network connection issue
- Server error
- Browser cache problem
- Organization ID not properly set
Solutions:
- Check internet connection
- Refresh the page (F5)
- Clear browser cache and reload
- Try a different browser
- Contact IT support if issue persists
Possible Causes:
- Network connectivity issues
- Server timeout
- Validation errors
- Permission restrictions
Solutions:
- Check network connection
- Look for error messages or validation warnings
- Verify you have appropriate permissions
- Try the action again after a few moments
- Contact support if consistent issue
Error Message Reference
| Error Message | Meaning | Solution |
|---|---|---|
| "Department name already exists in this organization" | Duplicate department name during creation | Use a different department name |
| "No active employees available to add" | No available employees for department assignment | Check employee status or create new employees |
| "Failed to load department data" | Network or server issue | Check connection, refresh page, contact support |
| "You don't have permission to perform this action" | Insufficient permissions for the requested action | Contact administrator for permissions |
| "Department manager updated successfully" | Success message (not an error) | No action needed - confirmation of successful update |
| "Selected employees have been added to the department" | Success message (not an error) | No action needed - confirmation of successful addition |
Performance Optimization Tips
- Use appropriate page sizes when working with large employee lists
- Clear browser cache regularly for optimal performance
- Use the latest version of supported browsers
- Close unnecessary browser tabs to free up memory
- Contact IT if experiencing consistent performance issues
Contact Support
- Persistent errors after trying solutions
- System performance issues
- Missing data or incorrect information
- Permission issues that aren't resolved by administrator
- Feature not working as expected
Information to Provide:
- Your user ID and name
- Detailed description of the issue
- Steps to reproduce the problem
- Screenshot of any error messages
- Browser and operating system information
- Date and time the issue occurred