NDIS Program Management System
Complete guide for managing NDIS programs, rate cards, and support items. Select a topic below to get started.
System Overview
Learn about NDIS program management features and capabilities.
Program Management
How to manage NDIS programs and their basic information.
Creating Programs
Step-by-step guide to creating new NDIS programs.
Editing Programs
How to modify existing program information.
Rate Card Groups
Organizing rate cards into logical groups.
Creating Rate Cards
Adding support items and rate card information.
Rate Card Details
Setting up state-based pricing and schedules.
Viewing Rate Cards
Navigating and searching through rate card data.
Managing Groups
Moving rate cards between groups and organizing.
Troubleshooting
Solutions to common issues and problems.
NDIS Program Management System Overview
The NDIS Program Management System enables organizations to manage National Disability Insurance Scheme programs, rate cards, and support items with comprehensive pricing and scheduling capabilities.
Key Features
🏥 Program Management
Create and manage NDIS programs with registration numbers and descriptions.
💳 Rate Card Creation
Define support items with detailed pricing and scheduling information.
👥 Group Organization
Organize rate cards into logical groups for better management.
🌏 State-Based Pricing
Set different rates for different states and territories.
⏰ Time Scheduling
Define rates based on day types, time types, and specific hours.
📤 Bulk Import
Upload multiple rate cards simultaneously using Excel templates.
System Architecture
NDIS programs represent different service offerings or funding categories. Each program contains:
- Program Name and Description
- Registration Number
- Program Type (NDIS, CHSP, etc.)
- Status (Active, Inactive, Pending)
Groups help organize rate cards logically:
- Group Name and Description
- Multiple rate cards per group
- Flexible grouping based on service types
Individual support items with NDIS specifications:
- Support Item Number and Name
- Registration Group Information
- Service Type Classification
- Multiple pricing details
Detailed pricing and scheduling information:
- State/Territory specific rates
- Day types (Weekday, Weekend, Holiday)
- Time types (Standard, Overtime, Night)
- Effective and expiry dates
- Custom time schedules
NDIS Compliance
The system is designed to align with the official NDIS Price Guide, supporting:
- Standard support item numbers and names
- Registration group classifications
- State-based price variations
- Time-based rate differences
- Current financial year pricing
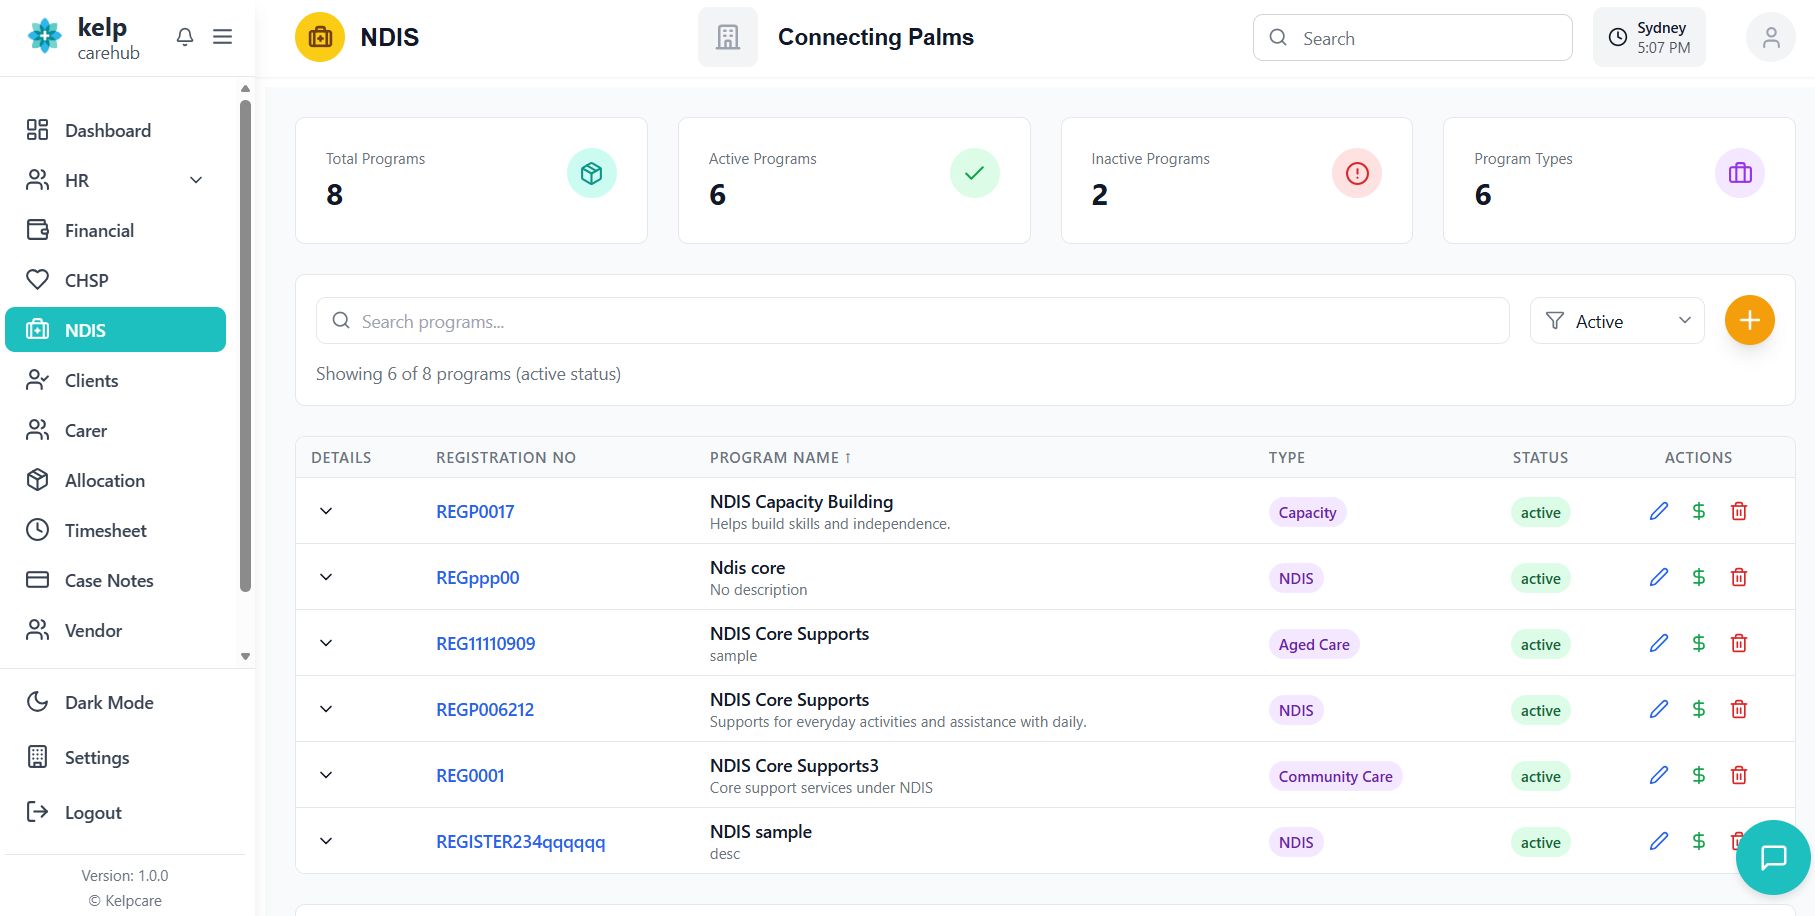
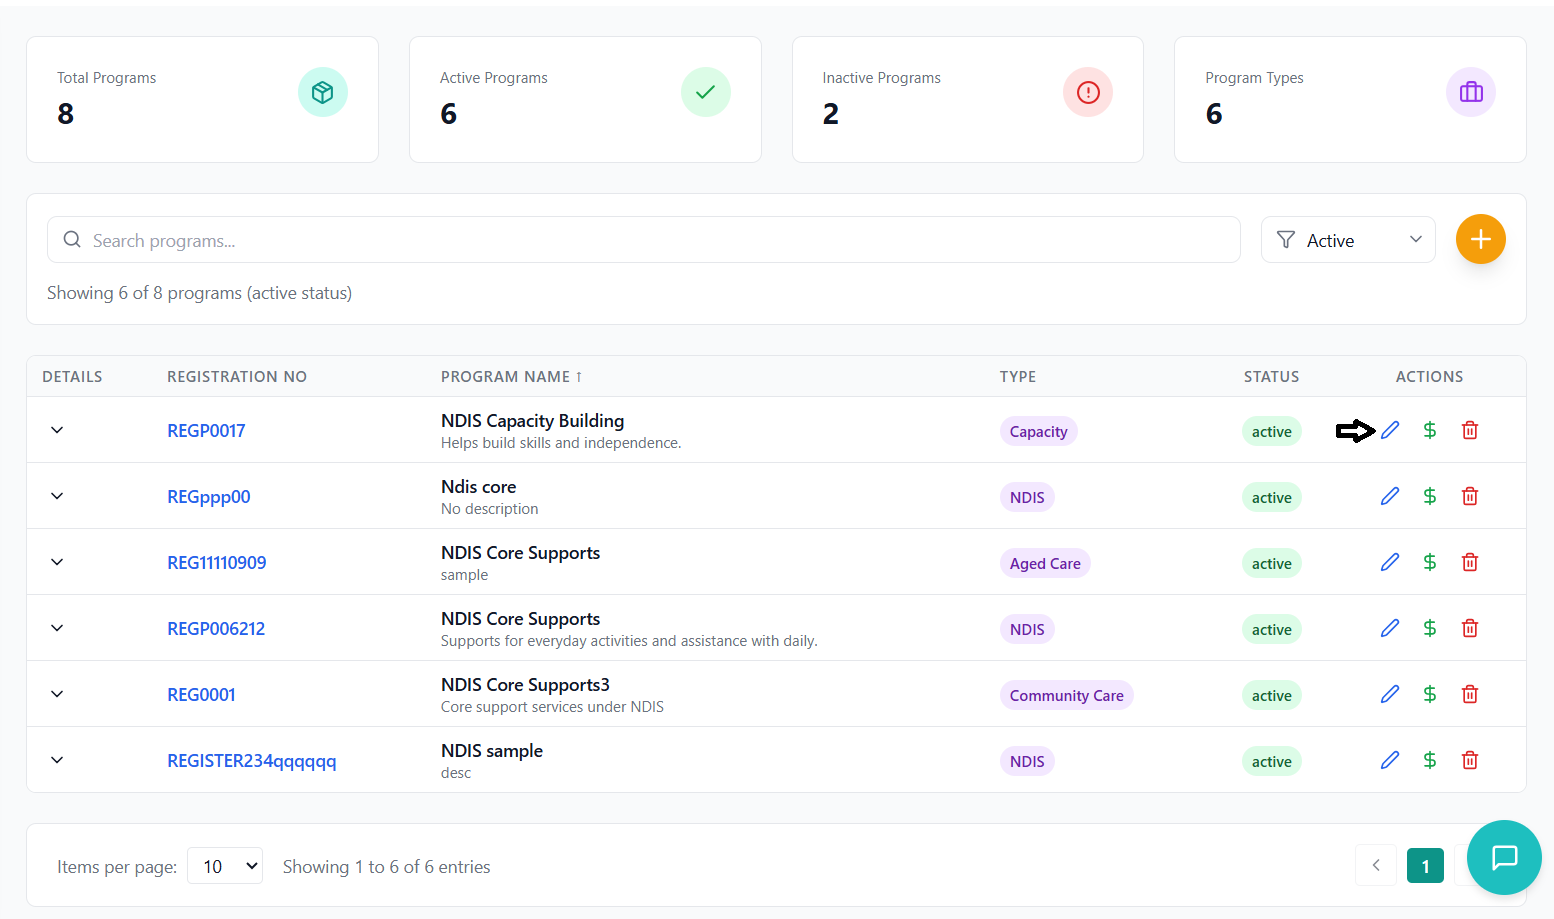
Program Management
Managing NDIS programs, including viewing, filtering, and basic operations.
Program List Interface
- Navigate to the NDIS Programs section
- View all existing programs in a table format
- Programs are displayed with key information columns
| Column | Description |
|---|---|
| Program Details | Program name and description |
| Type | Program type badge (NDIS, CHSP, etc.) |
| Registration # | Official registration number |
| Status | Current status badge |
| Rate Cards | Action buttons for rate card management |
| Actions | Edit and delete program buttons |
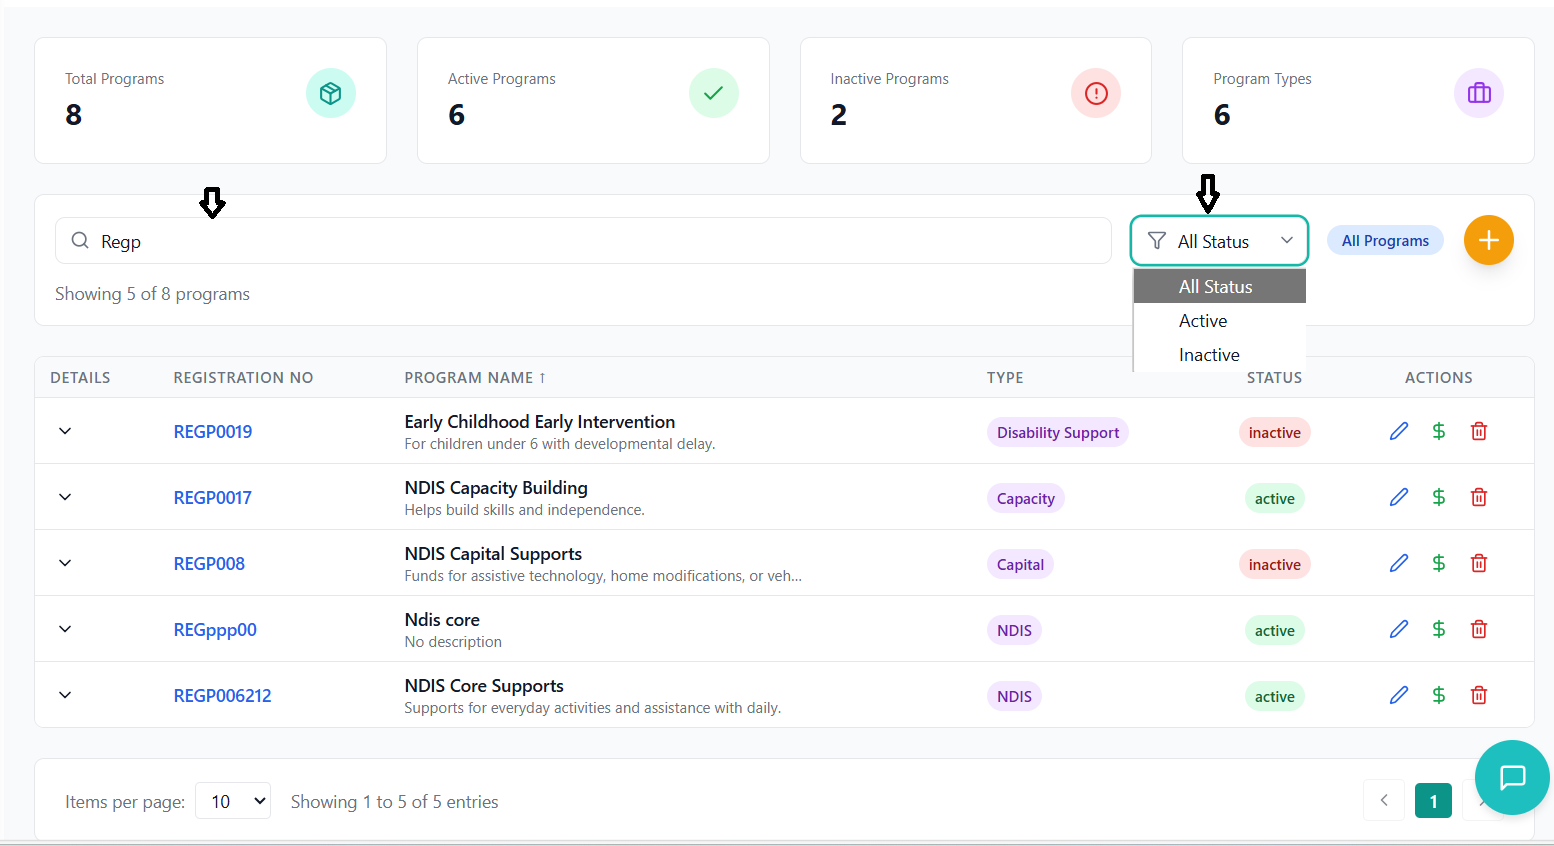
Search and Filter
- Use the search bar to find programs by name
- Search also includes registration numbers and descriptions
- Real-time filtering as you type
- Filter programs by status: All, Active, Inactive, Pending, Suspended
- Quickly view only active programs for current operations
- Identify pending or suspended programs that need attention
Program Actions
- Click on the program name to view all associated rate cards
- Navigate to the detailed rate card view for that program
- See rate cards organized by groups
- Use the "Add Rates" button to create new rate cards
- Opens the rate card creation form
- Program is automatically selected
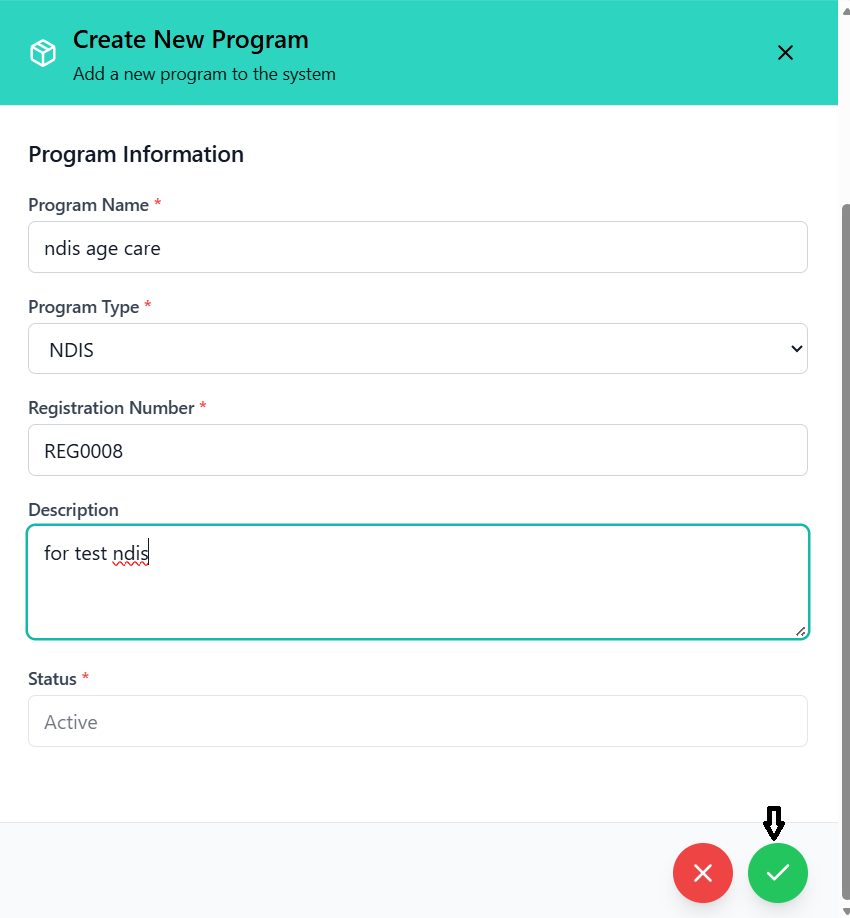
Creating NDIS Programs
Step-by-step guide to creating new NDIS programs in the system.
Accessing the Creation Form
- Click the "Add NDIS Program" button in the header
- Modal form opens with teal header "Add New NDIS Program"
- Form includes all required fields for program setup

Filling Program Details
- Enter a descriptive program name
- Examples: "NDIS Core Support", "NDIS Transport Services"
- Must be unique and identifiable
- Required field with validation
- Select from dropdown: NDIS, Community Care, Aged Care, Disability Support
- Defaults to "NDIS" for NDIS program creation
- Determines program classification
- Enter official registration number
- Format: Typically alphanumeric (e.g., "RG01", "NDIS2024")
- Used for official documentation and reporting
- Required field with validation
- Provide detailed description of the program
- Include service scope, target audience, special notes
- Examples: "For NDIS participants in NSW area requiring core support services"
- Required field with validation
- Select initial status: Active, Inactive, Pending, Suspended
- Defaults to "Active" for new programs
- Controls program visibility and usage
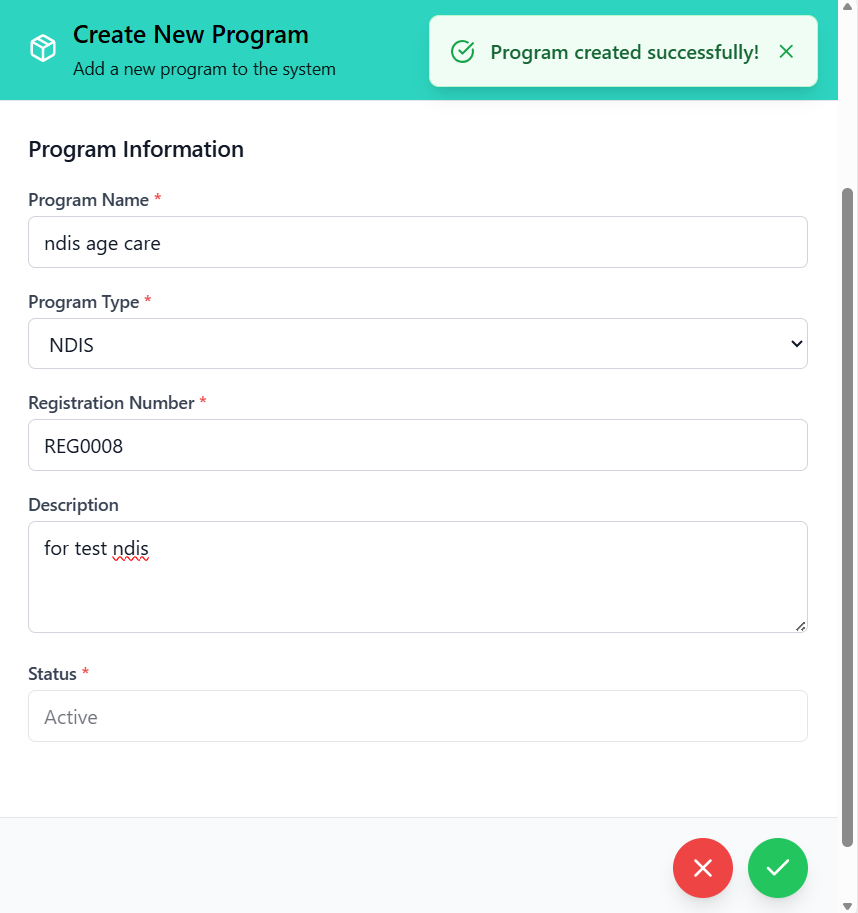
Validation and Submission
- System validates all required fields before submission
- Error messages appear below invalid fields
- Common validation errors:
- "Program name is required"
- "Registration number is required"
- "Program description is required"
- Click "Create Program" button
- System processes creation with loading indicator
- Success message: "Program created successfully!"
- Form closes automatically after success
- New program appears in the programs list
- Status shows as selected during creation
- Ready for rate card configuration
Editing NDIS Programs
How to modify existing NDIS program information and settings.
Accessing Edit Mode
- Find the program you want to edit in the programs list
- Click the blue "Edit" button in the Actions column
- Edit form opens with current program data pre-filled
Editing Program Information
- Update program name if needed
- Change program type if service scope has changed
- Update registration number if official details change
- Modify program description to reflect current services
- Change program status as needed:
- Active: Program is currently operational
- Inactive: Program is not currently available
- Pending: Program is under review or approval
- Suspended: Program temporarily unavailable
- Status changes affect program visibility and usage
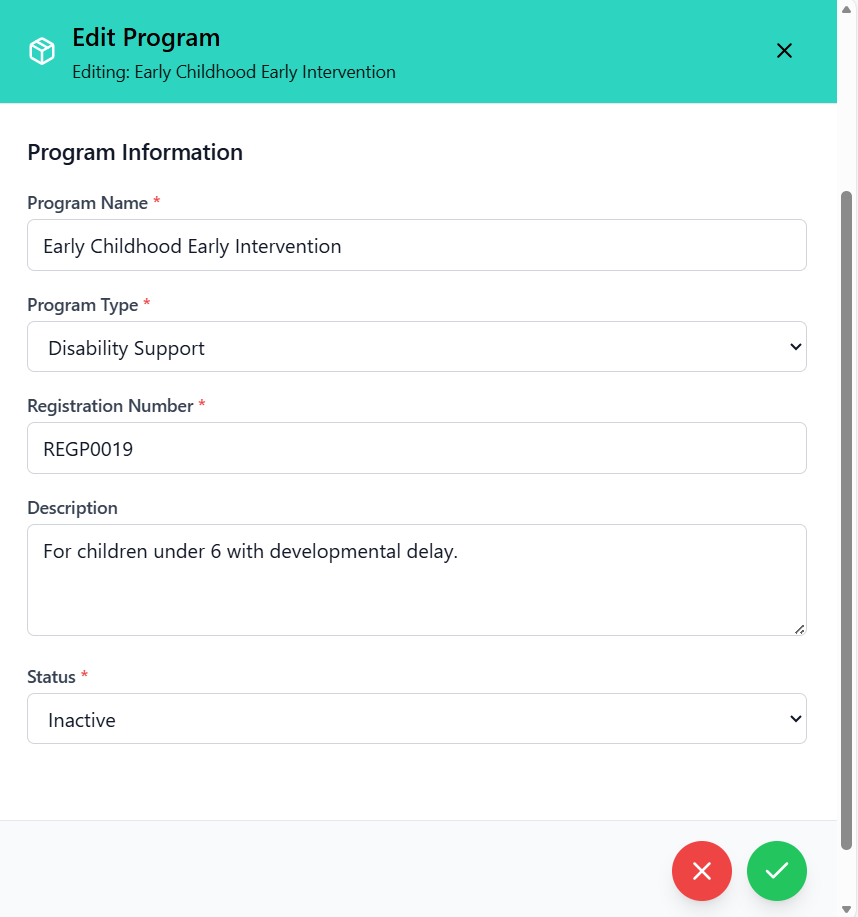
Saving Changes
- Review all changes before saving
- System validates required fields
- Click "Update Program" to save changes
- Success message: "Program updated successfully!"
- Changes are immediately reflected in the system
- Updated program appears in the programs list
- Rate cards and associated services maintain their connections
Rate Card Groups
Organizing rate cards into logical groups for better management and navigation.
Understanding Rate Card Groups
Rate card groups are organizational units that help categorize and manage related support items. Groups can be based on:
- Service types (e.g., Core Supports, Capacity Building)
- Client needs (e.g., High Intensity, Standard Support)
- Geographic regions (e.g., Metro, Regional, Remote)
- Any other logical grouping that makes sense for your organization
Creating New Groups
- When creating or editing a rate card, click the "New" button next to the group dropdown
- Modal opens for creating a new group
- Enter group name and optional description
- Use clear, descriptive names
- Follow consistent naming conventions
- Examples: "Core Activities", "Transport Services", "Therapeutic Supports"
- Avoid ambiguous or overly technical names

Group Management
- Groups are visible in the rate card view
- Each group shows a count of associated rate cards
- Groups can be expanded/collapsed for better organization
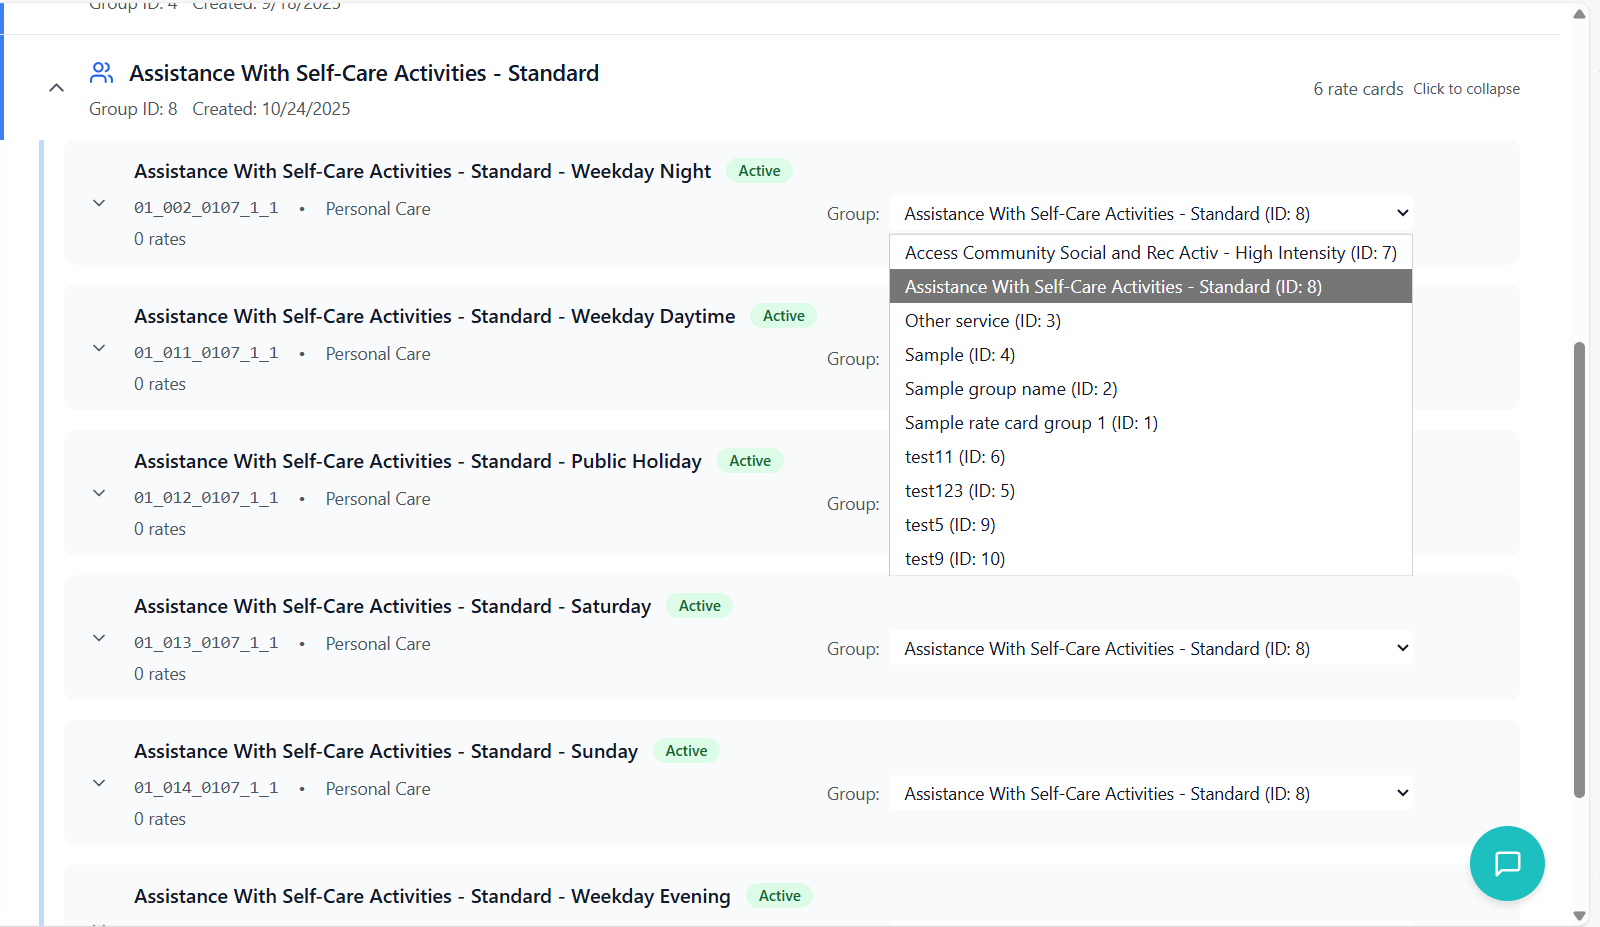
- Use the group dropdown on each rate card to change groups
- Changes are saved automatically
- Rate cards can be moved between groups at any time
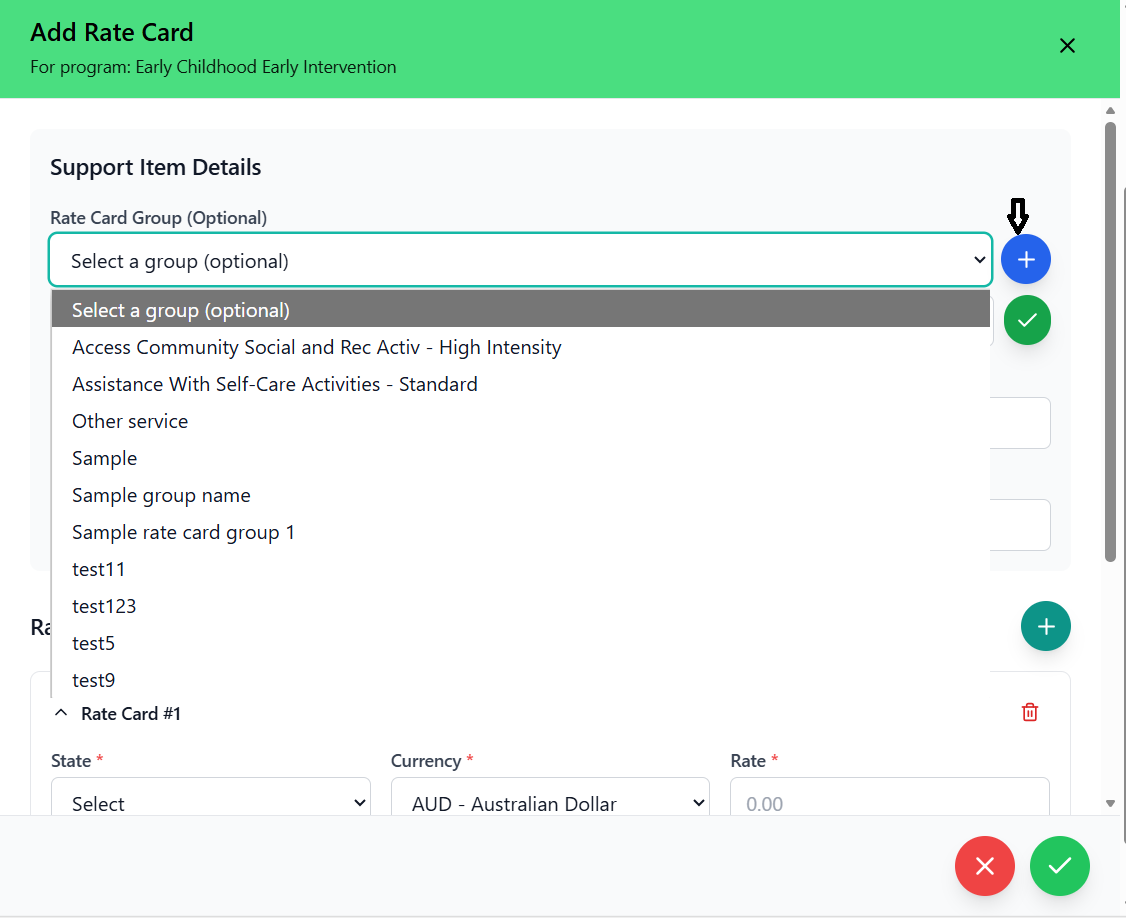
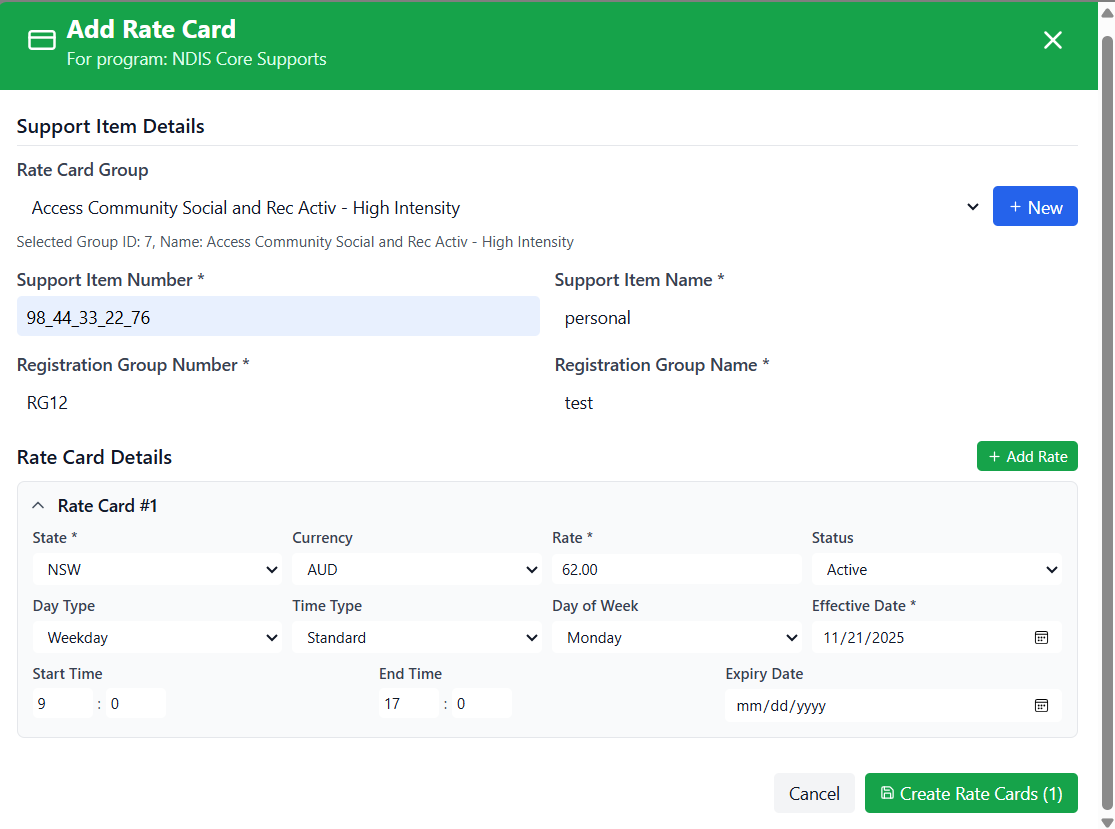
Creating Rate Cards
Step-by-step guide to creating NDIS support items and rate cards.
Accessing Rate Card Creation
- Click "Add Rates" button on the program row
- Rate card creation modal opens
- Form is pre-configured for the selected program
Support Item Details
- Select existing group from dropdown
- Or create new group using "New" button
- Helps organize rate cards logically
- Enter official NDIS support item number
- Format: e.g., "01_001_0104_1_1"
- Must match NDIS Price Guide specifications
- Required field with validation
- Enter descriptive support item name
- Examples: "Personal Activities", "Community Access"
- Should match NDIS Price Guide naming
- Required field with validation
- Enter registration group identifier
- Format: e.g., "RG001", "CB002"
- Used for NDIS reporting and categorization
- Required field with validation
- Enter full registration group name
- Examples: "Core Supports", "Capacity Building"
- Should match NDIS classification
- Required field with validation
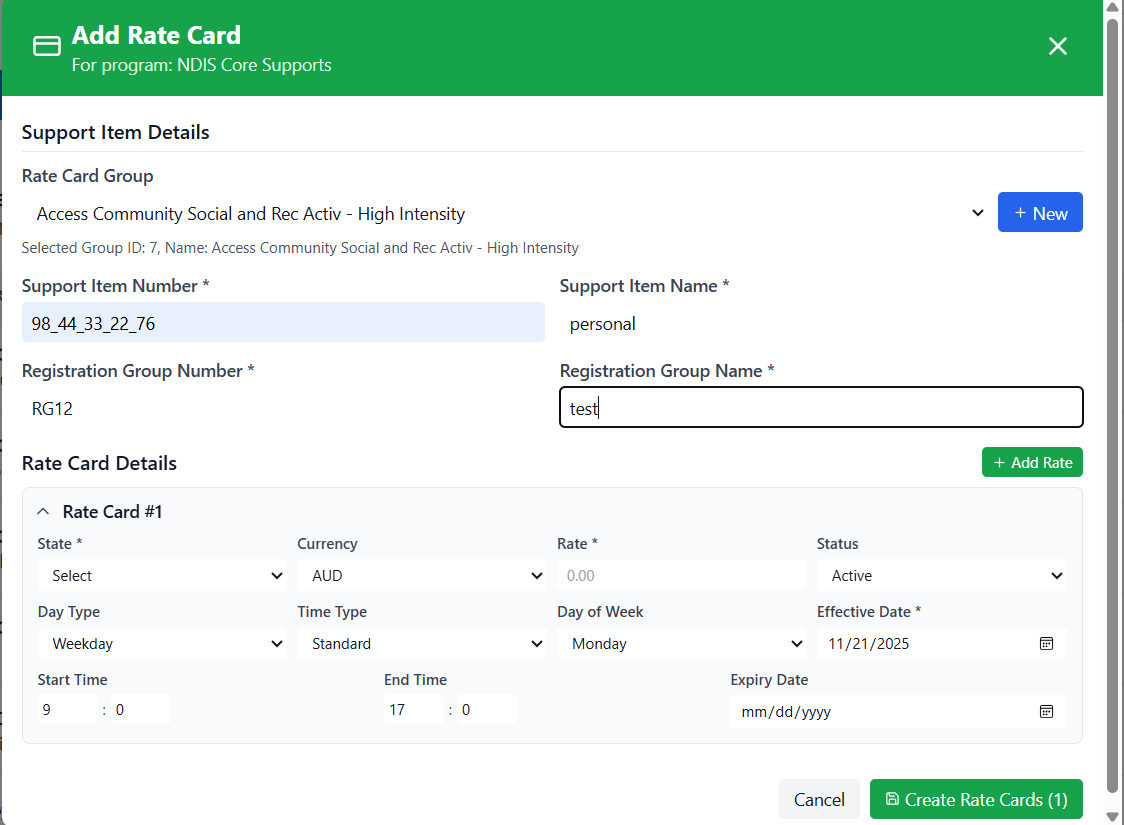
Rate Card Details Section
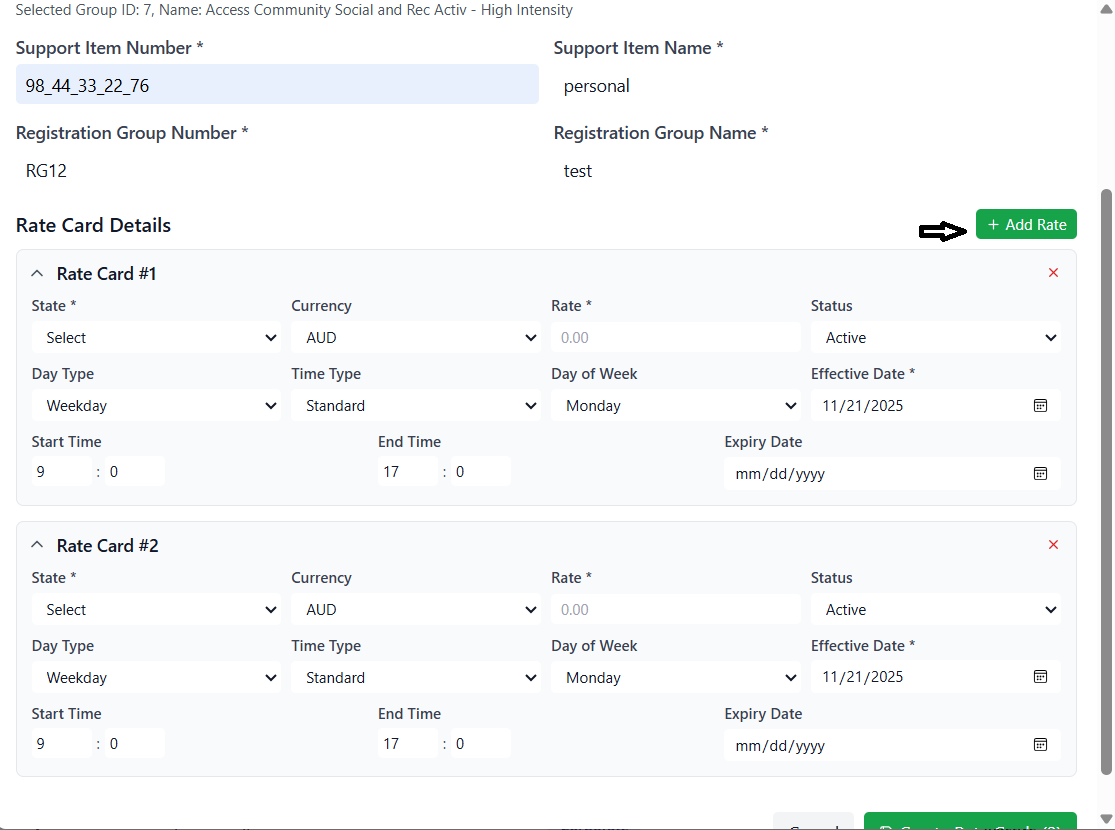
- Click "Add Rate" button to create pricing variations
- Each rate card can have multiple pricing details
- Different details for different states, times, or conditions
Each rate detail includes:
- State: Geographic location for the rate
- Currency: AUD (default)
- Rate: Hourly or unit price
- Day Type: Weekday, Weekend, Public Holiday
- Time Type: Standard, Overtime, Night
- Day of Week: Specific day if applicable
- Time Schedule: Start and end times
- Effective Dates: When the rate applies
- Status: Active, Inactive, Pending
Rate Card Details Configuration
Setting up detailed pricing, scheduling, and geographic variations for support items.
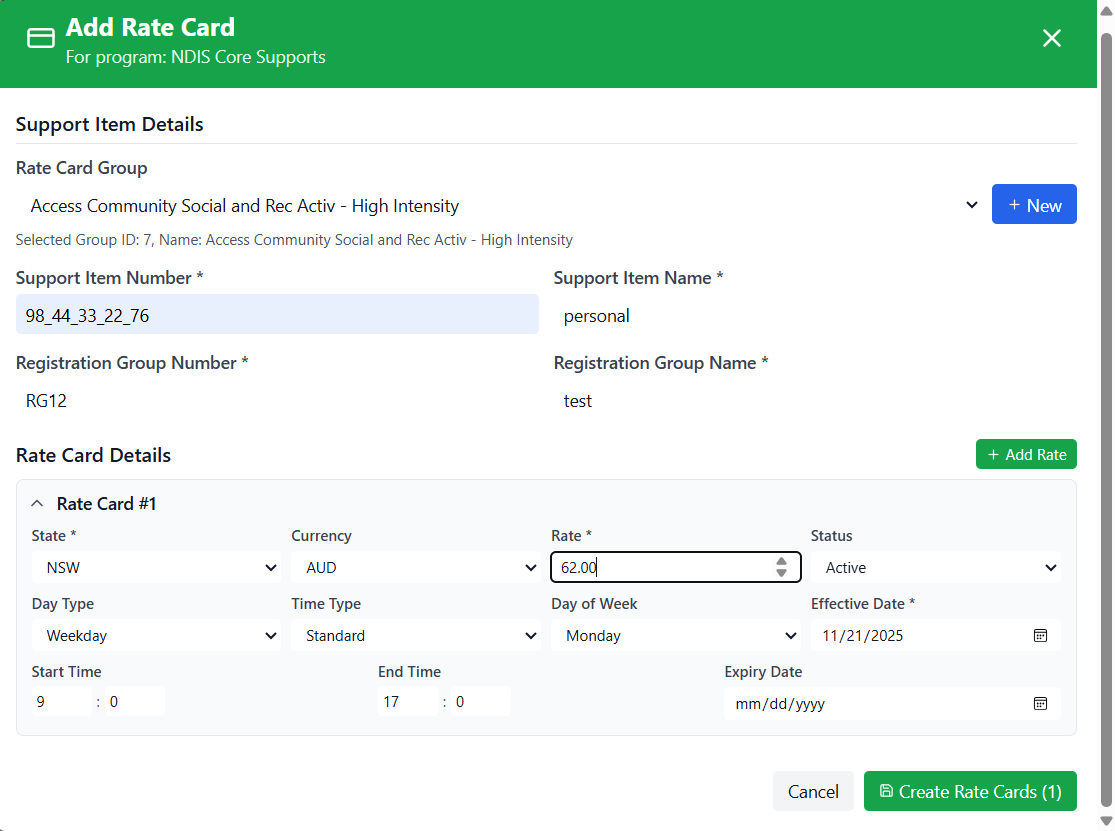
State-Based Pricing
- Choose state/territory from dropdown
- Options: NSW, VIC, QLD, WA, SA, TAS, ACT, NT
- Required field for each rate detail
- Create separate details for each state as needed
- Currency: Defaults to AUD (Australian Dollar)
- Rate: Enter hourly rate in decimal format
- Examples: 62.50, 75.00, 89.25
- Must be greater than 0
- Required field with validation
Time and Schedule Configuration
- Weekday: Monday to Friday (standard rates)
- Weekend: Saturday and Sunday
- Public Holiday: Official public holidays
- Select appropriate day type for the rate
- Standard: Regular business hours
- Overtime: Extended hours with premium rates
- Night: Overnight or late-night services
- Helps categorize different rate tiers
- Select specific day if rate applies to only one day
- Options: Monday through Sunday
- Leave as default if rate applies to all days in the day type
- Start Time: When the rate period begins
- End Time: When the rate period ends
- Use 24-hour format (HH:MM)
- Examples: 09:00, 17:00, 22:00
Effective Period Management
- Date when the rate becomes active
- Defaults to current date
- Can be set to future date for planned rate changes
- Required field with validation
- Date when the rate becomes inactive
- Leave blank for ongoing rates
- Use for temporary or seasonal rates
- System automatically deactivates expired rates
- Active: Rate is currently available
- Inactive: Rate is not available
- Pending: Rate awaiting activation
- Controls whether rate can be used for billing
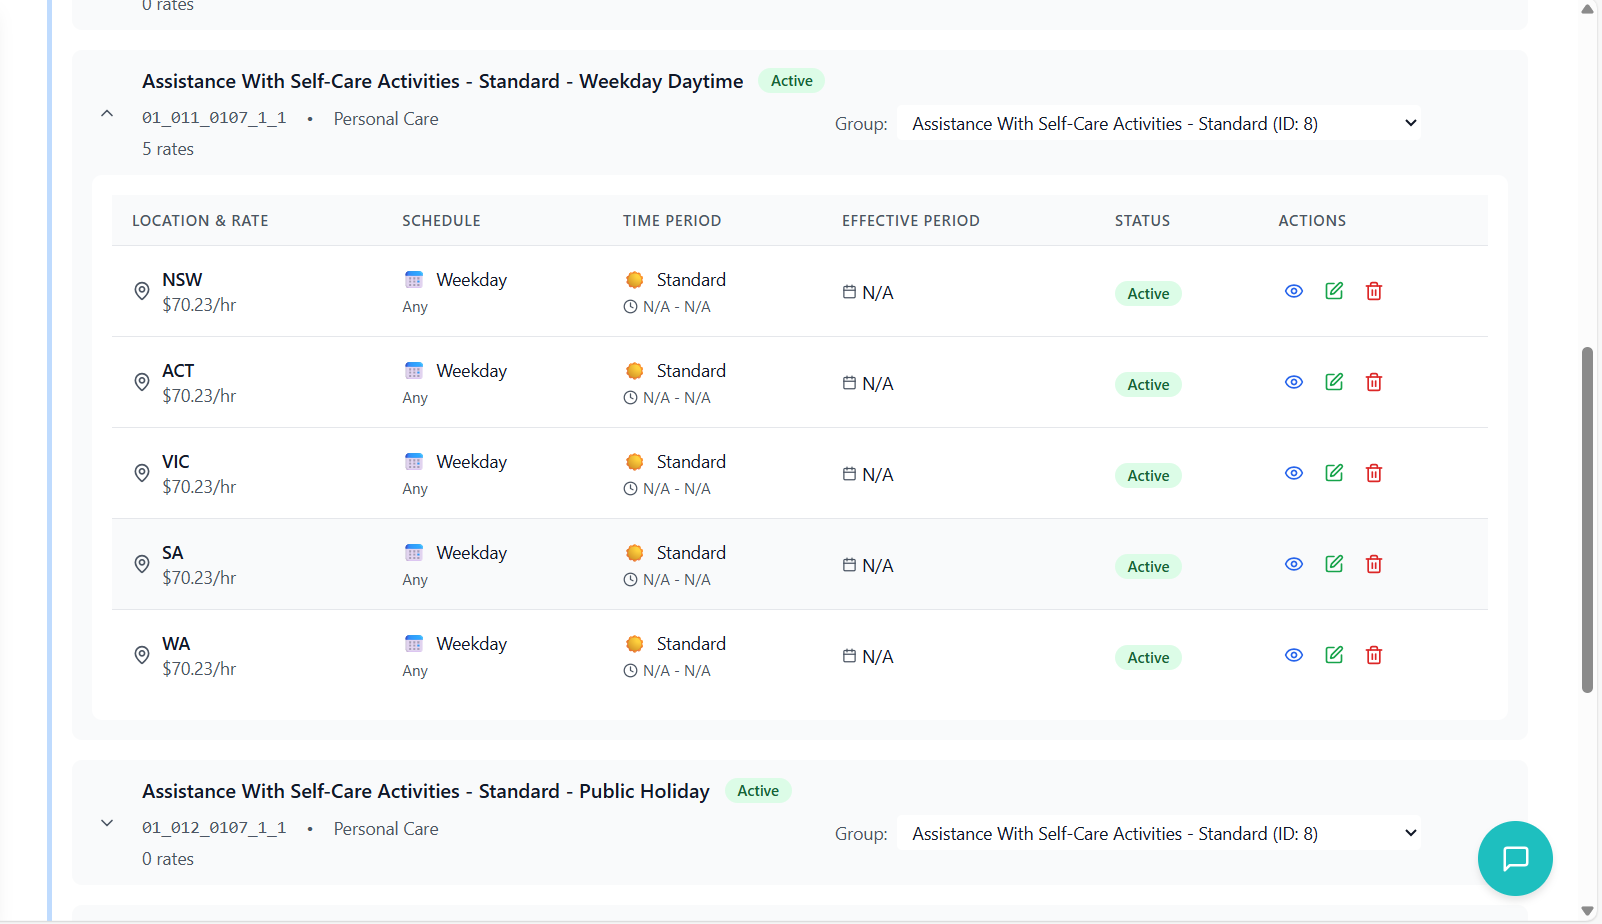
Viewing and Navigating Rate Cards
How to effectively browse, search, and review rate card information.
Rate Card View Interface
- Click on a program name in the programs list
- System navigates to rate card view for that program
- Rate cards are organized by groups
- Groups can be expanded/collapsed for better navigation
Group Organization
- Each group shows group name and rate card count
- Blue border indicates active group
- Click group header to expand/collapse
- Groups without rate cards show empty state
- Support item name and number
- Status badge (Active, Inactive, Pending)
- Registration group information
- Number of rate details available
- Group assignment with dropdown
Expanding Rate Card Details
- Click on a rate card to expand details
- Detailed view shows all rate variations
- Information organized in a table format
- Each row represents a specific rate scenario
| Column | Description |
|---|---|
| Location & Rate | State and formatted rate amount |
| Schedule | Day type and specific day of week |
| Time Period | Time type and start/end times |
| Effective Period | Effective and expiry dates |
| Status | Current status of the rate |
| Actions | View, edit, delete options |
Search and Filter
- Use search bar to find specific rate cards
- Searches: support item names, numbers, descriptions
- Real-time filtering as you type
- Search works across all groups
- Filter by status: All, Active, Inactive, Pending
- Quickly identify active rates for current use
- Find inactive rates that need updating
- Filter applies to all expanded groups
Managing Rate Card Groups
Organizing and maintaining rate card groups for optimal management.
Group Assignment
- Use the group dropdown on each rate card
- Select from existing groups or create new
- Changes save automatically
- Rate card moves to selected group immediately
- Multiple rate cards can be assigned to same group
- Use consistent grouping strategy across program
- Consider service types, client needs, or regions
Group Organization Strategies
- Core Supports: Assistance with daily activities
- Capacity Building: Skills development
- Capital Supports: Equipment and modifications
- Transport: Travel assistance
- Standard Support: Regular assistance needs
- High Intensity: Complex support requirements
- Specialized: Clinical or therapeutic services
- Metro: Major city areas
- Regional: Country towns and areas
- Remote: Isolated communities
Group Maintenance
- Use "New" button in group dropdown
- Enter descriptive group name
- Group is available immediately
- Can be assigned to rate cards right away
- Groups without rate cards show empty state
- Helpful for planning future rate cards
- Can be deleted if no longer needed
- Maintain consistent naming conventions
- Regularly review and reorganize as needed
- Consider organizational changes and updates
Troubleshooting Guide
Solutions to common issues and problems encountered in NDIS program management.
Common Issues and Solutions
Possible Causes:
- Required fields are missing or incomplete
- Program name already exists
- Network connection issues
- System maintenance in progress
Solutions:
- Check all required fields are completed
- Verify program name is unique
- Check internet connection and try again
- Contact system administrator if issue persists
Possible Causes:
- Missing required rate card details
- Invalid rate format or value
- Date validation errors
- Duplicate support item numbers
Solutions:
- Complete all required fields (marked with *)
- Ensure rate is numeric and greater than 0
- Check effective date is valid
- Verify support item number is unique
Possible Causes:
- Incorrect file format
- Missing required columns
- Invalid data in cells
- File size too large
Solutions:
- Use .xlsx or .xls format only
- Download and use the provided template
- Check all data matches expected formats
- Reduce file size if necessary
Possible Causes:
- Program filter applied
- Status filter hiding inactive items
- Search term too specific
- Rate cards in different groups
Solutions:
- Clear all filters
- Check status filter settings
- Broaden search terms or clear search
- Expand all groups to view all rate cards
Possible Causes:
- Network connectivity issues
- Group doesn't exist anymore
- Browser cache problems
- System performance issues
Solutions:
- Check internet connection
- Refresh group dropdown
- Clear browser cache and reload
- Try again after few minutes
Error Message Reference
| Error Message | Meaning | Solution |
|---|---|---|
| "Program name is required" | Program name field is empty | Enter a program name |
| "Registration number is required" | Registration number field is empty | Enter a registration number |
| "Support item number is required" | Support item number missing | Enter NDIS support item number |
| "Rate must be greater than 0" | Invalid rate value | Enter positive numeric rate |
| "Effective date is required" | Effective date missing | Select effective date |
| "State is required" | State selection missing | Select a state/territory |
| "File format not supported" | Invalid Excel file type | Use .xlsx or .xls format |
Performance Optimization
- Use groups to organize rate cards logically
- Apply filters to focus on relevant items
- Use search for specific item lookup
- Collapse groups when not needed
- Use latest version of Chrome, Firefox, or Edge
- Clear cache regularly for optimal performance
- Ensure sufficient RAM and processing power
- Close unnecessary browser tabs
Contact Support
- Persistent errors after trying solutions
- System performance issues
- Feature not working as expected
- Data corruption or loss
- Security concerns
Information to Provide:
- Detailed description of the issue
- Steps to reproduce the problem
- Error messages (screenshot if possible)
- Browser and operating system information
- Any recent changes or updates