Leave Type Management System
Complete guide for managing employee leave types and allocations. Select a topic below to get started.
System Overview
Learn about the system features, user roles, and permissions.
Accessing the System
How to login and navigate to the leave type module.
Leave Types View
Understanding the main interface for viewing leave types.
Adding Leave Types
How to create new leave type configurations.
Editing Leave Types
How to modify existing leave type configurations.
Deleting Leave Types
Process for removing leave types from the system.
Error Handling
Understanding and resolving system errors.
Loading States
How the system handles loading and data fetching.
Dark Mode Support
How the system handles dark mode theming.
Troubleshooting
Solutions to common issues and problems.
System Overview
The Leave Type Management System enables administrators to define and manage different types of employee leave with specific day allocations for annual and sick leave categories.
Key Features
📋 Leave Type Configuration
Create and manage different leave types with custom names and day allocations.
📅 Annual & Sick Leave
Configure separate day allocations for annual leave and sick leave categories.
🔄 CRUD Operations
Full Create, Read, Update, and Delete functionality for leave types.
🌙 Dark Mode Support
Complete dark mode theming for better user experience in low-light conditions.
⏳ Loading States
Visual feedback during data operations with loading indicators.
⚠️ Error Handling
Comprehensive error handling with user-friendly messages.
System Architecture
- React Components: LeaveType component with state management
- UI Elements: Modal dialogs, tables, forms, and buttons
- Icons: Lucide React icons for consistent visual language
- Loading States: LoadingFlower component for data fetching
- Redux Store: Centralized state management
- leaveTypeSlice: Dedicated slice for leave type operations
- Actions: create, fetch, update, delete operations
- Selectors: Access to leave types and loading states
- API Integration: RESTful API calls for CRUD operations
- Caching: leaveTypeCacheService for performance optimization
- Organization Context: Organization-based data isolation
- Real-time Updates: Immediate UI updates after operations
Leave Type Data Structure
| Field | Type | Description | Required |
|---|---|---|---|
| id | Number | Unique identifier for the leave type | Auto-generated |
| name | String | Display name for the leave type | Yes |
| annualLeaveDays | Number | Number of annual leave days allocated | Yes |
| sickLeaveDays | Number | Number of sick leave days allocated | Yes |
| organizationId | Number | ID of the organization this leave type belongs to | Yes |
| createTime | String | Timestamp when the record was created | Auto-generated |
| updatedTime | String | Timestamp when the record was last updated | Auto-generated |
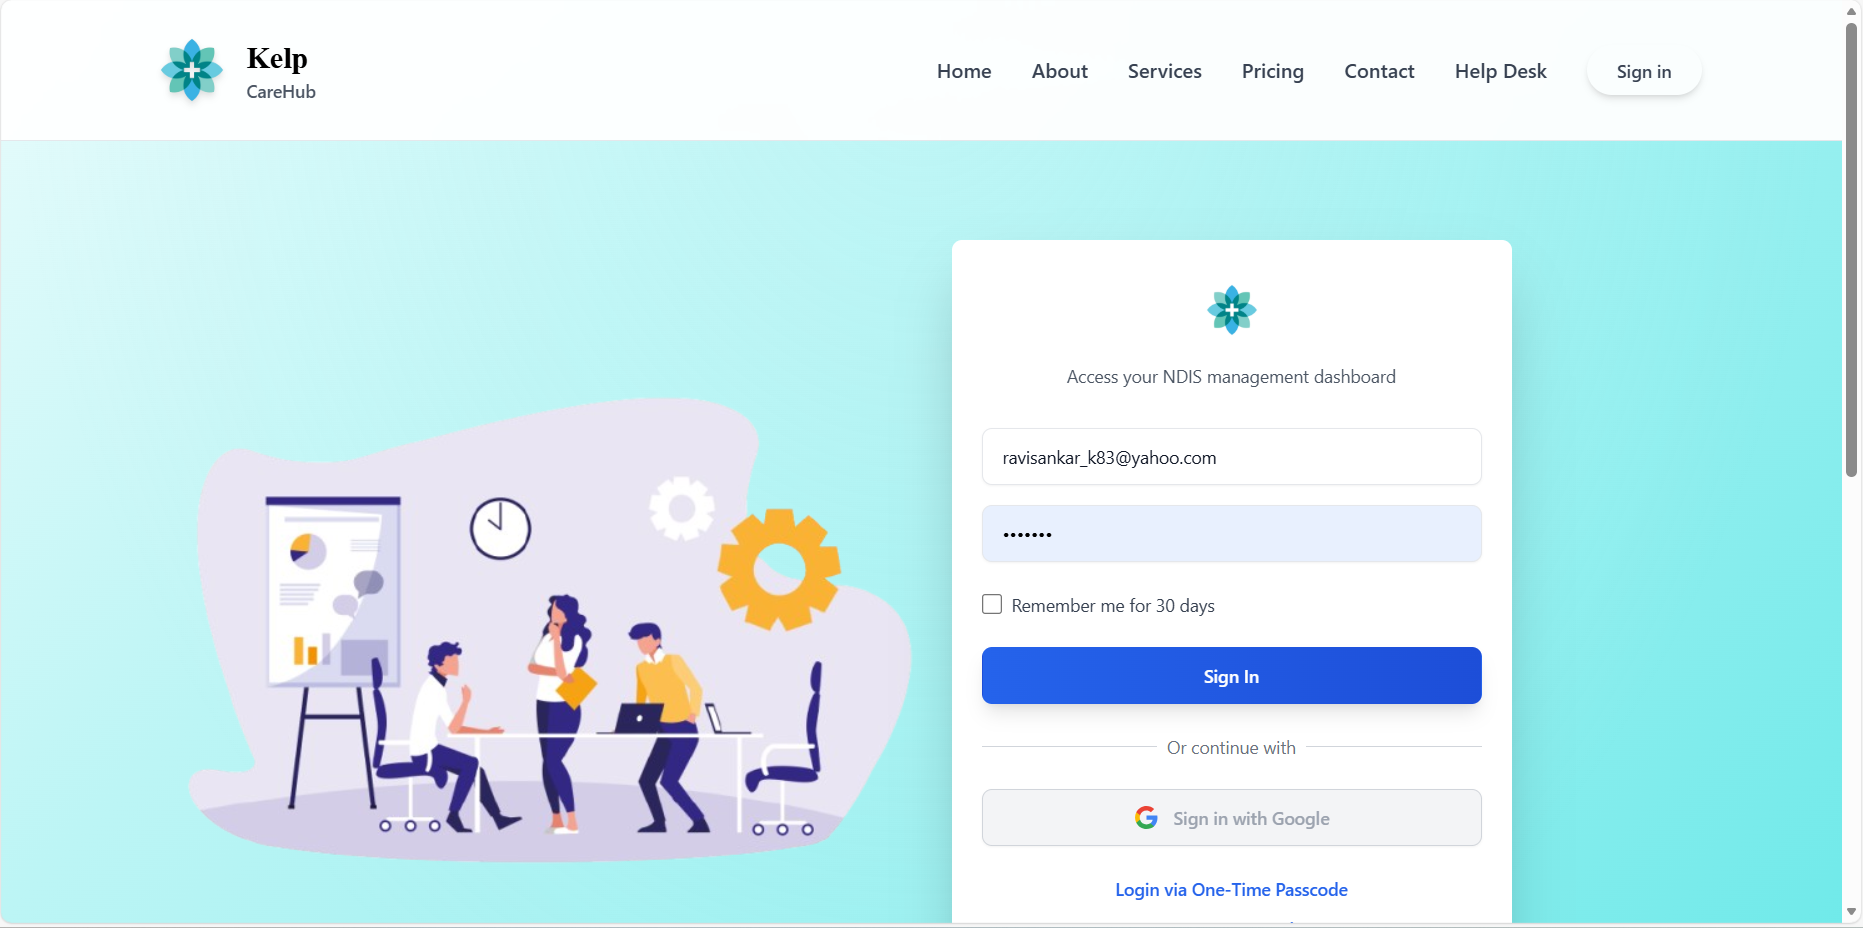
Accessing the Leave Type System
How to navigate to and access the leave type management module.
- Navigate to the main application URL
- Enter your username and password
- Complete any required authentication steps
- System validates your credentials and permissions
- From the main dashboard, locate the HR or Admin section
- Click on "Leave Management" or similar navigation item
- Select "Leave Types" from the submenu
- System loads the Leave Type Management interface
- Component mounts and checks for organization ID
- Automatically fetches existing leave types from the server
- Displays loading state during data retrieval
- Renders the leave types table once data is loaded
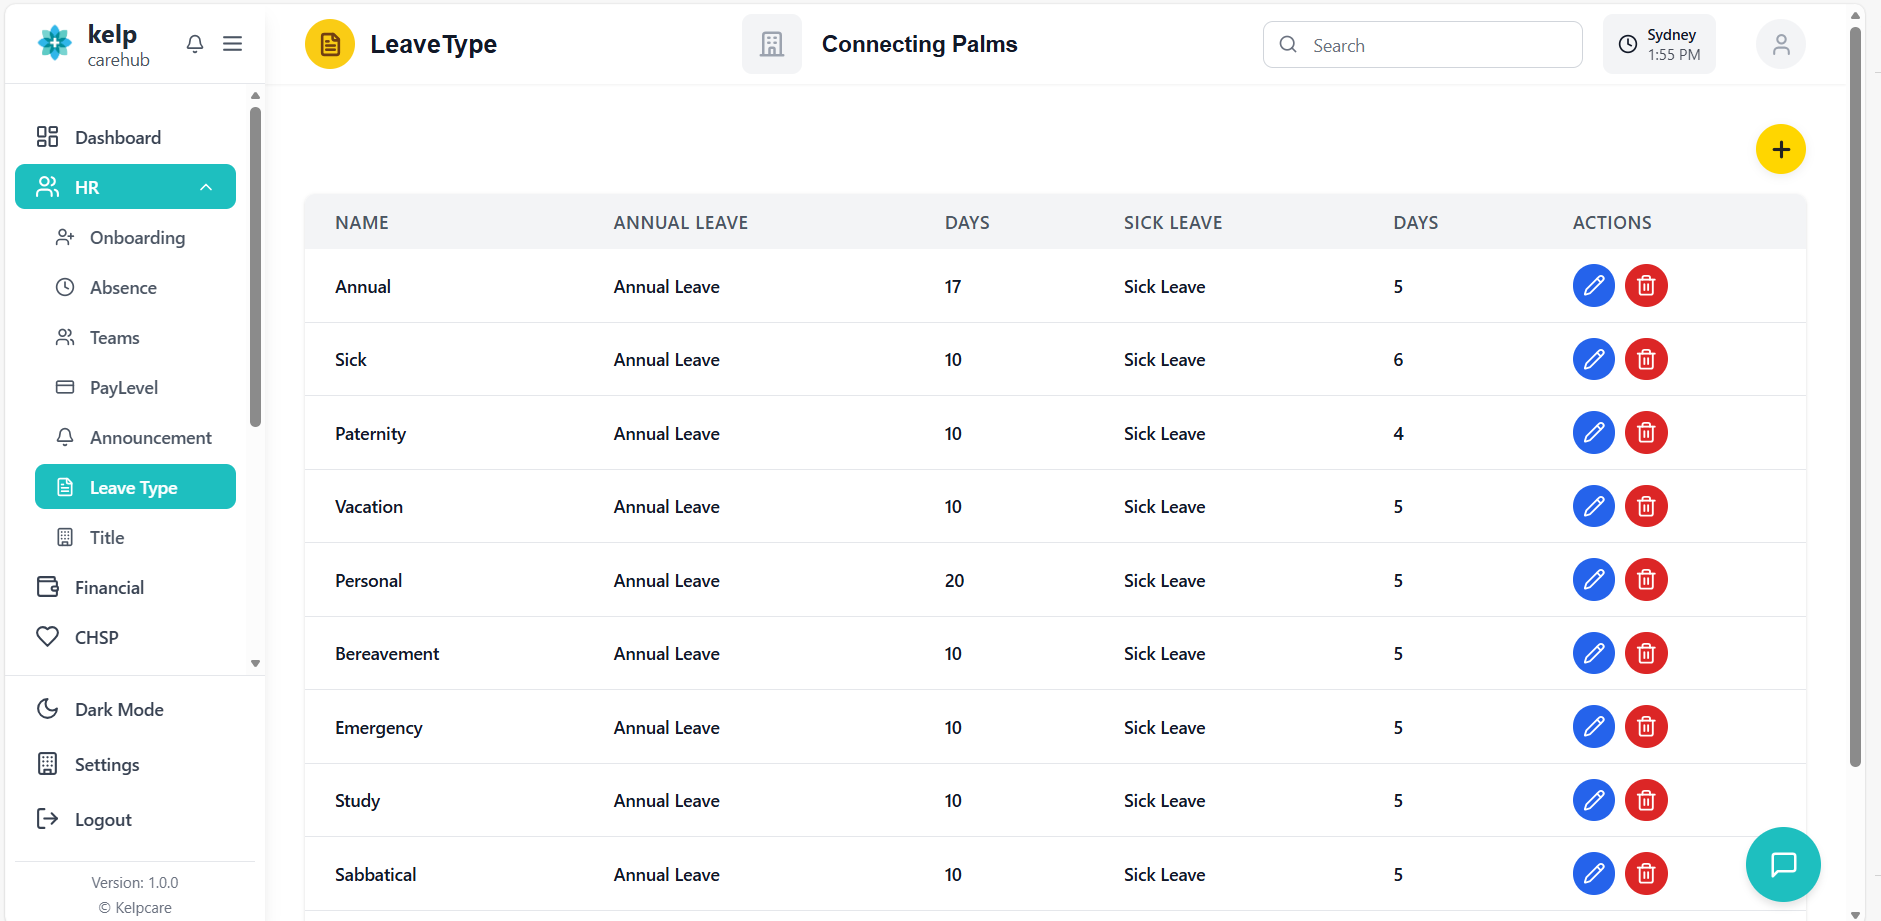
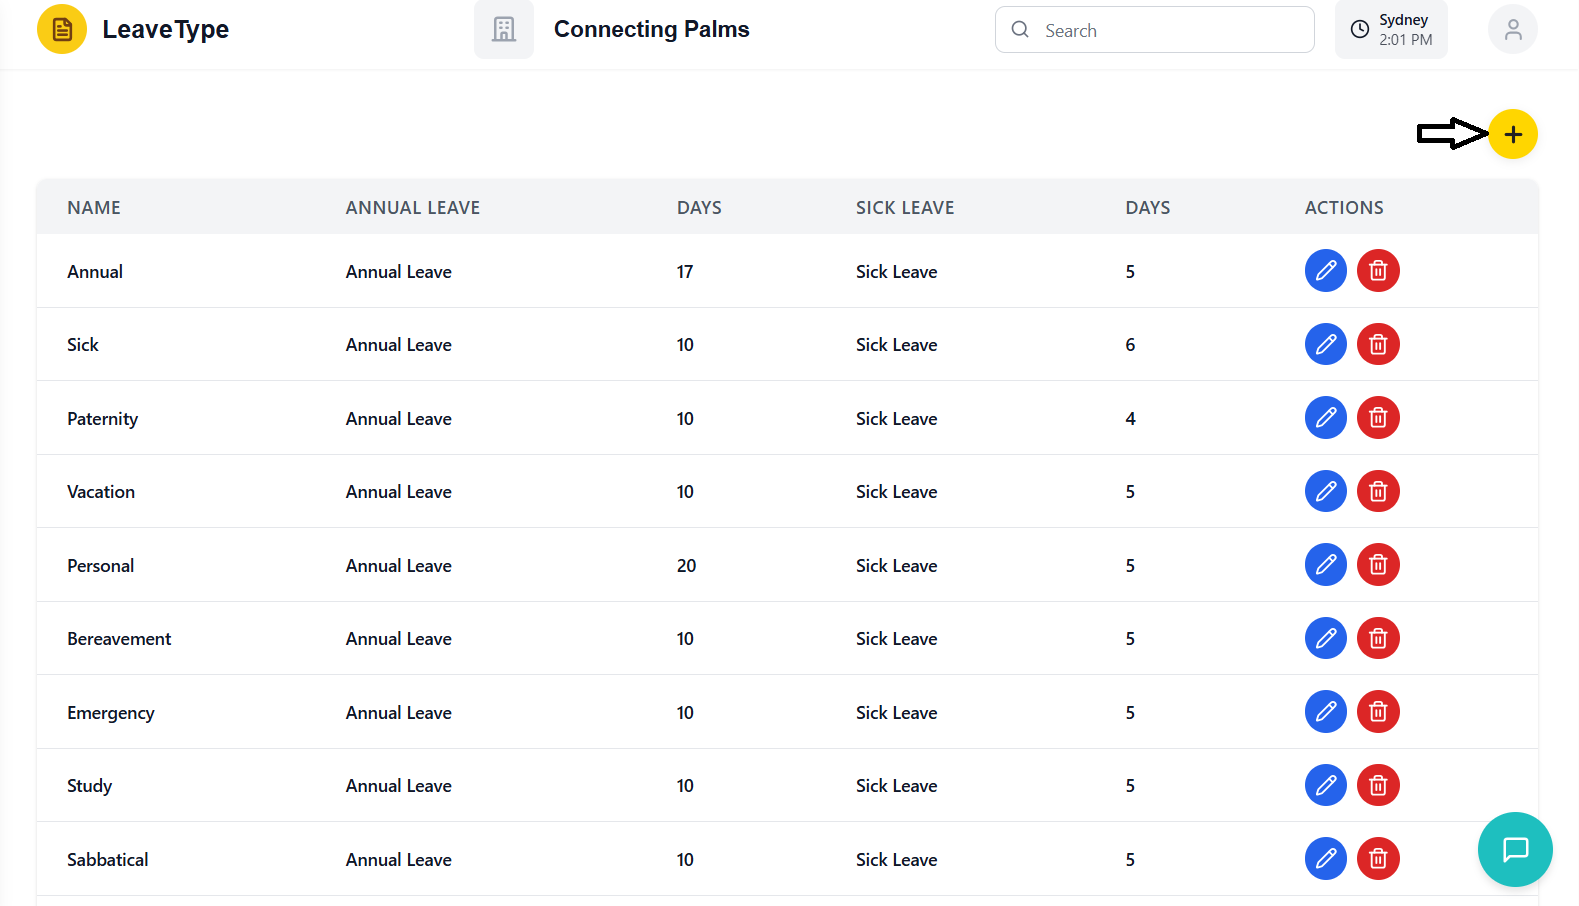
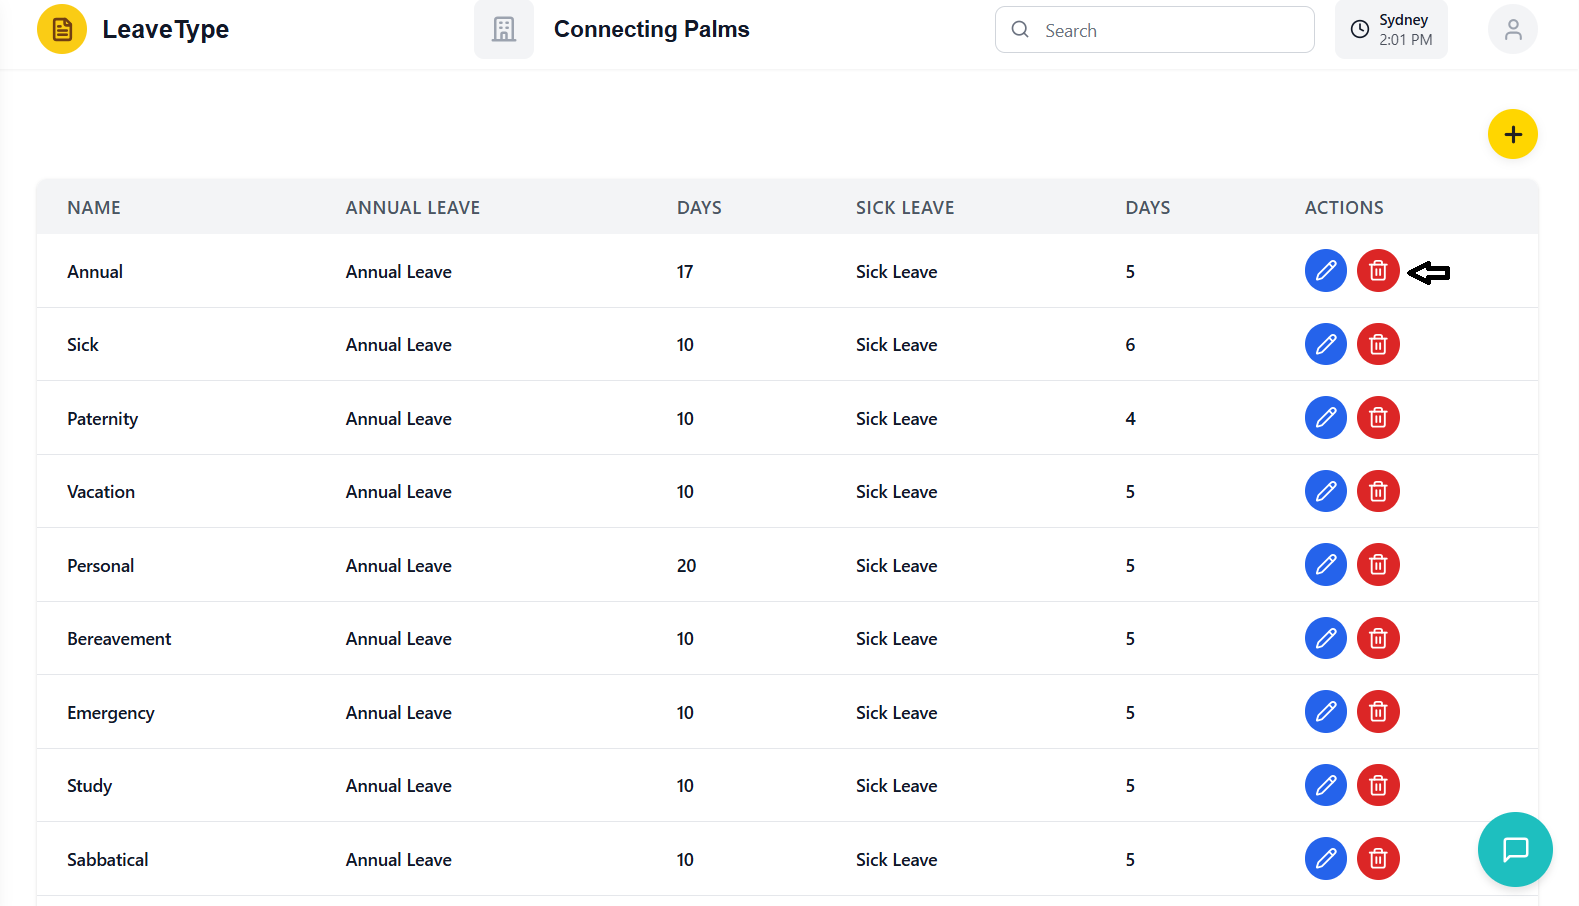
Leave Types View
Understanding the main interface for viewing and managing leave types.
Interface Components
- Page Title: "Leave Type Management"
- Add Button: Circular yellow button with plus icon in top-right corner
- Loading Indicator: Shows when data is being fetched

- Position: Top of the content area, below header
- Appearance: Red background with white text
- Close Button: X icon on the right to dismiss errors
- Auto-hide: Some errors auto-dismiss after timeout
- Structure: Responsive table with horizontal scrolling
- Columns: Name, Annual Leave, Days, Sick Leave, Days, Actions
- Styling: Alternating row colors for better readability
- Hover Effects: Rows highlight on hover
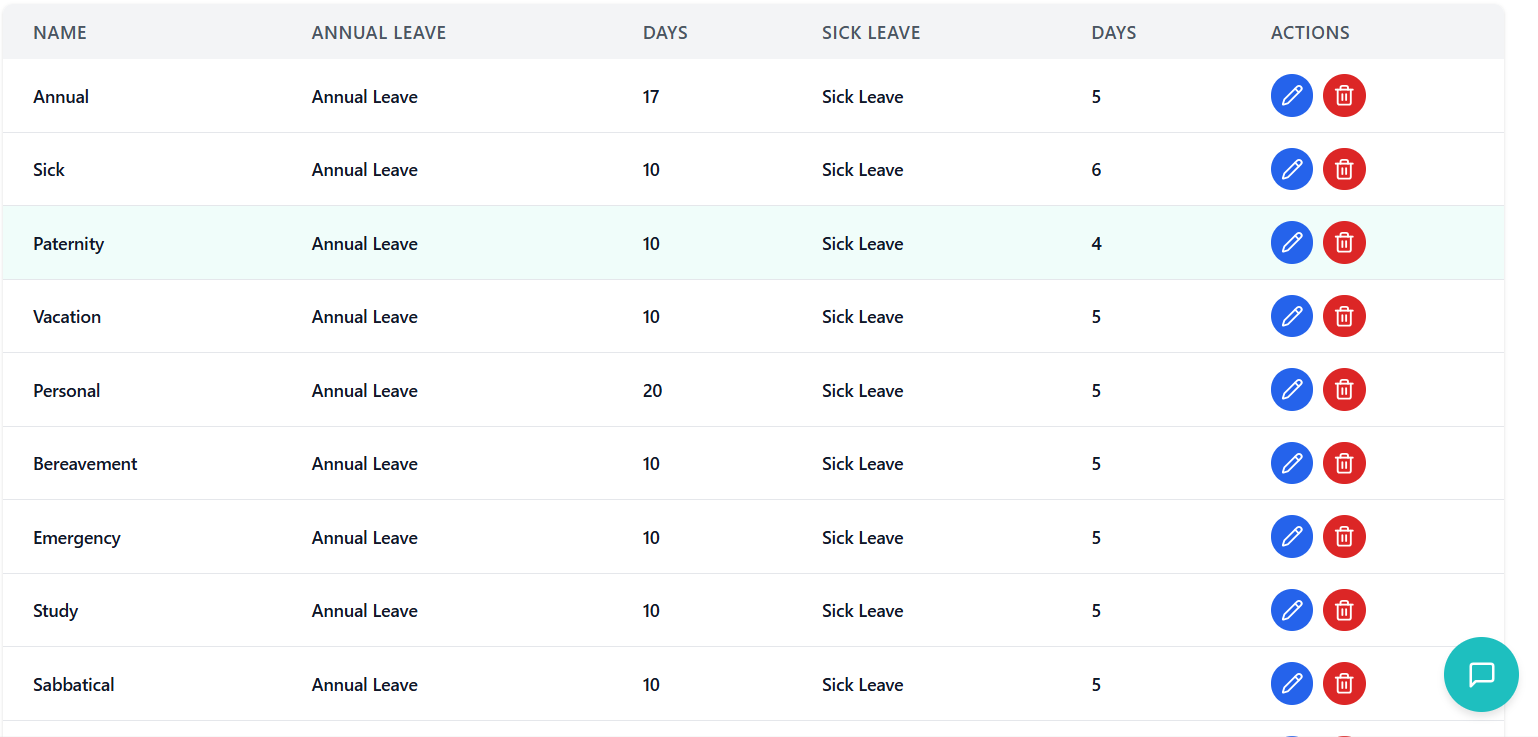
Table Columns Explained
| Column | Description | Data Source |
|---|---|---|
| Name | Custom name for the leave type (e.g., "Standard", "Executive") | leaveType.name |
| Annual Leave | Fixed label "Annual Leave" for all rows | Static |
| Days | Number of annual leave days allocated | leaveType.annualLeaveDays |
| Sick Leave | Fixed label "Sick Leave" for all rows | Static |
| Days | Number of sick leave days allocated | leaveType.sickLeaveDays |
| Actions | Edit and Delete buttons for each leave type | Component-generated |
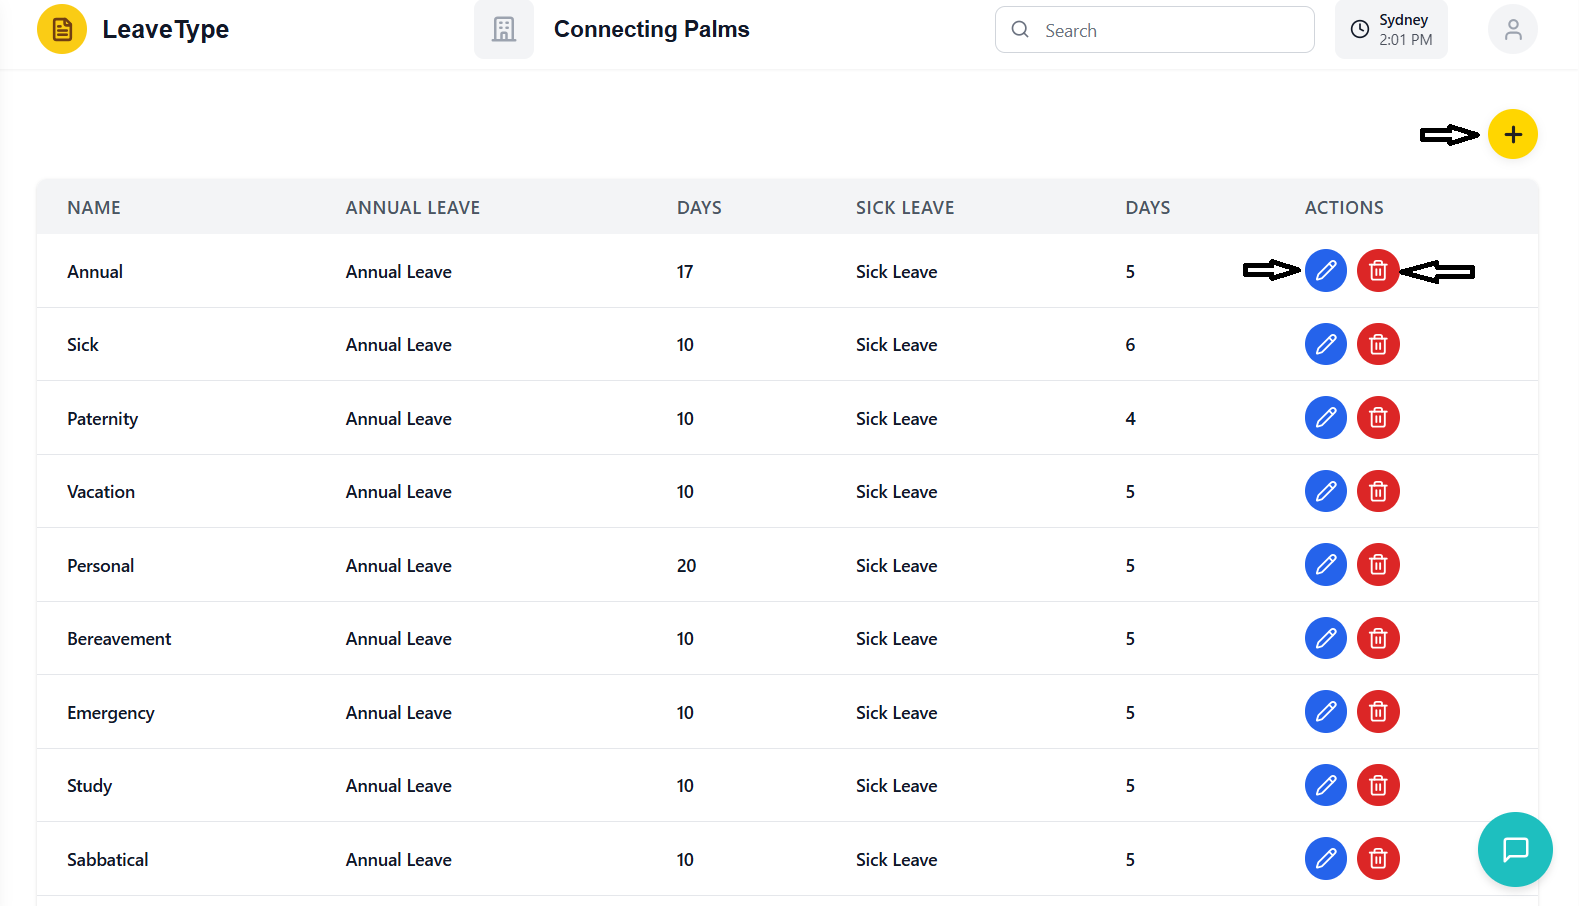
Action Buttons
- Appearance: Blue circular button with pencil icon
- Position: First button in Actions column
- Function: Opens edit modal with pre-filled data
- Disabled State: Grayed out during loading operations
- Appearance: Red circular button with trash icon
- Position: Second button in Actions column
- Function: Opens confirmation dialog for deletion
- Disabled State: Grayed out during loading operations
Adding Leave Types
Process for creating new leave type configurations in the system.
Accessing the Add Function
- Find the circular yellow button in the top-right corner
- Button has a plus (+) icon
- Hover shows tooltip: "Add Leave Type"
- Button is always visible when on the leave types page
- Click the yellow circular button
- System opens a slide-in modal from the right
- Modal has teal gradient header: "Add Leave Type"
- Form fields are empty and ready for input
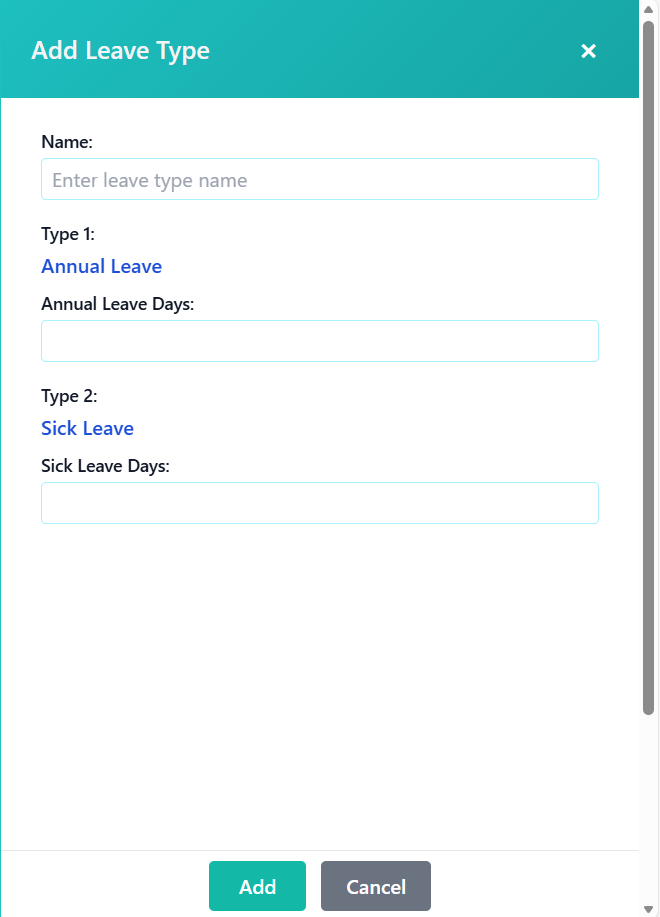
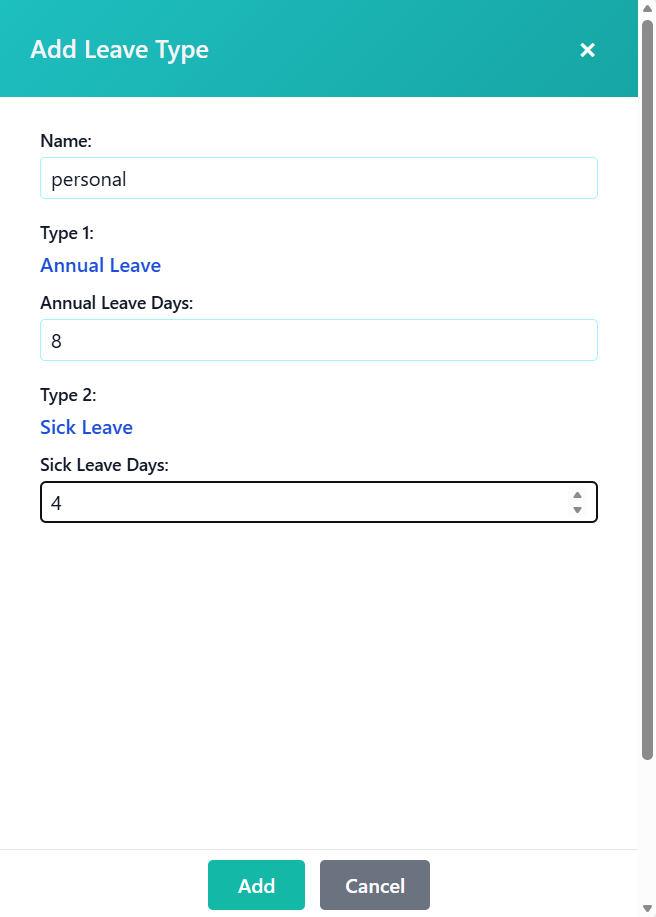
Filling Out the Form
- Field: Name (required)
- Purpose: Unique identifier for the leave type
- Format: Any text (e.g., "Standard", "Executive", "Part-time")
- Validation: Cannot be empty, must be unique within organization
- Section Label: "Type 1: Annual Leave"
- Field: Annual Leave Days (required)
- Purpose: Number of annual leave days allocated
- Format: Positive integer or zero
- Validation: Must be ≥ 0, required field
- Section Label: "Type 2: Sick Leave"
- Field: Sick Leave Days (required)
- Purpose: Number of sick leave days allocated
- Format: Positive integer or zero
- Validation: Must be ≥ 0, required field
Submitting the Form
- Double-check all entered information
- Ensure name is unique and descriptive
- Verify day allocations are correct
- Confirm both annual and sick leave days are set appropriately
- Locate the green "Add" button at bottom of modal
- Button is disabled during submission to prevent duplicates
- System validates all fields before submission
- If validation fails, error messages display below fields
- Modal closes automatically
- Success message appears: "Leave type added successfully!"
- New leave type appears in the table
- Table automatically refreshes with updated data
Editing Leave Types
Process for modifying existing leave type configurations.
Accessing the Edit Function
- Find the blue circular button with pencil icon in Actions column
- Button is available for every leave type in the table
- Hover shows tooltip: "Edit"
- Button is disabled during loading operations
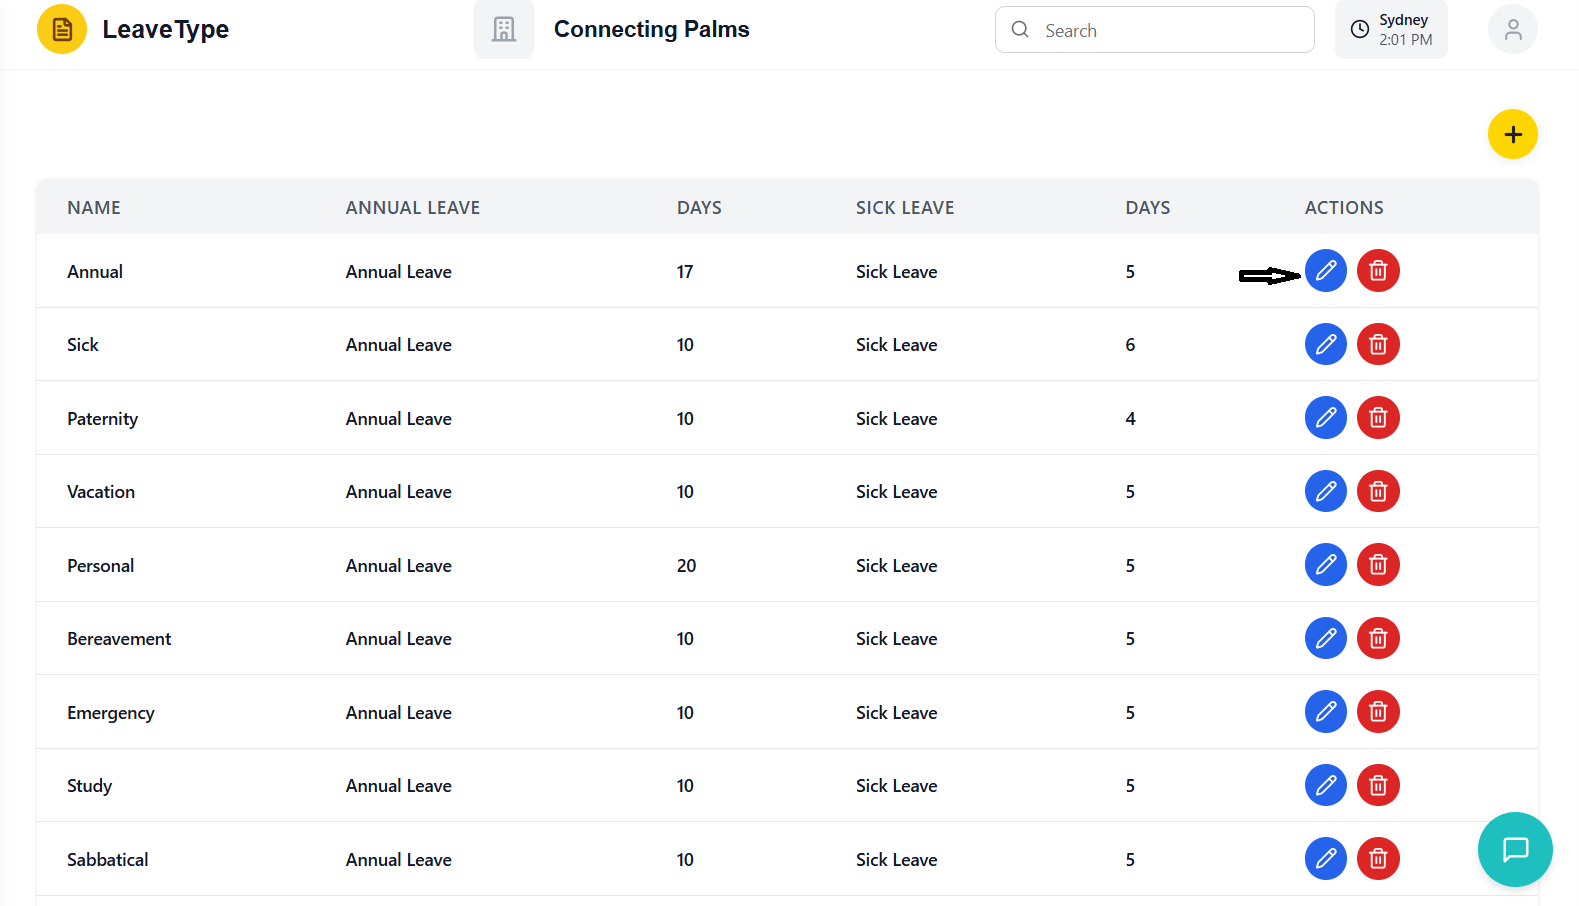
- Click the blue edit button for the desired leave type
- System opens a slide-in modal from the right
- Modal has teal gradient header: "Edit Leave Type"
- Form fields are pre-populated with current values
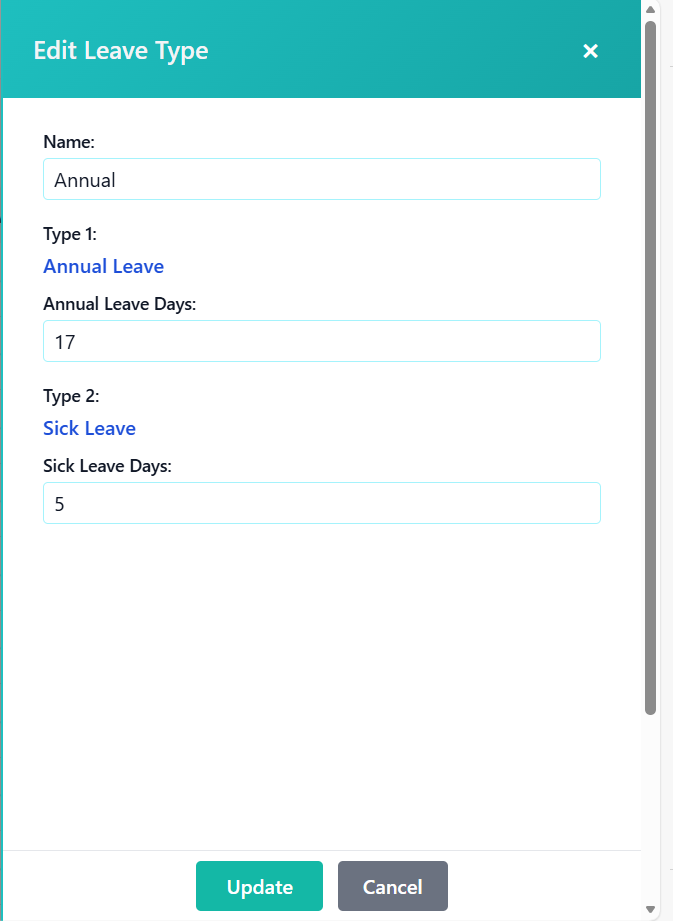
Modifying Leave Type Details
- Field: Name (required)
- Current Value: Pre-filled with existing name
- Editing: Modify as needed
- Validation: Must be unique within organization
- Field: Annual Leave Days (required)
- Current Value: Pre-filled with current allocation
- Editing: Increase or decrease as needed
- Considerations: Changes affect all employees with this leave type
- Field: Sick Leave Days (required)
- Current Value: Pre-filled with current allocation
- Editing: Increase or decrease as needed
- Considerations: Changes affect all employees with this leave type
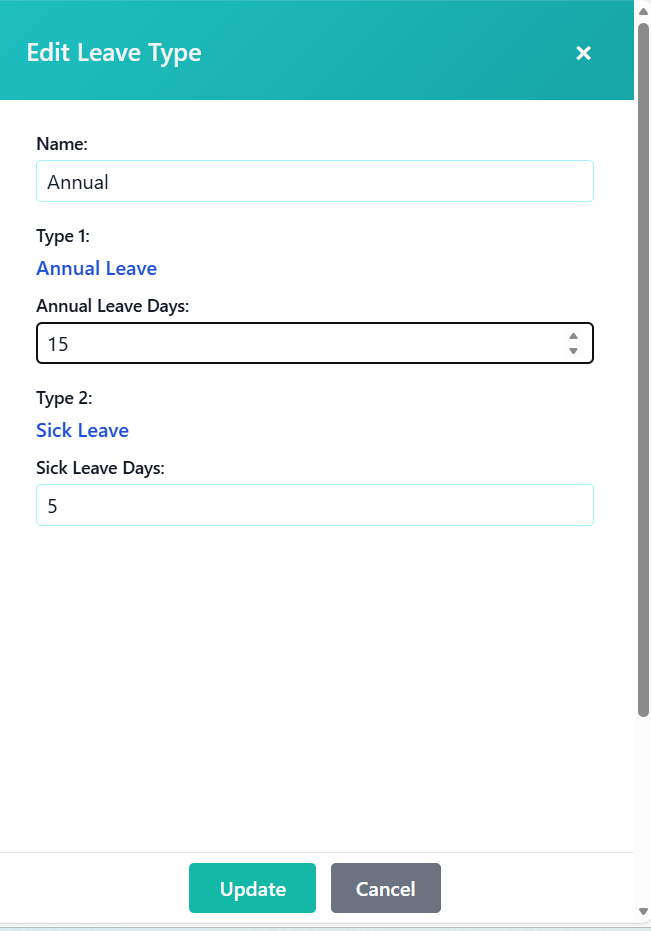
Saving Changes
- Double-check all modified fields
- Ensure name is still unique if changed
- Verify new day allocations are appropriate
- Consider notifying affected employees of changes
- Locate the green "Update" button at bottom of modal
- Button is disabled during submission
- System validates all fields before submission
- If validation fails, error messages display below fields
- Modal closes automatically
- Success message appears: "Leave type updated successfully!"
- Updated leave type appears in the table with new values
- Table automatically refreshes with updated data
Deleting Leave Types
Process for removing leave types from the system.
Accessing the Delete Function
- Find the red circular button with trash icon in Actions column
- Button is available for every leave type in the table
- Hover shows tooltip: "Delete"
- Button is disabled during loading operations
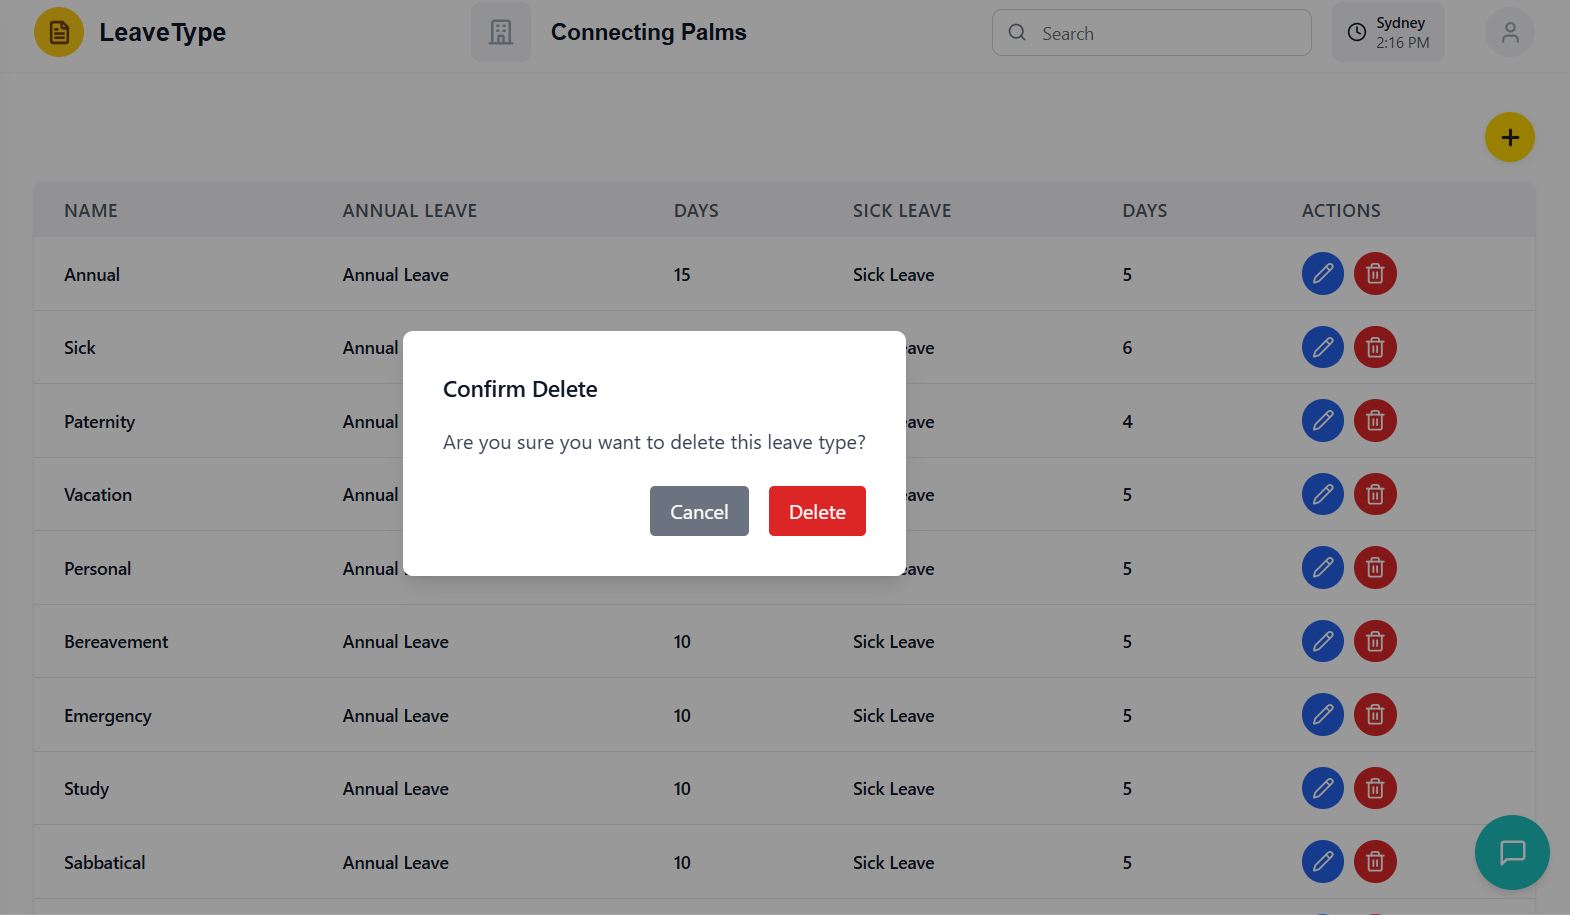
- Click the red delete button for the desired leave type
- System opens a confirmation dialog in the center of the screen
- Dialog has title: "Confirm Delete"
- Message: "Are you sure you want to delete this leave type?"
Delete Confirmation Process
- Check Dependencies: Ensure no employees are assigned to this leave type
- Consider Alternatives: Could you edit instead of delete?
- Backup Plan: Have a replacement leave type ready if needed
- Data Loss: Deletion is permanent and cannot be undone
- Cancel Button: Gray button to abort deletion
- Delete Button: Red button to confirm deletion
- Default Focus: Cancel button for safety
- Keyboard Shortcut: ESC key also cancels the dialog

Completing the Deletion
- Click the red "Delete" button in the confirmation dialog
- System immediately processes the deletion request
- Confirmation dialog closes
- Loading state may appear briefly during processing
- Success message appears: "Leave type deleted successfully!"
- Deleted leave type disappears from the table
- Table automatically refreshes with updated data
- Success message auto-dismisses after 2 seconds
- Cache is invalidated to ensure fresh data
- Any references to the deleted leave type are handled
- System remains stable and functional
- No residual data from the deleted leave type remains
Error Handling
Understanding and resolving system errors in the leave type management module.
Error Display System
- Position: Top of content area, below page header
- Appearance: Red background with white text
- Sticky: Remains visible when scrolling
- Close Button: X icon on right side to dismiss
- Duplicate Errors: "already exists" - leave type name conflict
- Validation Errors: Form field validation failures
- Network Errors: API connection issues
- Permission Errors: Insufficient user privileges
- System Errors: Unexpected application errors
Common Error Scenarios
Error Message: "A leave type with this name already exists"
Cause: Attempting to create or update a leave type with a name that already exists in the organization
Solution:
- Choose a different name for the leave type
- Edit the existing leave type instead of creating a new one
- Check if the leave type was recently deleted and needs to be restored
Error Message: Various field-specific validation messages
Common Causes:
- Empty required fields (Name, Annual Leave Days, Sick Leave Days)
- Negative numbers in day allocation fields
- Non-numeric values in number fields
- Extremely large numbers that exceed system limits
Solution:
- Fill in all required fields
- Ensure day allocations are positive numbers or zero
- Use only numeric values in number fields
- Contact support if legitimate large numbers are needed
Error Message: Various network-related error messages
Common Causes:
- Internet connection lost
- Server unavailable or down for maintenance
- API endpoint changes or incorrect URLs
- Firewall or proxy blocking requests
Solution:
- Check internet connection and try again
- Wait for server maintenance to complete
- Clear browser cache and reload the page
- Contact IT support if issue persists
Error Message: "You do not have permission to perform this action"
Cause: User lacks required permissions for leave type management
Solution:
- Contact system administrator to request appropriate permissions
- Verify you're logged in with the correct user account
- Check if your role has been changed recently
Error Resolution Workflow
- Carefully read the entire error message
- Note any specific field names or values mentioned
- Look for error codes or specific technical details
- Determine which operation caused the error (create, update, delete)
- Check if the error is related to specific data values
- Verify if the error is consistent or intermittent
- For validation errors: Correct the invalid data
- For duplicate errors: Change the conflicting value
- For network errors: Refresh the page and try again
- For permission errors: Contact administrator
- If basic resolution fails, contact IT support
- Provide the exact error message
- Note what you were trying to do when the error occurred
- Include any relevant screenshots
Loading States
How the system handles loading and data fetching operations.
Loading Indicators
- Trigger: When navigating to the leave types page
- Indicator: LoadingFlower component in center of screen
- Duration: Until leave types data is fetched from server
- User Action: No action possible during this state
- Trigger: During create, update, or delete operations
- Indicator: Button disabled states and possible spinners
- Duration: Until API request completes
- User Action: Limited - cannot perform duplicate operations
Loading State Behavior
- Add Button: Disabled during initial load and CRUD operations
- Edit Buttons: Disabled during any loading state
- Delete Buttons: Disabled during any loading state
- Form Submit Buttons: Disabled during submission
- Visual Feedback: Clear indicators that operation is in progress
- Prevention of Duplicates: System prevents duplicate submissions
- Error Handling: Loading states handle network timeouts gracefully
- Progressive Enhancement: UI remains functional where possible
- Initial: Empty table → LoadingFlower → Populated table
- Create: Form open → Submit clicked → Loading → Success/Error
- Update: Form open → Submit clicked → Loading → Success/Error
- Delete: Confirm dialog → Delete clicked → Loading → Success/Error
Performance Optimization
- leaveTypeCacheService: Manages client-side caching
- Cache Invalidation: Automatic after CRUD operations
- Organization Scope: Caches are organization-specific
- Performance Benefit: Reduced server requests for repeated views
- On-Demand Loading: Data fetched only when needed
- Optimistic Updates: UI updates before server confirmation
- Error Recovery: System recovers gracefully from fetch failures
- Background Sync: Minimal impact on user interaction
Dark Mode Support
How the system handles dark mode theming and provides optimal viewing in low-light conditions.
Dark Mode Implementation
- Prop-based: darkMode prop passed to component
- Global Class: Can also rely on global .dark CSS class
- System Preference: Can integrate with OS-level dark mode
- Manual Toggle: User can manually switch themes
- Tailwind Classes: Conditional classes based on darkMode prop
- CSS Variables: Theme-aware CSS custom properties
- Inline Styles: Dynamic style objects for complex cases
- Consistency: All UI elements support both themes
Theme-Aware Components
- Light Mode: bg-white, bg-gray-100
- Dark Mode: bg-gray-900, bg-gray-800
- Cards: White in light mode, gray-800 in dark mode
- Table Rows: Alternating colors adjusted for both themes
- Light Mode: text-gray-900, text-gray-700
- Dark Mode: text-gray-100, text-gray-300
- Headings: Maintain contrast ratio in both themes
- Labels: Readable in both light and dark backgrounds
- Light Mode: border-gray-200, border-cyan-200
- Dark Mode: border-gray-700, border-gray-600
- Input Borders: Visible in both themes
- Table Borders: Appropriate contrast for data separation
- Input Backgrounds: White in light mode, gray-700 in dark mode
- Input Text: Dark in light mode, light in dark mode
- Placeholders: Appropriate contrast in both themes
- Focus States: Consistent across both themes
Modal and Dialog Themes
- Header: Consistent teal gradient in both themes
- Background: Theme-appropriate card background
- Form Elements: Theme-aware inputs and labels
- Action Buttons: Consistent colors with proper contrast
- Background: Theme-appropriate modal background
- Text: Readable in both light and dark themes
- Buttons: Consistent danger and cancel button styles
- Overlay: Semi-transparent overlay in both themes

Accessibility Considerations
- Text Contrast: Meets WCAG AA standards in both themes
- Button Contrast: Sufficient contrast for all interactive elements
- Border Contrast: Clear visual separation of elements
- Error States: High contrast for important information
- Action Colors: Not relying solely on color for meaning
- Icons: Accompanying icons for color-coded actions
- Status Indicators: Multiple visual cues for important states
- Form Validation: Text labels in addition to color indicators
Troubleshooting Guide
Solutions to common issues and problems you may encounter in the leave type management system.
Common Issues
Symptoms: Loading spinner persists, table remains empty
Possible Causes:
- Network connection issues
- Server unavailable or down
- Organization ID not available
- Permission denied for current user
Solutions:
- Check internet connection and try refreshing
- Verify server status with system administrator
- Ensure you're logged in with correct permissions
- Clear browser cache and try again
- Contact IT support if issue persists
Symptoms: Add button doesn't work, or form submission fails
Possible Causes:
- Duplicate leave type name
- Validation errors in form fields
- Network connection issues
- Insufficient permissions
Solutions:
- Check for duplicate name error message
- Verify all required fields are filled correctly
- Ensure annual and sick leave days are valid numbers
- Check network connection and try again
- Contact administrator to verify permissions
Symptoms: Action buttons are grayed out and unclickable
Possible Causes:
- System is in loading state
- Another operation is in progress
- Network delay or timeout
- Browser performance issues
Solutions:
- Wait for current operation to complete
- Refresh the page if buttons remain disabled
- Check browser console for error messages
- Clear browser cache and try again
- Try a different browser if issue persists
Symptoms: Error messages remain visible after issue is resolved
Possible Causes:
- Error state not being cleared properly
- Multiple errors occurring in sequence
- Browser caching previous error state
Solutions:
- Click the X button to manually clear the error
- Refresh the page to reset the error state
- Perform a successful operation to clear previous errors
- Clear browser cache and local storage
Symptoms: Inconsistent colors, poor contrast, or theme not applying
Possible Causes:
- Browser extension interfering with styles
- CSS cache not updating
- Incomplete theme implementation
- System theme conflict
Solutions:
- Disable browser extensions and try again
- Force refresh page (Ctrl+F5 or Cmd+Shift+R)
- Clear browser cache and cookies
- Check system-level dark mode settings
- Try a different browser to isolate the issue
Advanced Troubleshooting
- Console Tab: Check for JavaScript errors
- Network Tab: Monitor API requests and responses
- Application Tab: Check Redux state and local storage
- Elements Tab: Inspect CSS and HTML structure
- API Responses: Verify data structure from server
- Redux State: Check leaveTypes array in Redux devtools
- Form Data: Validate payload before submission
- Error Messages: Note exact error text for support
- Large Datasets: Check if too many leave types are loading
- Memory Leaks: Monitor browser memory usage
- Network Speed: Check internet connection speed
- Browser Resources: Close other tabs to free resources
Contacting Support
- Issues persist after trying all troubleshooting steps
- Systematic errors affecting multiple users
- Data corruption or loss
- Security concerns or unauthorized access
- Feature requests or enhancement suggestions
Information to Provide:
- Your user ID and organization
- Exact error messages (screenshots helpful)
- Steps to reproduce the issue
- Browser and operating system version
- Date and time the issue occurred
- Any recent changes to your system