Incident Management System
Complete guide for incident management. Select a topic below to get started.
System Overview
Learn about the system features, user roles, and permissions.
Accessing the System
How to login and navigate to the incident module.
Incident Dashboard
Understanding the incident dashboard and analytics.
Incident List View
Navigating and filtering the incident list.
Creating Incidents
Process for creating new incident records.
Incident Details
Comprehensive view of individual incident information.
Editing Incidents
How to modify existing incident data.
Managing Status
Setting and updating incident status.
Assigning Incidents
Assigning incidents to departments and employees.
Managing Notes
Adding and managing incident notes.
Audit Logs
Tracking incident changes and history.
User Permissions
Understanding role-based access control.
Troubleshooting
Solutions to common issues and problems.
System Overview
The Incident Management System enables comprehensive incident tracking, assignment, resolution, and reporting with role-based access control.
Key Features
🚨 Incident Tracking
Comprehensive incident creation, assignment, and resolution tracking.
📊 Dashboard Analytics
Visual analytics and reporting on incident trends and status.
👥 Role-Based Access
Granular permissions for different user roles and departments.
📝 Notes Management
Detailed notes and audit trail for each incident.
🔍 Advanced Filtering
Filter incidents by status, assignee, department, and search terms.
📈 Status Workflow
Customizable status workflow from creation to resolution.
📎 Document Attachment
Attach relevant documents and files to incidents.
📱 Responsive Design
Works seamlessly across desktop, tablet, and mobile devices.
Incident Status Workflow
Technical Architecture
- Framework: React with Redux for state management
- UI Components: Custom components with Tailwind CSS
- Charts: Recharts for analytics and dashboard
- Icons: Lucide React for consistent iconography
- API: RESTful API with Redux Saga/Epic middleware
- Authentication: JWT token-based authentication
- Caching: Incident cache service for performance
- Permissions: ACL-based permission system
- State: Redux for global state management
- Persistence: Local storage for user preferences
- Real-time: Manual refresh with cache invalidation
- Validation: Form validation with error handling
Accessing the Incident System
How to login and navigate to the incident management module.
- Navigate to the application URL
- Enter your username and password
- System authenticates and loads your dashboard
- Permissions are automatically applied based on your role
- Click on "Incidents" in the main navigation menu
- System loads the incident dashboard or list based on your permissions
- Default view shows incidents relevant to your role
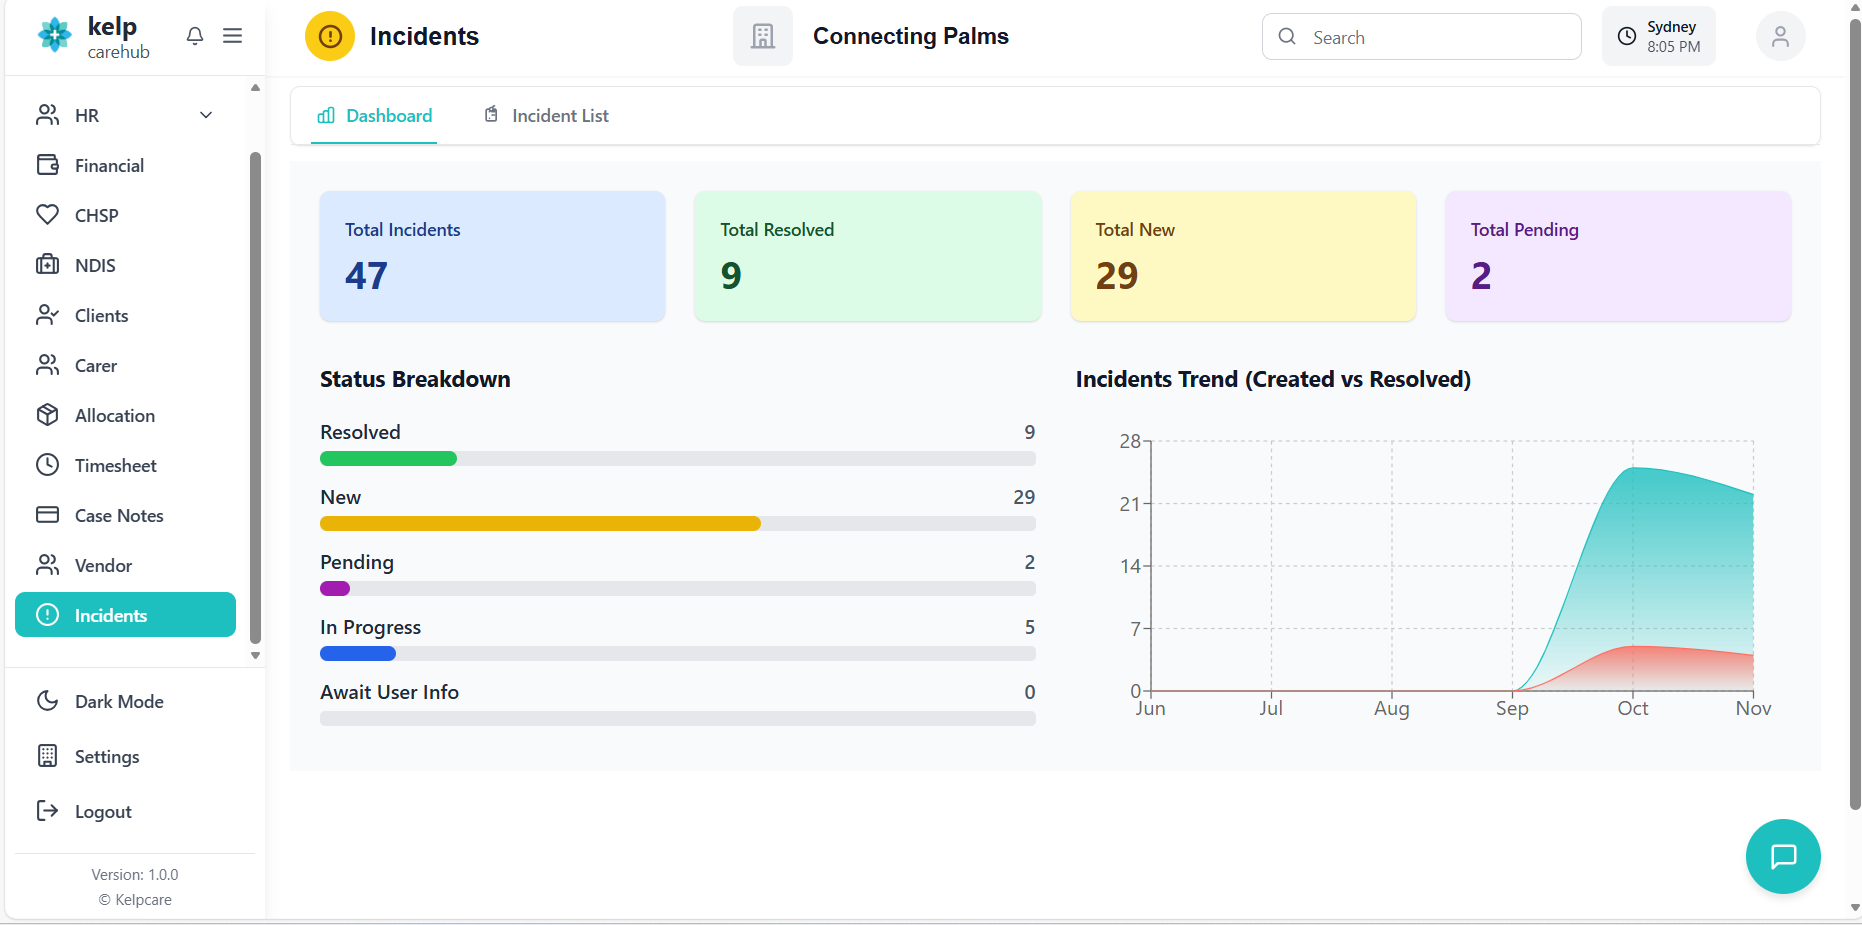
Incident Dashboard
Understanding the incident dashboard with analytics and visual reporting.
Dashboard Overview
- Total Incidents: Overall count of all incidents
- Total Resolved: Count of incidents with resolved status
- Total New: Count of incidents with new status
- Total Pending: Count of incidents with pending status
- Each card shows a color-coded background for quick reference

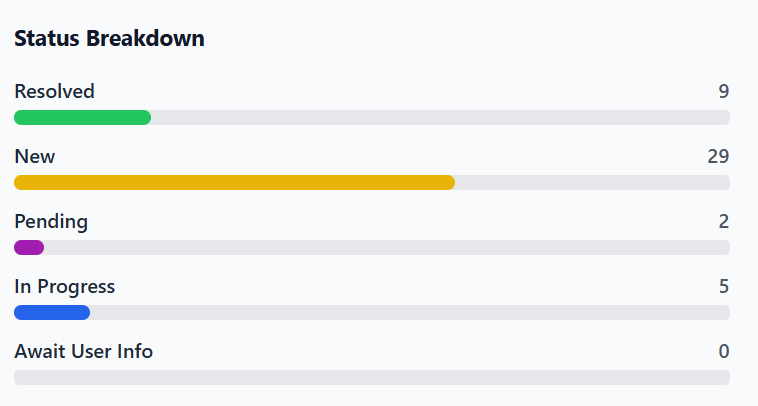
- Visual representation of incident distribution by status
- Color-coded progress bars for each status type
- Shows count and percentage for each status
- Statuses include: Resolved, New, Pending, In Progress, Await User Info
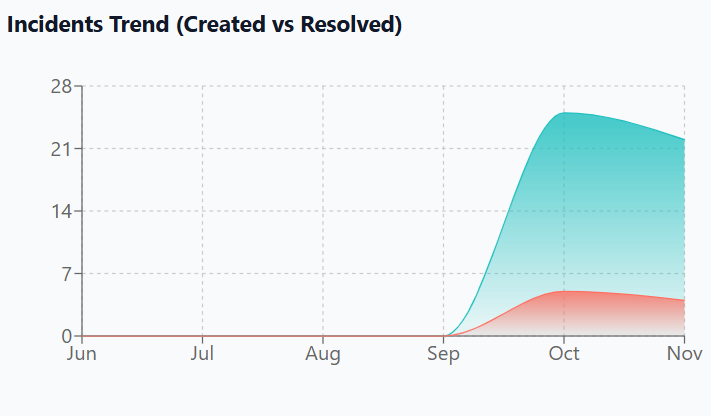
- Area chart showing incidents created vs resolved over time
- Displays data for the last 6 months by default
- Blue line for created incidents, red line for resolved incidents
- Hover over data points to see exact numbers
Dashboard Navigation
- Real-time Data: Dashboard updates automatically when incidents change
- Responsive Design: Adapts to different screen sizes
- Dark Mode Support: Toggle between light and dark themes
- Quick Access: Click on metrics to filter the incident list
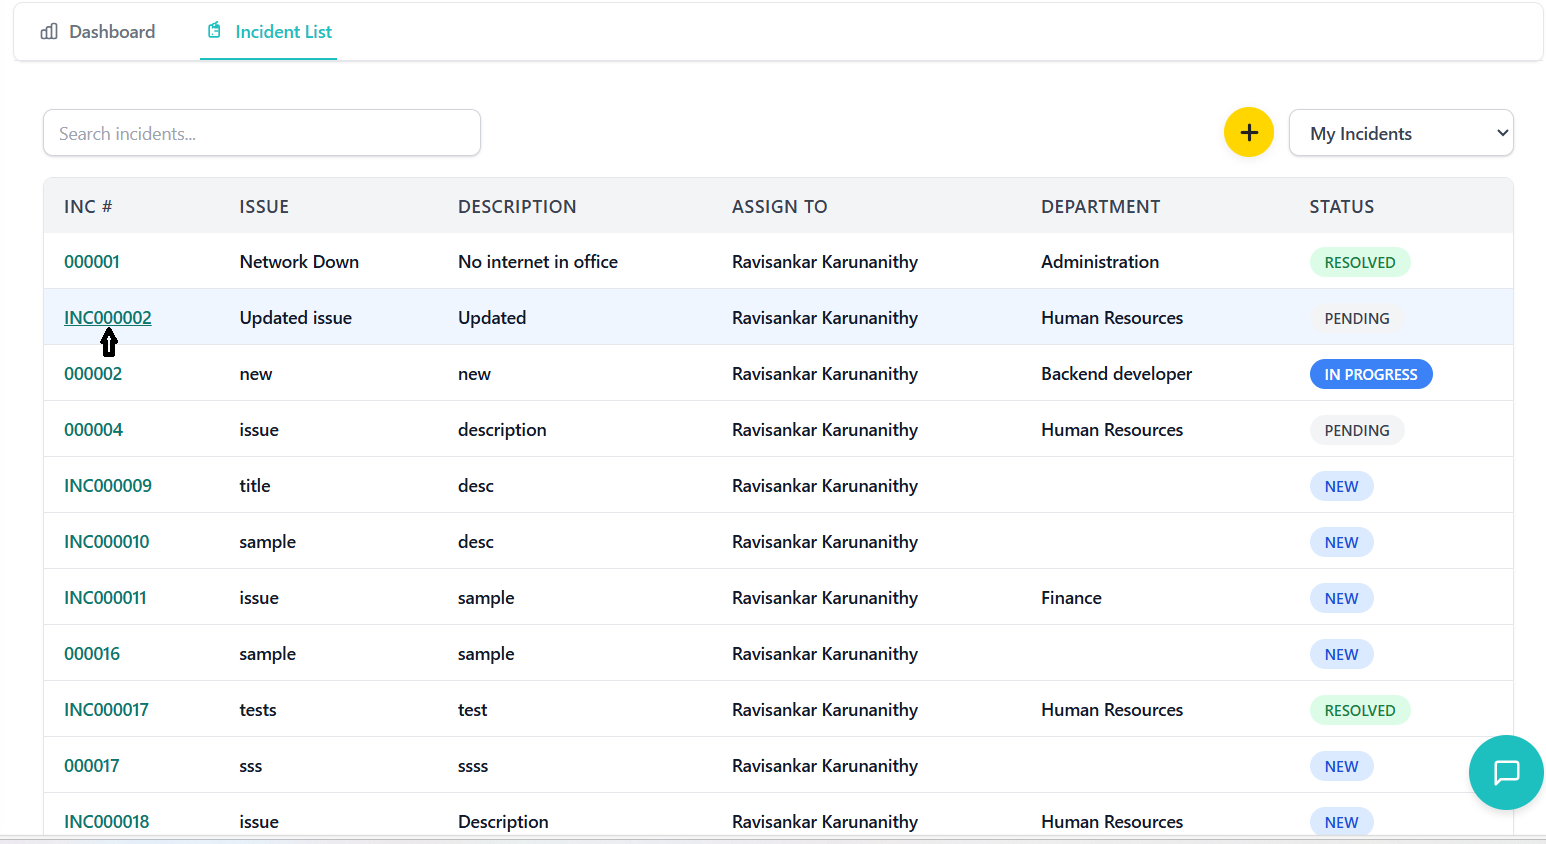
Incident List View
Understanding the main incident interface and navigation.
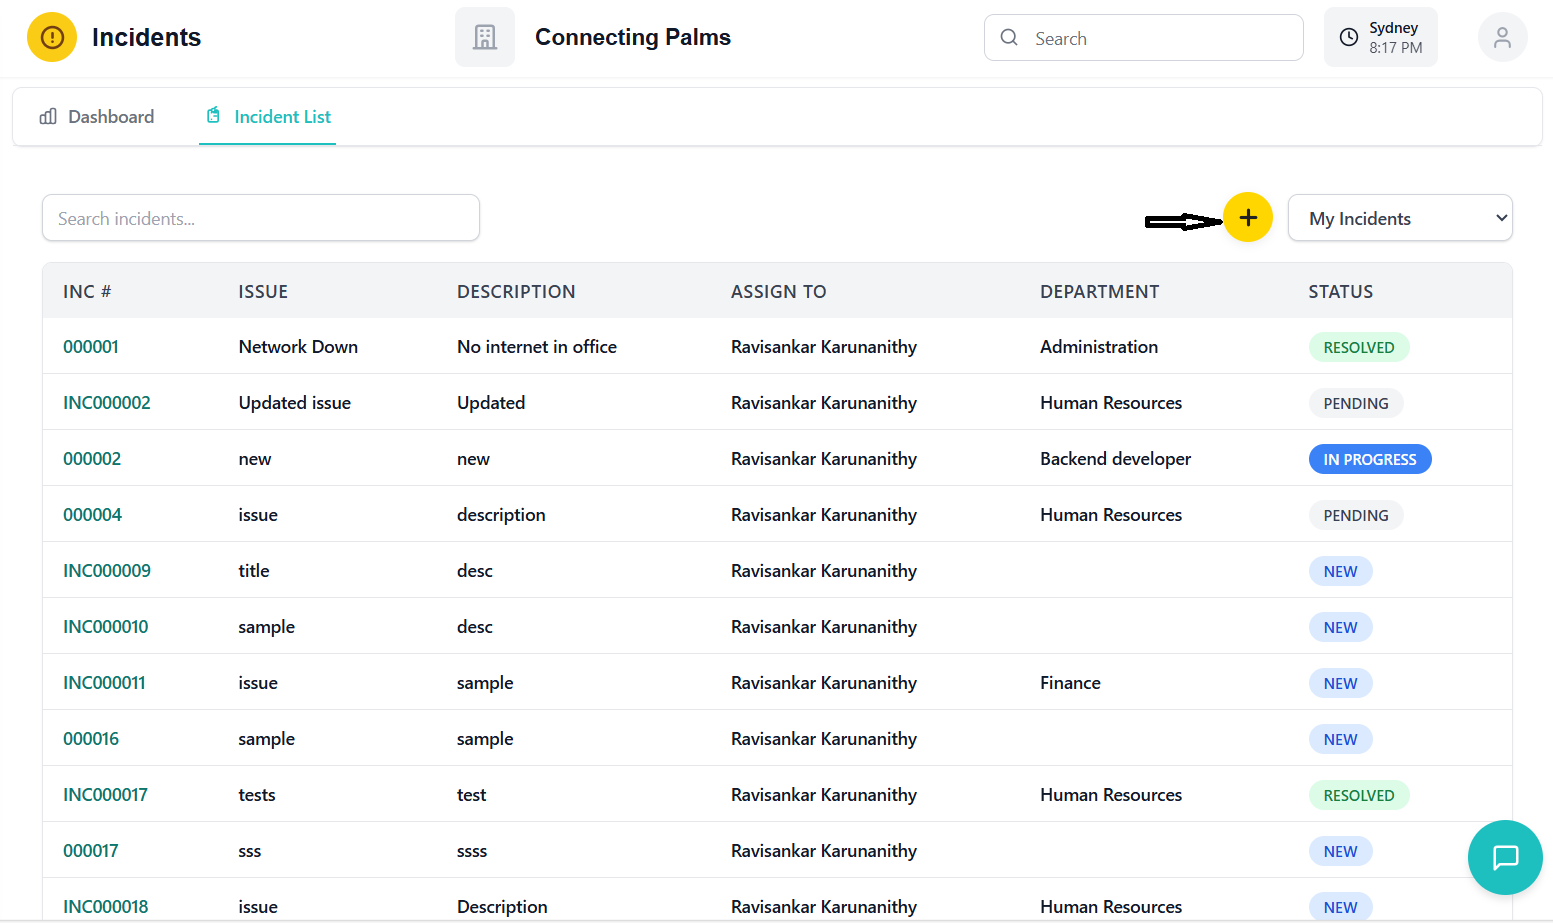
Incident List Interface
- Search Box: Search incidents by issue, description, assignee, or department
- Create Button: Yellow circular button with plus icon to create new incidents
- Filter Dropdown: Filter incidents by "My Incidents", "My Group Incidents", or "All Incidents"
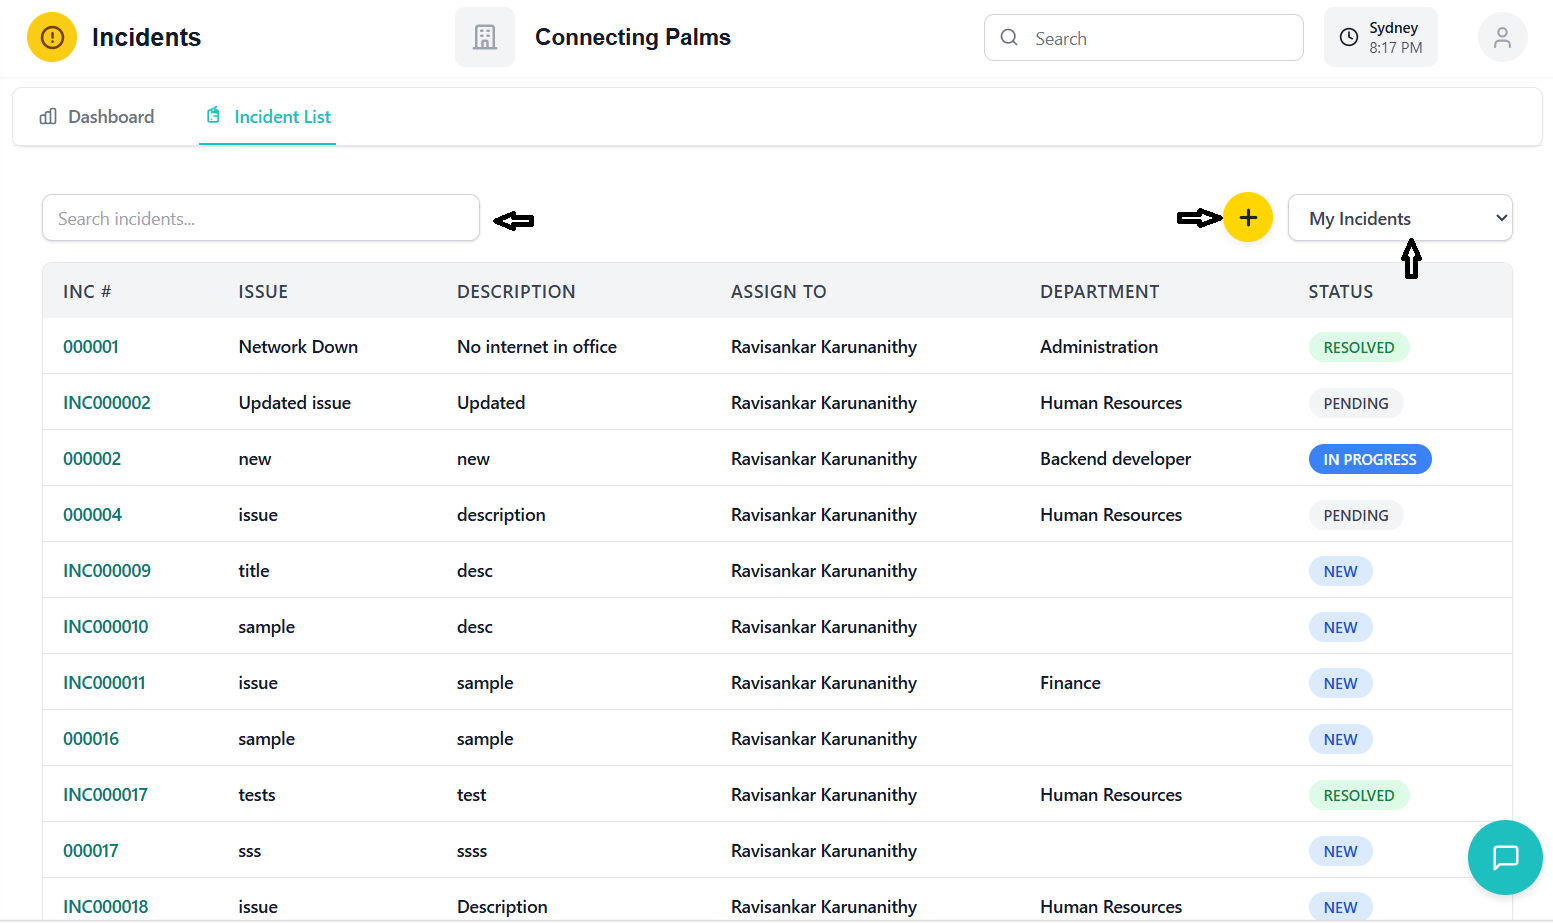
- Inc #: Unique incident identifier (clickable to view details)
- Issue: Brief title of the incident
- Description: Detailed description of the incident
- Assign To: Employee assigned to the incident
- Department: Department responsible for the incident
- Status: Color-coded status badge
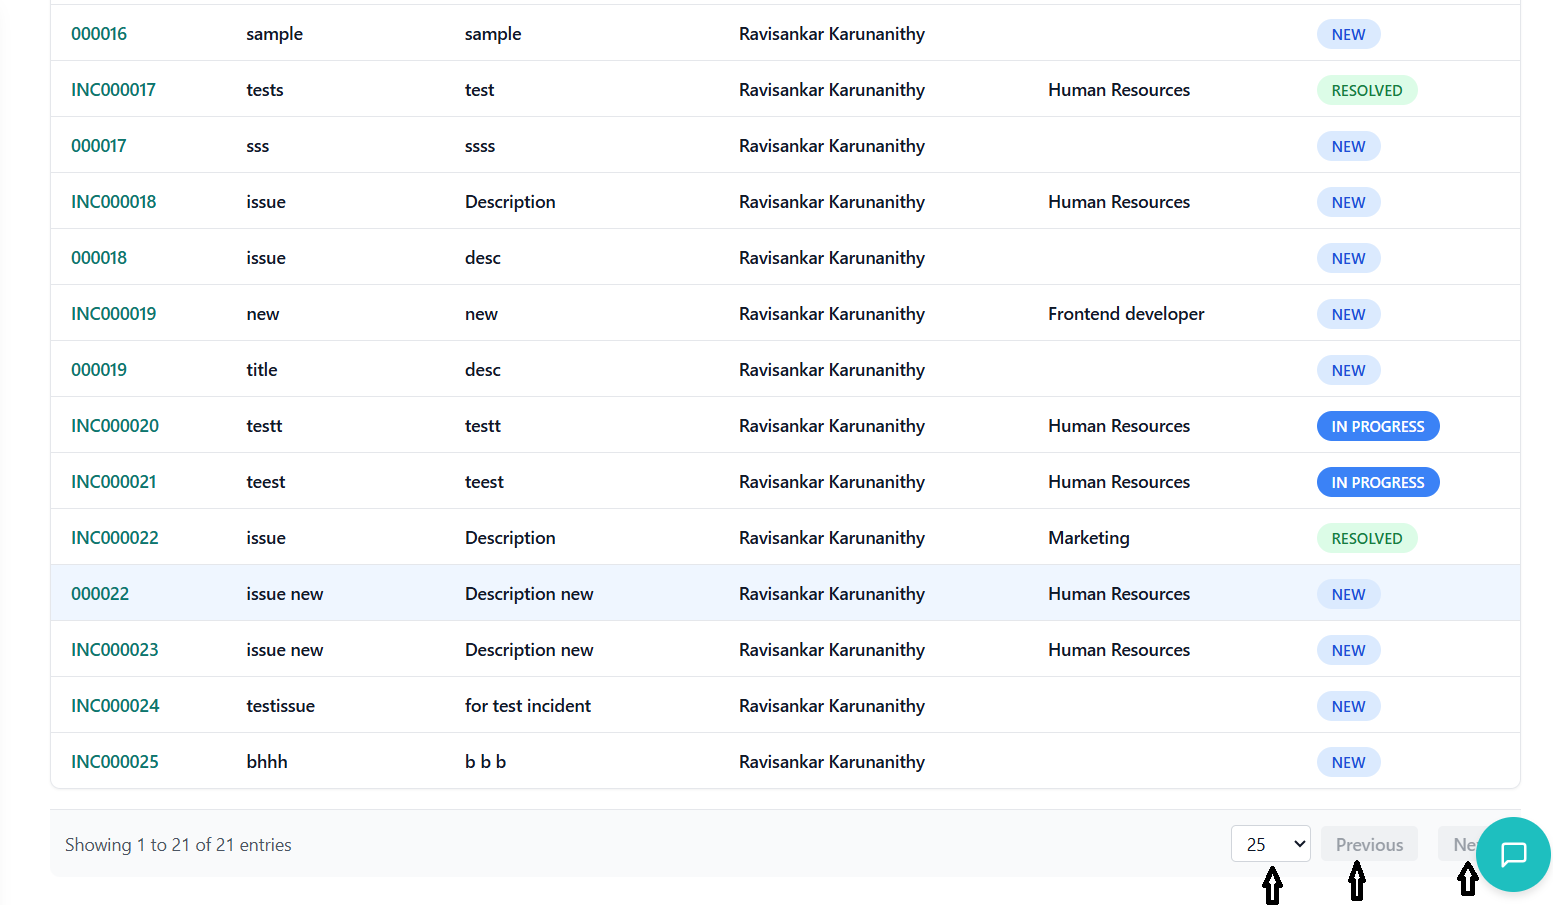
List Navigation Features
- My Incidents: Shows only incidents assigned to you
- My Group Incidents: Shows incidents assigned to your department
- All Incidents: Shows all incidents (admin permission required)
- Search: Real-time filtering as you type
- Page Size: Select how many incidents to show per page (5, 10, 25, 50, 100)
- Navigation: Previous/Next buttons and direct page number access
- Results Count: Shows current range and total incidents
- Smart Pagination: Ellipsis for large page ranges
Sorting and Organization
| Column | Sort Order | Description |
|---|---|---|
| Inc # | Ascending (Default) | Sorted by numeric value of incident number |
| Issue | Alphabetical | Sorted A-Z or Z-A when clicked |
| Description | Alphabetical | Sorted by description text |
| Assign To | Alphabetical | Sorted by employee name |
| Department | Alphabetical | Sorted by department name |
| Status | Status Order | Sorted by status workflow order |
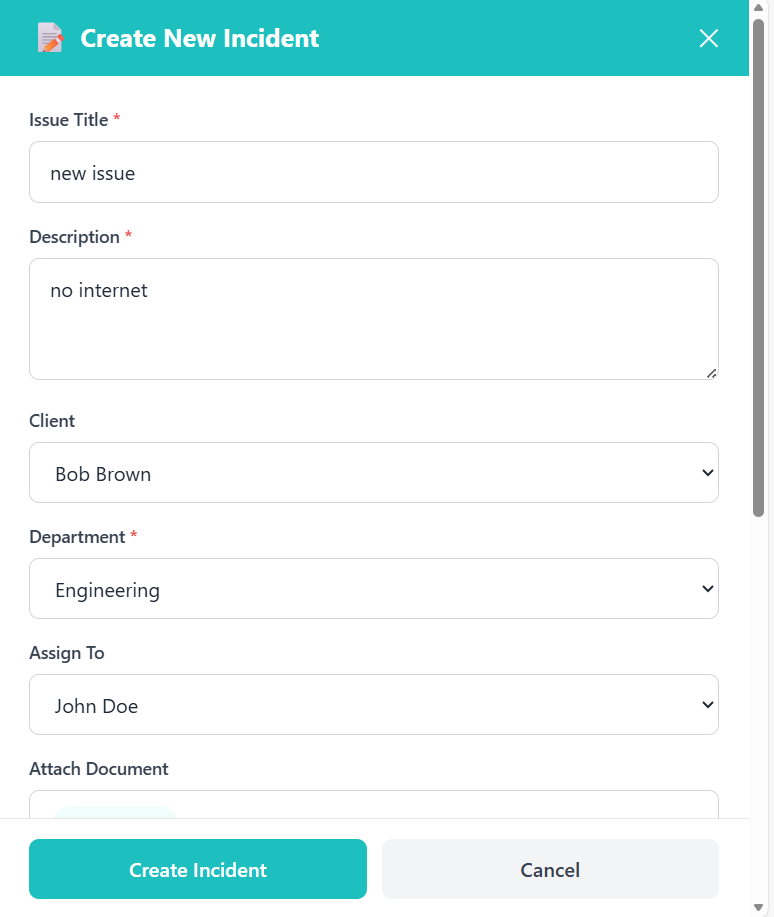
Creating Incidents
Process for creating new incident records in the system.
Prerequisites for Creating Incidents
- User must have "Incident Create" permission
- Access to incident management module
- Organization ID association
Creating New Incidents
- Navigate to Incidents list view
- Click the yellow circular "Create Incident" button with plus icon
- Creation modal opens on the right side of the screen
Issue Title *
- Enter a concise but descriptive title for the incident
- This will be the primary identifier in lists
- Required field
Description *
- Provide detailed information about the incident
- Include what happened, when, and impact
- Required field
Client (Optional)
- Select associated client from dropdown
- Includes both regular and CHSP clients
- Optional field
Department *
- Select the department responsible for resolution
- Dropdown shows all available departments
- Required field
Assign To (Optional)
- Select specific employee to assign the incident
- Dropdown filtered by selected department
- Optional field - can be assigned later
Attach Document (Optional)
- Upload relevant files, images, or documents
- Supported formats: PDF, JPG, PNG, DOC, DOCX
- Maximum file size: 10MB
Status *
- Automatically set to "New" for new incidents
- Cannot be changed during creation
- Required field
Initial Notes (Optional)
- Add any initial observations or context
- Can add multiple notes using "Add Another Note"
- Optional field
- Review all entered information
- Click "Create Incident" button
- System validates required fields
- Success message appears upon completion
- Modal closes and incident appears in list
Required Fields Validation
| Field | Validation Rule | Error Message |
|---|---|---|
| Issue Title | Cannot be empty | "Issue title is required" |
| Description | Cannot be empty | "Description is required" |
| Department | Must select from list | "Department is required" |
| Status | Must be "New" | "Status must be New for new incidents" |
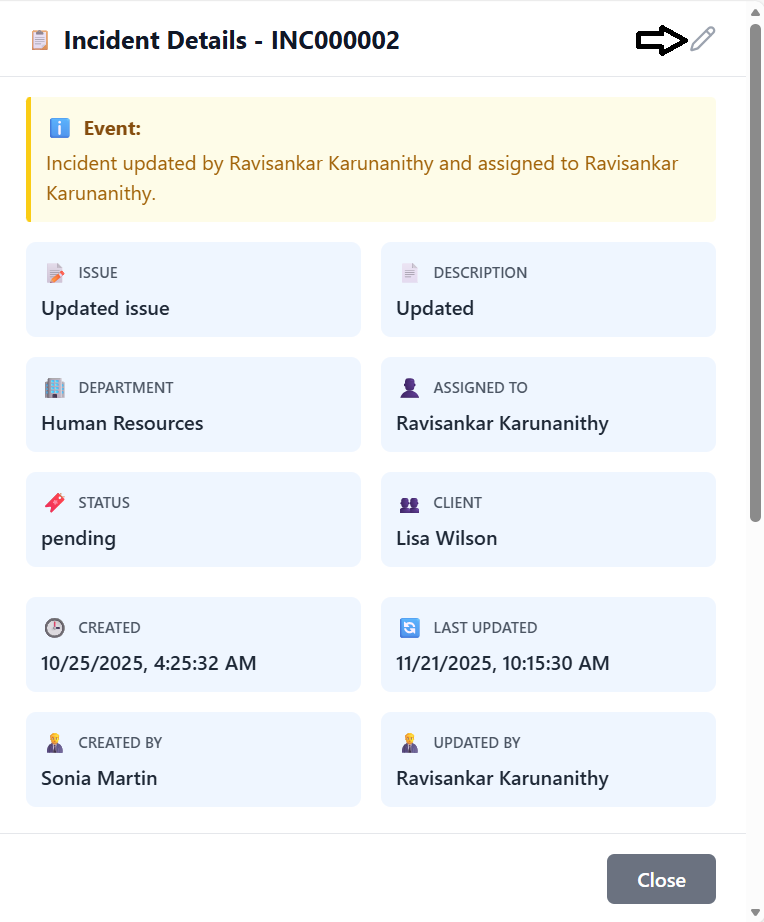
Incident Details
Comprehensive view of individual incident information with full history and audit trail.
Accessing Incident Details
- Click on any incident number in the list view
- Details panel opens on the right side of the screen
- Panel shows comprehensive incident information
Incident Details Layout
- Incident Number: Unique identifier prominently displayed
- Edit Button: Pencil icon to enter edit mode (if permissions allow)
- Close Button: X icon to close details panel
- Issue Card: Incident title with edit capability
- Description Card: Detailed description with edit capability
- Department Card: Assigned department with dropdown edit
- Assigned To Card: Assigned employee with dropdown edit
- Status Card: Current status with dropdown edit
- Client Card: Associated client with dropdown edit
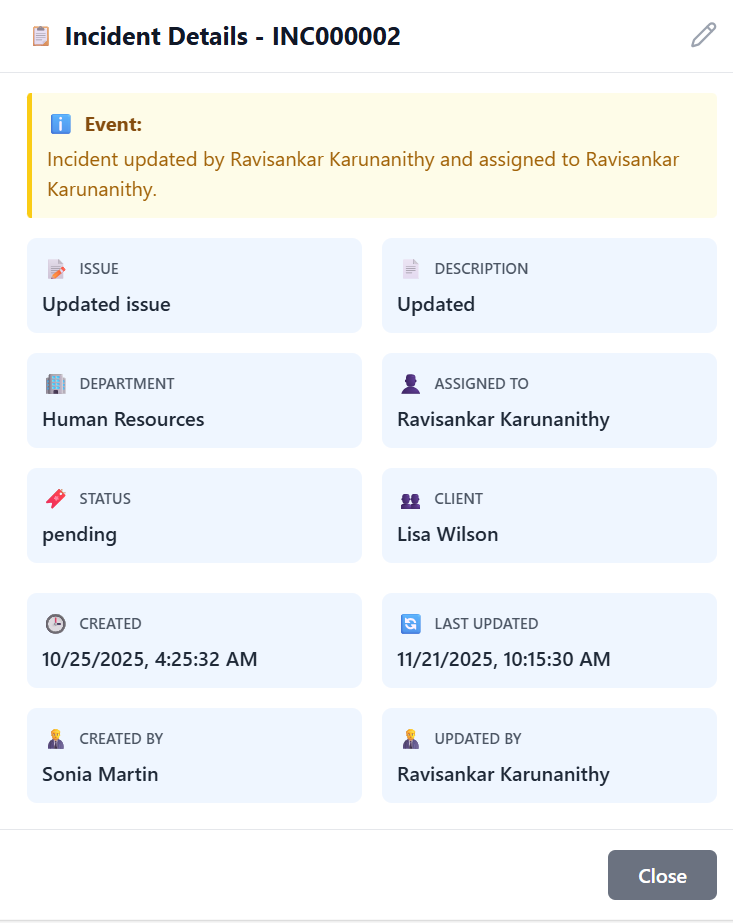
- Created: Date and time when incident was created
- Last Updated: Date and time of last modification
- Created By: Employee who created the incident
- Updated By: Employee who last updated the incident
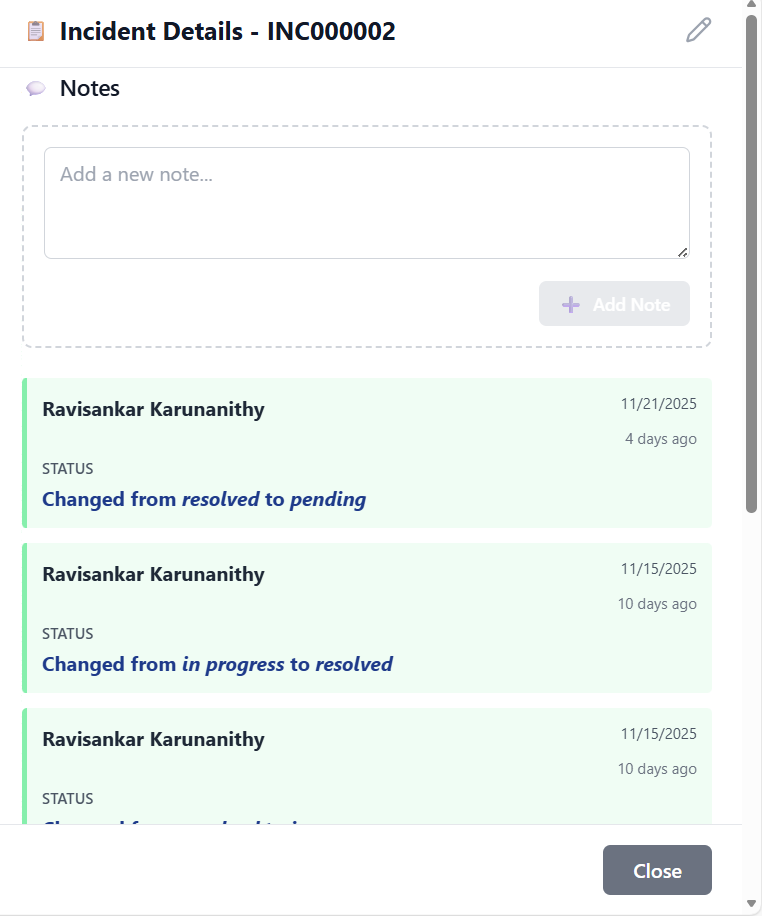
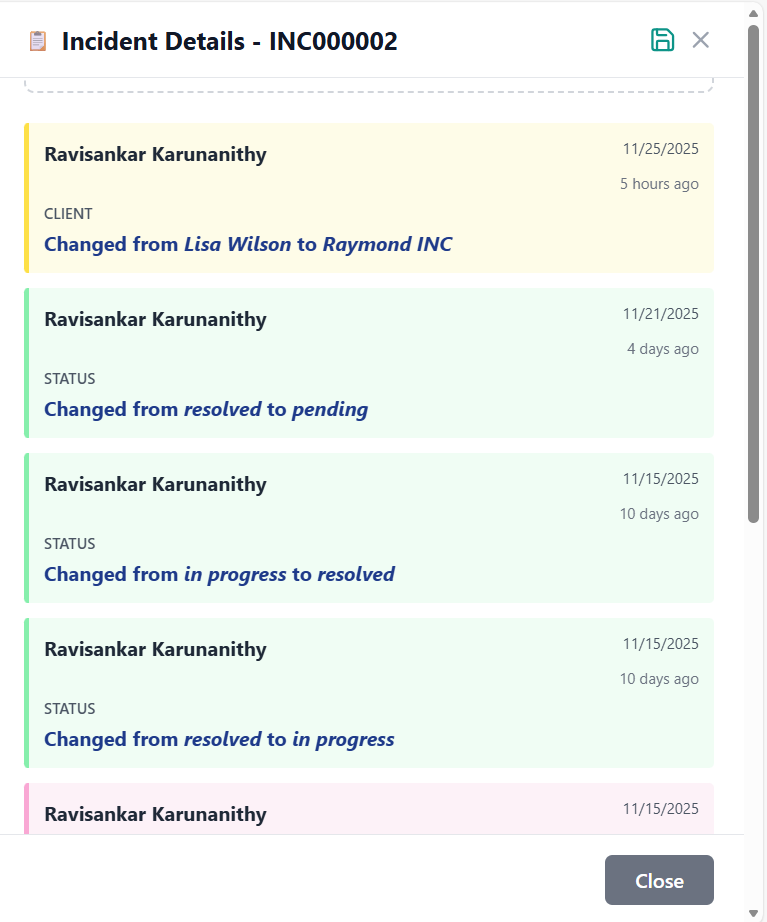
Notes Section
- Text area for entering new notes
- "Add Note" button to save the note
- Button disabled until text is entered
- Note is immediately saved and appears in notes list
- Notes displayed in chronological order (newest first)
- Each note shows author and timestamp
- Time displayed as relative (e.g., "2 hours ago")
- Full audit trail of all note additions
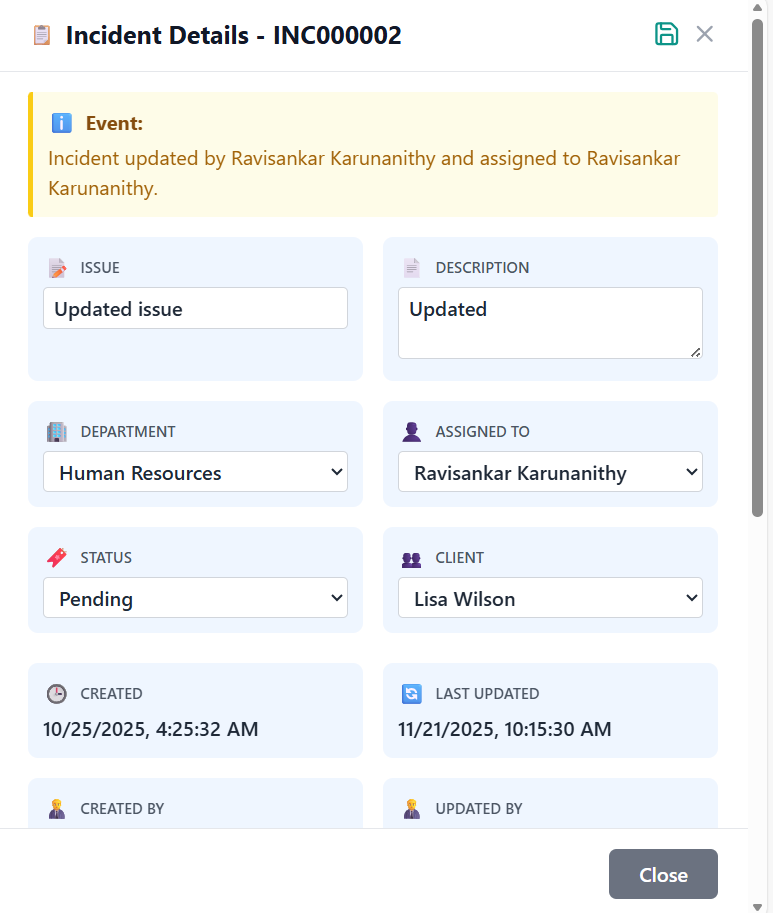
Editing Incidents
How to modify existing incident data and update incident records.
Accessing Edit Mode
- Click on incident number in list view to open details
- Or use search to find specific incident
- Find the edit button (pencil icon) in details header
- Button is only visible to users with edit permissions
- Click to enter edit mode
- Form fields become editable
- Save and Cancel buttons appear
- Fields show as input boxes, textareas, or dropdowns
Editing Process
- Update issue title as needed
- Modify description with additional details
- Incident number cannot be changed (read-only)
- Change assigned department from dropdown
- Update assigned employee (filtered by department)
- Clear assignment if needed
- Update status from dropdown options
- Available options: Resolved, In Progress, Await User Info, Pending
- Status change triggers audit log entry
- Change associated client from dropdown
- Includes both regular and CHSP clients
- Clear association if needed
- Review all changes made
- Click "Save" button to apply changes
- System validates updated information
- Success message appears upon save
Edit Restrictions
- User lacks edit permissions
- Incident record is locked by another user
- System maintenance is in progress
- User doesn't have access to the incident
Field-Specific Editing Rules
| Field | Edit Rules | Notes |
|---|---|---|
| Incident Number | Non-editable | Unique identifier, cannot be changed |
| Issue Title | Editable with validation | Must not be empty |
| Description | Editable with validation | Must not be empty |
| Department | Editable via dropdown | Must select from available departments |
| Assign To | Editable via dropdown | Filtered by selected department |
| Status | Editable via dropdown | Must select from status options |
| Client | Editable via dropdown | Optional field |
Managing Incident Status
Setting and updating incident status throughout the resolution lifecycle.
Understanding Incident Statuses
🟢 New
Incident has been created but not yet assigned or worked on.
🔵 In Progress
Incident is actively being investigated or worked on.
🟡 Await User Info
Waiting for additional information from the user or client.
🟠 Pending
Incident is on hold waiting for external factors.
🟣 Resolved
Incident has been successfully resolved and closed.
Updating Incident Status
- Navigate to incident details view
- Enter edit mode by clicking pencil icon
- Find status field in the information cards
- Click dropdown to see available status options
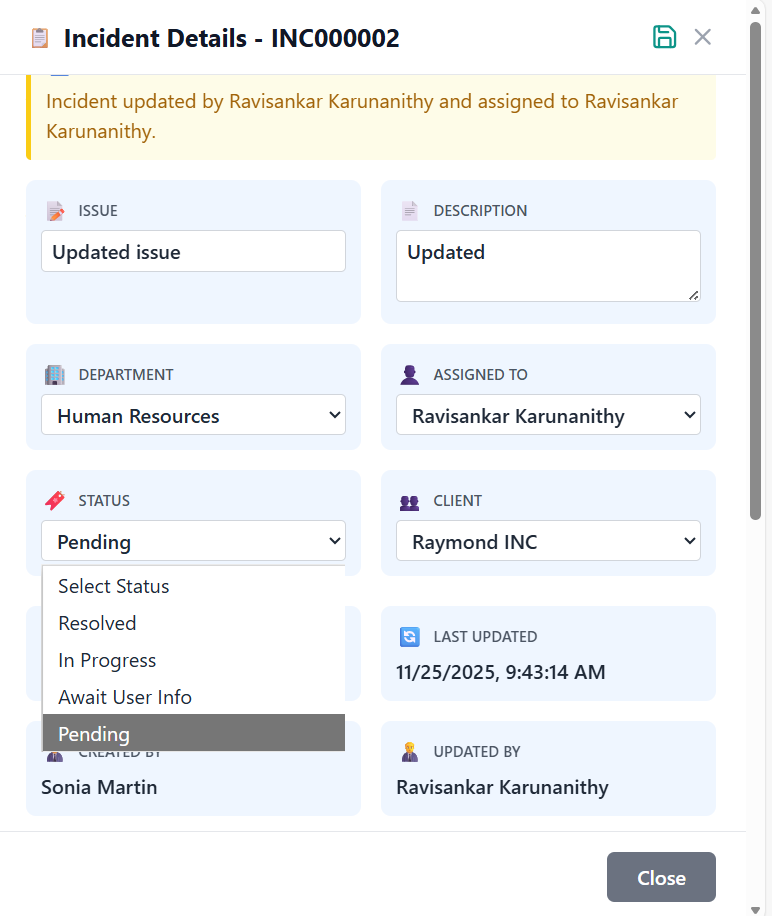
- Click desired status from dropdown list
- Status updates immediately in the form
- Color coding changes to reflect new status
- Click "Save" button to apply status change
- System records status change in audit log
- Change is reflected across the system
- Incident filtering respects new status
Status Change Implications
| Status Change | System Impact | Notes |
|---|---|---|
| New → In Progress | Incident appears in active work queues | Typically when assignment occurs |
| In Progress → Await User Info | Incident moves to waiting state | Requires follow-up with user/client |
| Any → Resolved | Incident moves to resolved state | Considered complete, no further action needed |
| Resolved → In Progress | Incident reopened for further work | Rare, typically for incorrectly resolved incidents |
Assigning Incidents
Assigning incidents to departments and specific employees for resolution.
Understanding Incident Assignment
Incident assignment involves designating responsibility for incident resolution to specific departments and employees. This ensures accountability and proper routing of incidents to the most appropriate resources.
Assigning Incidents to Departments
- Navigate to incident details view
- Enter edit mode by clicking pencil icon
- Find department field in information cards
- Click dropdown to see available departments
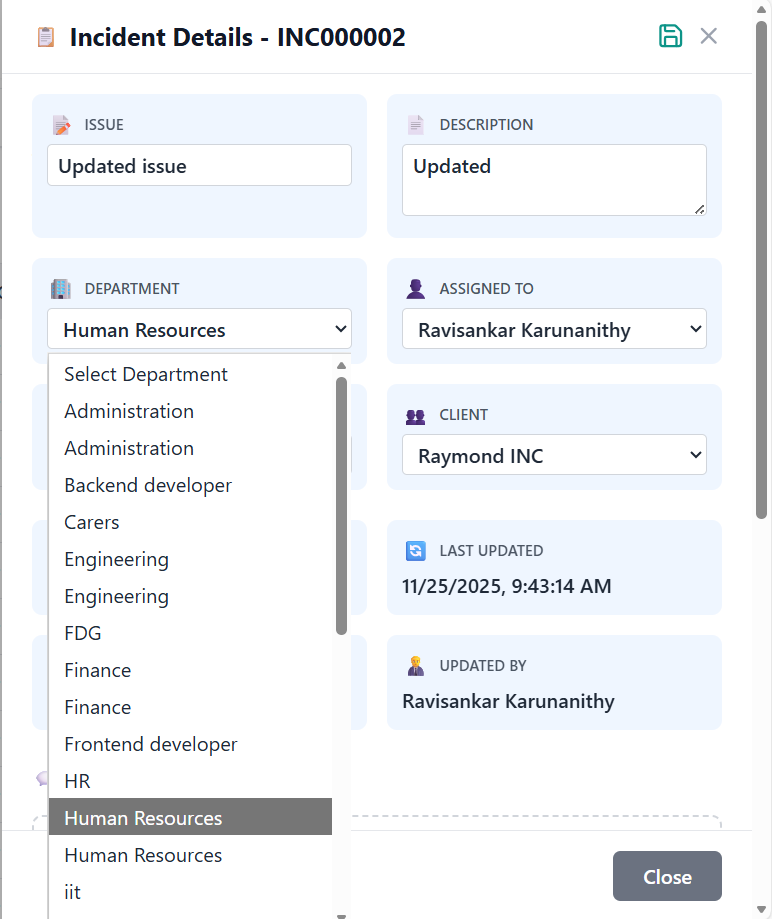
- Choose appropriate department from dropdown
- Department should match incident type and required expertise
- Selection automatically filters employee options
- Click "Save" button to apply department assignment
- System records assignment in audit log
- Incident now appears in department's incident queue
Assigning Incidents to Employees
- Navigate to incident details view
- Enter edit mode by clicking pencil icon
- Find "Assign To" field in information cards
- Click dropdown to see available employees
- Choose specific employee from dropdown
- Dropdown shows only employees from selected department
- Employee should have appropriate skills and availability

- Click "Save" button to apply employee assignment
- System records assignment in audit log
- Incident now appears in employee's personal incident queue
- Employee receives notification of new assignment
Assignment Best Practices
🎯 Match Skills
Assign incidents to employees with appropriate skills and expertise.
⚖️ Balance Workload
Consider current workload when assigning incidents to employees.
📋 Follow Procedures
Adhere to organizational incident assignment procedures.
📞 Communicate
Notify employees when assigning incidents to them.
Managing Notes
Adding and managing incident notes for comprehensive documentation and communication.
Understanding Incident Notes
Incident notes are detailed records of actions taken, observations made, communications, and progress updates related to an incident. They provide a chronological history of incident handling and are essential for transparency, knowledge sharing, and audit purposes.
Adding Notes to Incidents
- Navigate to incident details view
- Scroll down to Notes section
- Find text area for entering new notes
- Section is only visible to users with notes permissions
- Be clear, concise, and objective
- Include specific actions taken or observations
- Note any communications with users or stakeholders
- Document progress, challenges, or resolutions
- Record timestamps for significant events
- Click "Add Note" button to save the note
- Button is disabled until text is entered
- Note is immediately saved and appears in notes list
- System records note addition in audit log
Viewing and Managing Notes
- Notes display in chronological order (newest first)
- Each note shows author name and timestamp
- Timestamps show relative time (e.g., "2 hours ago")
- Full audit trail of all note additions
- Notes preserve formatting and line breaks
- Long notes are fully visible with scroll if needed
- No character limit for note content
- Notes cannot be edited or deleted once added
- Users with "Incident Notes" permission can add notes
- All users with incident access can view notes
- Notes are tied to specific incidents
- Notes visibility follows incident access rules
Best Practices for Incident Notes
⏱️ Timely Updates
Add notes promptly after significant actions or events.
🎯 Action-Oriented
Focus on actions taken, not just observations.
👥 Collaborative
Use notes to communicate with other team members.
📋 Structured
Follow organizational templates or guidelines when available.
Audit Logs
Tracking incident changes and maintaining comprehensive history for compliance and transparency.
Understanding Audit Logs
Audit logs automatically record all significant changes made to incidents, including field updates, status changes, assignments, and note additions. They provide a complete history of incident handling for compliance, troubleshooting, and process improvement.
Audit Log Contents
- Changed By: User who made the change
- Changed At: Date and time of the change
- Field Name: Which field was modified
- Old Value: Previous value before change
- New Value: New value after change
- Relative Time: How long ago the change occurred
- Issue: Changes to incident title
- Description: Updates to incident description
- Status: All status changes
- Assign To: Employee assignment changes
- Assign Department: Department assignment changes
- Client: Client association changes
- Notes: Addition of new notes
Viewing Audit Logs
- Navigate to incident details view
- Scroll down to Audit Log section
- Logs appear below Notes section
- All users with incident access can view audit logs
- Logs display in chronological order (newest first)
- Each log entry has a color-coded border based on field type
- Entries show both absolute and relative timestamps
- Field names are human-readable
- Status Changes: Green border
- Assignment Changes: Blue border
- Department Changes: Purple border
- Description Changes: Pink border
- Issue Changes: Orange border
- Document Changes: Gray border
- Notes Changes: Yellow border
Audit Log Benefits
🔍 Transparency
Complete visibility into all incident changes and actions.
📈 Accountability
Clear record of who made what changes and when.
⚖️ Compliance
Meets regulatory requirements for change tracking.
🛠️ Troubleshooting
Helps identify when and how issues were introduced.
User Permissions
Understanding role-based access control and permission management.
Permission System Overview
The incident management system uses a granular permission system that controls what users can see and do based on their roles and permissions. Permissions are managed through ACL (Access Control List) and are applied automatically when users access the system.
User Roles & Permissions
| Feature | Regular User | Department Manager | Administrator |
|---|---|---|---|
| View Incident Dashboard | ✓ | ✓ | ✓ |
| View Incident List | ✓ | ✓ | ✓ |
| View All Incidents | ✗ | ✓ (Department only) | ✓ |
| Create Incidents | ✓ | ✓ | ✓ |
| Edit Incidents | ✗ | ✓ (Department only) | ✓ |
| Assign Incidents | ✗ | ✓ (Department only) | ✓ |
| Change Status | ✗ | ✓ (Department only) | ✓ |
| Add Notes | ✓ | ✓ | ✓ |
| View Audit Logs | ✓ | ✓ | ✓ |
| Manage Users | ✗ | ✗ | ✓ |
Incident Access Rules
- Users can always see incidents assigned to them
- Appears in "My Incidents" filter view
- Full access to view, add notes, and update (if permitted)
- Department managers can see all incidents in their department
- Appears in "My Group Incidents" filter view
- Can assign, edit, and change status for department incidents
- Administrators can see all incidents across the organization
- Appears in "All Incidents" filter view
- Full administrative access to all incident functions
Permission Management
- Permissions are assigned by system administrators
- Users cannot modify their own permissions
- Permission changes take effect immediately
- Contact your administrator for permission changes
- Follow principle of least privilege - grant only necessary permissions
- Regularly review and update permissions as roles change
- Document permission assignments for audit purposes
- Train users on their specific permissions and responsibilities
Troubleshooting Guide
Solutions to common issues and problems you may encounter.
Common Issues
Possible Causes:
- Network connection issues
- Organization ID not properly set
- Permission restrictions
- Server maintenance
Solutions:
- Check internet connection
- Refresh the page (F5)
- Verify organization settings
- Contact administrator for permission verification
Possible Causes:
- Search term too specific
- Incident not in current view (filtered out)
- Search indexing delay
Solutions:
- Try broader search terms
- Check current filter settings
- Wait a few moments and try again
- Use incident number for precise search
Possible Causes:
- Lack of edit permissions
- Incident record locked by another user
- Browser cache issues
Solutions:
- Verify user permissions with administrator
- Wait and try again later
- Clear browser cache and reload
- Try different browser
Possible Causes:
- File size too large
- Unsupported file format
- Network connectivity issues
- Server storage limits
Solutions:
- Use files under 10MB
- Convert to supported formats (PDF, JPG, PNG, DOC, DOCX)
- Check internet connection
- Contact administrator for storage issues
Possible Causes:
- Lack of notes permission
- Text area not visible
- Browser JavaScript issues
Solutions:
- Verify notes permission with administrator
- Scroll down to notes section in incident details
- Check browser console for errors
- Try different browser
Possible Causes:
- Chart library loading issues
- Large dataset processing
- Browser performance issues
Solutions:
- Wait for charts to load completely
- Refresh the page
- Check browser performance
- Contact administrator if persistent
Error Message Reference
| Error Message | Meaning | Solution |
|---|---|---|
| "Failed to load incidents" | Network or server issue | Refresh page, check connection |
| "Incident not found" | Incident ID doesn't exist | Verify incident ID, check filters |
| "Permission denied" | User lacks required permissions | Contact administrator |
| "Duplicate incident number" | Incident number already exists | System should auto-generate unique numbers |
| "Invalid file format" | Unsupported file type | Use supported formats only |
| "File upload failed" | Document upload issue | Check file size and format |
| "Validation error" | Required fields missing or invalid | Check all required fields are completed |
Performance Tips
🔍 Use Filters
Apply filters to narrow down large incident lists instead of scrolling through all records.
📱 Optimize Browser
Clear cache regularly and use updated browsers for best performance.
💾 Manage Page Size
Use smaller page sizes (25-50) for better performance with large datasets.
🕒 Off-Peak Usage
Schedule large operations during off-peak hours for faster processing.
Contact Support
- Persistent errors after trying solutions
- Data appears incorrect or corrupted
- Cannot access incidents at all
- Permission issues not resolved by administrator
- System performance problems
- Feature not working as expected
Information to Provide:
- Your user ID and organization
- Screenshot of the error
- Steps you took before error occurred
- Browser and operating system
- Date and time of issue
- Incident ID if applicable