Clients Management System
Complete guide for client management. Select a topic below to get started.
System Overview
Learn about the system features, user roles, and permissions.
Accessing the System
How to login and navigate to the clients module.
Client Grid View
Understanding the main client interface and navigation.
Client Details Page
Comprehensive view of individual client information.
Editing Client Information
How to modify existing client data.
Managing Client Status
Setting and updating client status (Active, Inactive, Pending).
Tagging Clients
Organizing clients with custom tags for better management.
Setting Client Limits
Configuring expense and mileage limits for clients.
Service Allocation
Assigning services and rate cards to clients.
Creating Case Notes
Documenting client interactions and observations.
Managing Documents
Uploading and organizing client documents.
Troubleshooting
Solutions to common issues and problems.
System Overview
The Clients Management System enables comprehensive client record management, including personal information, service allocations, case notes, documents, and financial limits.
Key Features
👥 Client Profile Management
Comprehensive client information storage and management.
🏷️ Tag-Based Organization
Categorize clients with custom tags for easy filtering.
💰 Client-Specific Limits
Set and manage expense and mileage limits per client.
📋 Service Allocation
Assign services and rate cards to clients.
📝 Integrated Case Notes
Document client interactions and observations.
📄 Document Management
Upload and organize client documents securely.
📤 Bulk Import
Import multiple clients using Excel templates.
🔄 Status Management
Track client status (Active, Inactive, Pending).
User Roles & Permissions
| Feature | Carer (Employee) | Administrator/Manager |
|---|---|---|
| View Client List | ✓ | ✓ |
| View Client Details | ✓ | ✓ |
| Add New Clients | ✗ | ✓ |
| Edit Client Information | ✗ | ✓ |
| Set Client Status | ✗ | ✓ |
| Manage Client Tags | ✗ | ✓ |
| Set Client Limits | ✗ | ✓ |
| Allocate Services | ✗ | ✓ |
| Create Case Notes | ✓ | ✓ |
| Upload Documents | ✗ | ✓ |
| Bulk Import Clients | ✗ | ✓ |
Client Status Workflow
Accessing the Clients System
How to login and navigate to the clients management module.
- Navigate to the application URL
- Enter your credentials
- System automatically detects your employee status and permissions
- Click on "Clients" in the main navigation menu
- System loads your client view based on your role
- Default view shows client grid with search and filter options
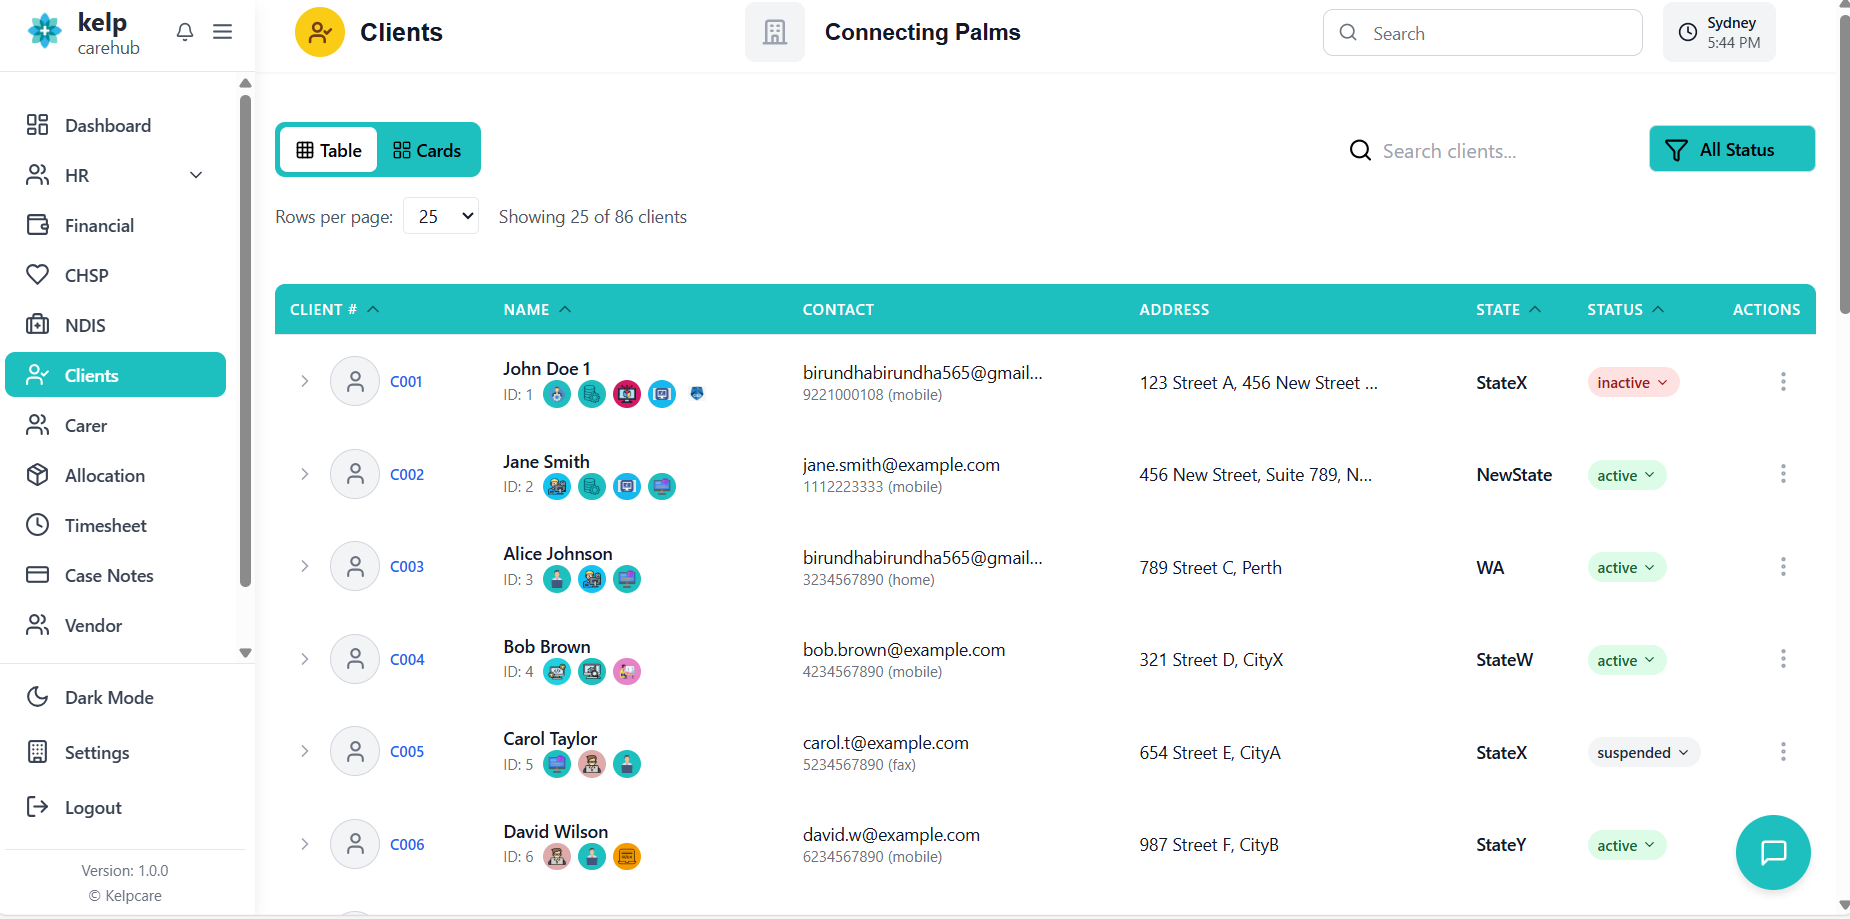
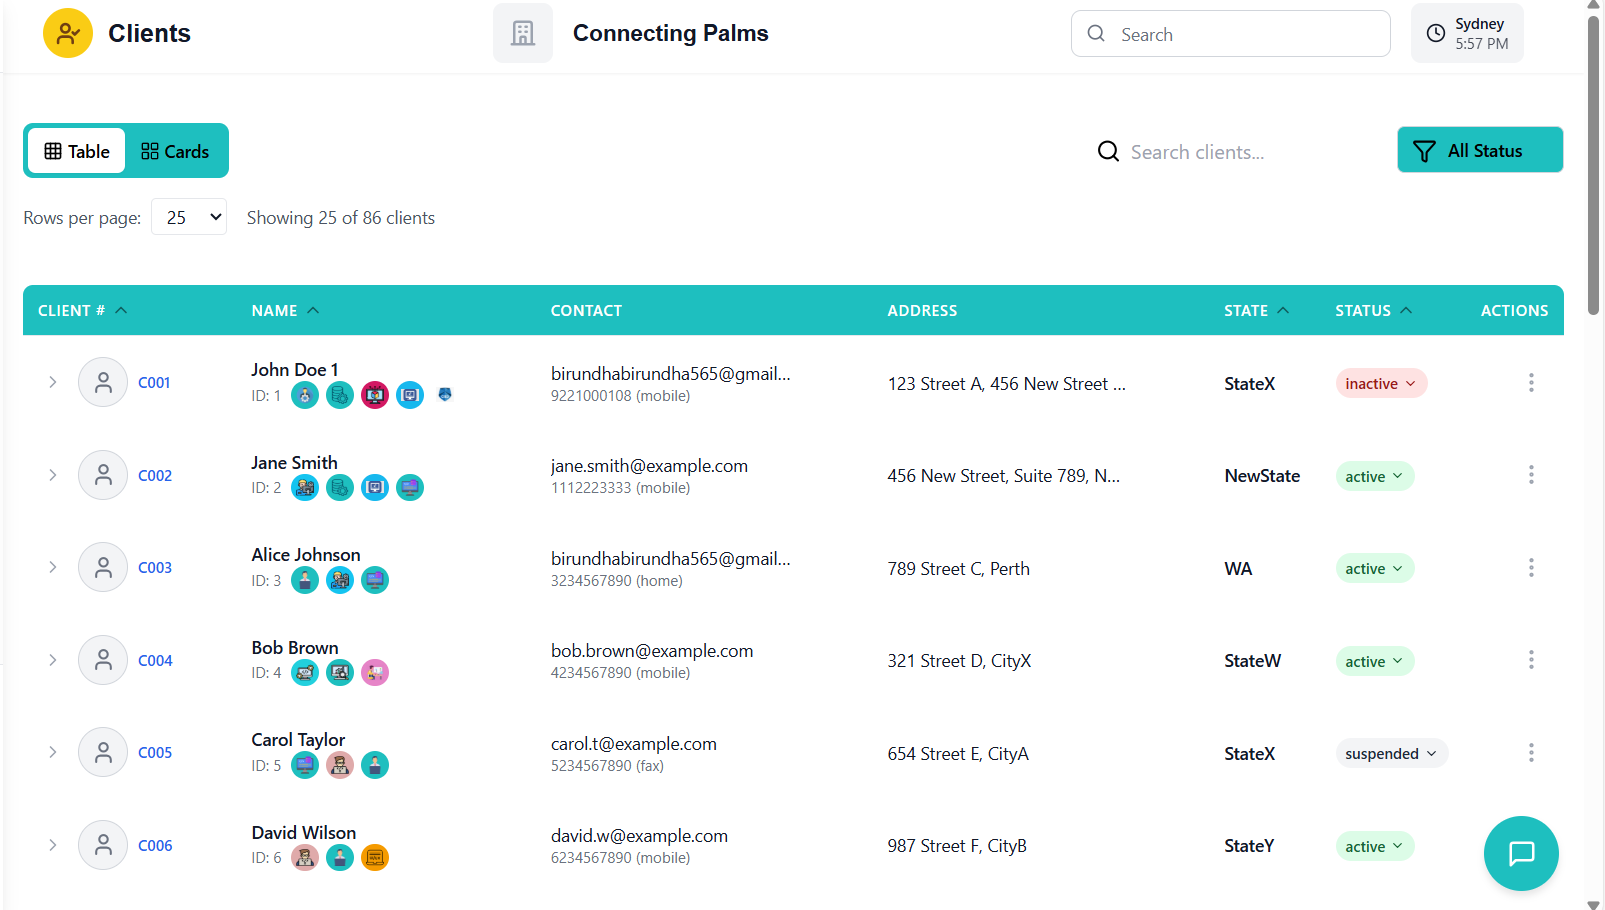
Client Grid View
Understanding the main client interface and navigation.
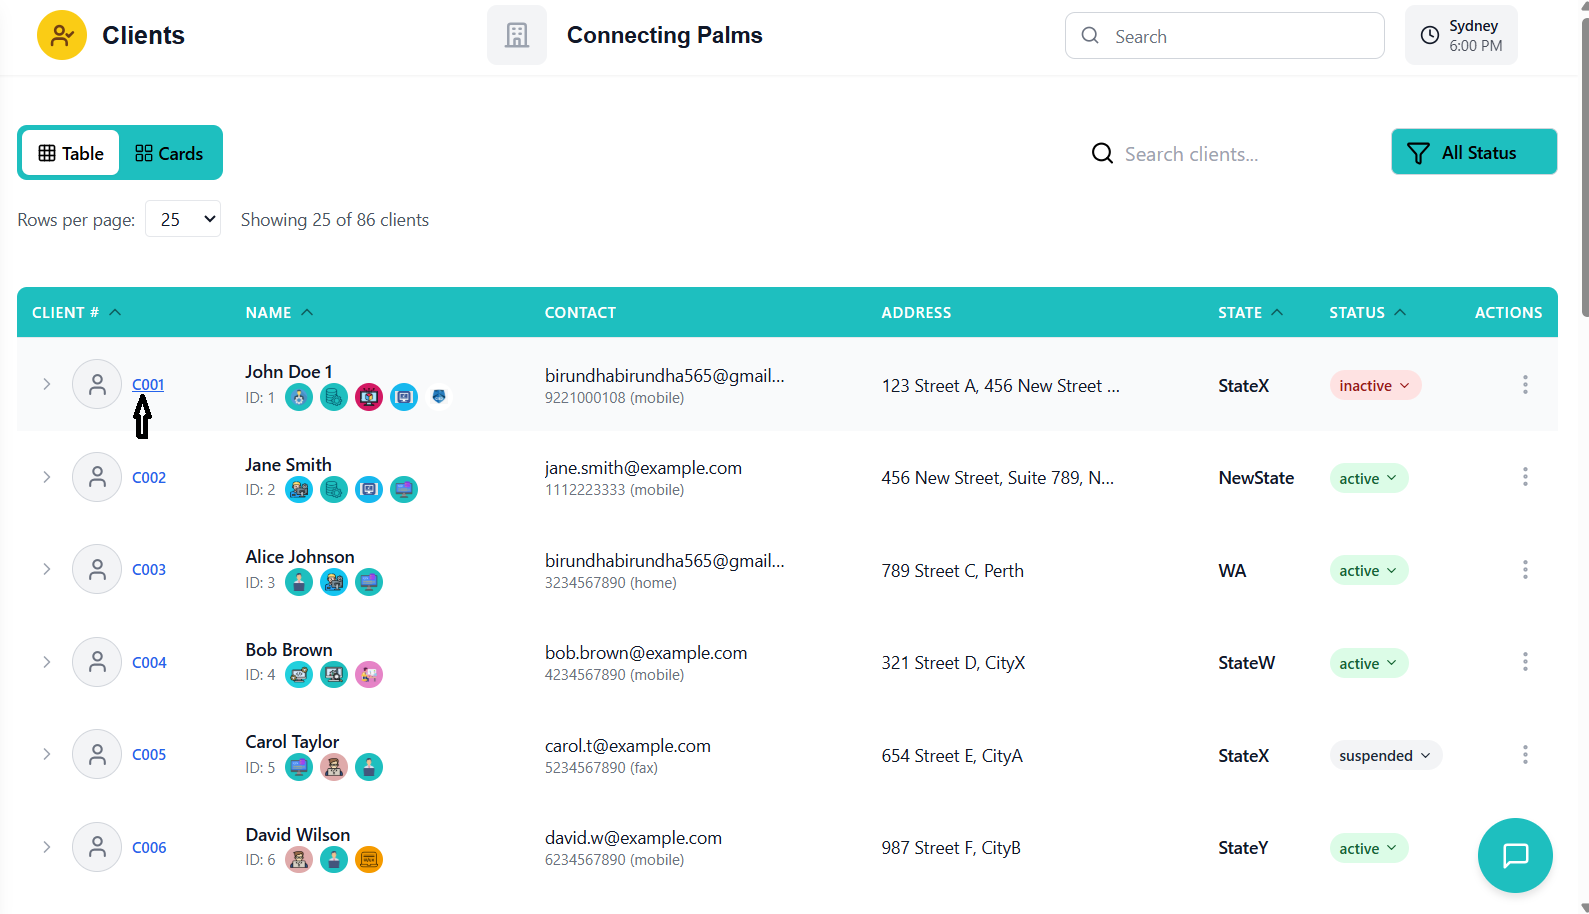
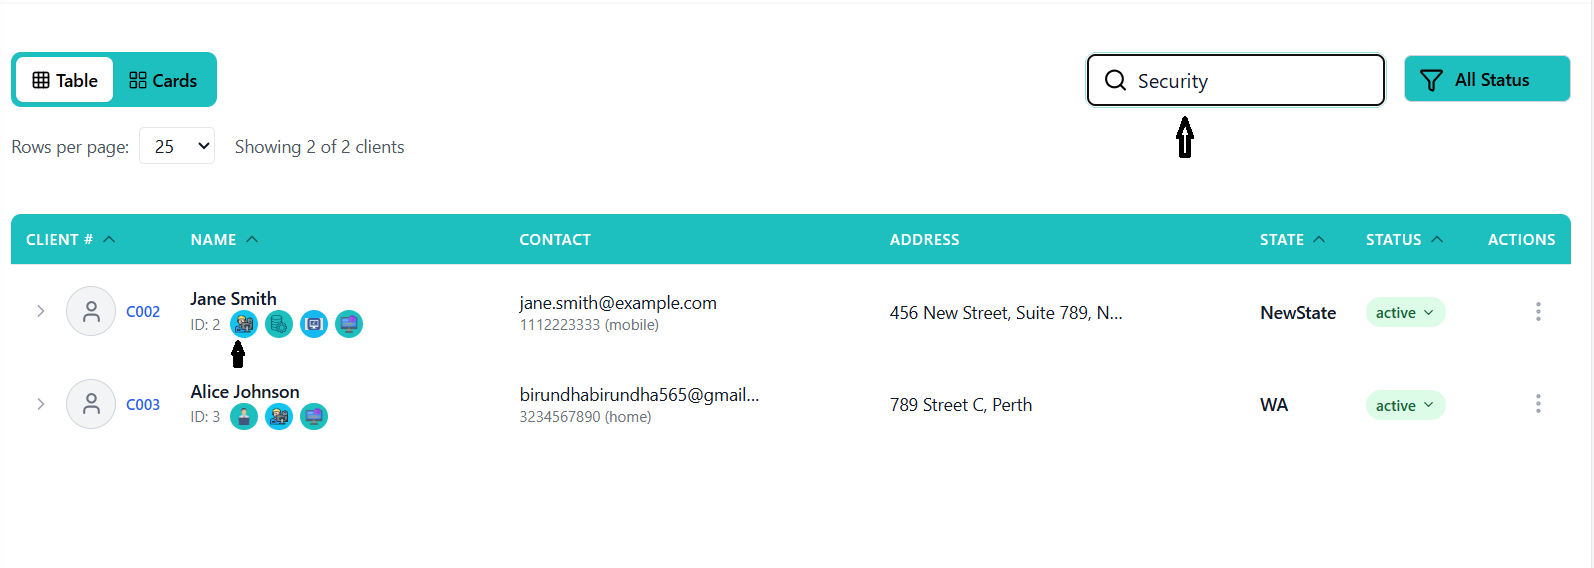
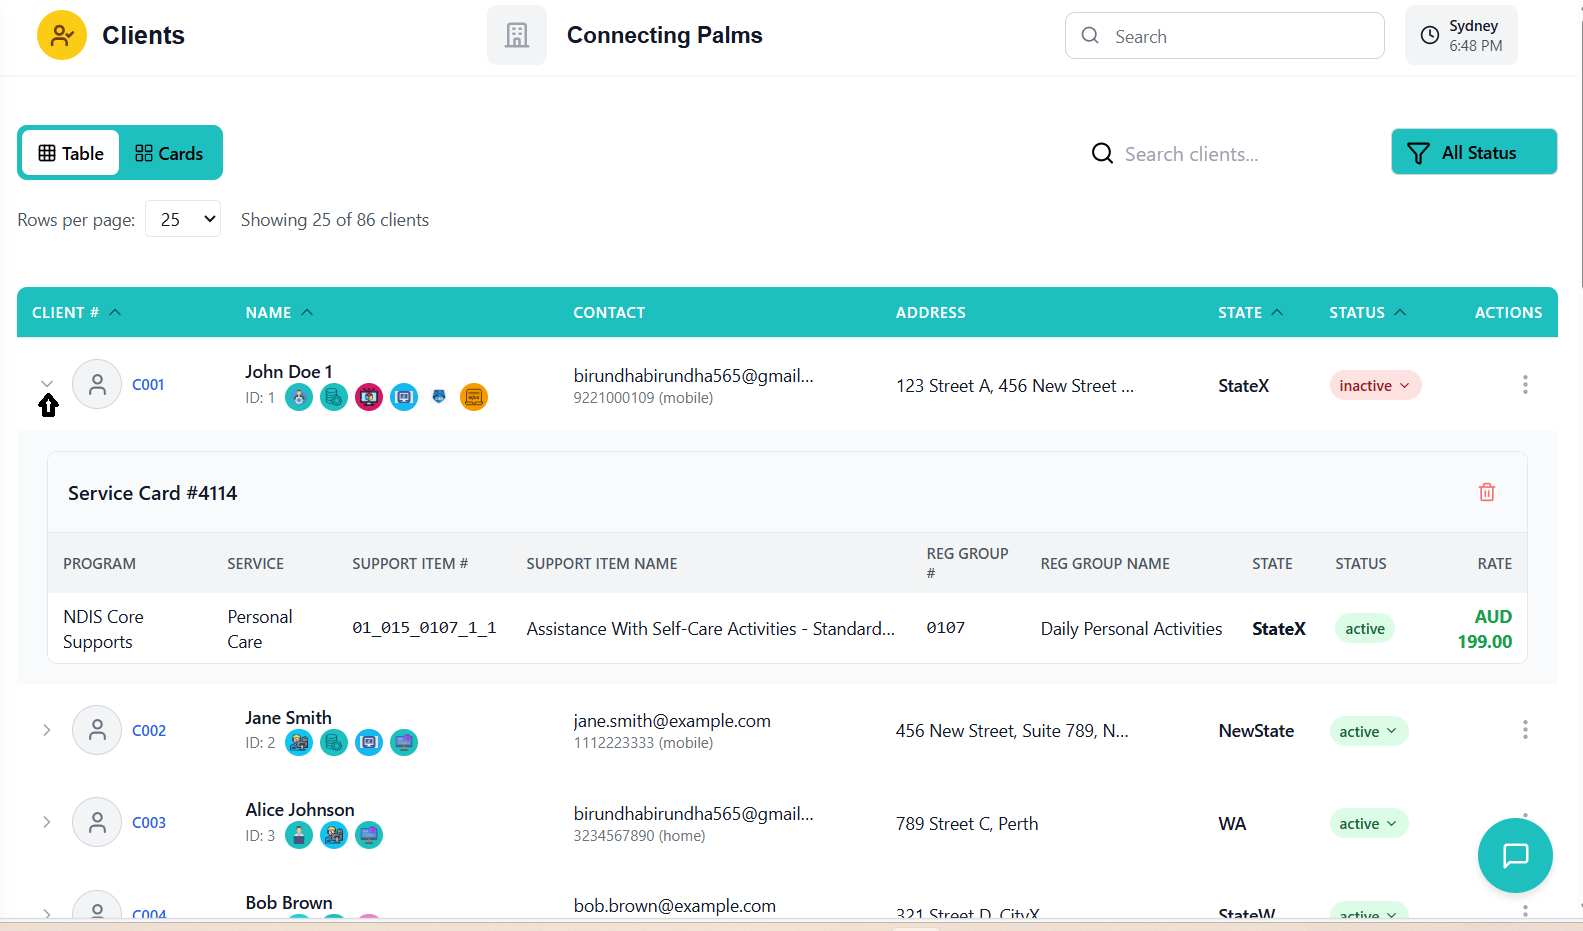
Understanding the Client Grid Interface
- Title: "Clients"
- View Toggle: Switch between Table and Card views
- Organization Indicator: Shows current organization

- Search Bar: Search by client name, ID, email, or tags
- Status Filter: Filter by Active, Inactive, or Pending status
- View Toggle: Switch between grid and card views
- Refresh Button: Refresh client data
Client Grid Columns (Table View)
| Column | Description |
|---|---|
| Client # | Unique client identifier number |
| Name | Client full name with profile image |
| Contact | Email address and primary phone number |
| Address | Client's primary address information |
| State | Client's state/territory |
| Status | Current status badge (Active/Inactive/Pending) |
| Actions | Expand, Edit, and Action menu buttons |
Client Card View
- Profile Image: Client photo or placeholder
- Client Name: Prominently displayed
- Client ID: Unique identifier
- Status Badge: Color-coded status indicator
- Contact Information: Email and phone
- Address: Primary address details
- Expand Button: View services and allocations

Grid Navigation Features
- Click Client Name: Navigate to client details page
- Expand Button: View allocated services without leaving grid
- Action Menu: Access client-specific actions (Edit, Generate Agreement, etc.)
- Sorting: Click column headers to sort
- Pagination: Navigate through large client lists
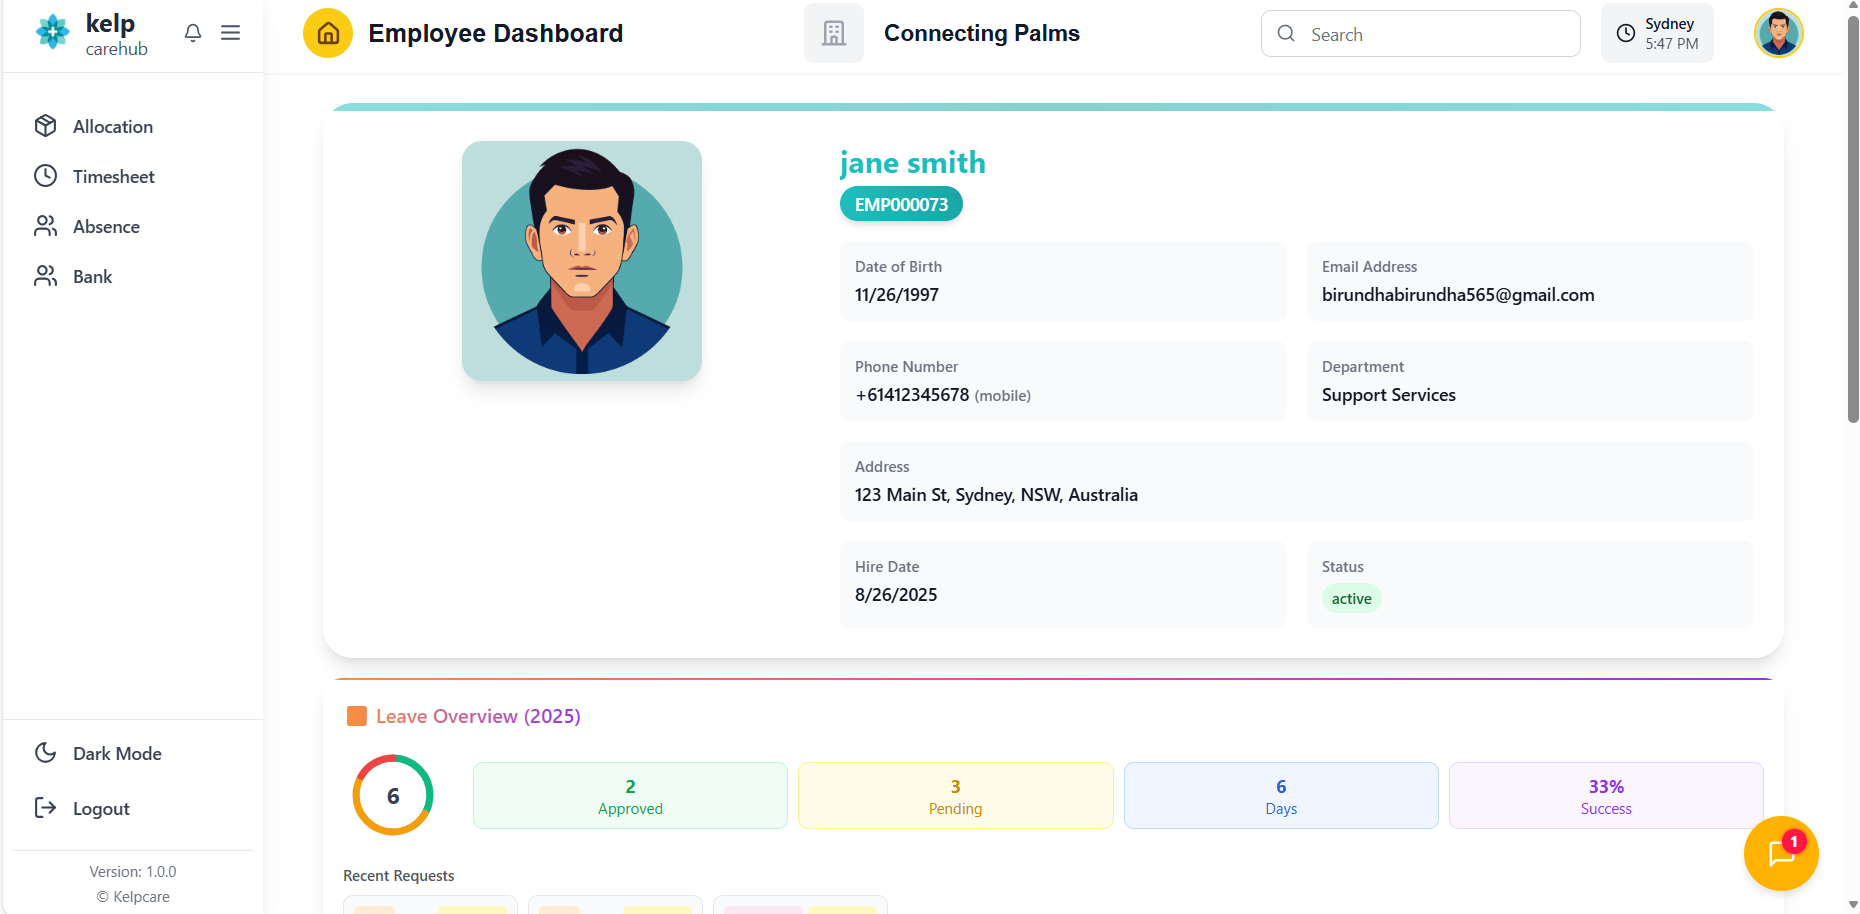
Client Details Page
Comprehensive view of individual client information with tabbed navigation.
Accessing Client Details
- Click on any client name in the grid view
- Or click the client profile image
- System opens the client details page in a new view
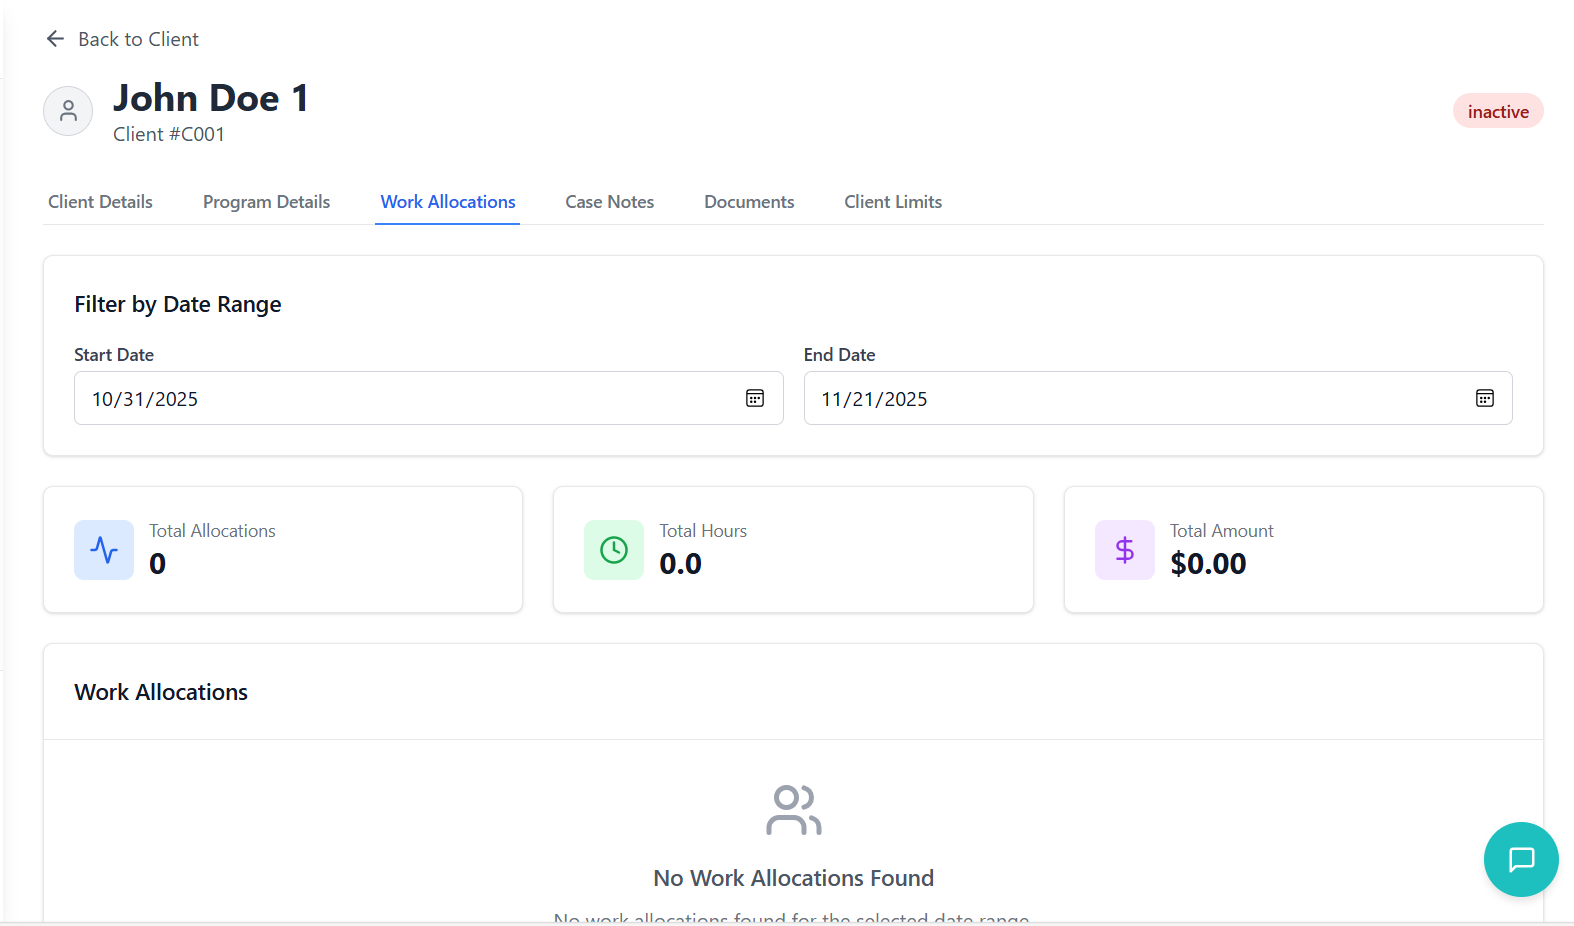
Client Details Page Layout
- Back Button: Return to client grid
- Client Profile: Image, name, and client number
- Status Badge: Current client status
- Edit Button: Quick access to edit client details
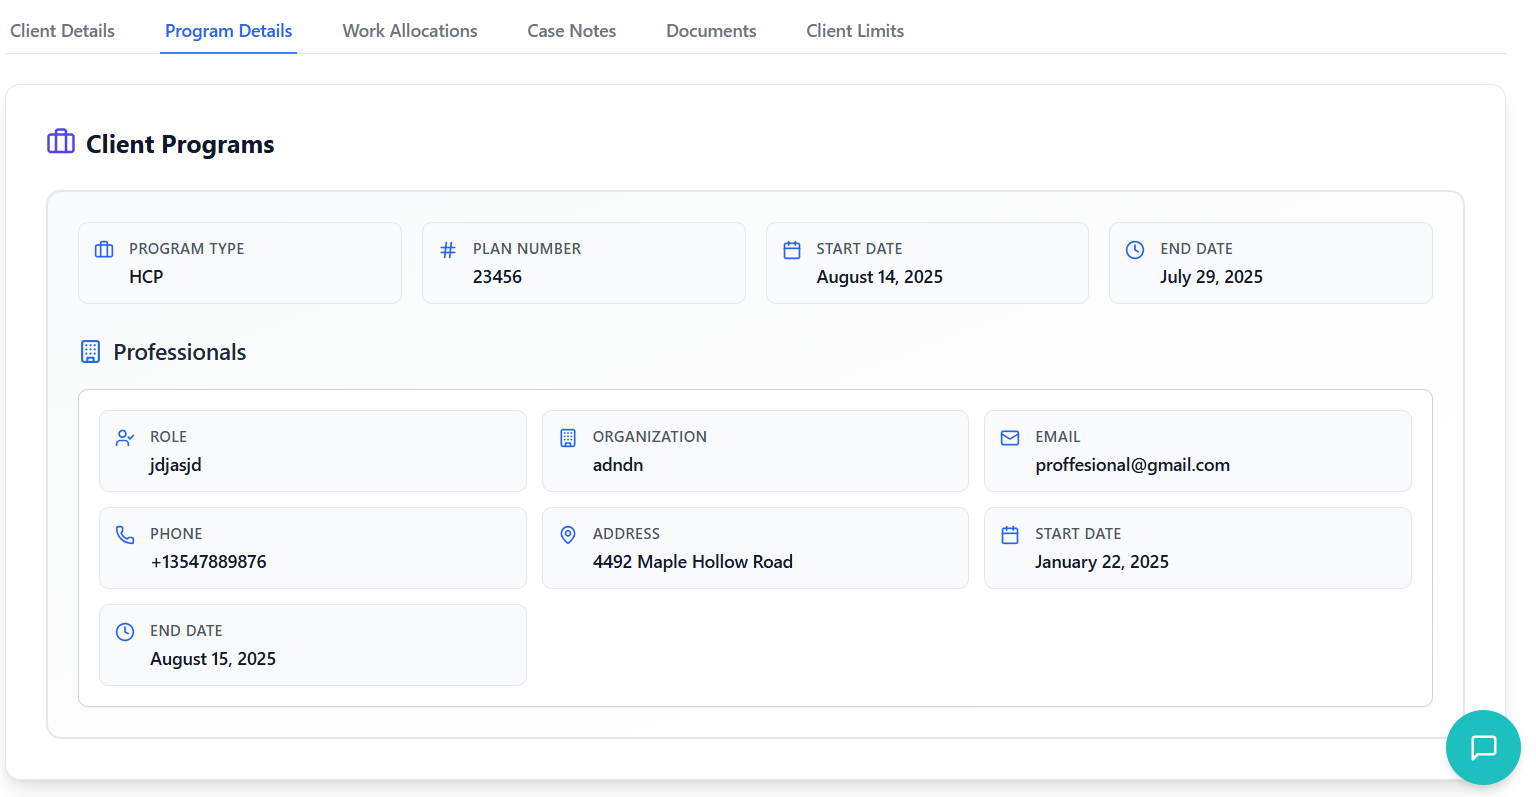
- Client Details: Personal and contact information
- Program Details: Client program information
- Work Allocations: Service assignments and schedules
- Case Notes: Client interaction records
- Documents: Uploaded files and agreements
- Client Limits: Expense and mileage limits
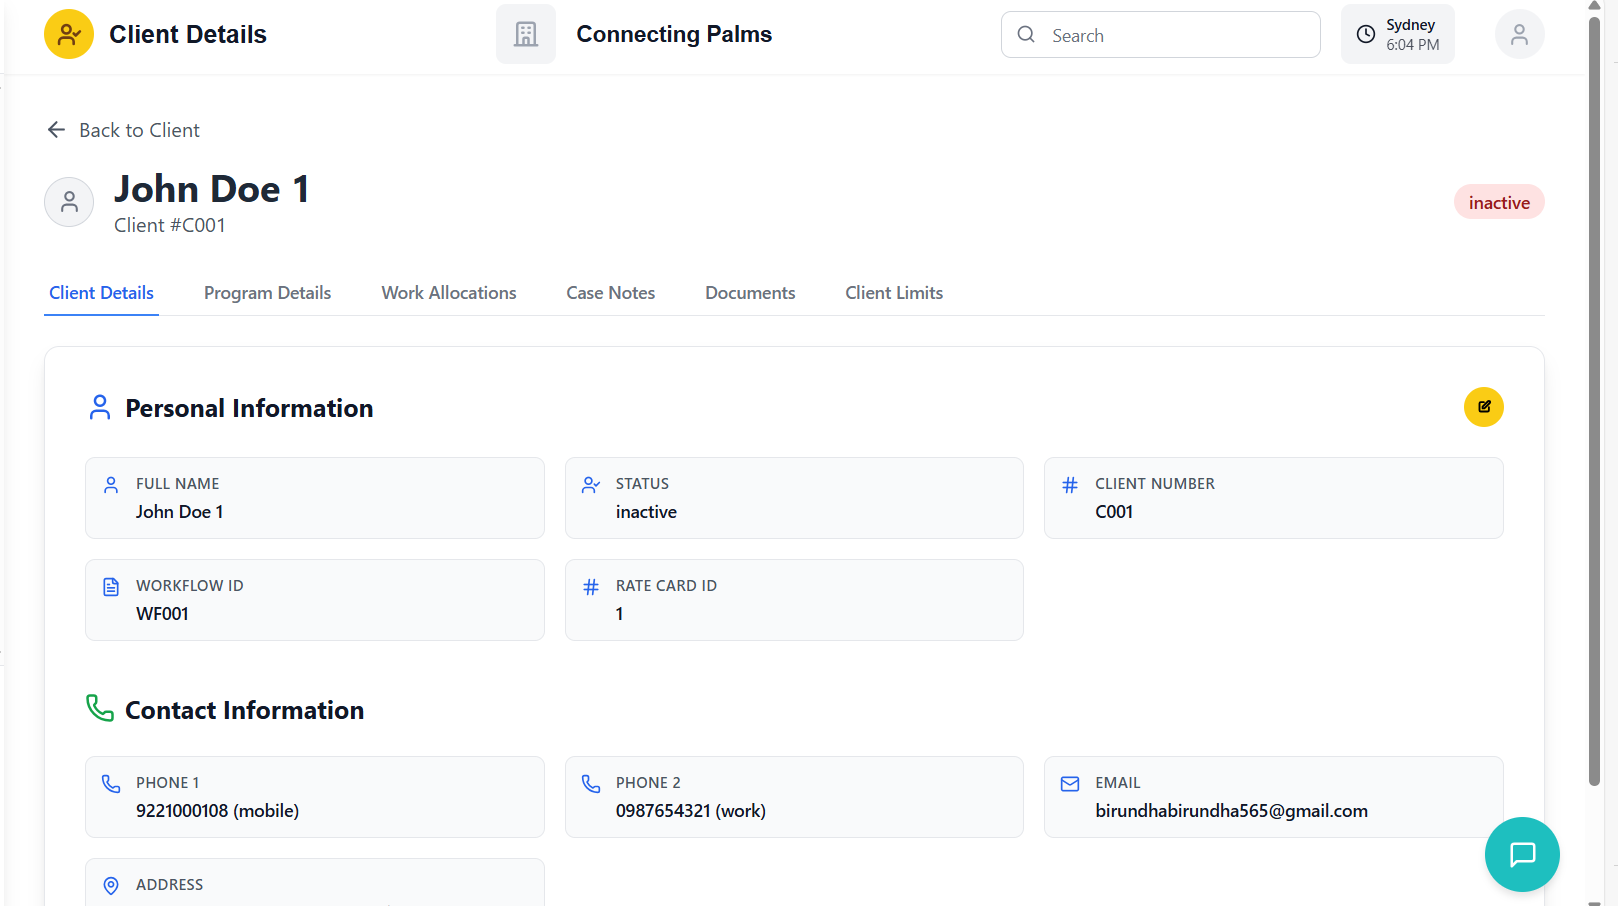
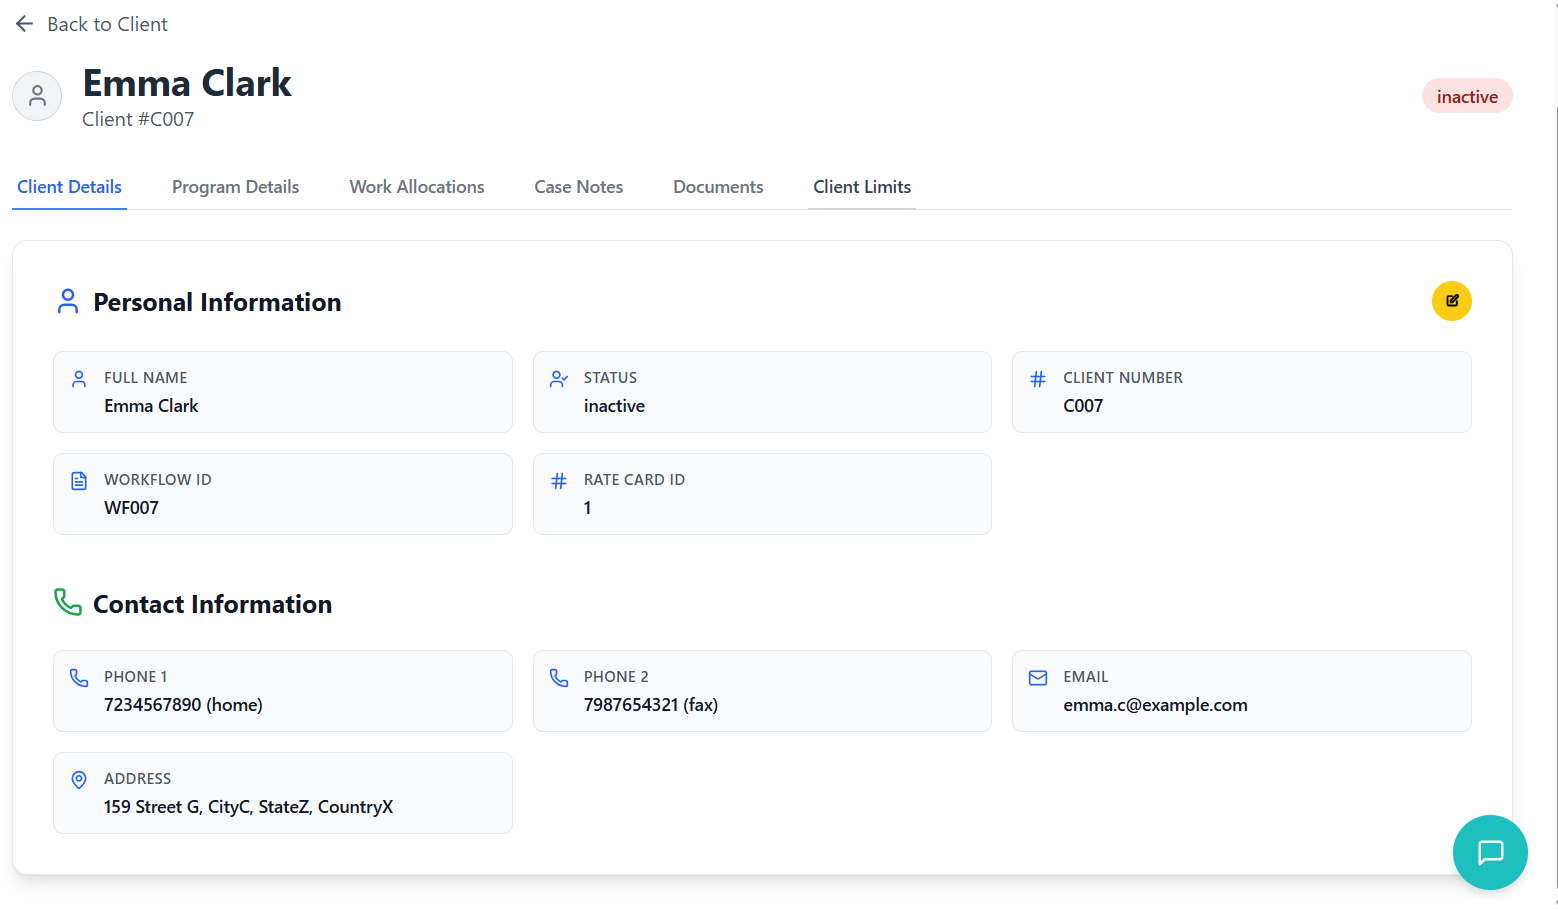
Client Details Tab
- Full Name: Client's complete name
- Age & Gender: Demographic information
- Date of Birth: Client's birth date
- Client Number: Unique identifier
- Workflow ID: Process tracking identifier
- Rate Card ID: Associated pricing structure
- Phone Numbers: Primary and secondary contacts
- Email Address: Primary communication email
- Address: Complete residential address
- Contact Name: Emergency contact person
- Phone & Email: Emergency contact details
- Relationship: Relationship to client
- Address: Emergency contact address
- Guardian Name: Legal guardian if applicable
- Contact Details: Phone and email
- Address: Guardian's address
Editing Client Information
How to modify existing client data and update client records.
Accessing Edit Mode
- Click on client name in grid view to open details
- Or use search to find specific client
- Find the edit button (pencil icon) in client details header
- Button is typically located next to client name/status
- Only visible to users with edit permissions
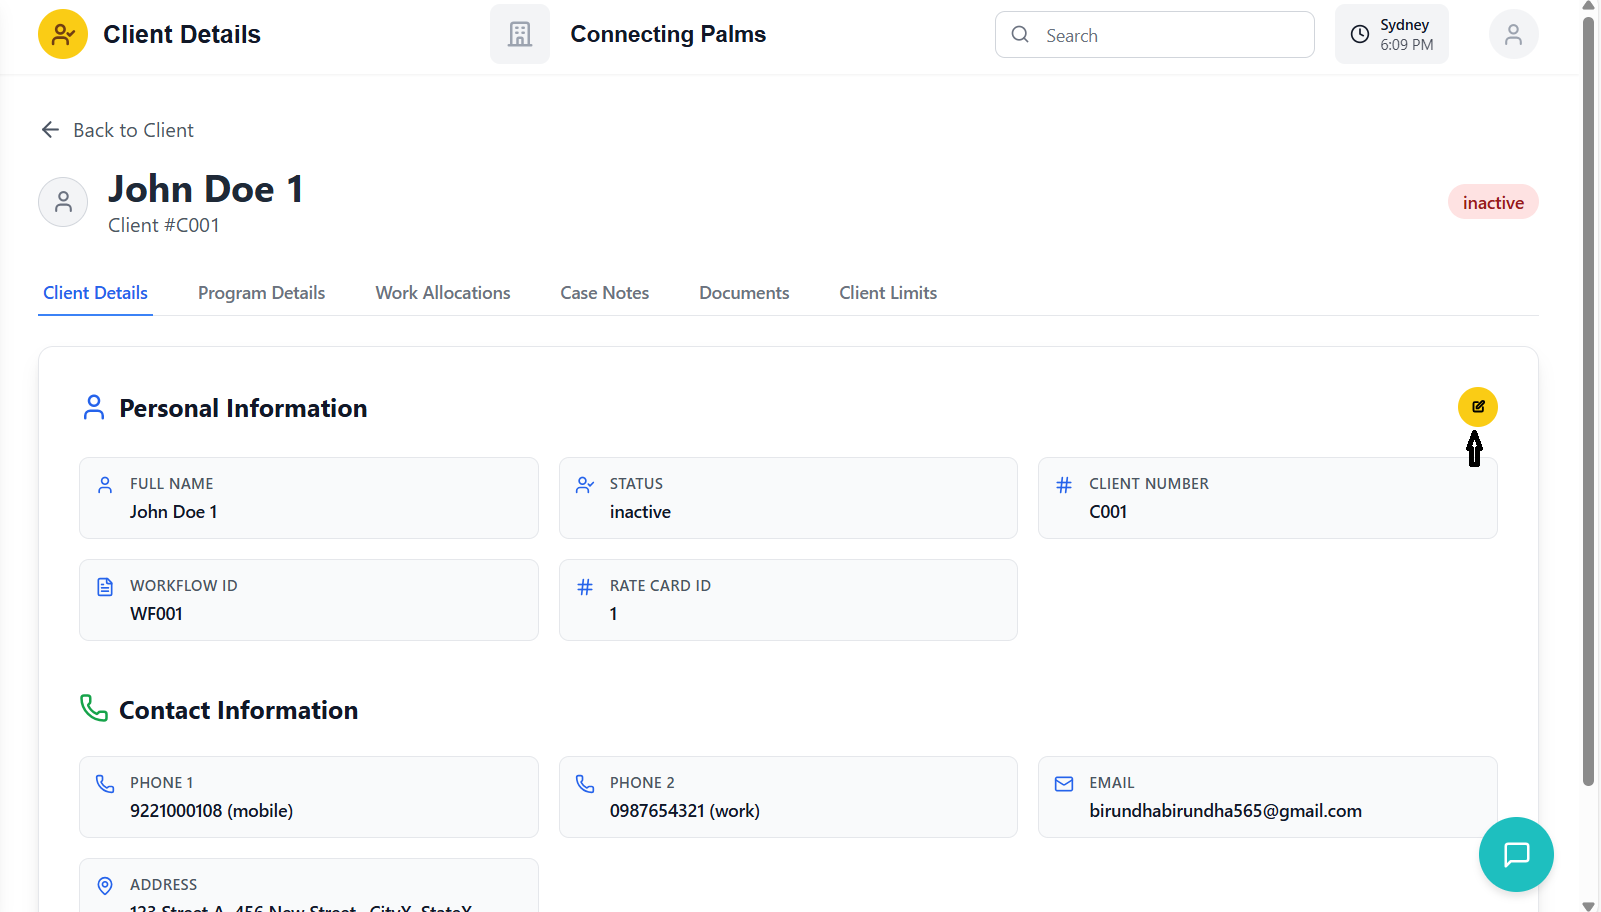
- Click the edit button to enter edit mode
- Form fields become editable
- Side panel or inline editing appears
Editing Process
- Update first name, last name as needed
- Modify date of birth if incorrect
- Update gender information
- Client number typically cannot be changed
- Change email address if client has new email
- Update phone numbers and types
- Add secondary phone if previously missing
- Update address line 1 for street changes
- Modify address line 2 for unit/suite changes
- Change city, state, or postcode as needed
- Update country if client has moved internationally
- Change emergency contact name if needed
- Update emergency contact phone and email
- Modify relationship information
- Update emergency contact address
- Review all changes made
- Click "Save" button to apply changes
- System validates updated information
- Success message appears upon save

Edit Restrictions
- User lacks edit permissions
- Client record is locked by another user
- System maintenance is in progress
- Client has active service allocations that would be affected
Field-Specific Editing Rules
| Field | Edit Rules | Notes |
|---|---|---|
| Client Number | Typically non-editable | Unique identifier, cannot be changed |
| First Name | Editable with validation | Must not be empty |
| Last Name | Editable with validation | Must not be empty |
| Email Address | Editable with format validation | Must be valid email format |
| Phone Numbers | Editable with format validation | Must be valid phone format |
| Address | Fully editable | No special restrictions |
| Status | Editable via status dropdown | Separate from general editing |
Managing Client Status
Setting and updating client status (Active, Inactive, Pending).
Understanding Client Statuses
🟢 Active
Client is currently receiving services and actively engaged with the organization.
🔴 Inactive
Client is not currently receiving services but may return in the future.
🟡 Pending
Client is in the intake process or awaiting service commencement.
⚫ Suspended
Client services are temporarily suspended due to specific circumstances.
Updating Client Status
- Navigate to client grid or details page
- Locate the status badge (colored indicator)
- Click on the status badge to open dropdown
- Dropdown shows available status options
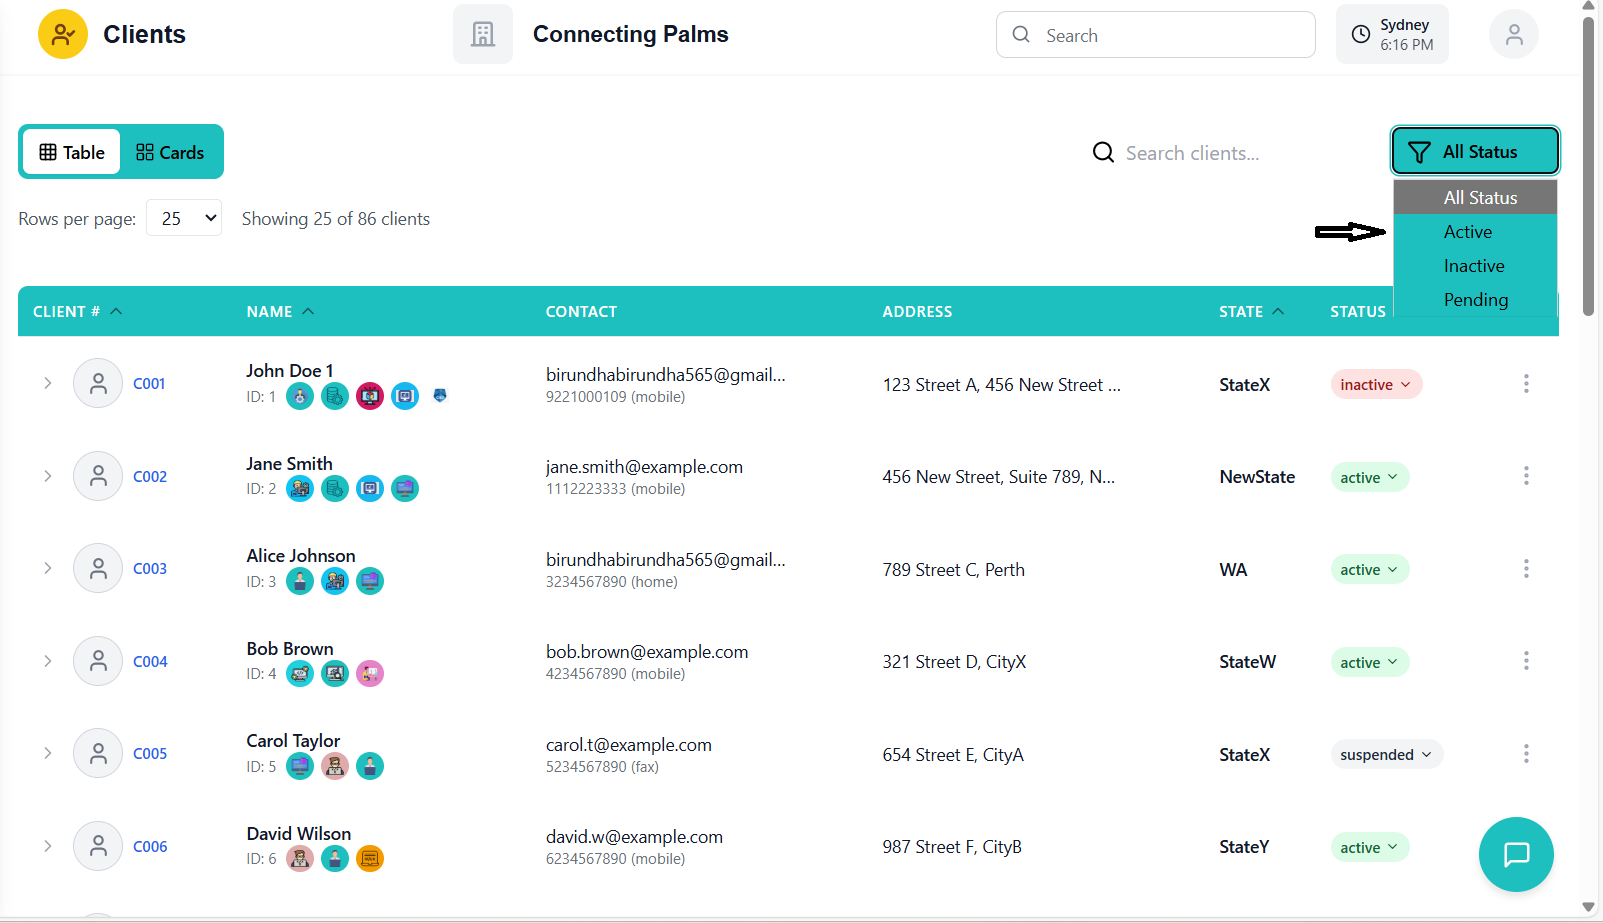
- Click desired status from dropdown list
- System immediately updates the status
- Status badge color changes accordingly
- Update is saved automatically
- Status badge updates immediately
- No additional save required
- Change is reflected across the system
- Client filtering respects new status
Status Change Implications
| Status Change | System Impact | Notes |
|---|---|---|
| Active → Inactive | Services continue but no new allocations | Existing schedules complete normally |
| Active → Suspended | All services paused immediately | Requires administrator approval |
| Inactive → Active | Services can be allocated again | Previous allocations remain inactive |
| Pending → Active | Services can commence | Intake process complete |
Tagging Clients
Organizing clients with custom tags for better management and filtering.
Understanding Client Tags
Tags are customizable labels that help categorize and organize clients based on specific criteria such as service types, locations, special needs, or any other classification relevant to your organization.
Adding Tags to Clients
- Navigate to client grid view
- Click the action menu (three dots) for a client
- Select "Add Tag" from the dropdown menu
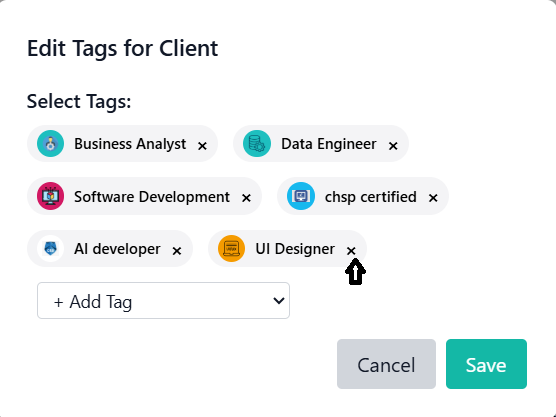
- Tag management modal opens
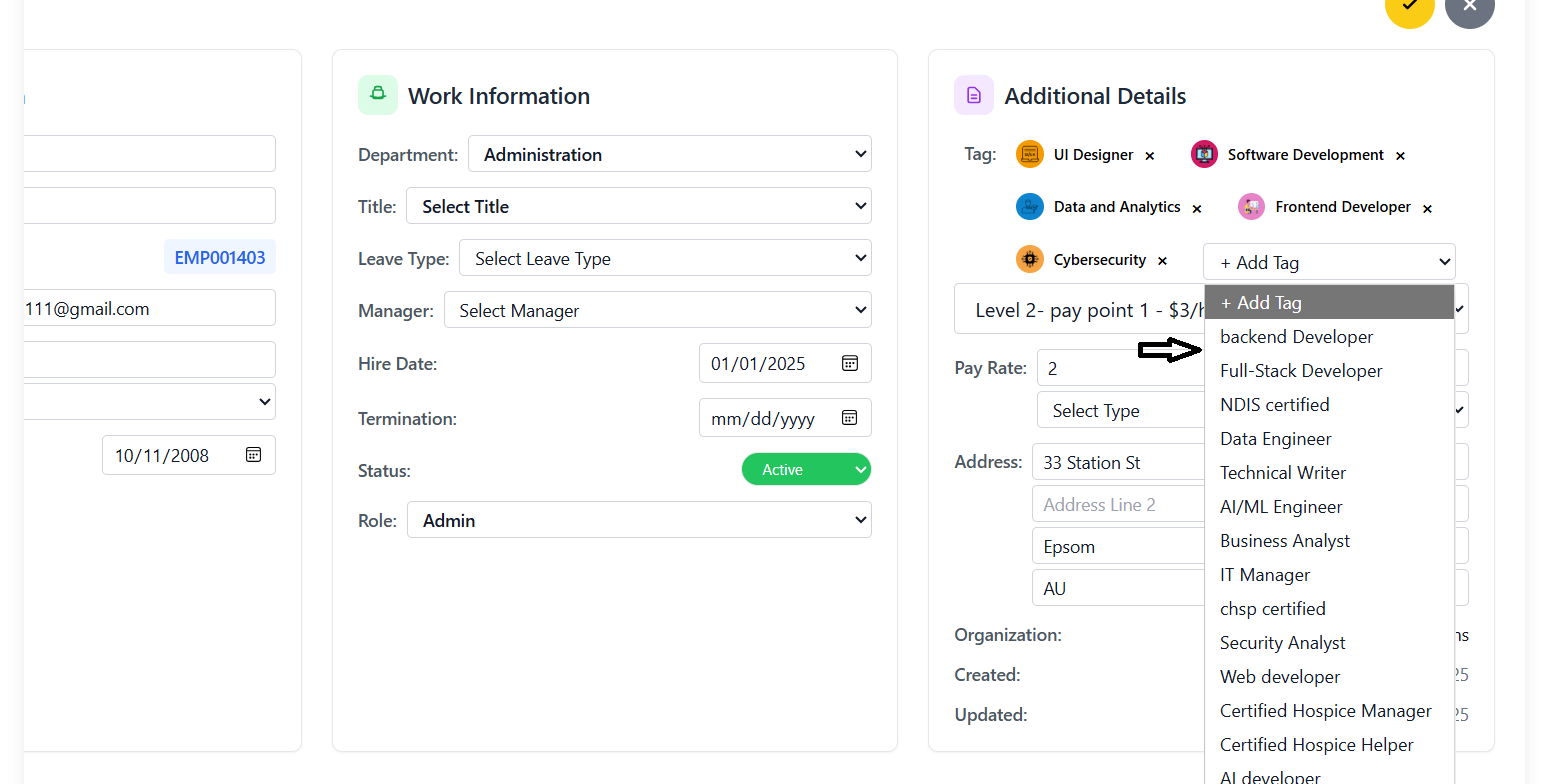
- Modal shows existing tags with checkboxes
- Check tags to apply to the client
- Use "Create New Tag" to add custom tags
- New tags can include name, color, and icon
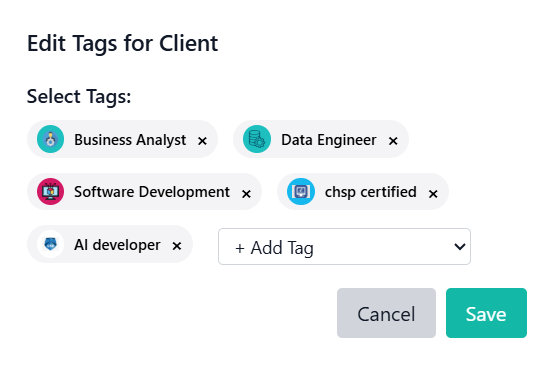
- Review selected tags
- Click "Save Tags" button
- Modal closes and tags are applied
- Tags appear as colored badges in client grid
Managing Tags
- Tags appear as small colored badges in client grid
- Hover over tags to see full tag name
- Multiple tags stack horizontally
- Tags with icons show visual indicators
- Open tag management modal
- Uncheck tags to remove them
- Or click "X" on tag badge in some views
- Save changes to apply removal
- Access organization settings
- Navigate to Tags management section
- Create new tags with name, color, and optional icon
- New tags become available for all clients
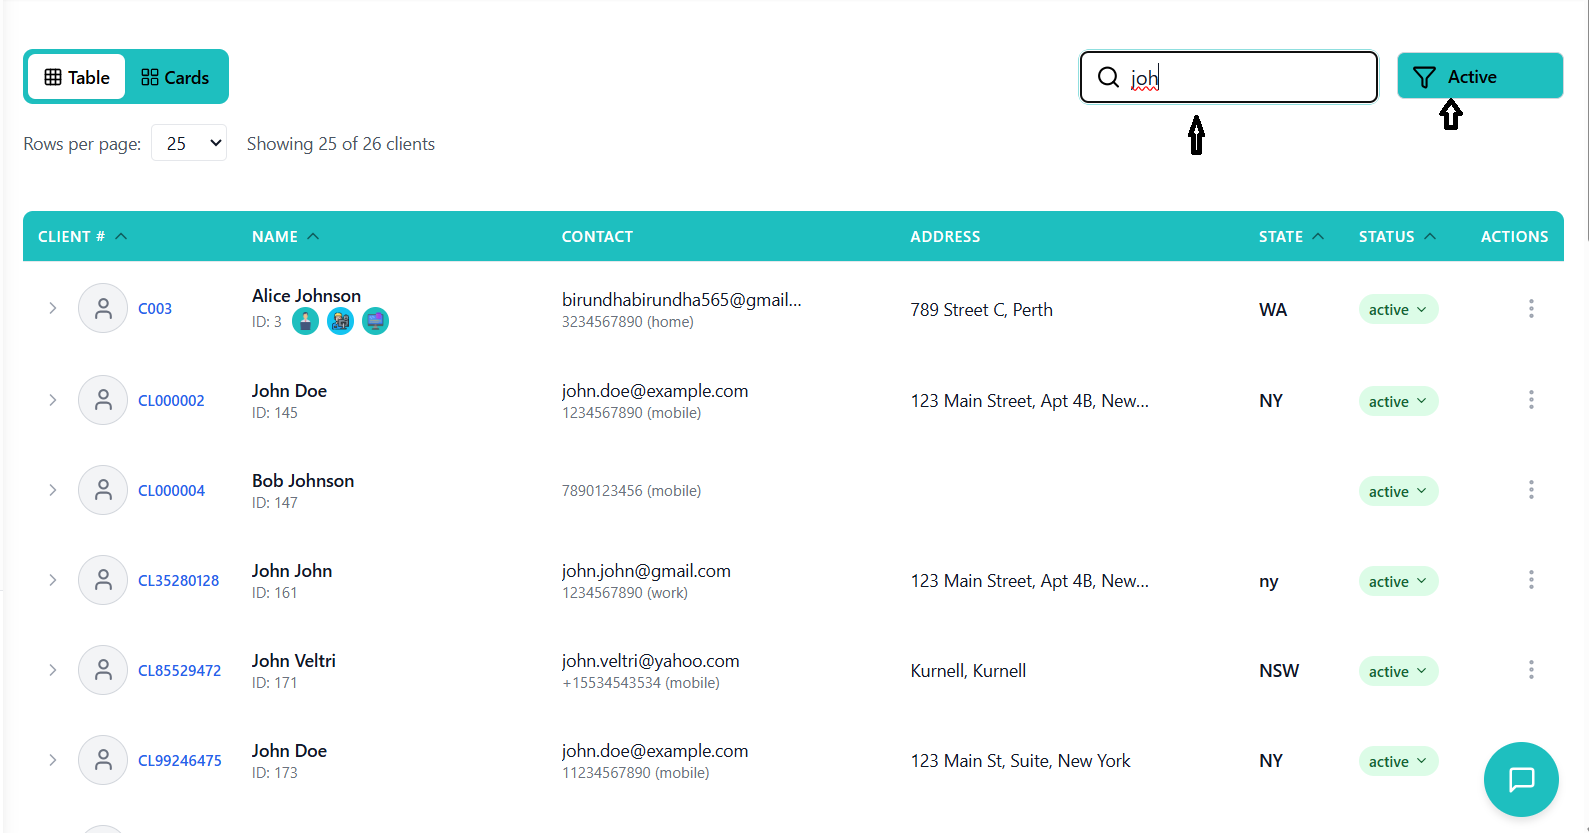
Filtering by Tags
- Type tag name in search bar to filter
- Or use advanced filter options
- System shows clients matching selected tags
- Multiple tags can be combined for precise filtering
- Use consistent naming conventions for tags
- Limit the number of tags per client to maintain clarity
- Create tag categories for different types (service, location, urgency)
- Regularly review and clean up unused tags
Setting Client Limits
Configuring expense and mileage limits for clients with date ranges.
Understanding Client Limits
Client limits define the maximum mileage and expense amounts that can be claimed for a specific client within defined date ranges. These limits ensure compliance with client agreements and funding allocations.
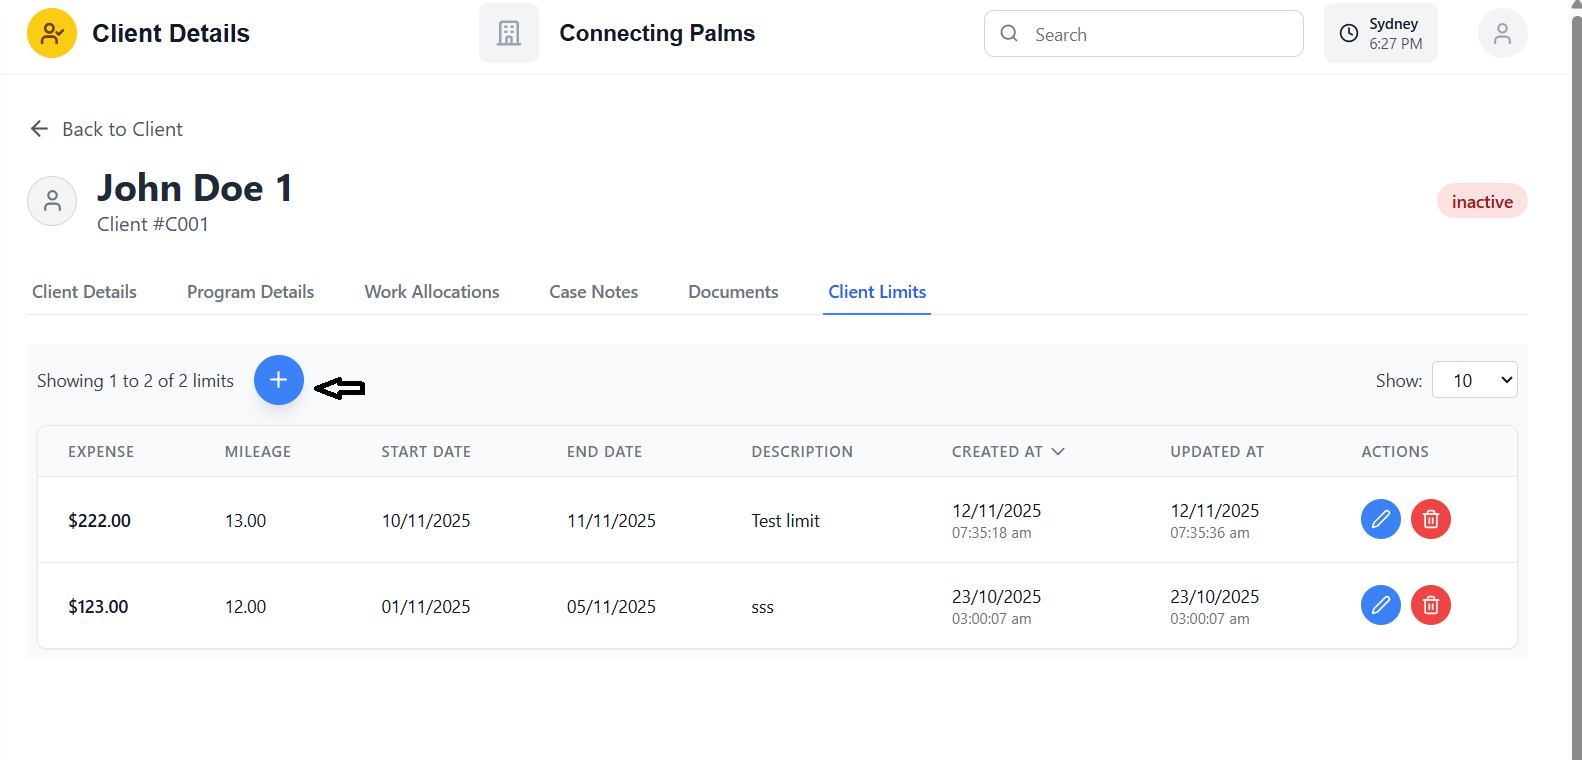
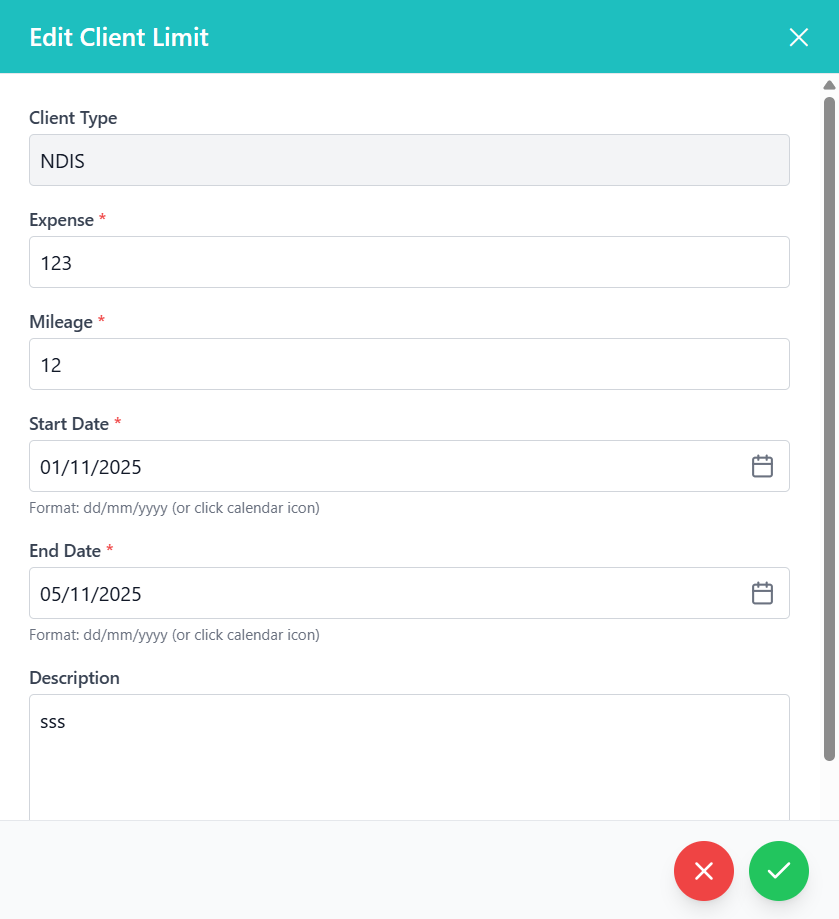
Adding Client Limits
- Navigate to client details page
- Click on "Client Limits" tab
- View existing limits or add new ones
- Click "+" button to add new limit
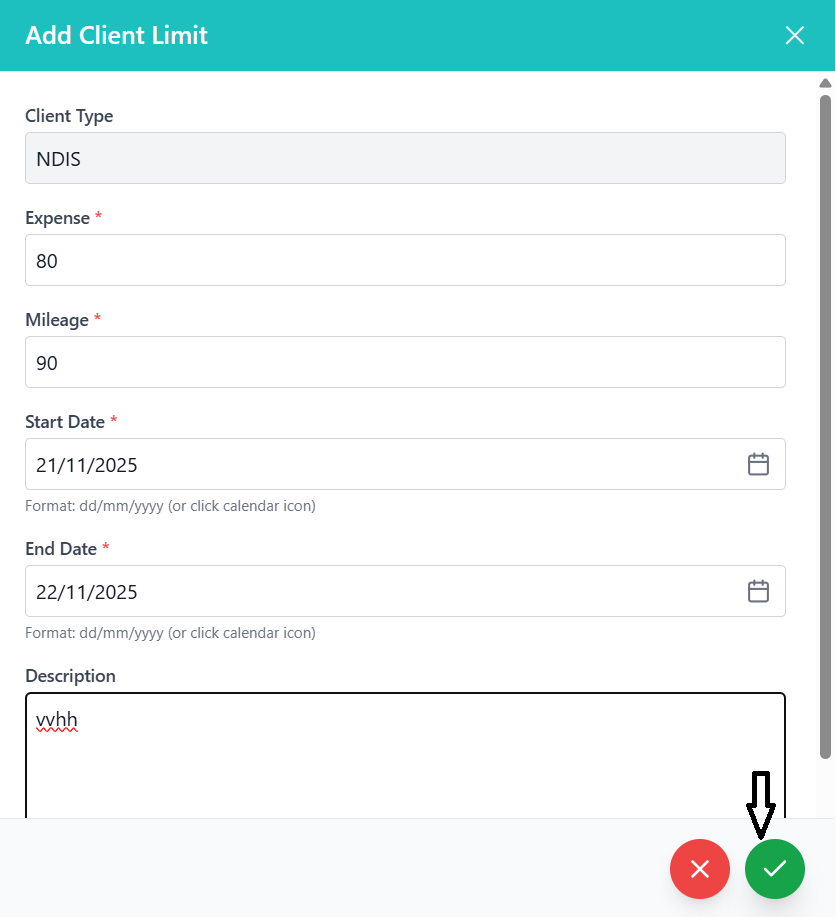
Client Type (Read-only)
- Automatically populated (NDIS, CHSP, or CHSP_V1)
- Based on client's program type
- Cannot be changed
Expense Amount *
- Enter maximum expense amount in dollars
- Use decimal format (e.g., 100.00)
- Must be greater than or equal to 0
Mileage *
- Enter maximum mileage in kilometers
- Use decimal format (e.g., 50.00)
- Must be greater than or equal to 0
Start Date *
- Type date in dd/mm/yyyy format
- OR click calendar icon to use date picker
- System auto-formats as you type
- Defines when the limit period begins
End Date *
- Enter limit period end date
- Must be equal to or after start date
- Use same format as start date
Description (Optional)
- Add notes about the limit (max 1000 characters)
- Character counter displays below field
- Useful for explaining special circumstances
- Review all entered information
- Click the green "Save" button
- System validates all fields
- Success message appears if saved successfully
- New limit appears in the limits table
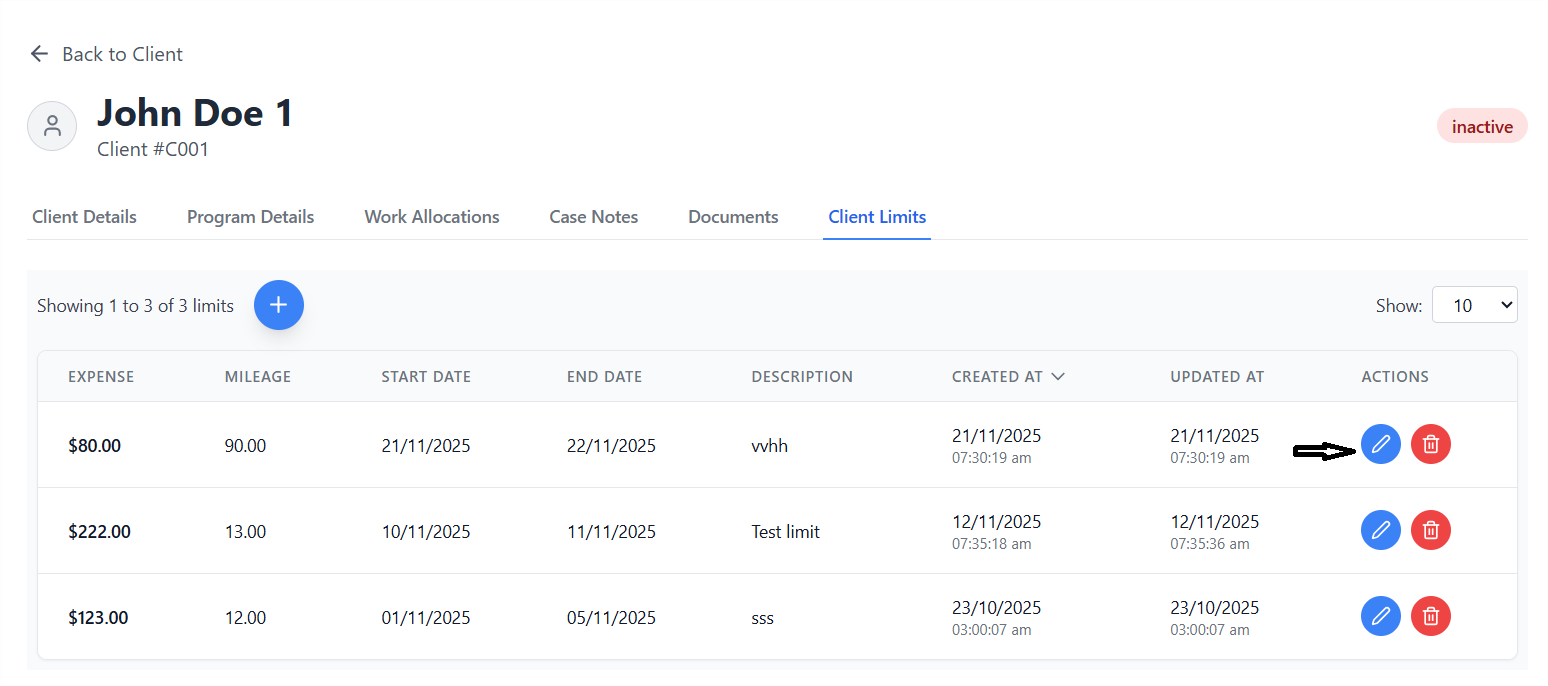
Managing Existing Limits
- All limits display in a table format
- Columns show expense, mileage, dates, and description
- Active limits are highlighted
- Expired limits are grayed out
- Click edit button (pencil icon) for any limit
- Form opens with existing values
- Make necessary changes
- Save to update the limit
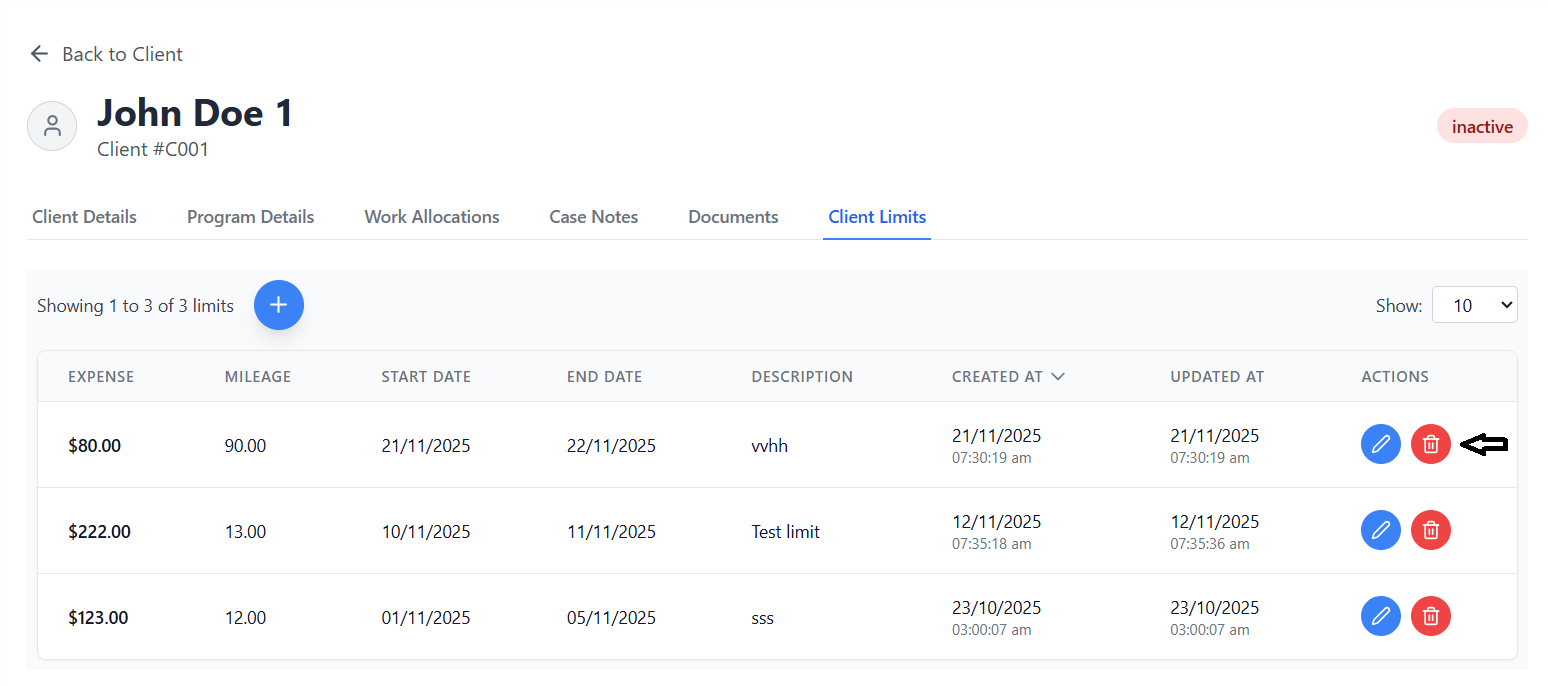
- Click delete button (trash icon) for any limit
- Confirmation dialog appears
- Confirm deletion to remove the limit
- Limit is permanently removed from system
Validation Rules for Client Limits
| Field | Validation Rule | Error Message |
|---|---|---|
| Expense | Must be ≥ 0 | "Please enter a valid expense amount (must be >= 0)" |
| Mileage | Must be ≥ 0 | "Please enter a valid mileage (must be >= 0)" |
| Start Date | Valid dd/mm/yyyy format | "Please enter a valid start date (dd/mm/yyyy)" |
| End Date | Valid date, ≥ start date | "End date must be after or equal to start date" |
| Description | Max 1000 characters | "Description must not exceed 1000 characters" |
Service Allocation
Assigning services and rate cards to clients for service delivery.
Understanding Service Allocation
Service allocation involves assigning specific services and rate cards to clients, which determines what services they can receive, who provides them, and how they are billed. This forms the foundation for work scheduling and timesheet management.
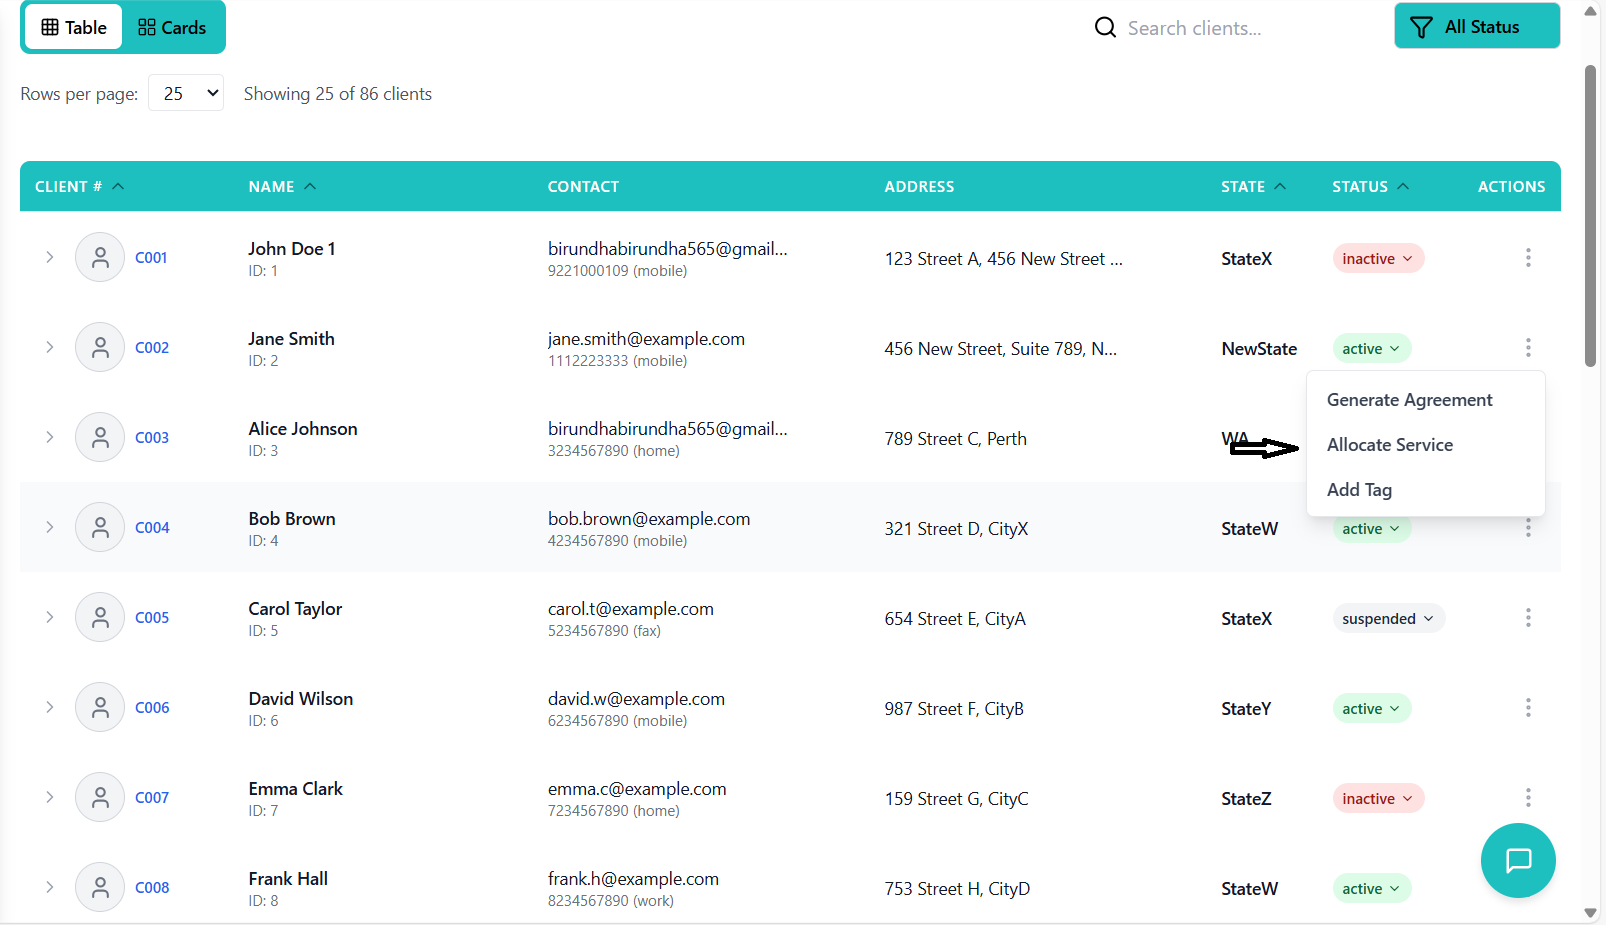
Allocating Services to Clients
- Navigate to client grid view
- Click the action menu (three dots) for a client
- Select "Allocate Service" from dropdown
- Service allocation panel opens
- Choose from available service categories
- Filter by program type (NDIS, CHSP, etc.)
- Select specific service items
- View service details and rates
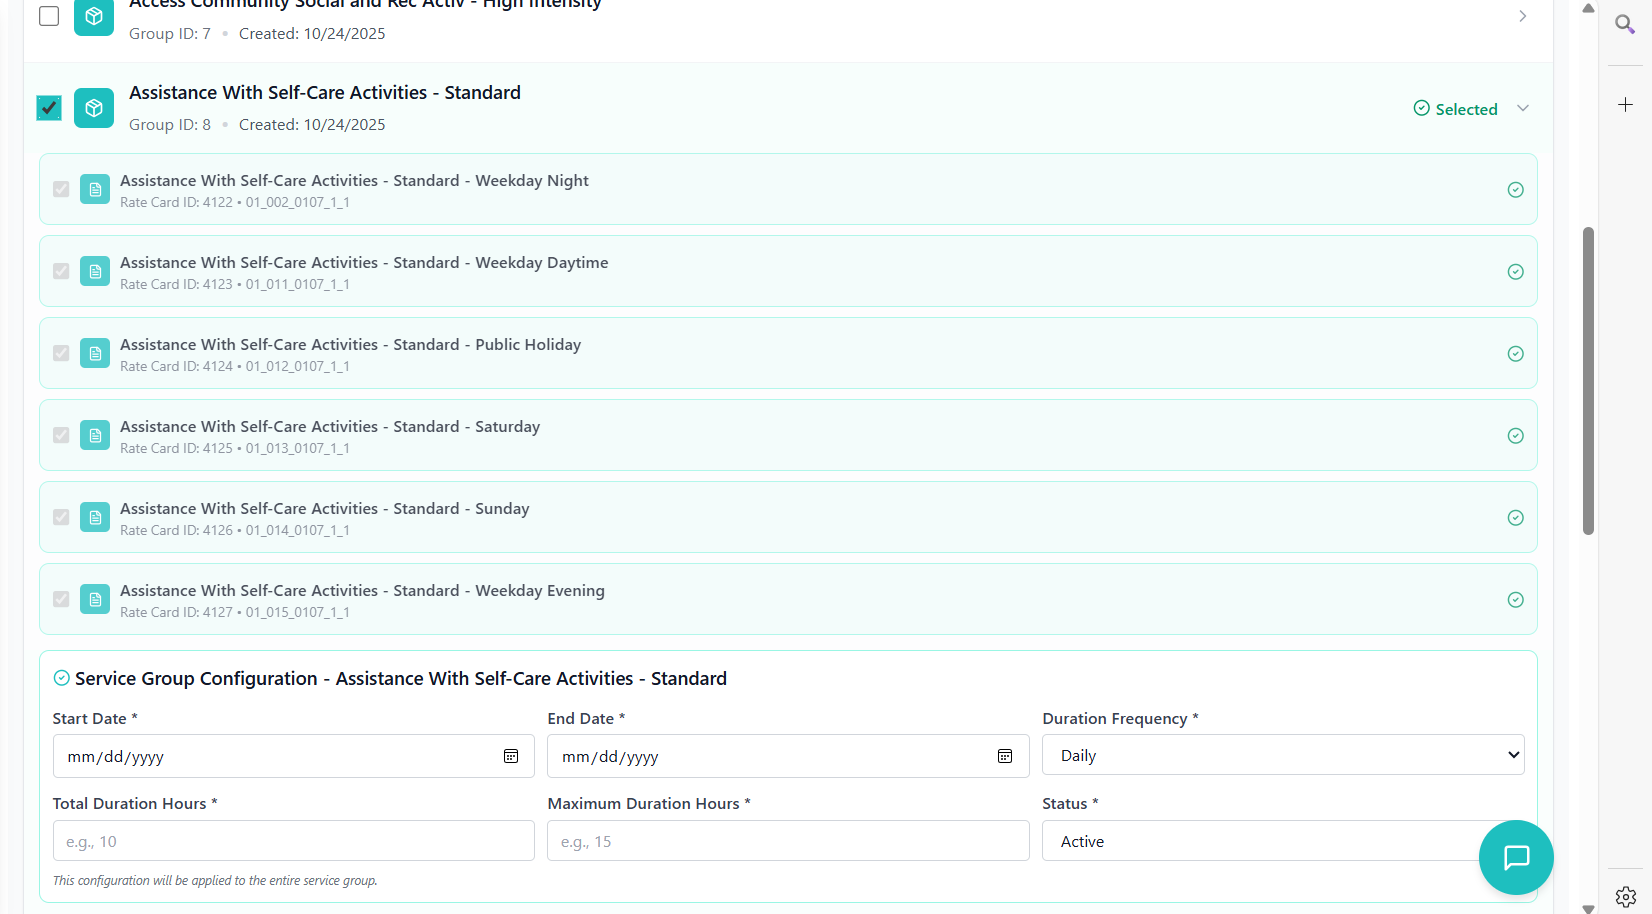
- Start Date: When service begins
- End Date: When service ends (optional)
- Frequency: How often service occurs
- Duration: Length of each service session
- Rate Card: Associated pricing structure
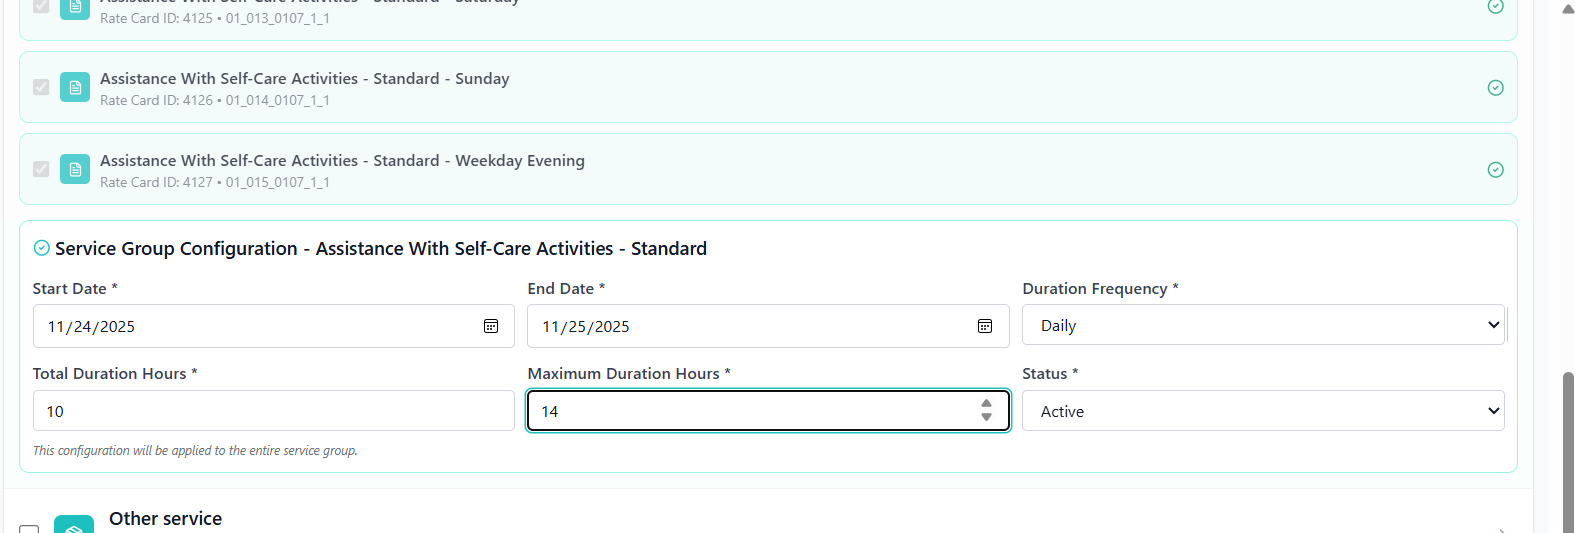
- Review all allocation details
- Click "Save Allocation" button
- System validates the allocation
- Success message appears upon completion
Viewing Allocated Services
- Click expand button (chevron) next to client name
- Allocated services display in expanded view
- See service names, rates, and status
- Quick overview without leaving grid
- Navigate to "Work Allocations" tab
- Comprehensive view of all services
- See detailed information including dates and employees
- Filter by date range or status
Managing Allocated Services
- Navigate to client's Work Allocations tab
- Find the service allocation to modify
- Click edit button (pencil icon)
- Update details and save changes
- Navigate to client's Work Allocations tab
- Find the service allocation to remove
- Click delete button (trash icon)
- Confirm deletion in dialog
- Service is removed from client
Service Allocation Best Practices
📅 Plan Ahead
Set appropriate start and end dates to avoid service gaps or overlaps.
💰 Match Rates
Ensure rate cards match client funding and organizational pricing.
👥 Staff Appropriately
Assign services to qualified employees with appropriate skills.
📊 Regular Reviews
Periodically review allocations to ensure they remain appropriate.
Creating Case Notes
Documenting client interactions, observations, and progress notes.
Understanding Case Notes
Case notes are detailed records of client interactions, observations, progress, and any significant events. They provide a chronological history of client engagement and are essential for continuity of care, compliance, and quality assurance.
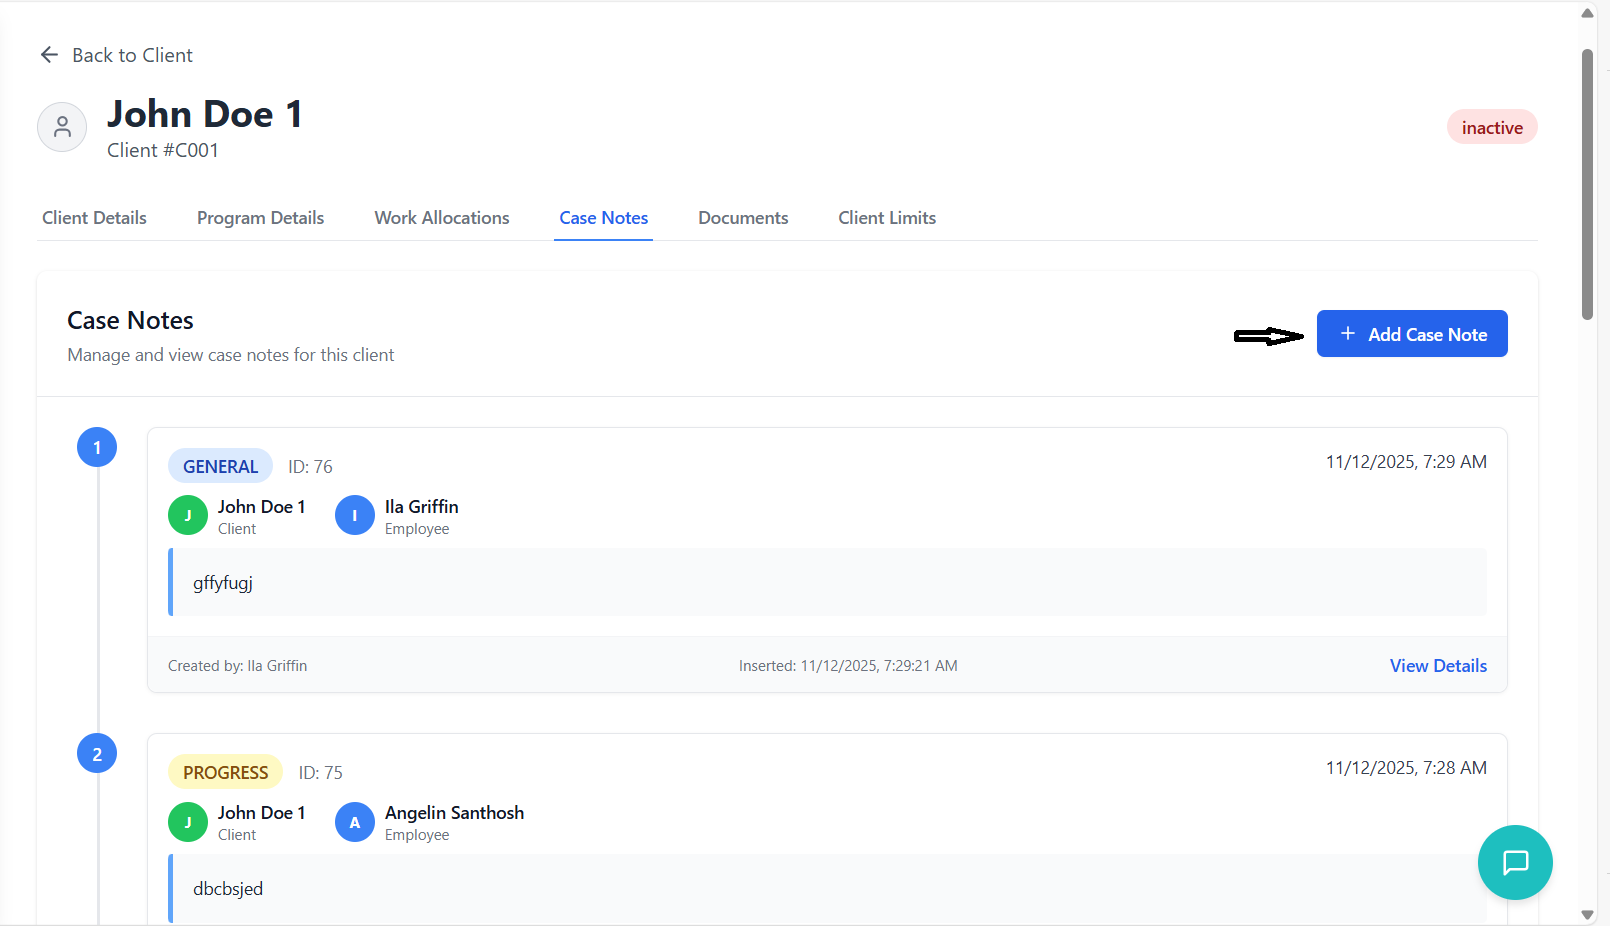
Creating a Case Note
- Navigate to client details page
- Click on "Case Notes" tab
- View existing notes or create new ones
- Click "Add Case Note" button
- Employee: Select staff member creating note
- Note Type: Choose appropriate category
- Date: Date of interaction/observation
- Note Content: Detailed description
- Private Note: Mark if sensitive information

- Be objective and factual
- Include specific observations
- Note client responses and behaviors
- Document any concerns or changes
- Record follow-up actions needed
- Review note for accuracy and completeness
- Click "Create Note" button
- System saves the note with timestamp
- Note appears in case notes timeline

Case Note Types
| Note Type | Purpose | When to Use |
|---|---|---|
| Progress Note | Document client progress toward goals | Regular service delivery, goal reviews |
| Incident Report | Record unusual events or concerns | Falls, behavioral incidents, safety concerns |
| Medication Note | Document medication administration | Medication given, refused, or changes |
| Assessment | Record formal assessment results | Initial assessments, re-assessments |
| General Note | Miscellaneous client interactions | Phone calls, family meetings, general observations |
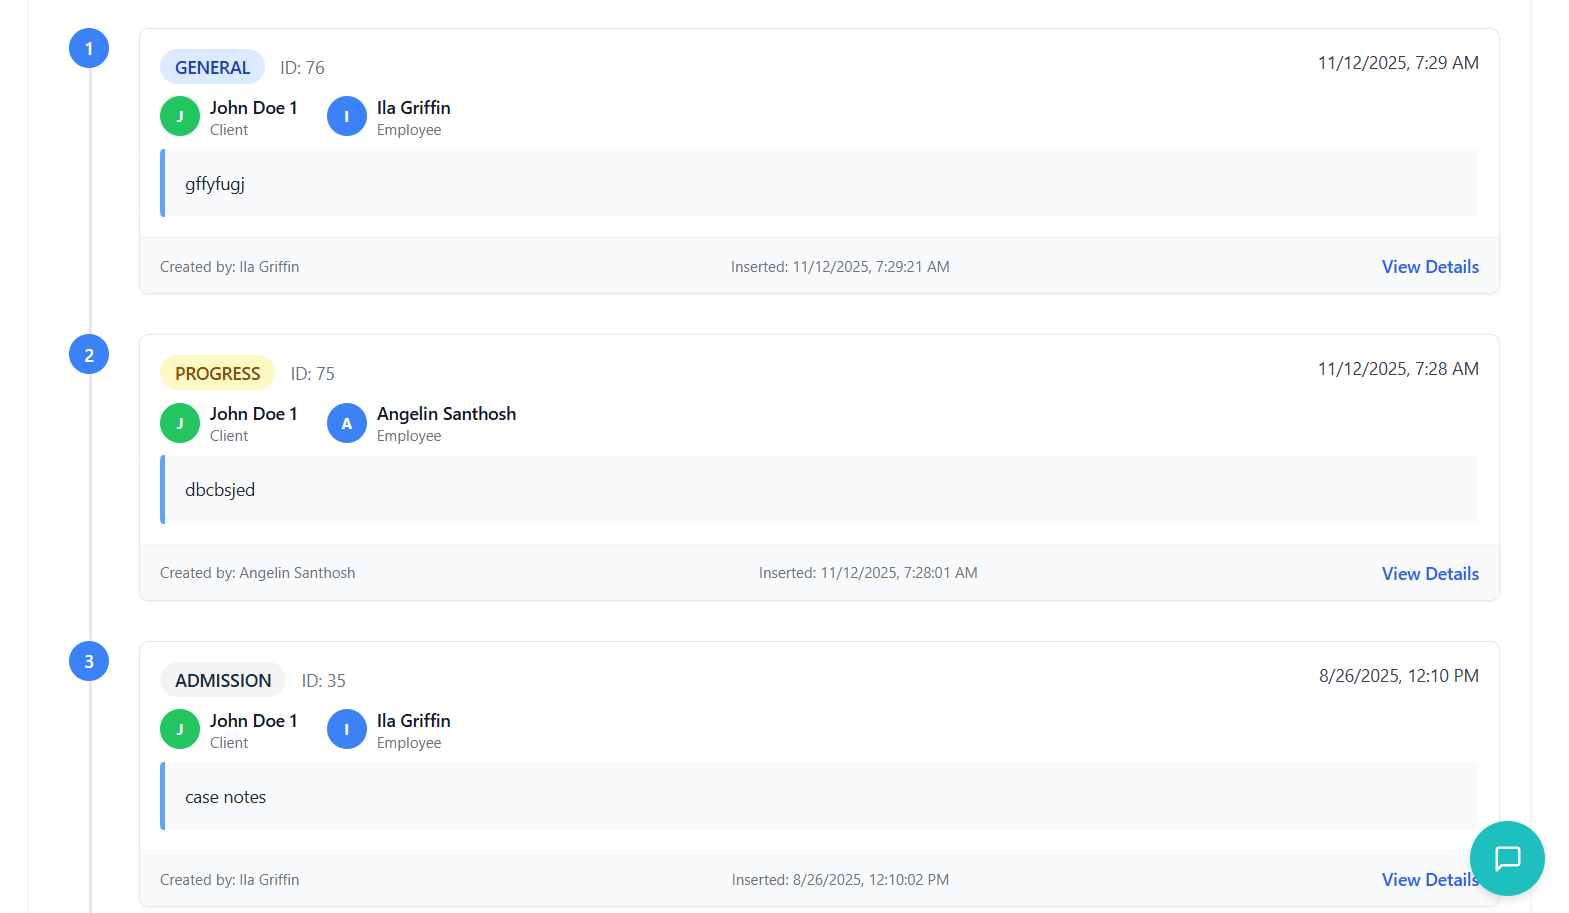
Viewing and Managing Case Notes
- Notes display in chronological order
- Most recent notes appear at top
- Each note shows date, author, and type
- Click any note to view full details
- Filter by note type using dropdown
- Search by keyword in note content
- Filter by date range
- Filter by staff member
- Private notes marked with special indicator
- Only authorized staff can view private notes
- Regular notes visible to all staff with client access
- Privacy settings enforced based on user roles
- Write notes promptly after interactions
- Use objective language and avoid judgments
- Be specific and include relevant details
- Note both positive progress and concerns
- Maintain client confidentiality
- Follow organizational templates and guidelines
Managing Documents
Uploading, organizing, and managing client documents and agreements.
Understanding Document Management
The document management system allows you to store, organize, and access all client-related documents in one secure location. This includes agreements, assessments, identification, reports, and any other relevant files.
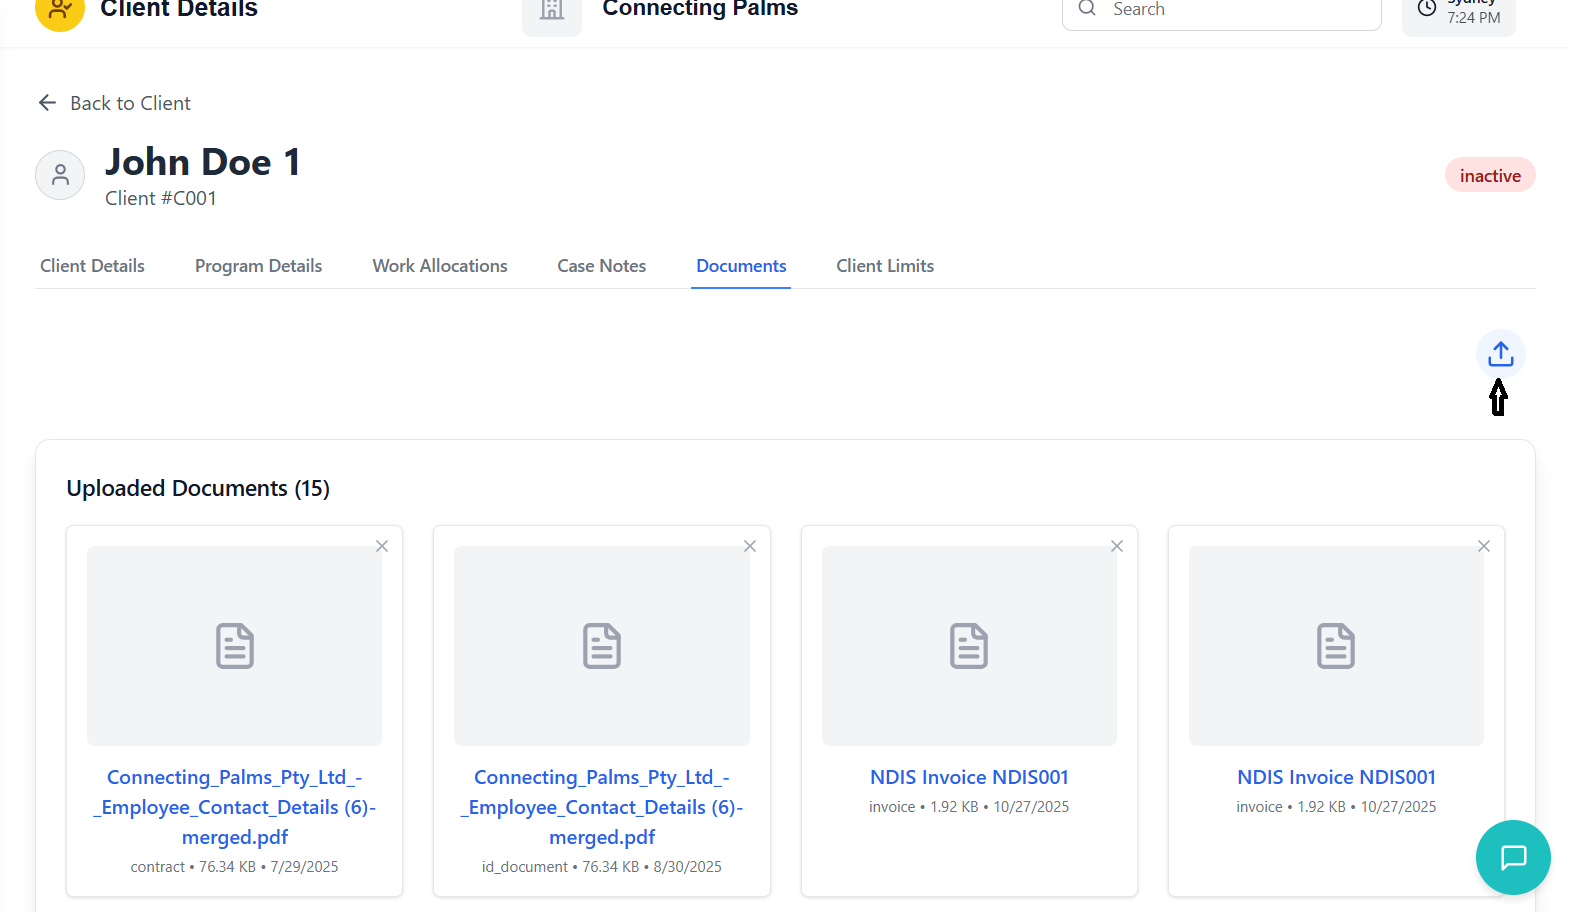
Uploading Documents
- Navigate to client details page
- Click on "Documents" tab
- View existing documents or upload new ones
- Click upload button (cloud with arrow)
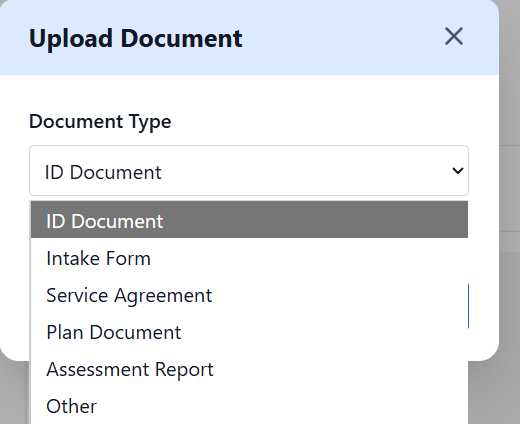
- Choose appropriate document category
- Common types: ID Document, Service Agreement, Assessment
- Selecting correct type helps with organization
- Some types may be required for compliance
- Drag and drop files into upload area
- Or click to browse and select files
- Supported formats: PDF, JPG, PNG, DOC, DOCX
- Maximum file size: 10MB per document
- System processes and stores the file
- Progress indicator shows upload status
- Document appears in documents list
- Success message confirms completion
Document Types and Requirements
| Document Type | Purpose | Required/Optional |
|---|---|---|
| ID Document | Verify client identity | Required |
| Service Agreement | Formal service contract | Required |
| Intake Form | Initial client information | Required |
| Assessment Report | Client needs assessment | Conditional |
| Care Plan | Service delivery plan | Required |
| Incident Report | Document incidents | As needed |
| Other | Miscellaneous documents | Optional |
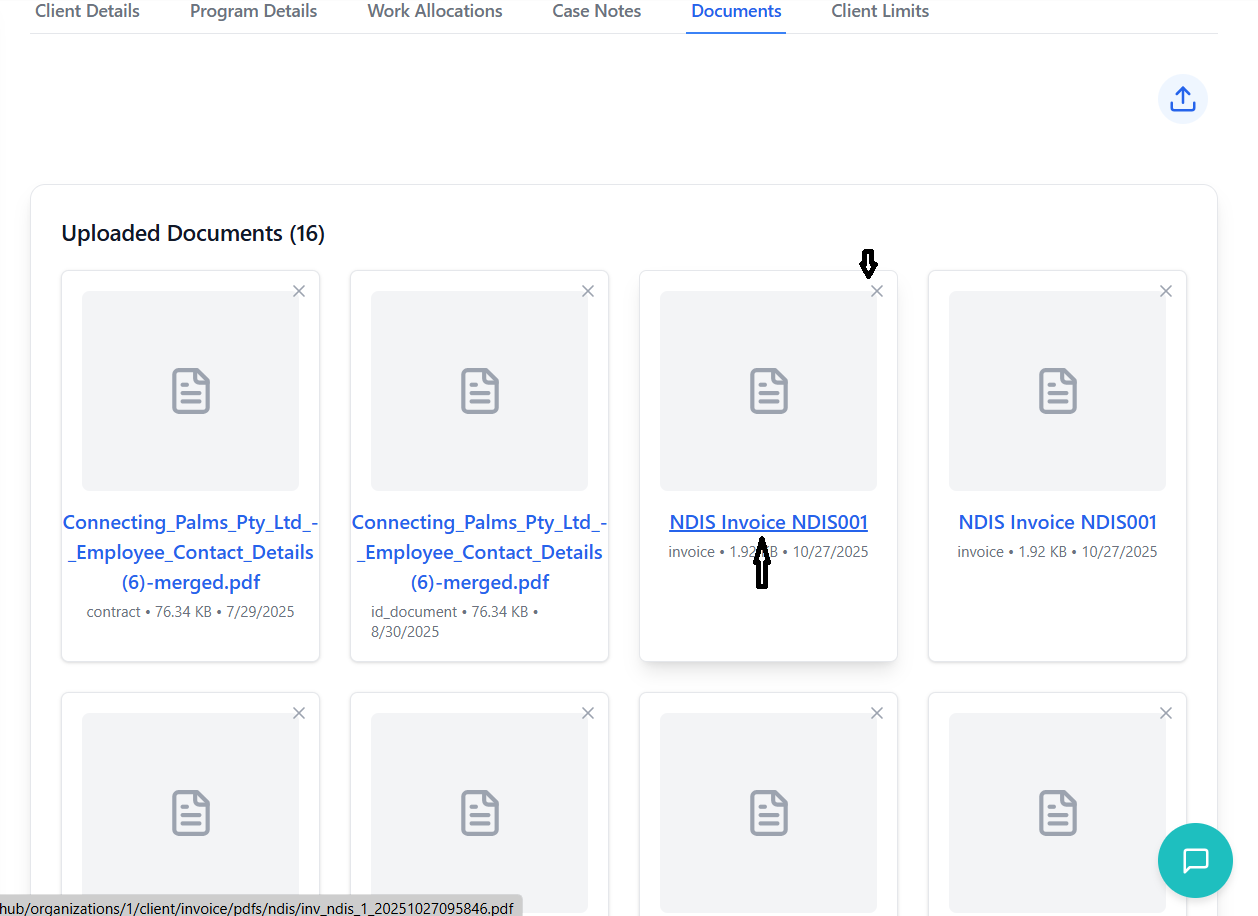
Managing Uploaded Documents
- Documents display in grid or list view
- See document name, type, upload date, and size
- Preview images and PDFs directly in browser
- Download any document for offline viewing
- Filter by document type using dropdown
- Search by document name or content
- Sort by date, name, or type
- Group related documents together
- View: Open document in viewer
- Download: Save copy to device
- Rename: Change document name
- Delete: Remove document from system
Generating Service Agreements
- Navigate to client grid or details
- Click action menu (three dots)
- Select "Generate Agreement"
- Agreement generation panel opens
- System pre-populates client information
- Review service details and pricing
- Add any custom terms if needed
- Select agreement duration
- Click "Generate Agreement" button
- System creates professional PDF document
- Document opens in new window for review
- Option to print or save directly to client documents
Troubleshooting Guide
Solutions to common issues and problems you may encounter.
Common Issues
Possible Causes:
- Network connection issues
- Organization ID not properly set
- Permission restrictions
- Server maintenance
Solutions:
- Check internet connection
- Refresh the page (F5)
- Verify organization settings
- Contact administrator for permission verification
Possible Causes:
- Search term too specific
- Client not in current organization
- Search indexing delay
Solutions:
- Try broader search terms
- Check organization filter
- Wait a few moments and try again
- Use client ID for precise search
Possible Causes:
- Lack of edit permissions
- Client record locked by another user
- Browser cache issues
Solutions:
- Verify user permissions with administrator
- Wait and try again later
- Clear browser cache and reload
- Try different browser
Possible Causes:
- File size too large
- Unsupported file format
- Network connectivity issues
- Server storage limits
Solutions:
- Use images under 5MB
- Convert to supported formats (JPG, PNG)
- Check internet connection
- Contact administrator for storage issues
Possible Causes:
- Incorrect Excel format
- Missing required fields
- Data validation failures
- Duplicate client records
Solutions:
- Use the provided template
- Check all required fields are populated
- Review error report for specific issues
- Ensure client numbers/emails are unique
Possible Causes:
- Invalid date ranges
- Service not available for client type
- Rate card configuration issues
- Employee availability conflicts
Solutions:
- Check that end date is after start date
- Verify service compatibility with client program
- Confirm rate card is active and properly configured
- Check employee schedules for conflicts
Error Message Reference
| Error Message | Meaning | Solution |
|---|---|---|
| "Failed to load clients" | Network or server issue | Refresh page, check connection |
| "Client not found" | Client ID doesn't exist | Verify client ID, check organization |
| "Permission denied" | User lacks required permissions | Contact administrator |
| "Duplicate client number" | Client number already exists | Use unique client number |
| "Invalid email format" | Email doesn't match required format | Enter valid email address |
| "File upload failed" | Document/image upload issue | Check file size and format |
| "Service allocation conflict" | Overlapping service allocations | Check date ranges and employee availability |
| "Client limits exceeded" | Mileage/expense over allowed limits | Adjust amounts or update client limits |
Performance Tips
🔍 Use Filters
Apply filters to narrow down large client lists instead of scrolling through all records.
📱 Optimize Browser
Clear cache regularly and use updated browsers for best performance.
💾 Batch Operations
Use bulk operations for multiple updates instead of individual changes.
🕒 Off-Peak Usage
Schedule large operations during off-peak hours for faster processing.
Contact Support
- Persistent errors after trying solutions
- Data appears incorrect or corrupted
- Cannot access clients at all
- Permission issues not resolved by administrator
- System performance problems
- Feature not working as expected
Information to Provide:
- Your user ID and organization
- Screenshot of the error
- Steps you took before error occurred
- Browser and operating system
- Date and time of issue
- Client ID if applicable