Carer Management System
Complete guide for carer management. Select a topic below to get started.
System Overview
Learn about the system features, user roles, and permissions.
Accessing the System
How to login and navigate to the carer management module.
Carer List View
Understanding the carer list interface and functionality.
Search & Filter
How to search and filter carers effectively.
Adding a Carer
Process for adding new carers to the system.
Editing Carer Details
How to modify carer information and settings.
Status Management
Managing carer status (active, inactive, suspended, terminated).
Tag Management
Assigning and managing tags for carers.
Profile Image Upload
Uploading and managing carer profile images.
Carer Details View
Comprehensive view of carer information and activities.
Work Allocations
Viewing and managing carer work schedules.
Case Notes
Creating and managing case notes for carers.
Document Management
Uploading and managing carer documents.
Permissions & Roles
Understanding user permissions and role-based access.
Import & Export
Bulk import and export of carer data.
Troubleshooting
Solutions to common issues and problems.
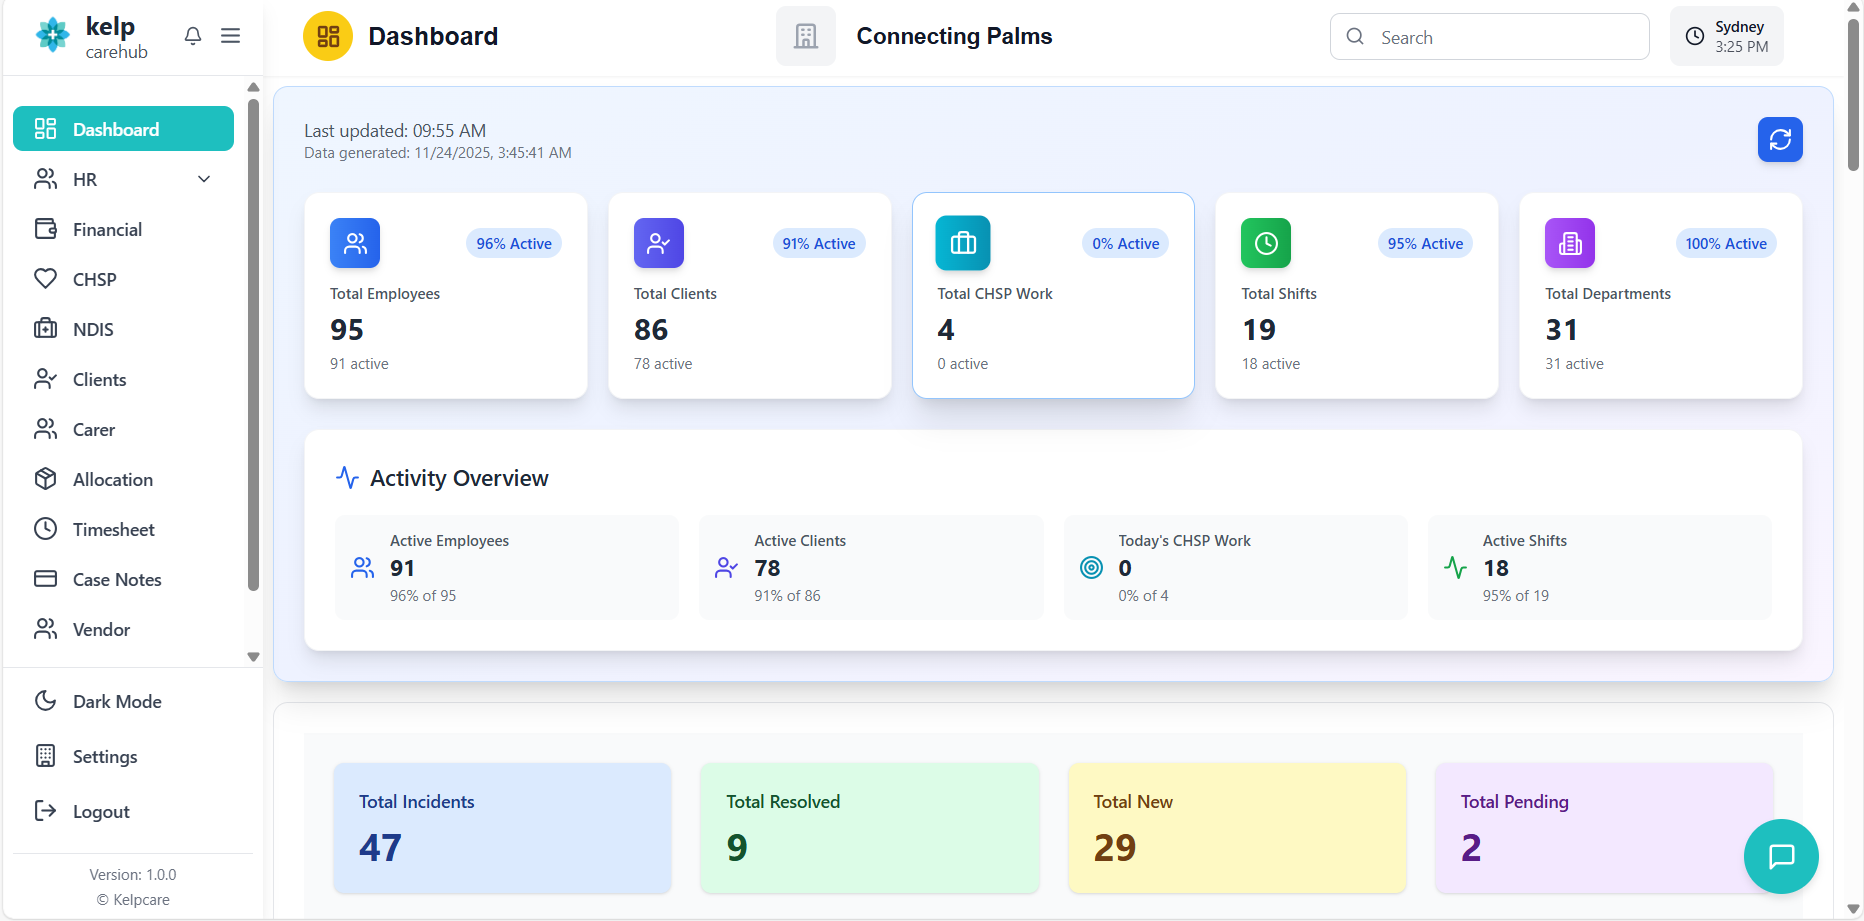
System Overview
The Carer Management System enables organizations to manage carer information, work allocations, case notes, and documents in a centralized platform.
Key Features
👨⚕️ Comprehensive Carer Profiles
Complete carer information including personal details, contact information, and employment data.
🔍 Advanced Search & Filtering
Search by name, email, carer number, or tags with real-time filtering.
🏷️ Tag Management
Assign custom tags with icons and colors to categorize and identify carers.
📅 Work Allocation Tracking
View and manage carer work schedules and allocations.
📝 Case Note Management
Create and track case notes with client associations.
📁 Document Management
Upload and manage carer documents with categorization.
🔄 Status Management
Manage carer status (active, inactive, suspended, terminated).
🔐 Role-Based Permissions
Control access based on user roles and permissions.
📤 Bulk Import/Export
Import carers via Excel and export data for reporting.
User Roles & Permissions
| Feature | Standard User | Manager | Administrator |
|---|---|---|---|
| View Carer List | ✓ | ✓ | ✓ |
| View Carer Details | ✓ | ✓ | ✓ |
| Add New Carer | ✗ | ✓ | ✓ |
| Edit Carer Details | ✗ | ✓ | ✓ |
| Change Carer Status | ✗ | ✓ | ✓ |
| Manage Tags | ✗ | ✓ | ✓ |
| Import/Export Data | ✗ | ✓ | ✓ |
| Manage Documents | ✗ | ✓ | ✓ |
Carer Status Workflow
Accessing the Carer System
How to login and navigate to the carer management module.
- Navigate to the application URL
- Enter your username and password
- Click "Login" to access the system
- System automatically detects your permissions based on your role
- From the main navigation menu, click on "Carers" or "Employees"
- System loads the carer list view based on your permissions
- If you have limited permissions, you may only see specific carers
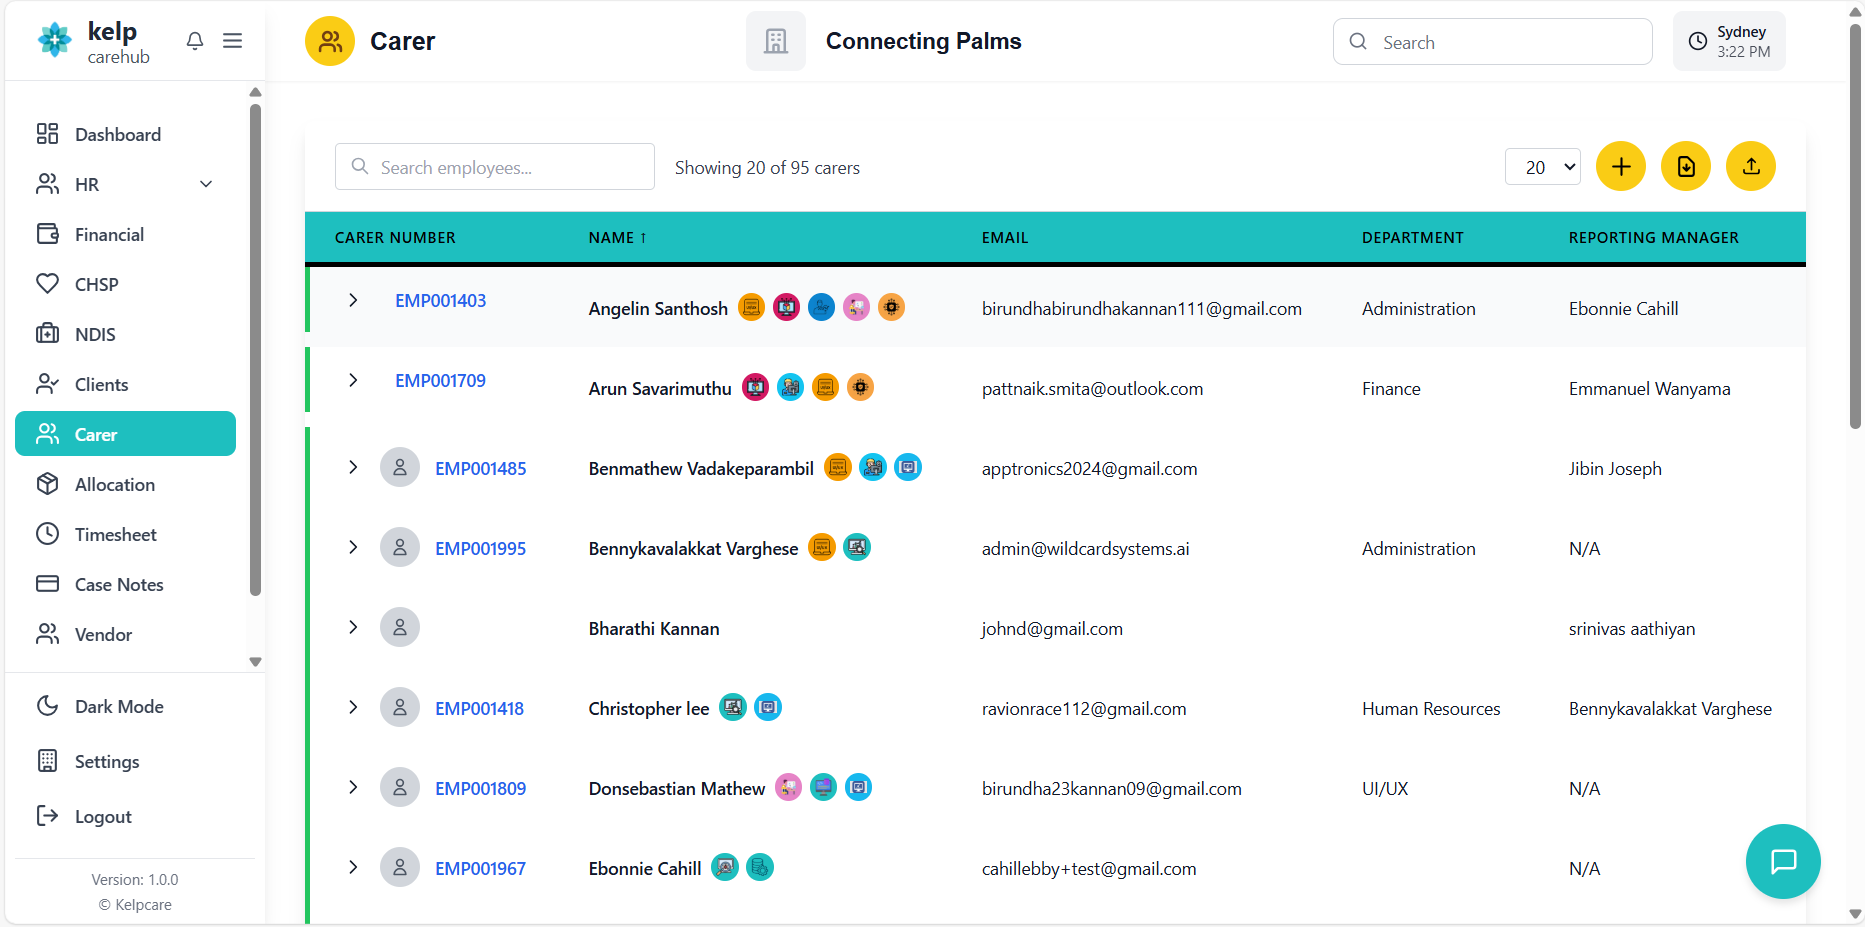
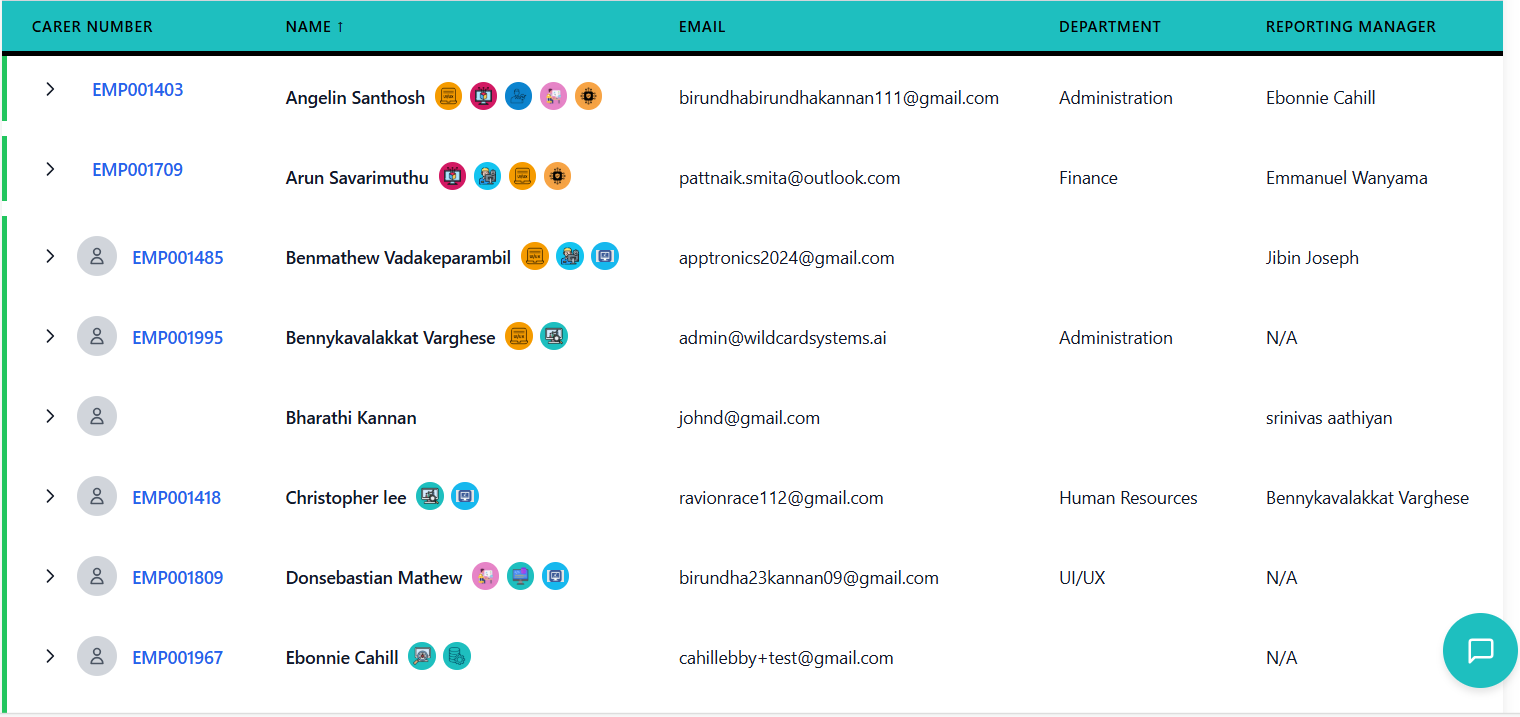
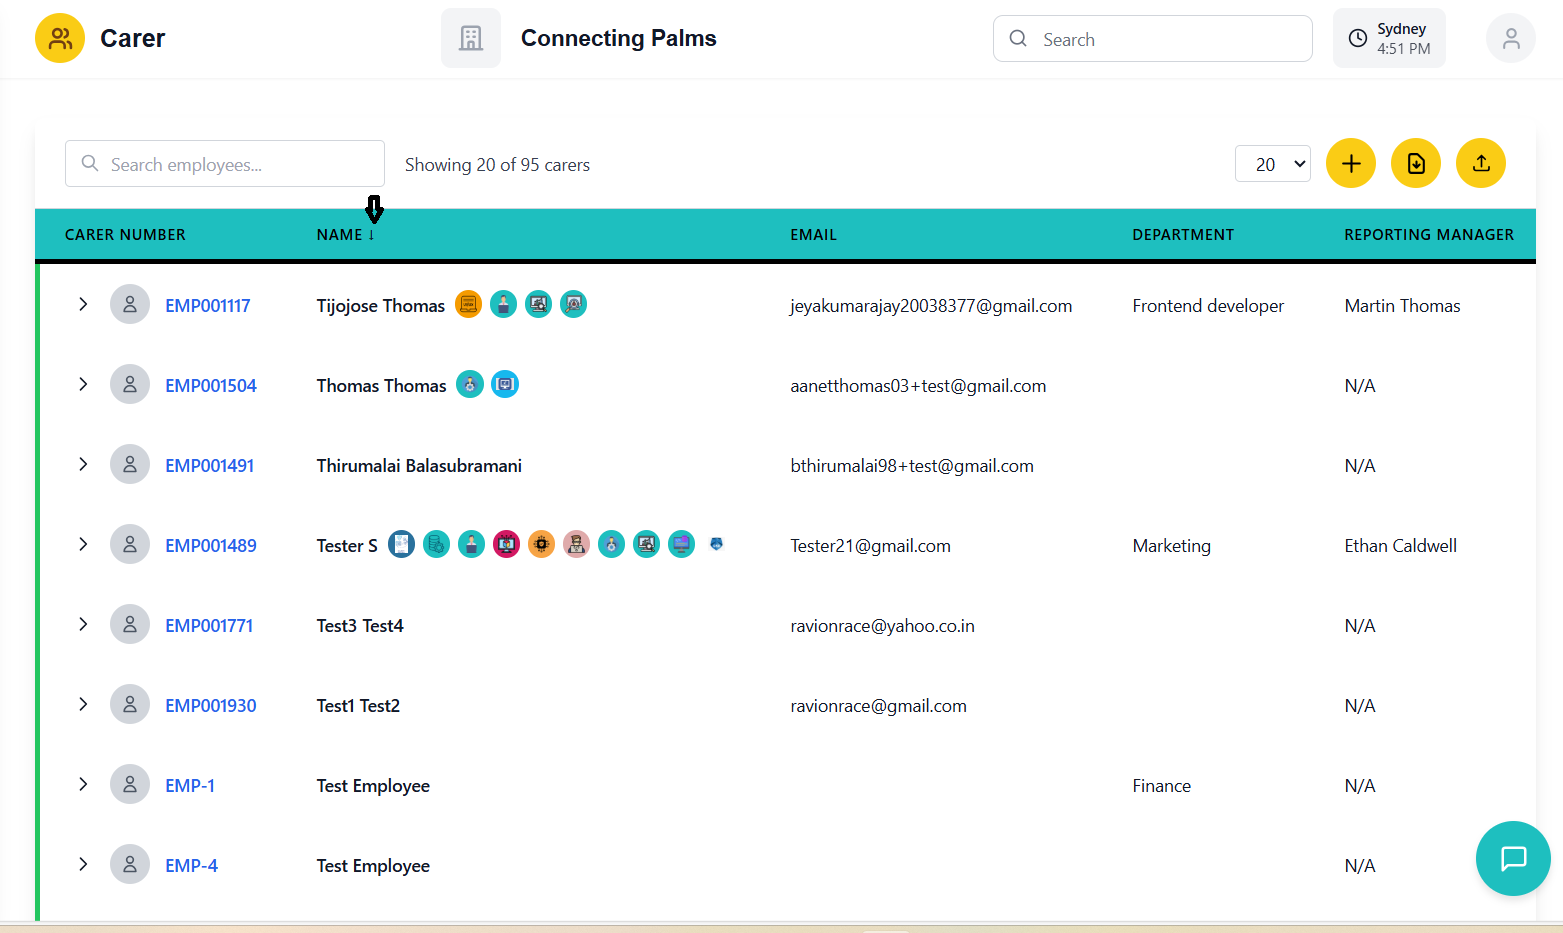
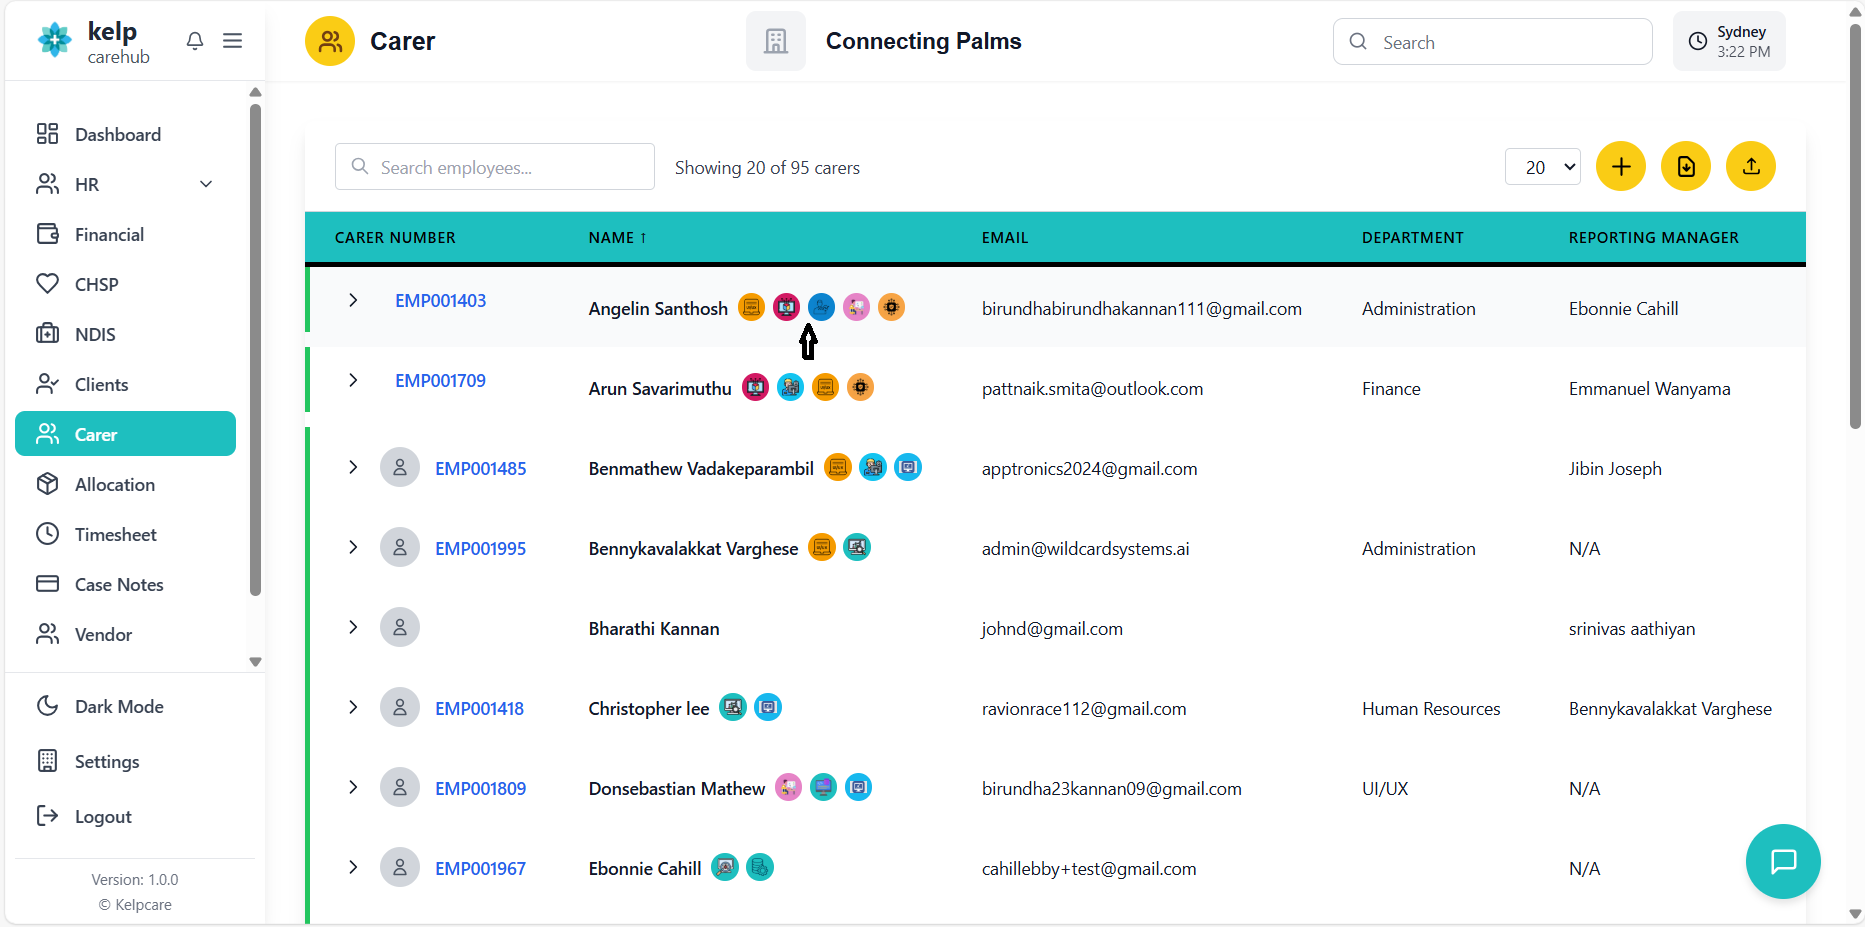
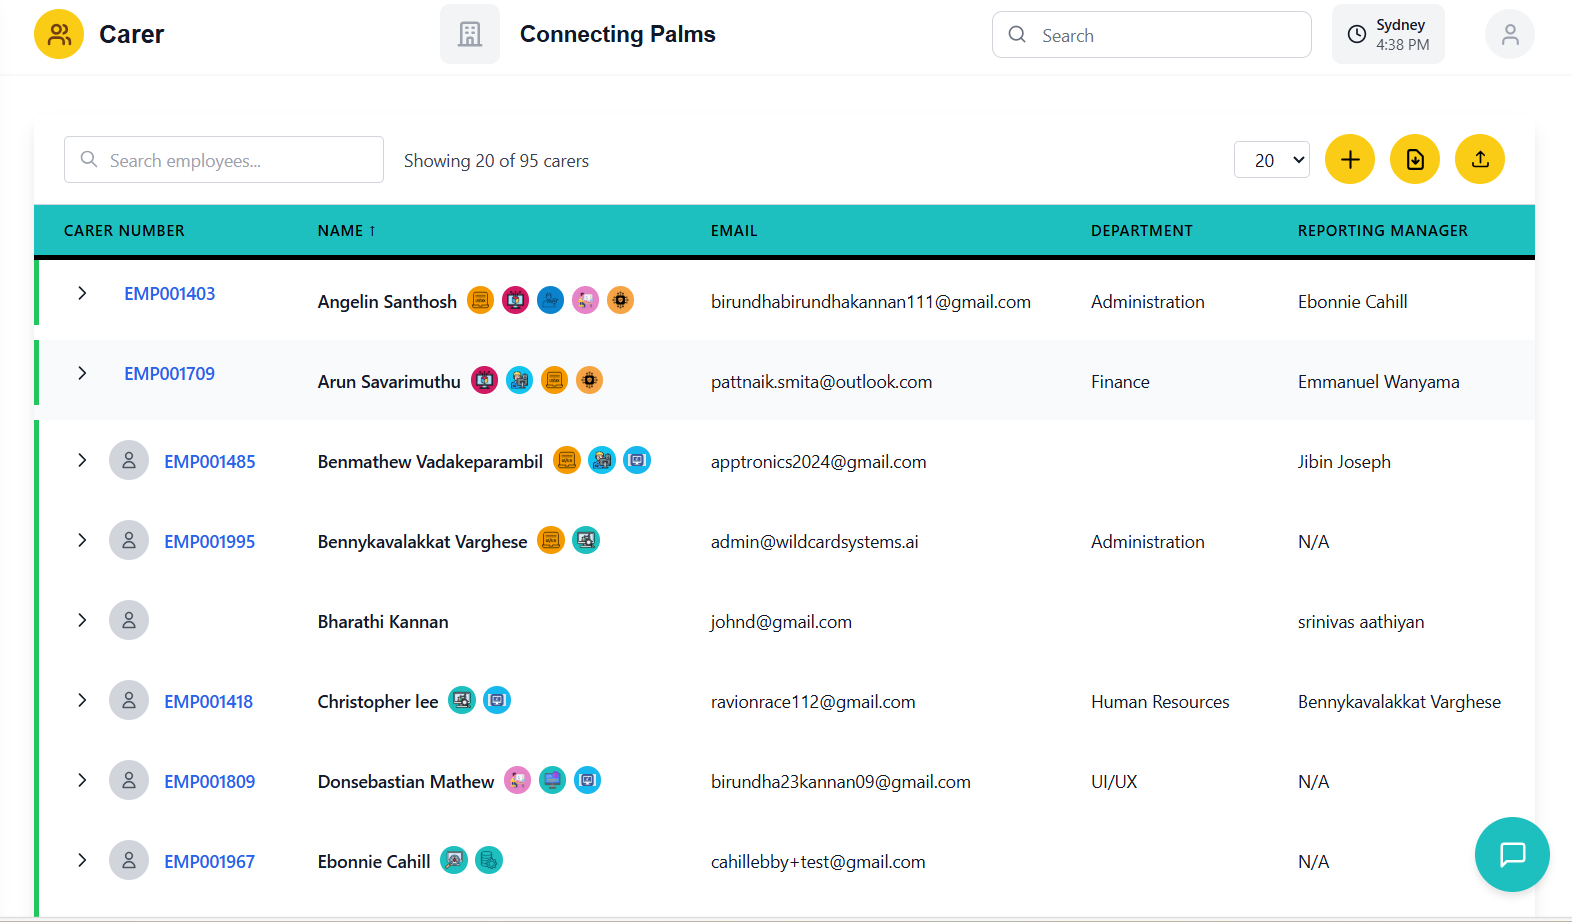
Carer List View
Understanding the carer list interface and functionality.
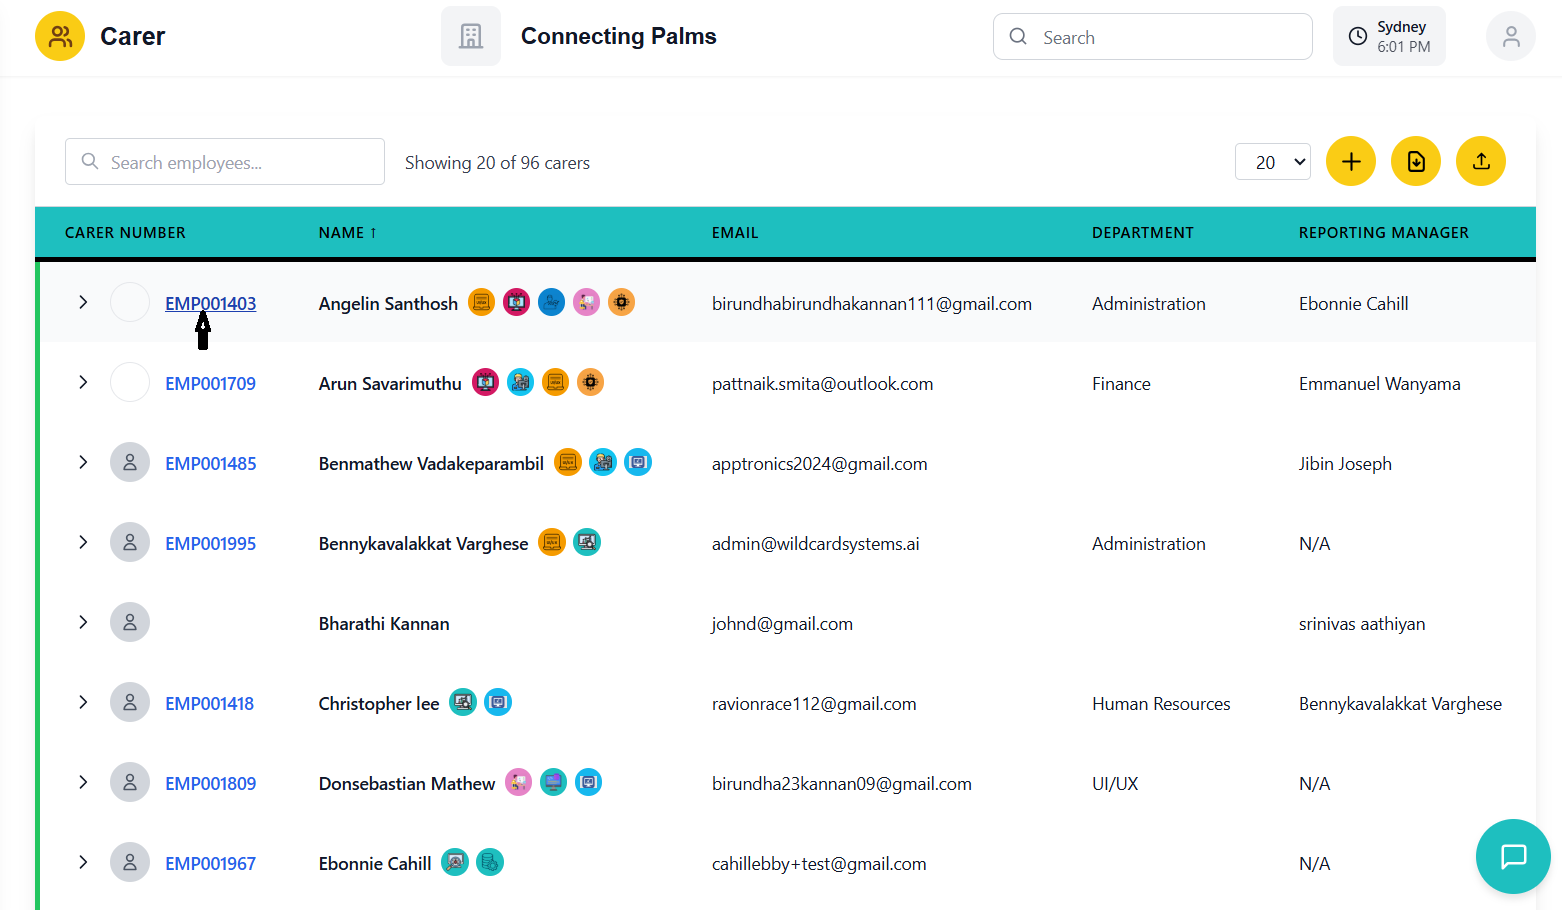
Understanding the Carer List Interface
- Search Bar: Located on the left for quick searching
- Carer Count: Shows number of carers displayed
- Page Size Selector: Dropdown to change number of carers per page
- Action Buttons: Add, Export, and Import buttons on the right
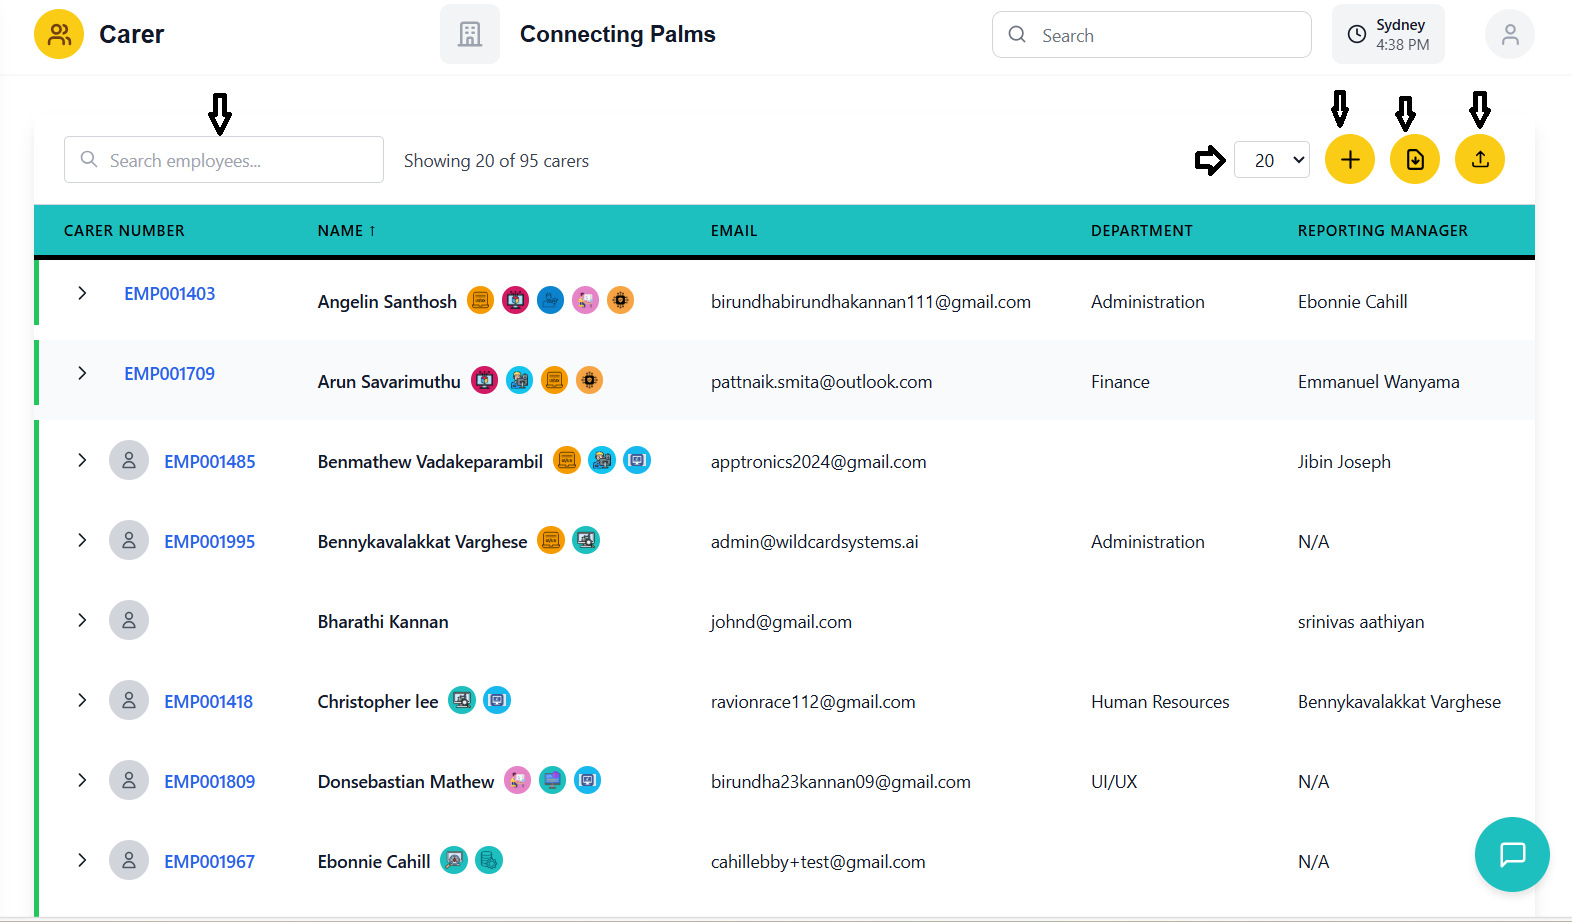
| Column | Description |
|---|---|
| Expand/Collapse | Arrow icon to expand/collapse carer details |
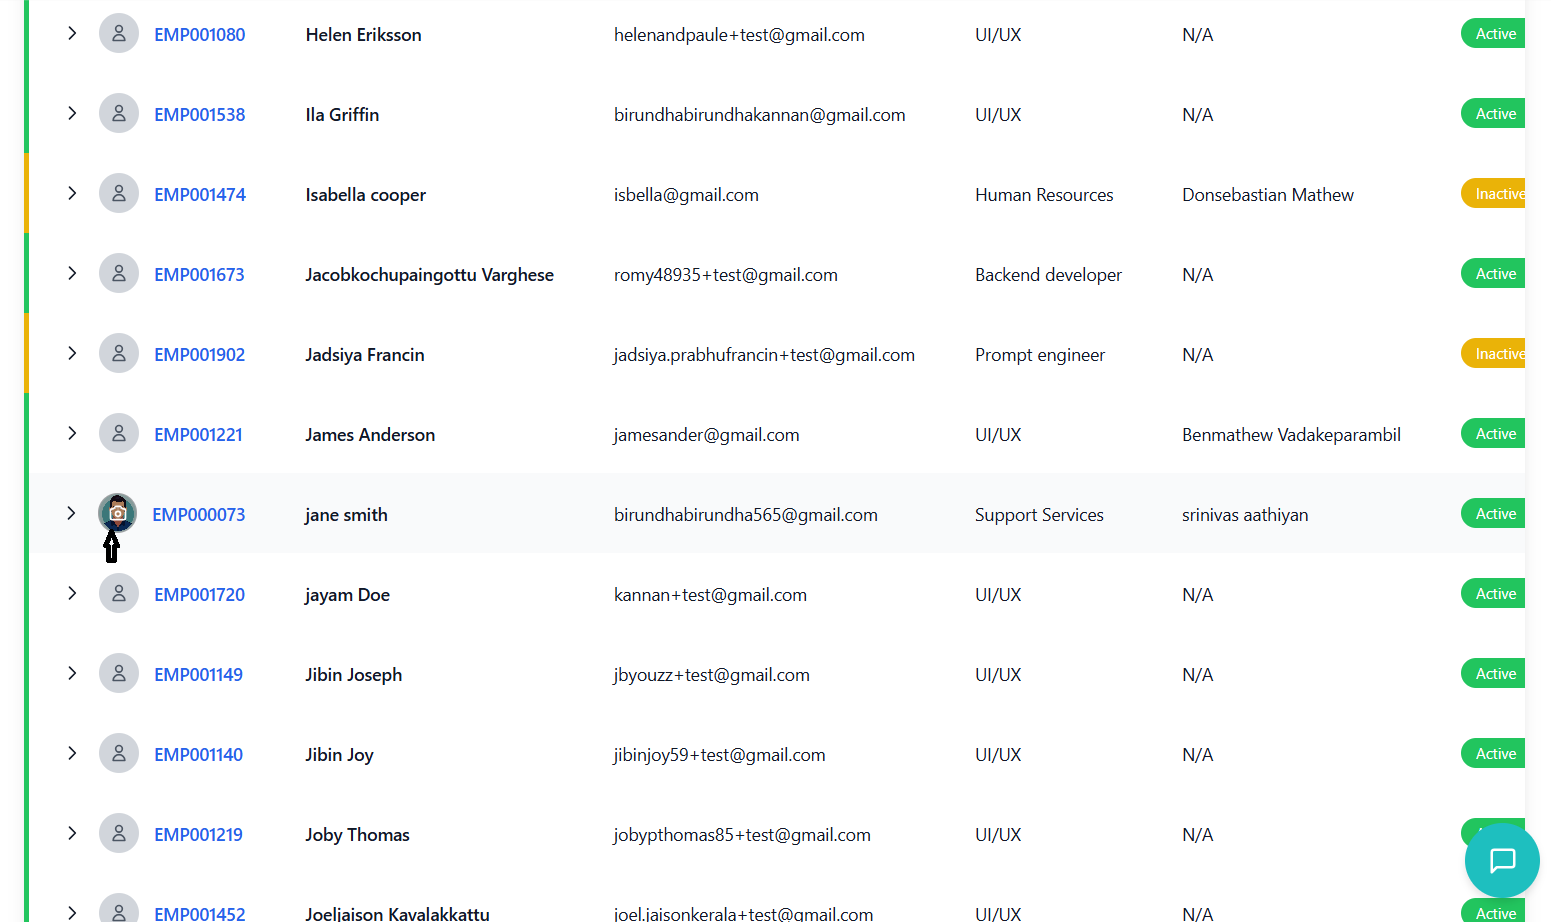
| Profile Image | Carer profile picture or placeholder with upload functionality |
| Carer Number | Unique identifier for the carer (clickable for details) |
| Name | Carer's full name with tag icons displayed |
| Carer's email address | |
| Department | Department the carer belongs to |
| Reporting Manager | Name of the carer's reporting manager |
| Status | Current status with color-coded badge |
| Actions | Edit button (if permissions allow) |
Status Indicators
- Active - Green: Carer is currently active and available for work
- Inactive - Gray: Carer is not currently active but may return
- Suspended - Yellow: Carer is temporarily suspended
- Terminated - Red: Carer employment has been terminated
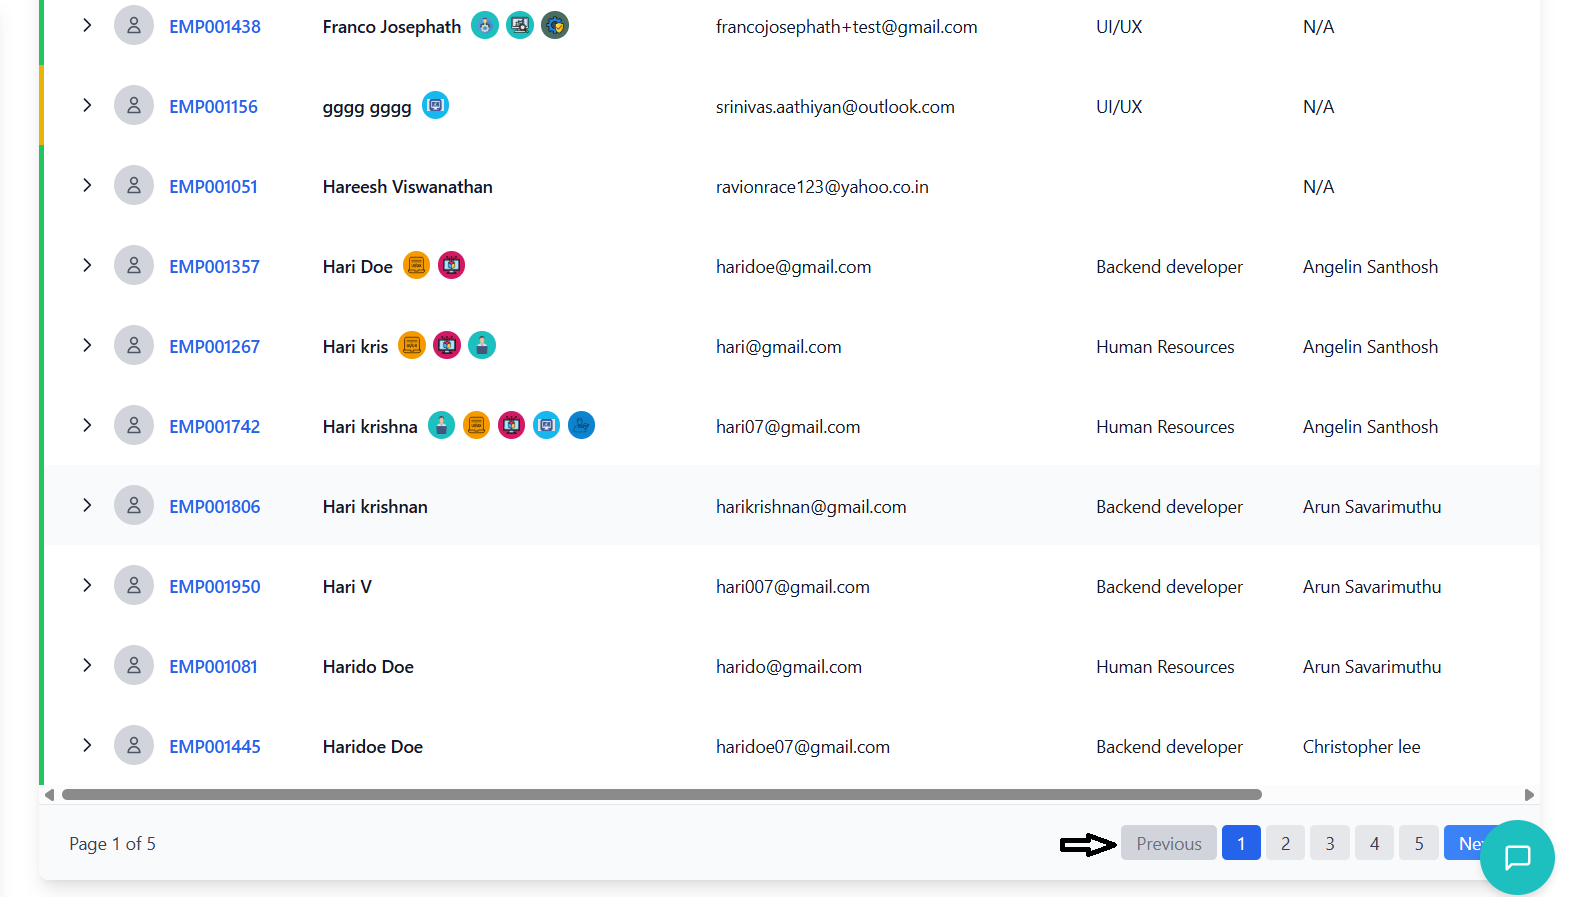
Pagination
- Located at the bottom of the carer list
- Shows current page and total number of pages
- Previous/Next buttons for navigation
- Page number buttons for direct navigation
- Ellipsis (...) indicates skipped pages in large datasets
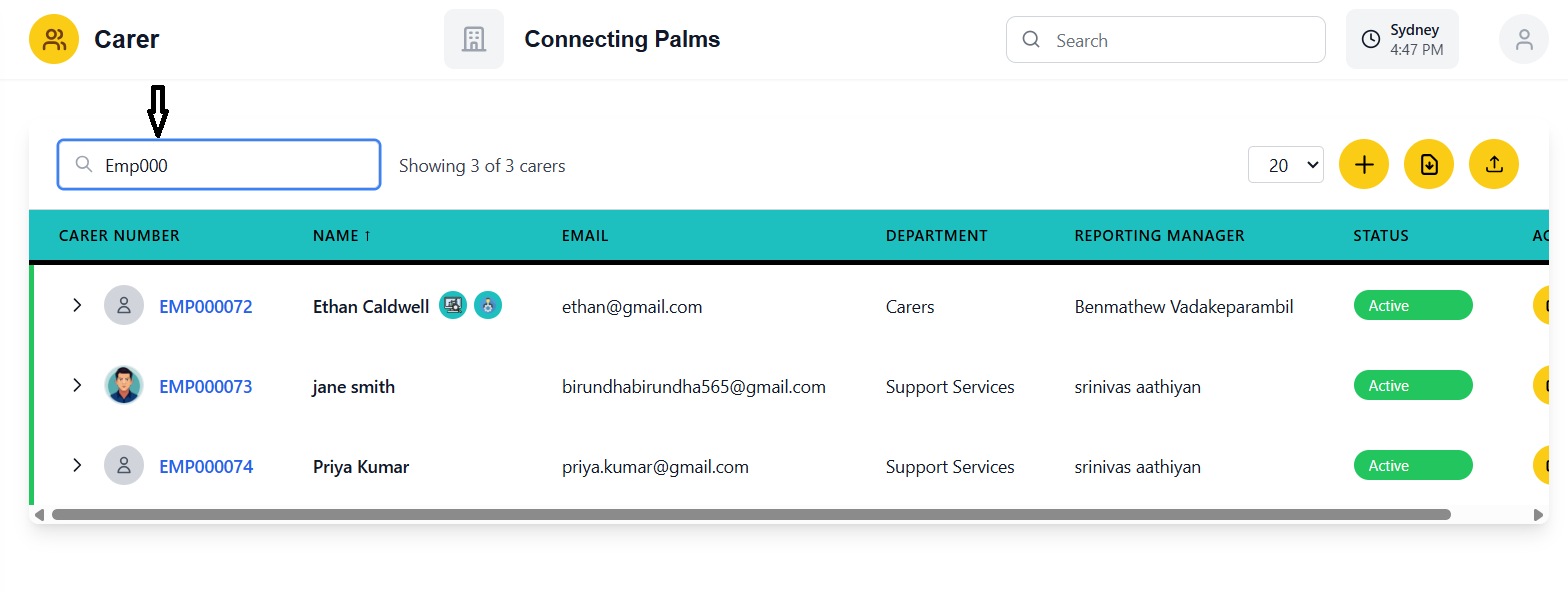
Search & Filter
How to search and filter carers effectively.
Search Functionality
- Located at the top-left of the carer list
- Placeholder text: "Search carers..."
- Real-time filtering as you type
- Debounced search (300ms delay) for performance
The search function searches across multiple fields:
- Name: Full name, first name, or last name
- Email: Email address
- Carer Number: Unique carer identifier
- Tags: Tag names assigned to carers
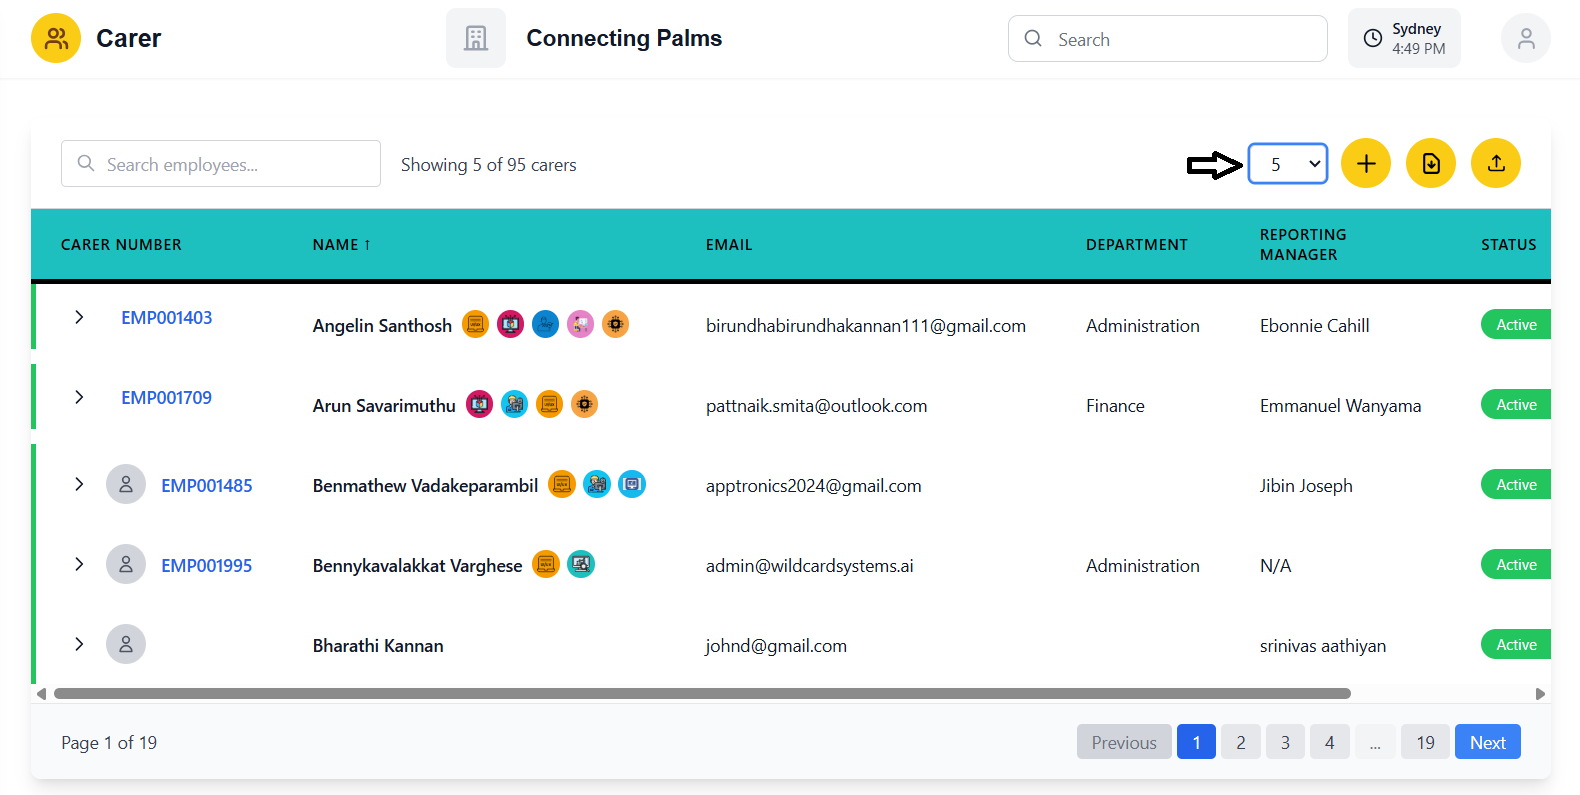
Filtering Options
- Located in the header next to the carer count
- Dropdown with options: 5, 10, 20, 50, 75
- Changes the number of carers displayed per page
- Automatically resets to first page when changed
- Click on column headers to sort
- Name column is sortable by default
- Arrow indicator shows sort direction (↑ for ascending, ↓ for descending)
- Sorting resets pagination to first page
Search Tips
- Use partial matches - the search will find carers with matching text anywhere in the searched fields
- Search is case-insensitive
- Clear the search field to see all carers again
- Combine search with pagination for large datasets
- Use tags for categorical filtering alongside search
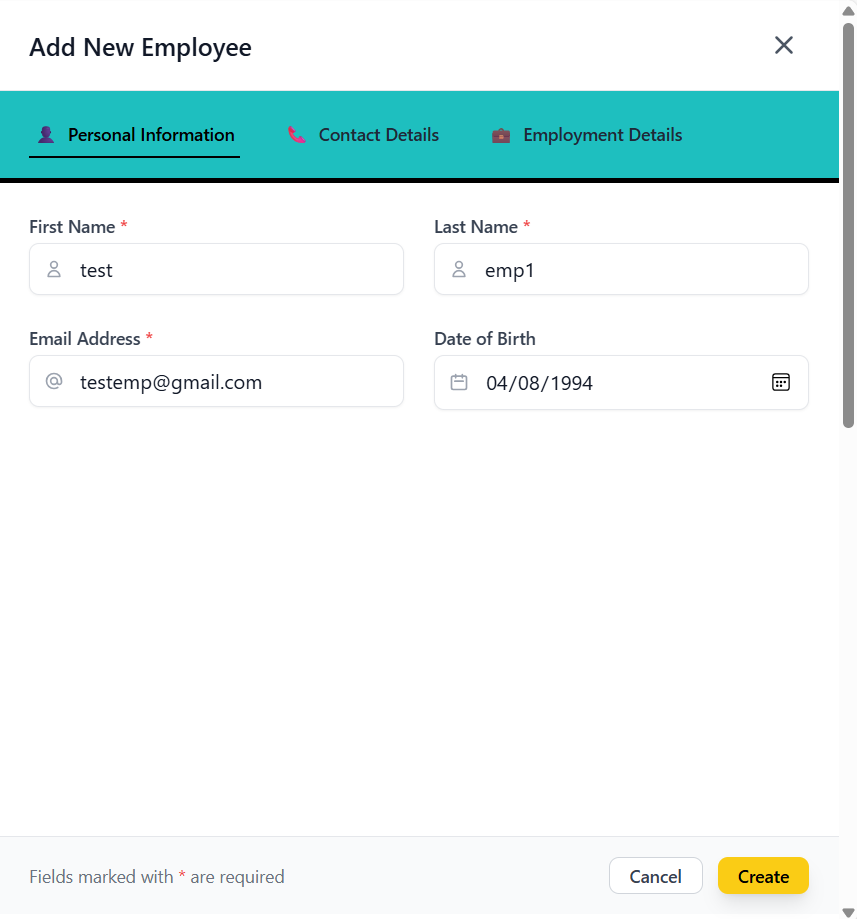
Adding a Carer
Process for adding new carers to the system.
Prerequisites for Adding a Carer
- Click the yellow "Add" button with plus icon in the header
- Slide-in panel opens from the right
- Form is organized into tabs for better organization

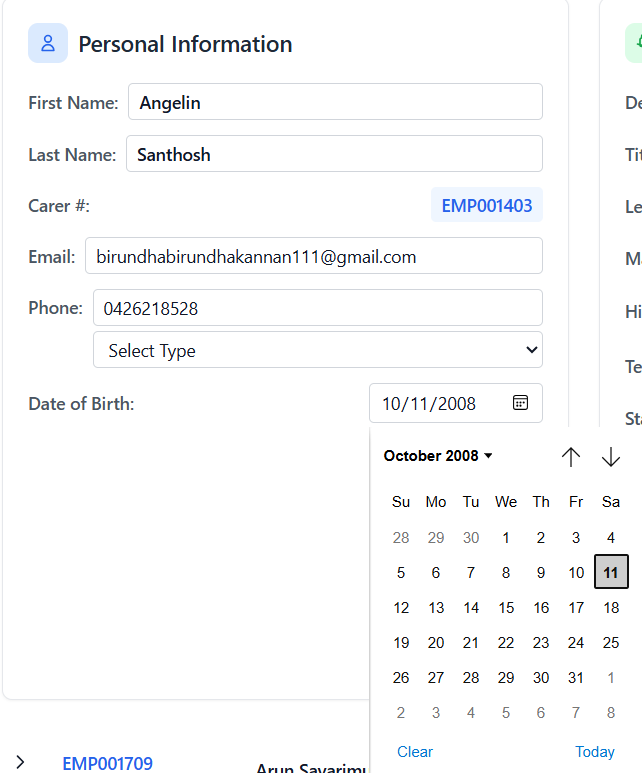
Personal Information Tab
- First Name: Carer's first name (required)
- Last Name: Carer's last name (required)
- Email Address: Valid email format (required)
- Date of Birth: Carer's date of birth
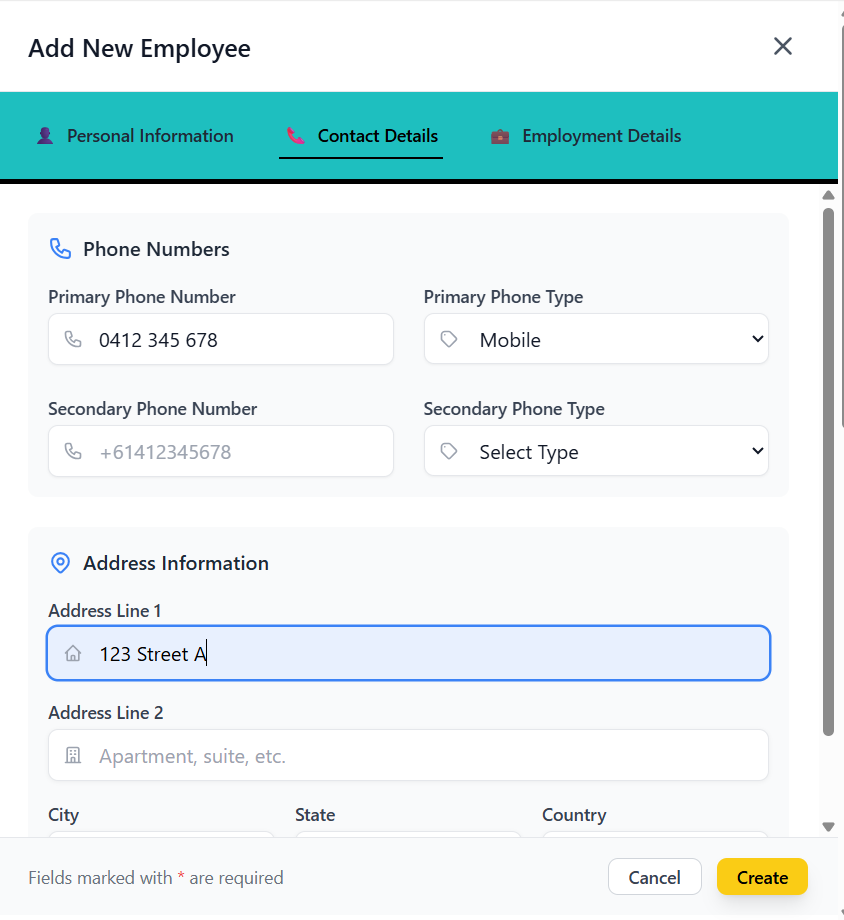
Contact Details Tab
- Primary Phone Number: Australian format (+61 or 0 followed by 9 digits)
- Primary Phone Type: Mobile, Home, Work, Fax, or Other
- Secondary Phone Number: Optional additional phone
- Secondary Phone Type: Type for secondary phone
- Address Line 1: Street address
- Address Line 2: Apartment, suite, etc.
- City: City name
- State: State/Province
- Country: Country name
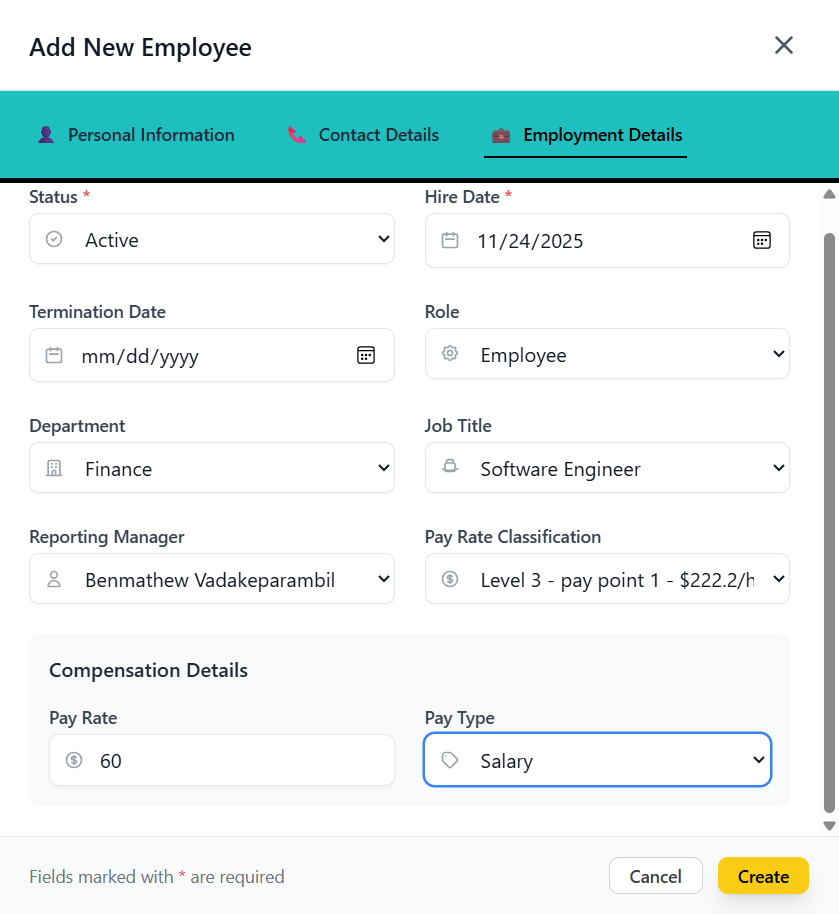
Employment Details Tab
- Status: Active, Inactive, On Leave, Terminated, Pending, or Suspended (required)
- Hire Date: Date carer was hired (required)
- Termination Date: If applicable
- Role: Select from available roles
- Department: Select from organization departments
- Job Title: Select from organization titles
- Reporting Manager: Select from existing carers
- Pay Rate Classification: Select from pay rate options
- Pay Rate: Numerical value
- Pay Type: Hourly, Salary, Contract, or Commission
Saving the New Carer
- Click "Create" button at the bottom of the form
- System validates all required fields
- Email format is validated
- Phone numbers are validated for Australian format
- Date validations ensure logical dates
- Form closes automatically on success
- New carer appears in the carer list
- Carer list refreshes to include the new entry
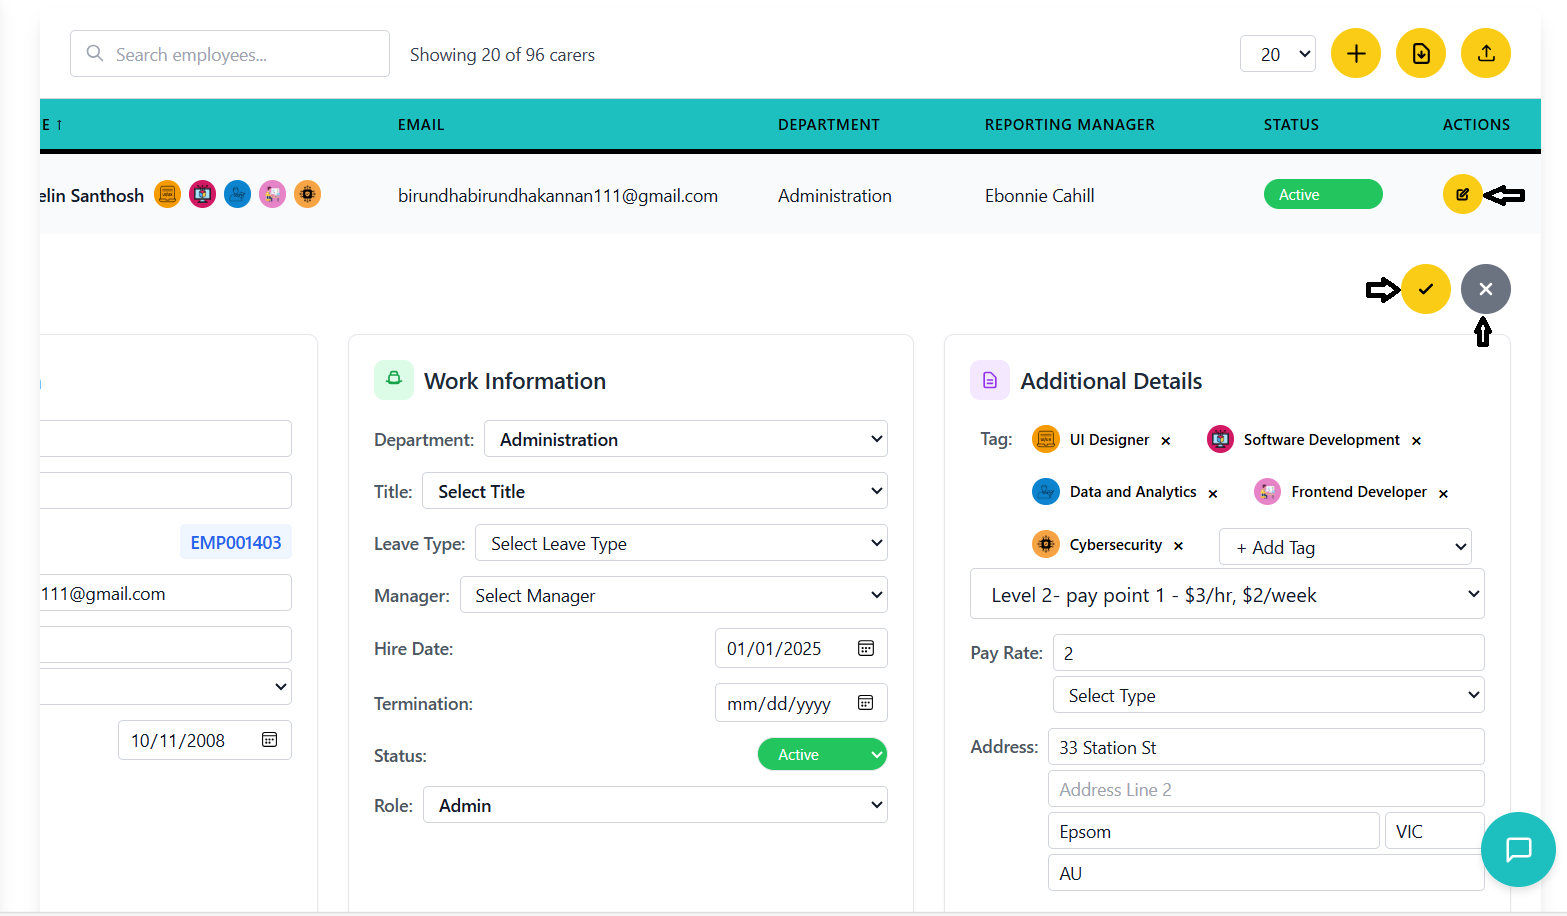
Editing Carer Details
How to modify carer information and settings.
Prerequisites for Editing
- Locate the carer you want to edit in the list
- Click the yellow "Edit" button (pencil icon) in the Actions column
- The row expands to show editable fields in a detailed form
- Save and Cancel buttons appear at the top of the expanded section
Editing Personal Information
- First Name: Text input field
- Last Name: Text input field
- Email: Email input with validation
- Phone Numbers: Primary and secondary with type selectors
- Date of Birth: Date picker
Editing Work Information
- Department: Dropdown with organization departments
- Title: Dropdown with organization titles
- Reporting Manager: Dropdown with active carers
- Leave Type: Dropdown with available leave types
- Hire Date: Date picker
- Termination Date: Date picker (if applicable)
- Status: Dropdown with status options
- Role: Dropdown with available roles
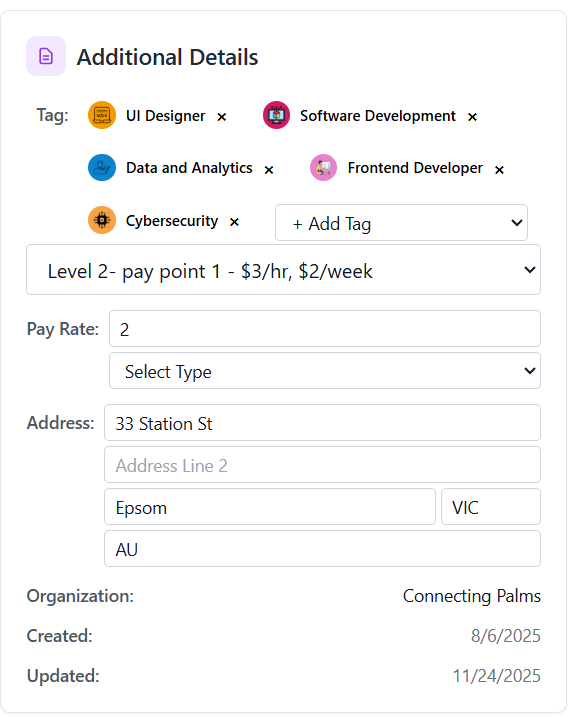
Editing Additional Details
- Pay Rate Classification: Dropdown with pay rate options
- Pay Rate: Numerical input
- Pay Type: Dropdown with pay type options
- Address: Multiple fields for complete address
Saving Changes
- Click the green "Save" button (checkmark icon) at the top of the expanded section
- System validates all changes
- Phone number format validation for Australian numbers
- Date validation to ensure logical dates
- Email format validation
- Expanded view collapses back to normal row view
- Changes are immediately reflected in the carer list
- No explicit success message - changes are visible immediately
- Click the gray "Cancel" button (X icon) to discard changes
- Expanded view collapses without saving any changes
- All edited values are reverted to their original state
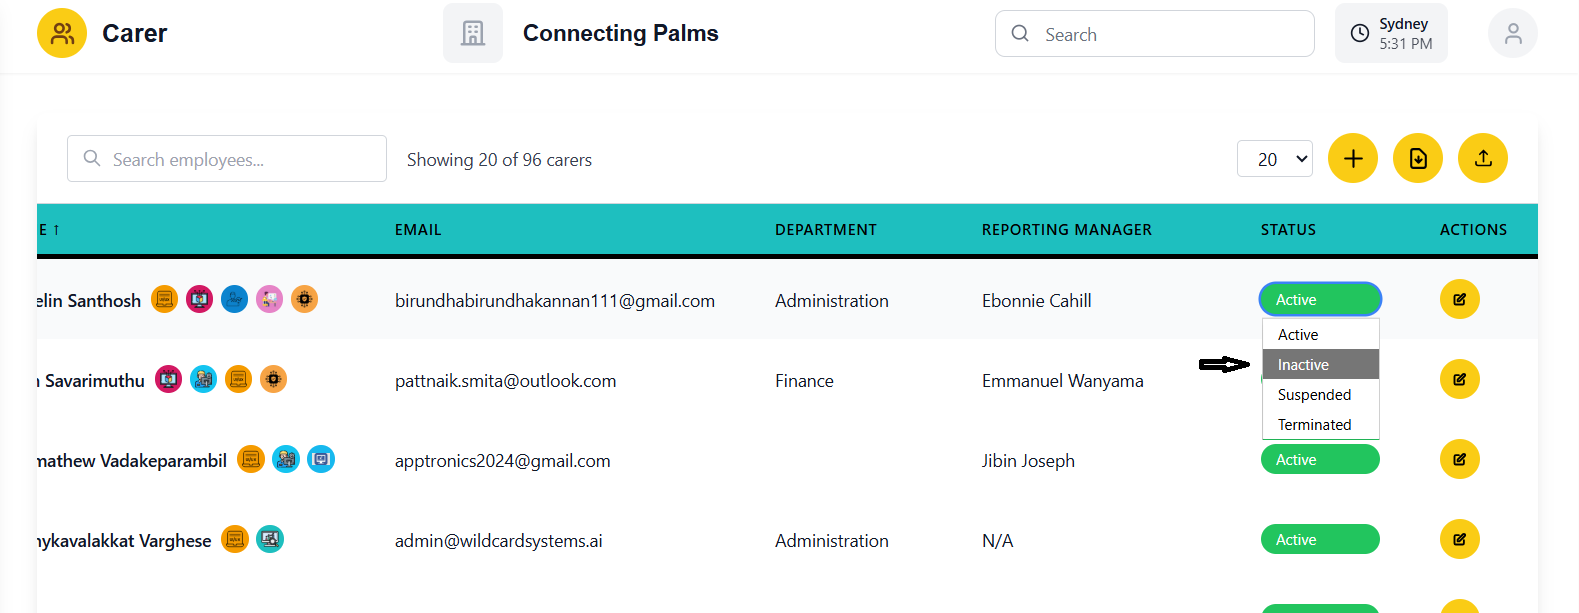
Status Management
Managing carer status (active, inactive, suspended, terminated).
Understanding Carer Statuses
- Active - Carer is currently employed and available for work assignments
- Inactive - Carer is not currently working but may return (e.g., on extended leave)
- Suspended - Carer is temporarily unable to work (e.g., disciplinary action, investigation)
- Terminated - Carer employment has been ended permanently
Changing Carer Status
- Find the status badge in the carer list table
- It appears as a colored badge with the current status
- The dropdown is available for all statuses
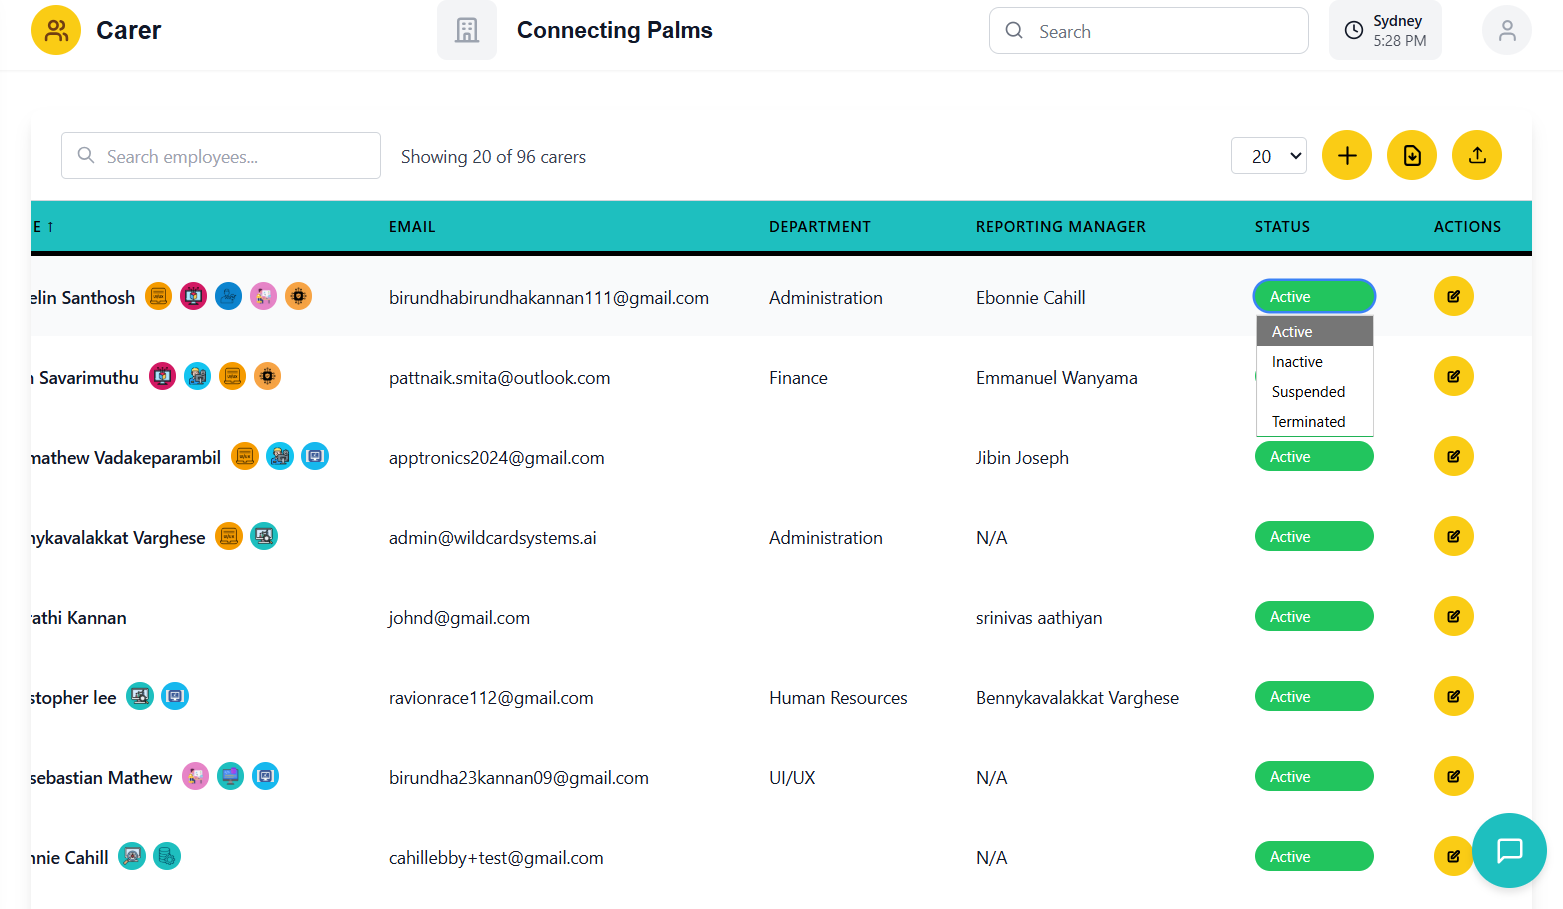
- Click on the status badge to open the dropdown
- Select the new status from the available options
- System immediately processes the status change
- Loading spinner appears briefly during update
- Status badge updates immediately with new color and text
- No explicit confirmation message - change is visible immediately
- Status change is saved to the database
Status Change Implications
- Status changes may affect carer's ability to be assigned to work
- Terminated status may trigger additional processes (final pay, access revocation)
- Suspended status may require documentation or follow-up actions
- Inactive status may affect reporting and statistics
Status Change Workflow
Tag Management
Assigning and managing tags for carers.
Understanding Tags
Tags are customizable labels that can be assigned to carers for categorization, filtering, and quick identification. Each tag can have:
- A name
- An icon (image or text)
- A background color
- Custom metadata
Viewing Tags
- Tags appear as circular icons next to the carer's name
- Each tag shows its custom icon or the first letter of the tag name
- Multiple tags are displayed in a row
- Hover over a tag to see its full name
- In the expanded edit view, tags are displayed as chips
- Each chip shows the tag icon and name
- Chips can be removed when editing
Adding Tags to a Carer
- Click the Edit button for the carer you want to tag
- Expand the carer details if not already expanded
- Navigate to the Additional Details section
- In the Tag section, click the "+ Add Tag" dropdown
- Select a tag from the available options
- The tag immediately appears as a chip
- Repeat to add multiple tags
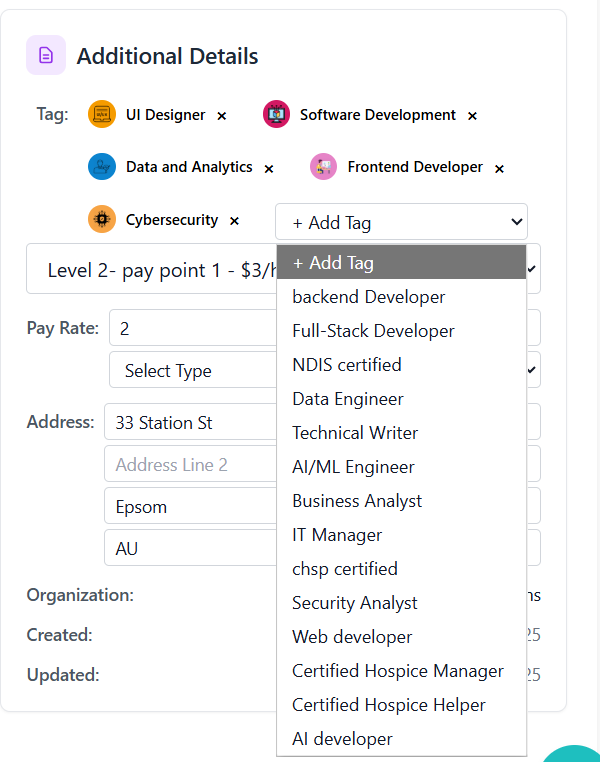
- Click the Save button to persist tag changes
- Tags are immediately visible in the carer list
- No additional confirmation for tag changes
Removing Tags
- Enter edit mode for the carer
- In the Tag section, locate the tag chip you want to remove
- Click the "×" button on the right side of the chip
- The tag is immediately removed from the display
- Click Save to persist the removal
- The tag will no longer appear next to the carer's name

Searching by Tags
- Tags are included in the global search functionality
- Type a tag name in the search bar to find carers with that tag
- Search is case-insensitive and matches partial tag names
- Combined with other search criteria for refined results
Profile Image Upload
Uploading and managing carer profile images.
Image Requirements
- File Type: JPEG, PNG, or other common image formats
- File Size: Maximum 5MB
- Dimensions: Recommended square aspect ratio (1:1)
- Quality: Clear, well-lit images work best
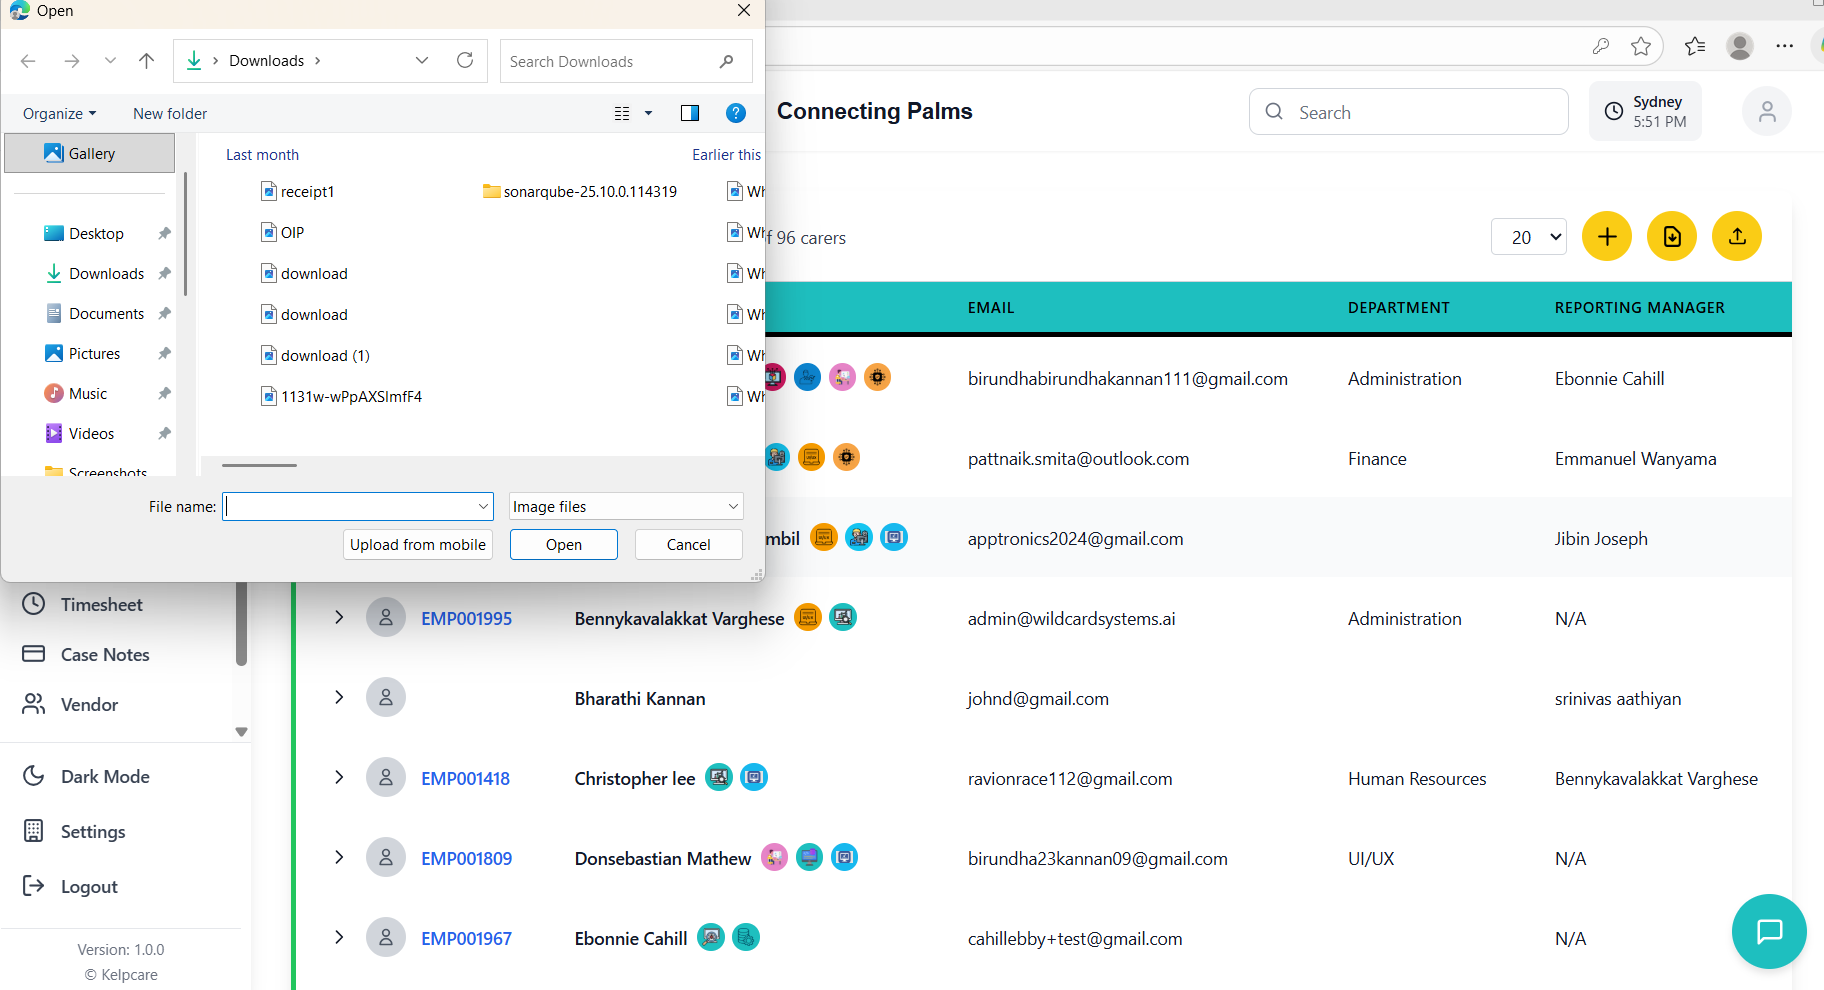
Uploading a New Image
- Locate the carer in the list
- Click on the profile image placeholder or existing image
- A file selection dialog will open

- In the file dialog, navigate to your image file
- Select the appropriate image
- Click "Open" to proceed with upload
- System validates the file type and size
- Loading spinner appears on the image during upload
- For new images: "Uploading..." process
- For existing images: "Updating..." process
- New image appears in the profile image circle
- Image is automatically cropped to circular format
- Success message appears temporarily at the top of the page
- Image is saved to the carer's profile
Updating an Existing Image
- Click on the existing profile image
- Same process as uploading a new image
- Hover over the image to see the camera icon indicating upload capability
- Follow the same file selection process
- New image replaces the existing one
- Previous image is not retained (no version history)
Error Handling
- "File too large": Image exceeds 5MB limit - compress or resize the image
- "Invalid file type": File is not a supported image format - use JPEG, PNG, etc.
- "Upload failed": Network or server issue - try again later
- Use square images for best results
- Optimize images for web before uploading
- Ensure good lighting and clarity in the image
- Use professional-looking headshots for consistency
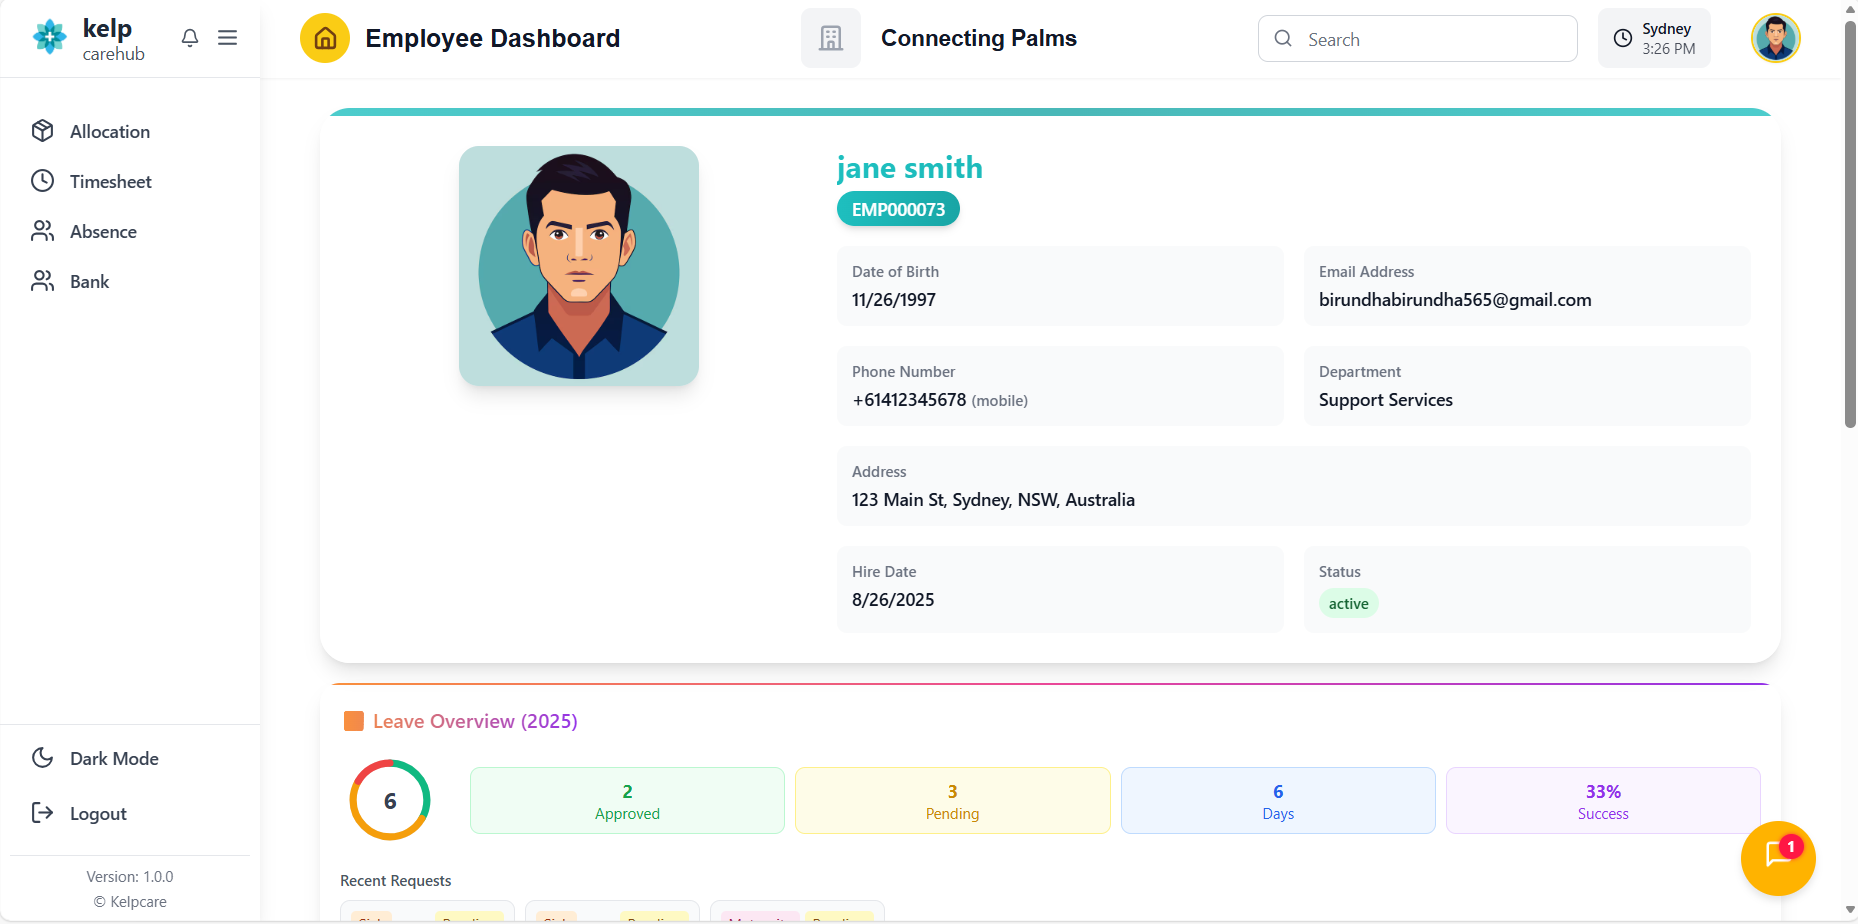
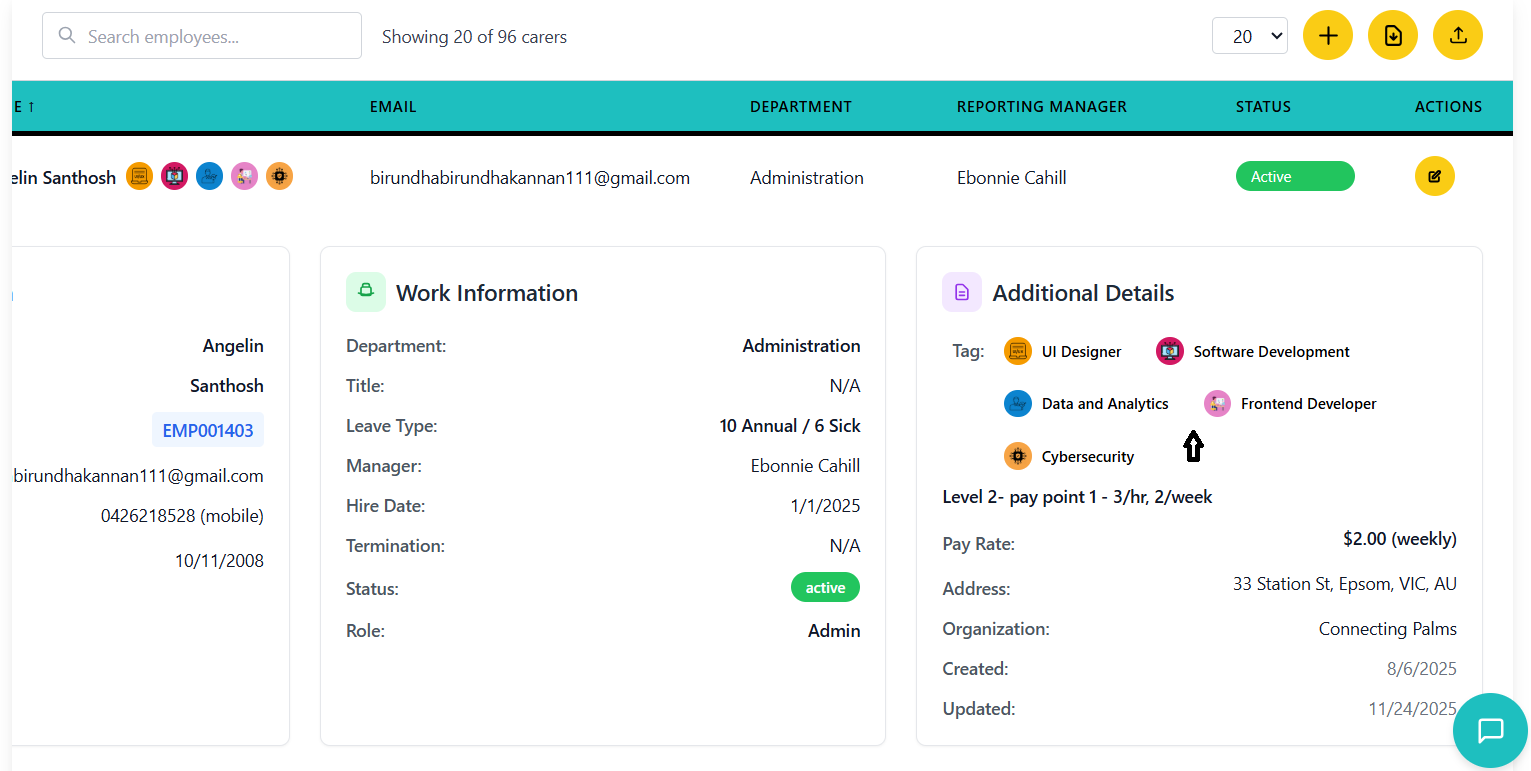
Carer Details View
Comprehensive view of carer information and activities.
Accessing Carer Details
- In the carer list, click on the carer number (blue link)
- System opens a dedicated carer details page
- Full-screen view with comprehensive information
- Header: Back button and page title
- Profile Card: Large profile image and basic info
- Tab Navigation: Personal, Work, Case Notes, Documents
- Tab Content: Detailed information based on selected tab
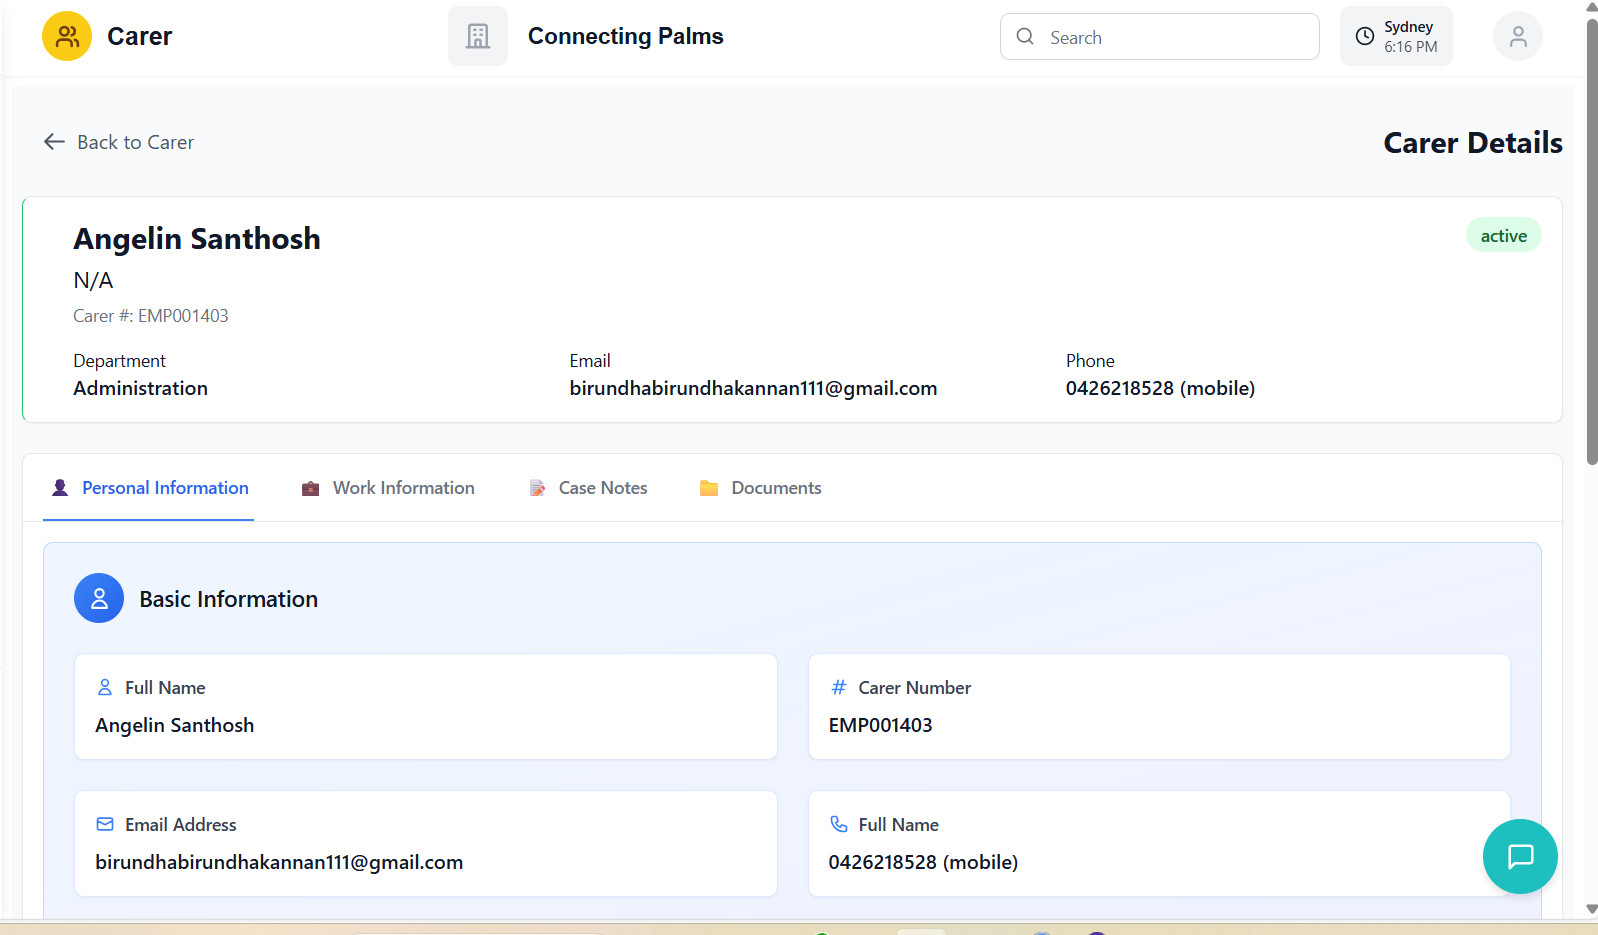
Personal Information Tab
- Full Name: Carer's complete name
- Carer Number: Unique identifier
- Email Address: Contact email
- Phone: Primary phone number with type
- Date of Birth: Formatted date
- Employment Status: Color-coded badge
- Address: Complete formatted address
- Department: Organizational department
- Job Title: Position title
- Quick Action: Link to Work tab

Navigation and Actions
- Click the "Back to Carers" button at the top left
- Returns to the carer list with previous filters intact
- No data loss - previous state is maintained
- Large profile image in the profile card
- Click to upload or update image
- Same functionality as in the carer list
Work Allocations
Viewing and managing carer work schedules.
Accessing Work Allocations
- Open carer details view
- Click on the "Work" tab in the tab navigation
- System loads work allocation data for the selected carer
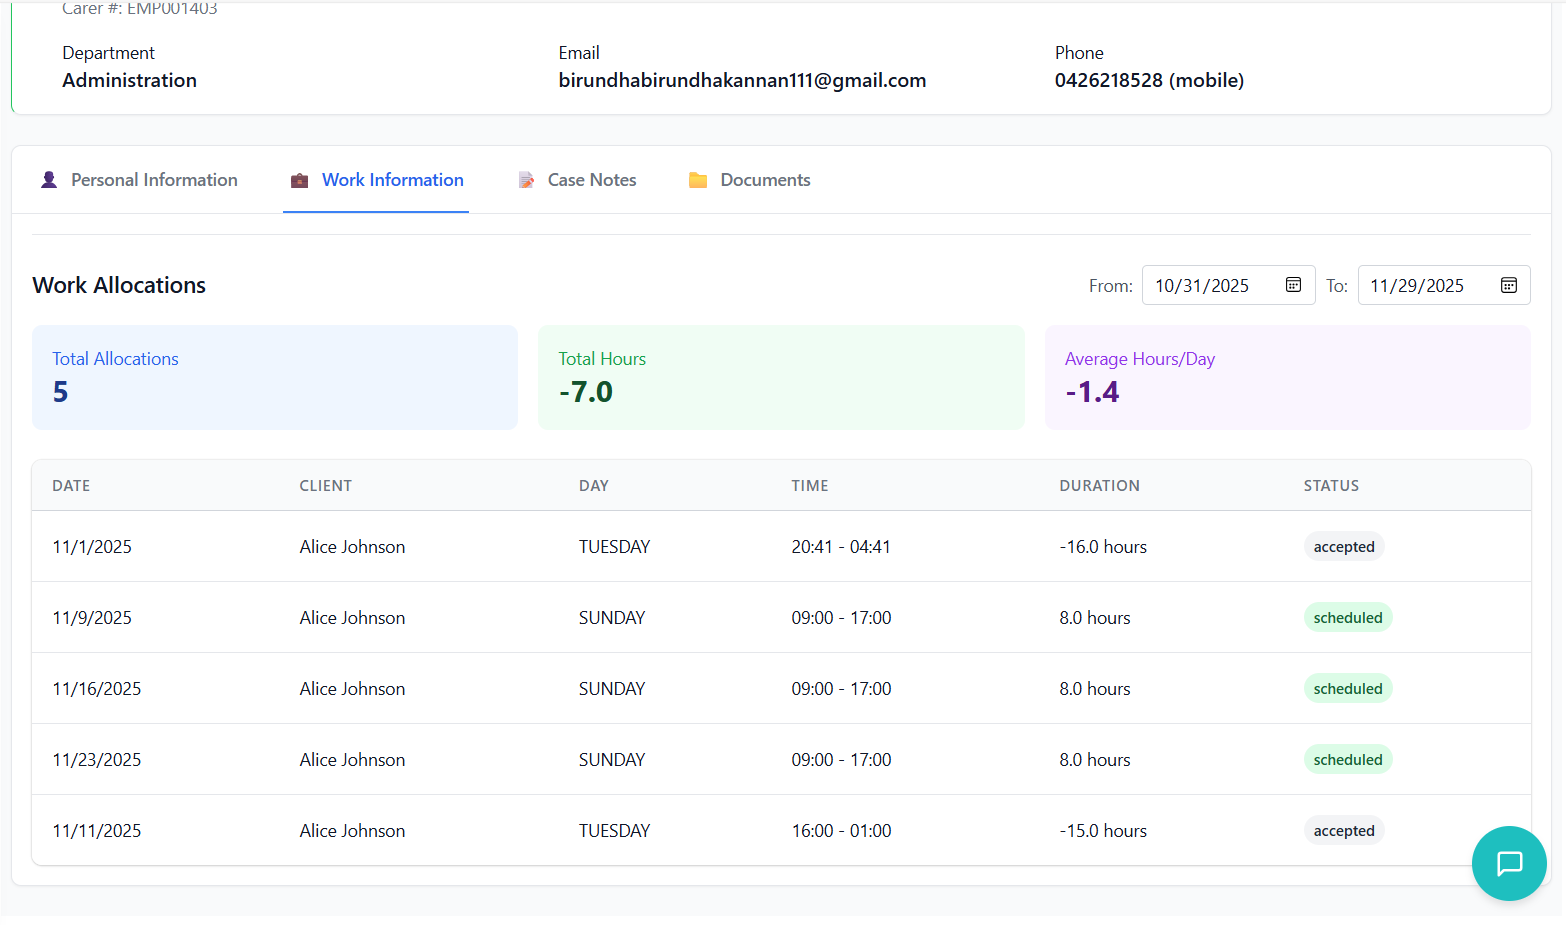
Work Allocation Interface
- Located at the top right of the work allocations section
- Default range: current month
- "From" and "To" date pickers
- Changes trigger immediate reload of allocations
- Total Allocations: Number of work assignments
- Total Hours: Sum of all scheduled hours
- Average Hours/Day: Calculated average
- Color-coded cards for quick reference
Work Allocation Table
| Column | Description |
|---|---|
| Date | Allocation date |
| Client | Client name for the allocation |
| Day | Day of week |
| Time | Shift start and end times |
| Duration | Calculated shift duration |
| Status | Allocation status (active, confirmed, etc.) |
Understanding Allocation Data
- Each allocation represents a scheduled work assignment
- Allocations can span multiple days with specific time slots
- Status indicates the current state of the allocation
- Duration is automatically calculated from start and end times
Empty State
If no work allocations are found for the selected date range:
- Message: "No work allocations found for the selected date range."
- Suggestion: "Try adjusting the date range to see more results."
- Calendar icon for visual indication
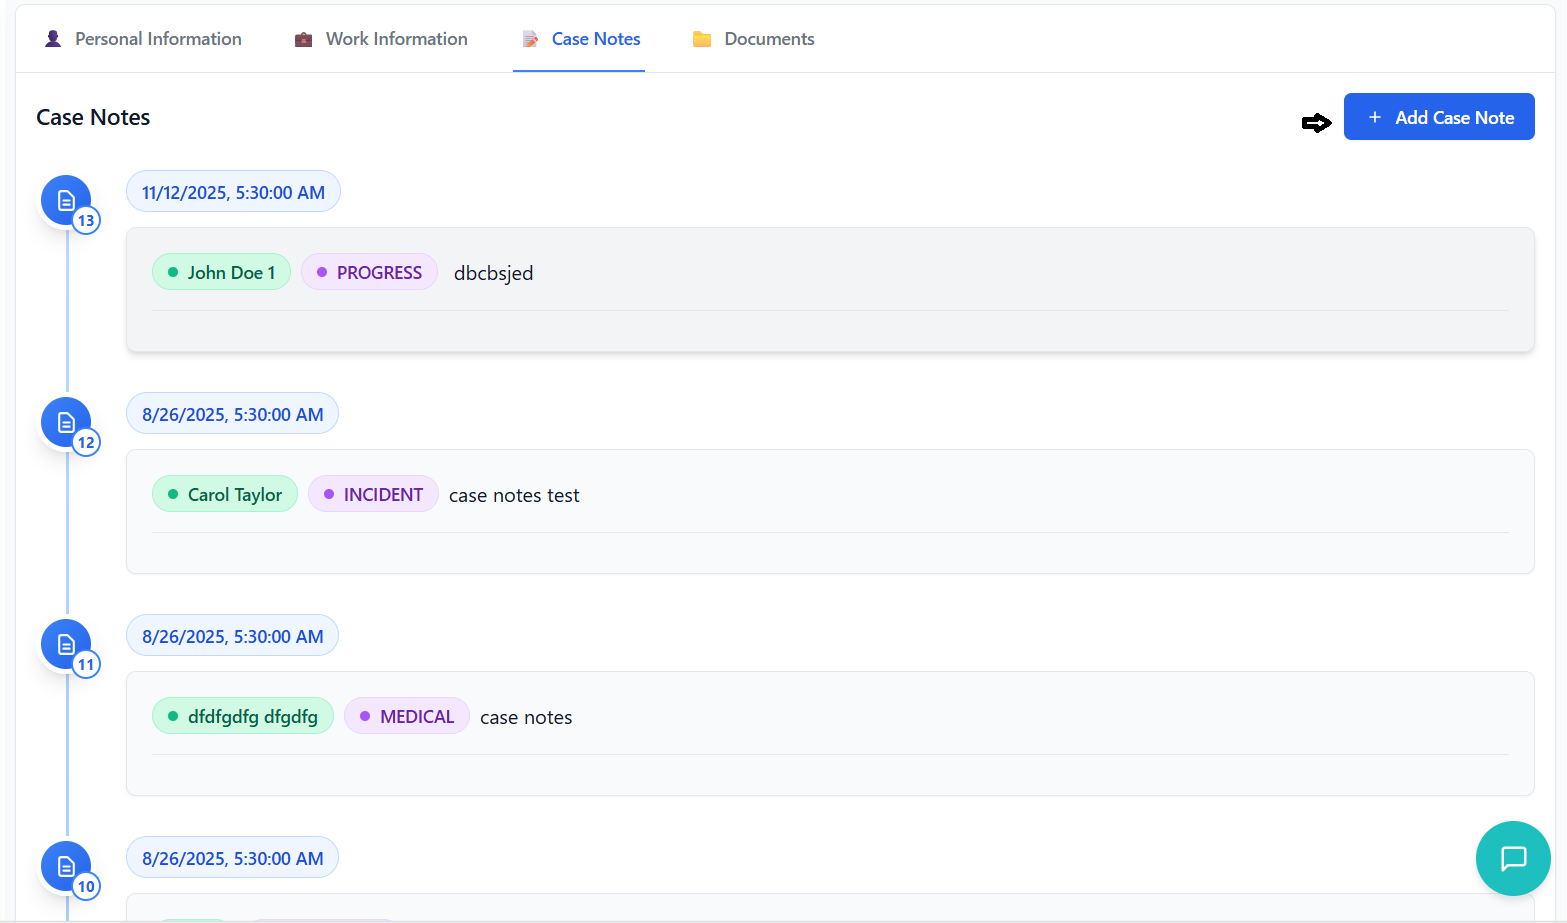
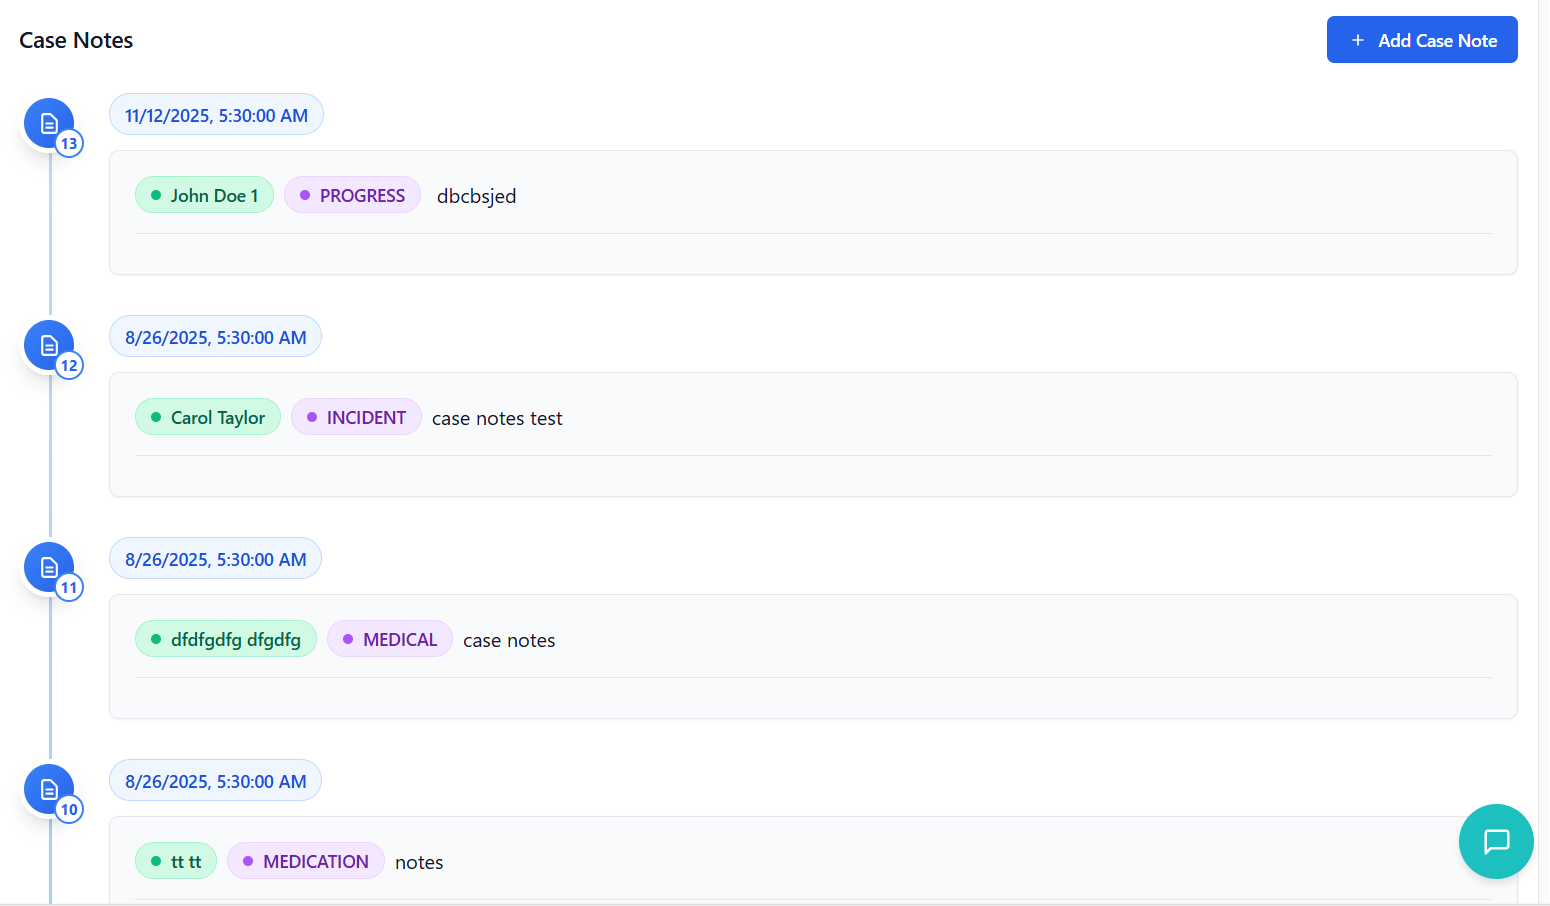
Case Notes
Creating and managing case notes for carers.
Accessing Case Notes
- Open carer details view
- Click on the "Case Notes" tab in the tab navigation
- System loads existing case notes for the carer
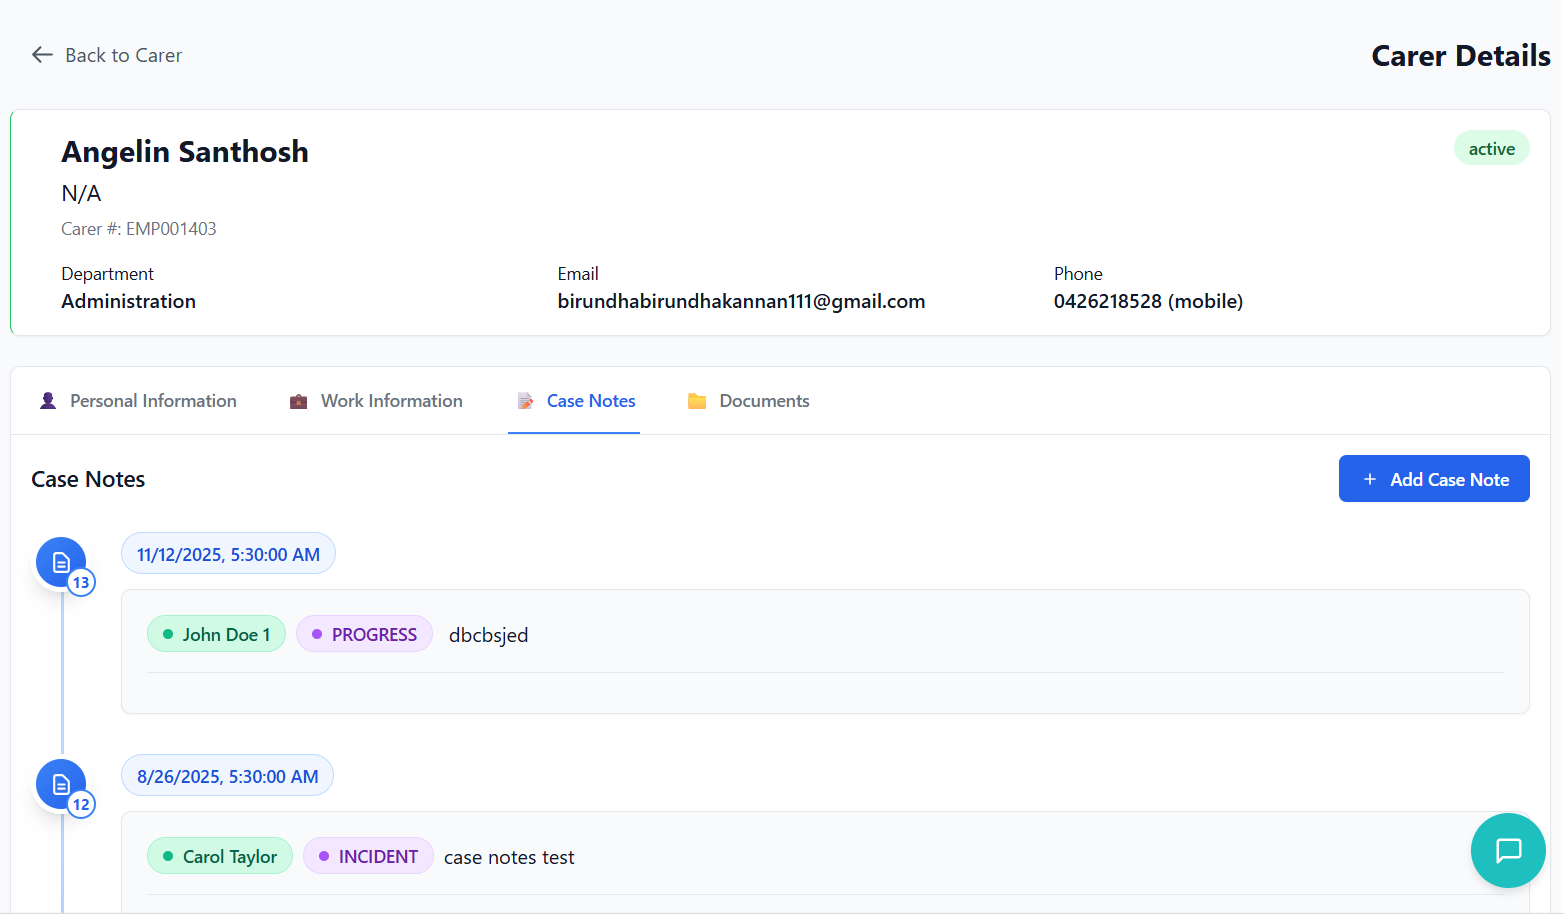
Case Notes Interface
- Page title: "Case Notes"
- Blue "Add Case Note" button on the right
- Button with plus icon for quick access
- Case notes displayed in chronological order (newest first)
- Vertical timeline with connecting line
- Each note has a distinct card with full details
- Visual indicators for note type and privacy
Creating a Case Note
- Click the "Add Case Note" button
- Form expands below the header
- Blue gradient background for visual distinction
- Client: Dropdown selection (required)
- Note Content: Text area (required)
- Note Type: Dropdown selection
- Date: Date picker (defaults to current date)
- Private Note: Checkbox for privacy
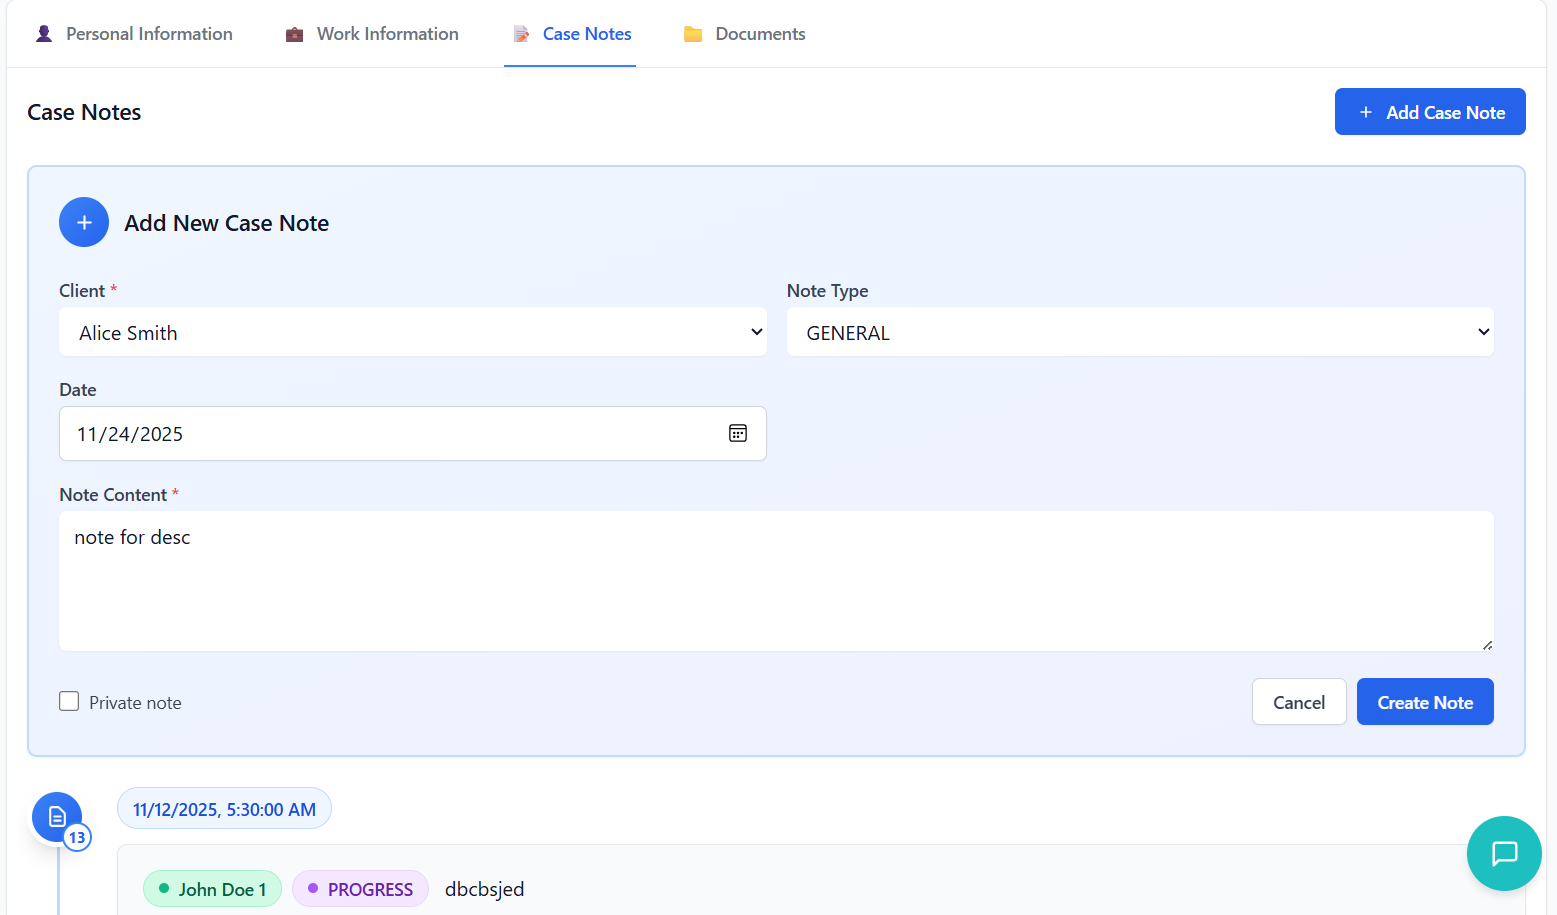
- Click "Create Note" button
- Form validates required fields
- On success: form closes, note appears in timeline
- Loading state during creation
Case Note Display
- Timeline Marker: Blue circle with note icon
- Date Badge: Formatted date and time
- Header Tags: Client name, note type, privacy indicator
- Note Content: Full text of the note
- Footer: Created by information and update timestamp
- Client Tag: Green badge with client name
- Note Type: Purple badge with type
- Private Note: Red badge with lock icon
- Entry Number: Sequence indicator in timeline
Empty State
When no case notes exist for a carer:
- Centered empty state with visual elements
- Message: "No case notes found"
- Description: "Start documenting this employee's case by creating your first note."
- Prominent "Start Case Timeline" button
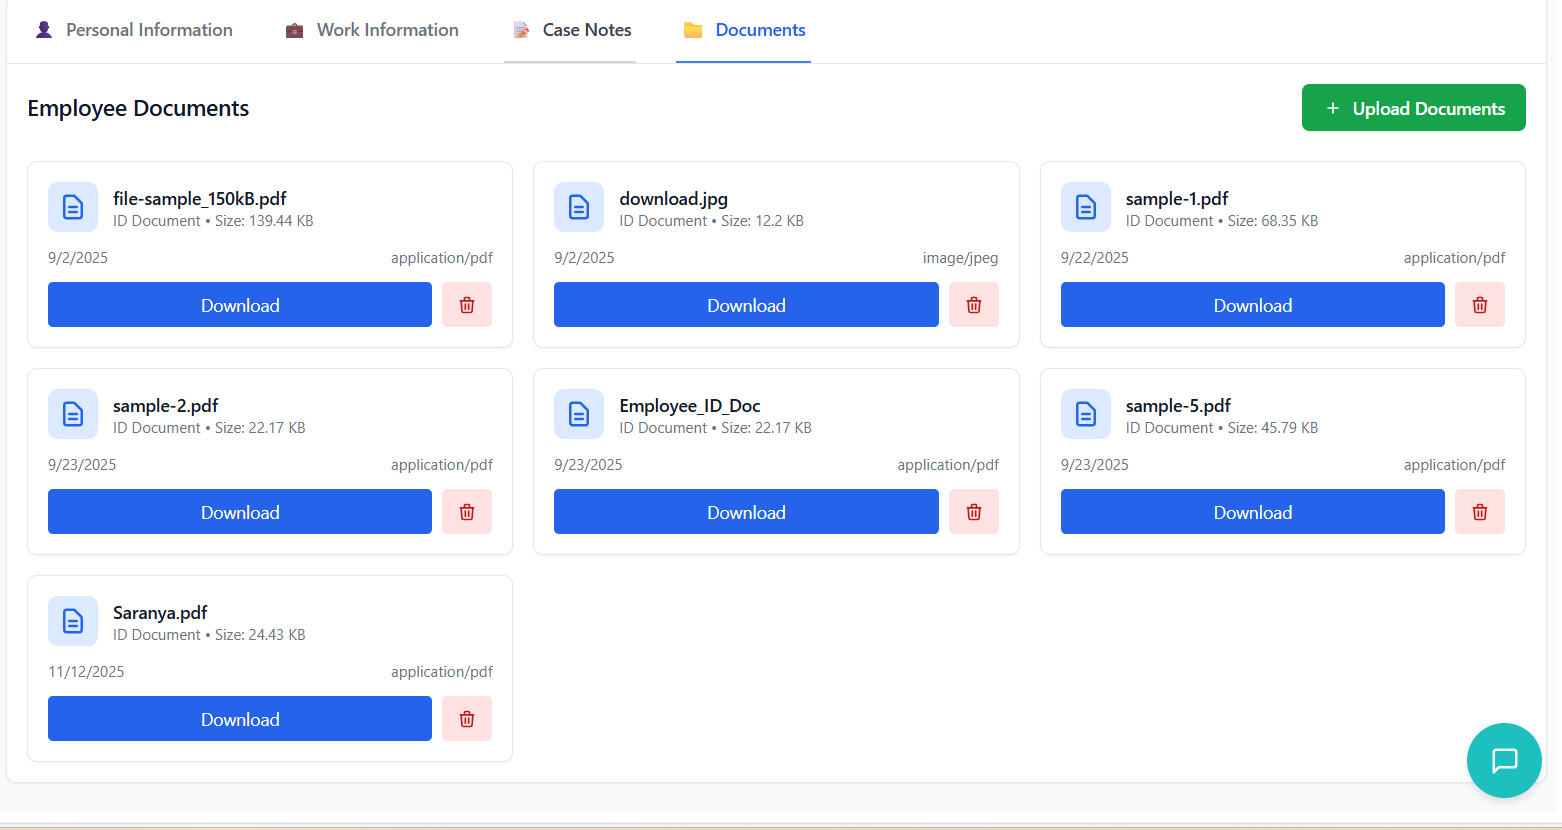
Document Management
Uploading and managing carer documents.
Accessing Documents
- Open carer details view
- Click on the "Documents" tab in the tab navigation
- System loads existing documents for the carer
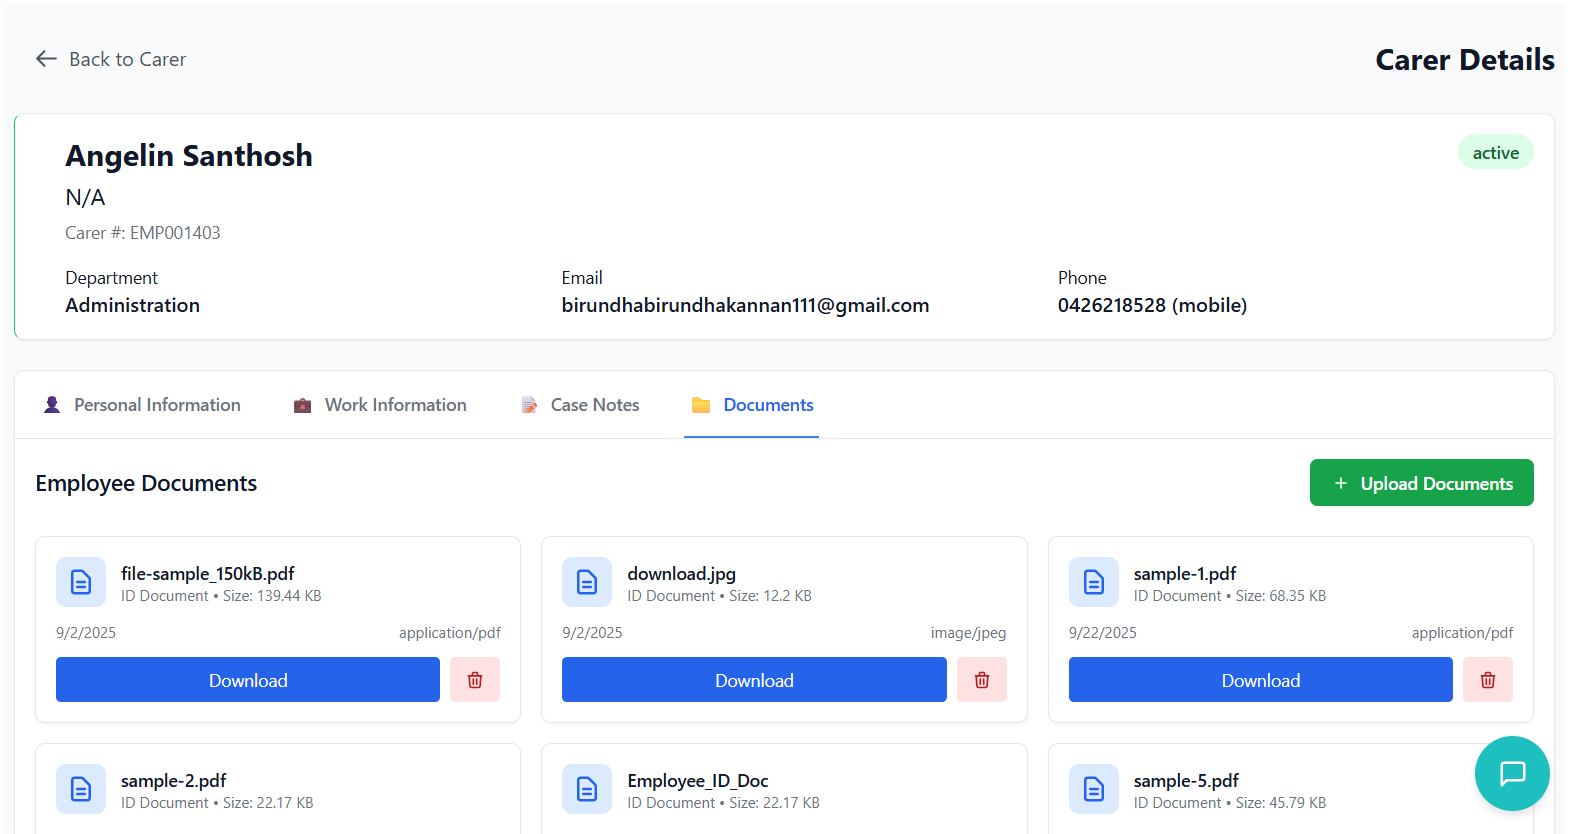
Documents Interface
- Page title: "Employee Documents"
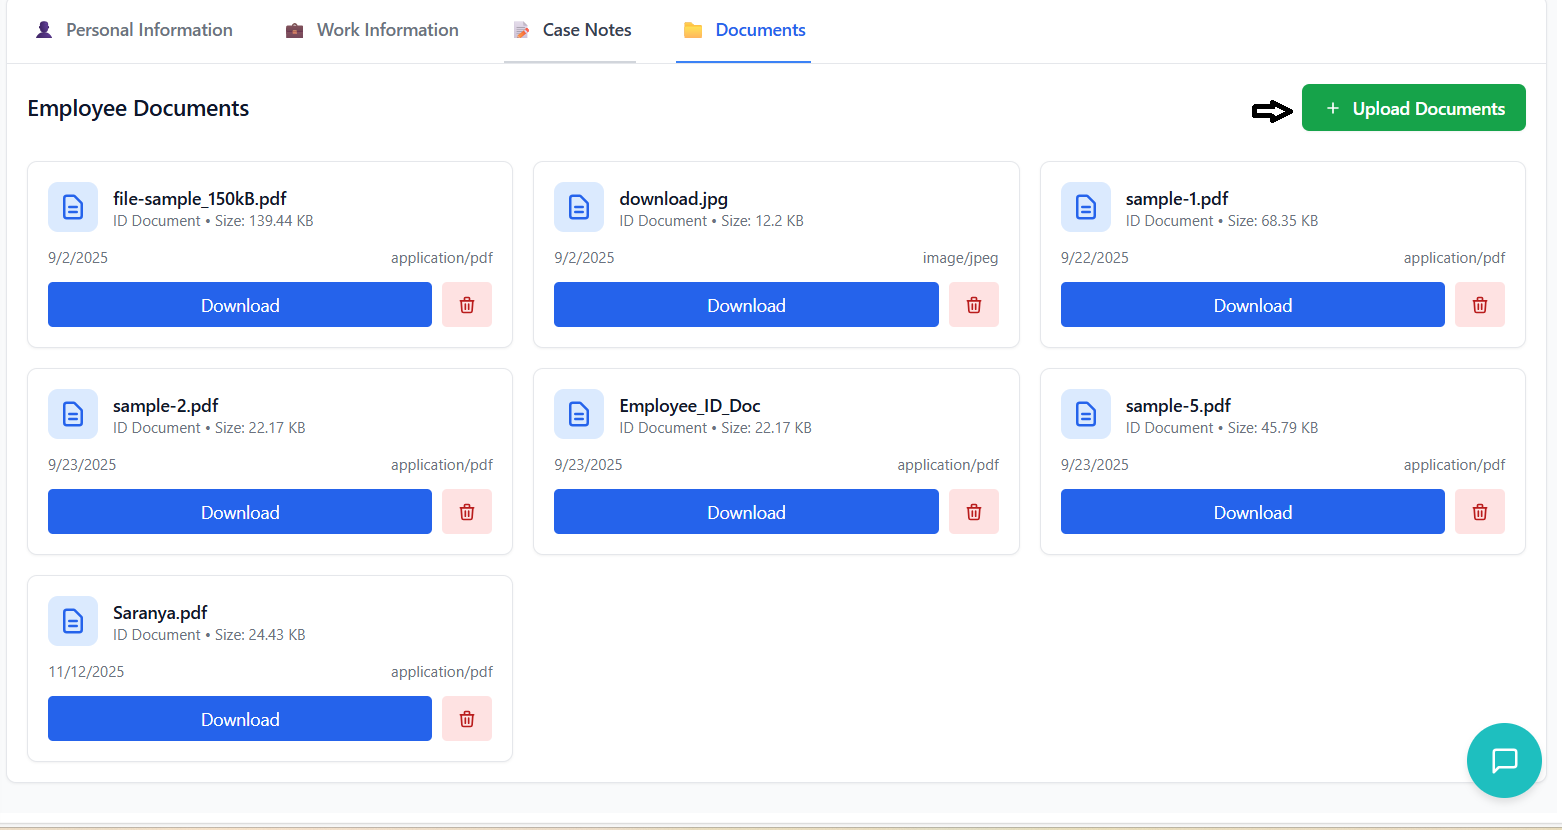
- Green "Upload Documents" button on the right
- Button with plus icon for quick access
- Documents displayed in a responsive grid
- Cards with document preview and actions
- Grid adapts to screen size (1-3 columns)
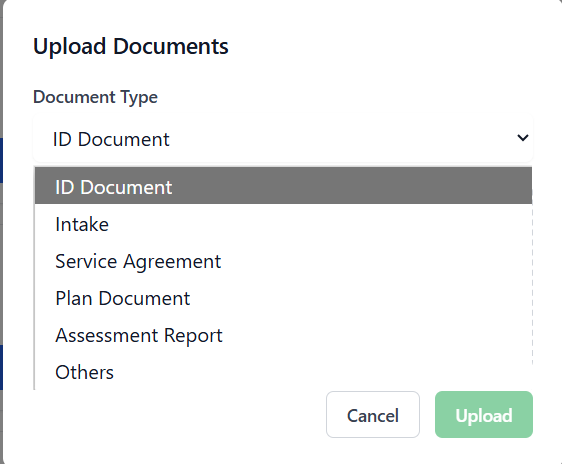
Uploading Documents
- Click the "Upload Documents" button
- Modal dialog appears over the content
- Dark background overlay for focus
- Dropdown with document type options:
- - ID Document
- - Intake
- - Service Agreement
- - Plan Document
- - Assessment Report
- - Others
- Drag-and-drop area or click to select files
- Supports multiple file selection
- Maximum file size: 10MB per file
- File type restrictions: common document formats
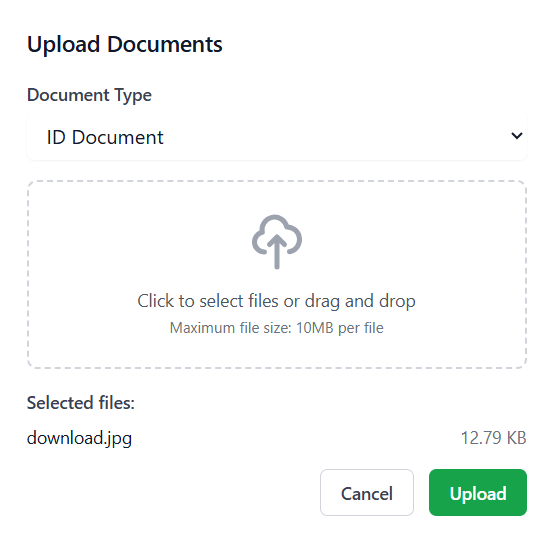
- Click "Upload" button to start process
- Loading state with spinner
- Multiple files uploaded sequentially
- Success: modal closes, documents appear in grid
Document Card Features
- Document Icon: Blue document icon in left area
- Document Name: Truncated if too long
- Document Details: Type and size information
- Metadata: Upload date and file type
- Actions: Download and Delete buttons
- Download: Blue button to download file
- Delete: Red button with trash icon to remove document
- Delete requires confirmation

Empty State
When no documents exist for a carer:
- Centered empty state with document icon
- Message: "No documents found"
- Description: "Upload documents to get started"
- Prominent "Upload Documents" button
Permissions & Roles
Understanding user permissions and role-based access.
Permission System Overview
The carer management system uses a role-based permission system where:
- Users are assigned to roles (Standard User, Manager, Administrator)
- Roles have specific permissions for different features
- Permissions are checked before allowing actions
- UI elements are shown/hidden based on user permissions
Carer Package Features
- Employee Create: Permission to add new carers
- Employee Edit: Permission to modify carer details
- Employee Export: Permission to export carer data
- Employee Import: Permission to import carer data
The system checks permissions for each action:
- Add Button: Only shown with Employee Create permission
- Edit Button: Only shown with Employee Edit permission
- Export Button: Only shown with Employee Export permission
- Import Button: Only shown with Employee Import permission
User Experience with Limited Permissions
- Users without edit permissions can view carer details
- Edit buttons are disabled or hidden
- Status dropdowns are read-only
- Add, import, and export functions are unavailable
- When trying to edit without permission: "You don't have permission to edit employee details."
- Edit button replaced with: "No edit access" text
- Clear indication of permission restrictions
Requesting Additional Permissions
If you require additional permissions to perform your duties:
- Contact your system administrator
- Specify which features you need access to
- Explain the business need for the additional permissions
- Administrators can modify role permissions in the system settings
Import & Export
Bulk import and export of carer data.
Exporting Carer Data
- Click the green "Export" button (download icon) in the header
- Button requires Employee Export permission
- Exports current filtered view of carers
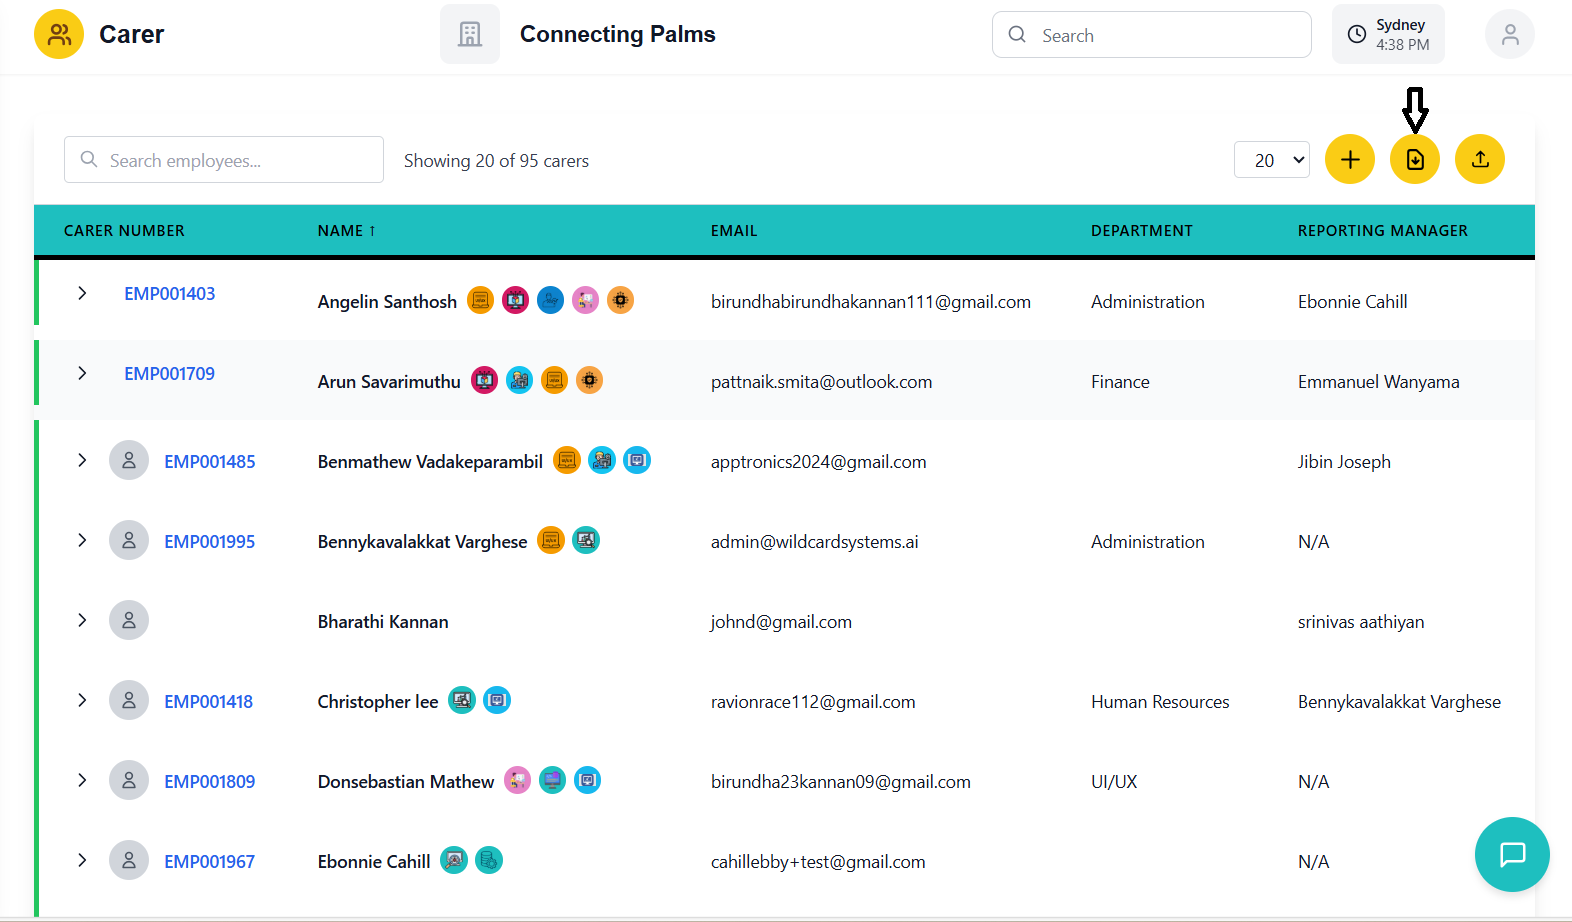
- Clicking button triggers download
- Loading spinner appears during export
- File downloads automatically as Excel (.xlsx)
- Filename format:
employees_YYYY-MM-DD.xlsx
Exported file includes all visible columns plus additional fields:
- All table columns (Name, Email, Department, etc.)
- Additional hidden fields (IDs, timestamps, etc.)
- Data reflects current search and filter settings
- Formatted for Excel with proper data types
Importing Carer Data
- Click the green "Import" button (upload icon) in the header
- Button requires Employee Import permission
- Hidden file input triggered programmatically

- Formats: Excel (.xlsx, .xls) or CSV
- Size: Maximum 10MB
- Structure: Must match expected column format
- Data: Valid data types in appropriate columns
- Select file through file dialog
- System validates file type and size
- Loading state during processing
- Success: summary message with results
- Carer list refreshes to include new entries
Import Results
After a successful import, you'll see a summary including:
- Total Records: Number of rows processed
- Successfully Processed: Number of carers added/updated
- Failed Records: Number of rows with errors
- Message: Overall status of the import
Troubleshooting Import Issues
- Invalid file format: Use Excel or CSV format only
- File too large: Reduce file size below 10MB
- Data validation errors: Check data types and formats
- Missing required fields: Ensure all mandatory columns are present
Troubleshooting Guide
Solutions to common issues and problems you may encounter.
Common Issues
Possible Causes:
- Missing required permissions (Employee Create/Edit)
- User role restrictions
- System configuration issue
Solutions:
- Contact administrator to verify permissions
- Check if you're logged in with the correct account
- Look for "No edit access" message which confirms permission issue
Possible Causes:
- Search term too specific
- Data not in expected format
- Filters applied limiting results
- Pagination hiding results
Solutions:
- Try broader search terms
- Check spelling of search terms
- Clear search field to see all results
- Check if you're on the correct page of results
- Verify data exists in the system
Error Messages:
"File too large" or "Invalid file type"
Solutions:
- Ensure file is under 5MB
- Use supported formats (JPEG, PNG, etc.)
- Try a different image file
- Check network connection if upload fails without specific error
Possible Causes:
- Network connection issue
- Server error
- Browser cache problem
Solutions:
- Check internet connection
- Refresh the page (F5)
- Clear browser cache and reload
- Try a different browser
- Contact IT support if issue persists
Possible Causes:
- Missing permissions
- Dropdown not responding
- Network issue
Solutions:
- Verify you have edit permissions
- Try refreshing the page
- Check if other edits work (if so, specific to status change)
- Contact support if consistent issue
Possible Causes:
- Missing permissions
- File format issues
- Browser settings blocking download
- File size too large for import
Solutions:
- Verify import/export permissions
- Check file format requirements
- Ensure browser allows downloads
- Reduce file size for imports
- Check error messages for specific issues
Error Message Reference
| Error Message | Meaning | Solution |
|---|---|---|
| "You don't have permission to edit employee details" | Missing Employee Edit permission | Contact administrator for permissions |
| "File too large" | Uploaded file exceeds size limit | Reduce file size (5MB for images, 10MB for documents) |
| "Invalid file type" | Unsupported file format | Use supported formats (images: JPEG/PNG, documents: Excel/CSV) |
| "Failed to load carer data" | Network or server issue | Check connection, refresh page, contact support |
| "Please enter a valid email address" | Invalid email format during carer creation/editing | Use valid email format (user@domain.com) |
| "Phone number must be a valid Australian number" | Invalid phone number format | Use Australian format (+61 or 0 followed by 9 digits) |
Contact Support
- Persistent errors after trying solutions
- System performance issues
- Missing data or incorrect information
- Permission issues that aren't resolved by administrator
- Feature not working as expected
Information to Provide:
- Your user ID and name
- Detailed description of the issue
- Steps to reproduce the problem
- Screenshot of any error messages
- Browser and operating system information
- Date and time the issue occurred