CHSP System Management
Comprehensive guide for managing Commonwealth Home Support Programme services. Select a topic below to get started.
System Overview
Learn about CHSP system features, architecture, and components.
Access Control & Permissions
Understand permission levels and access control.
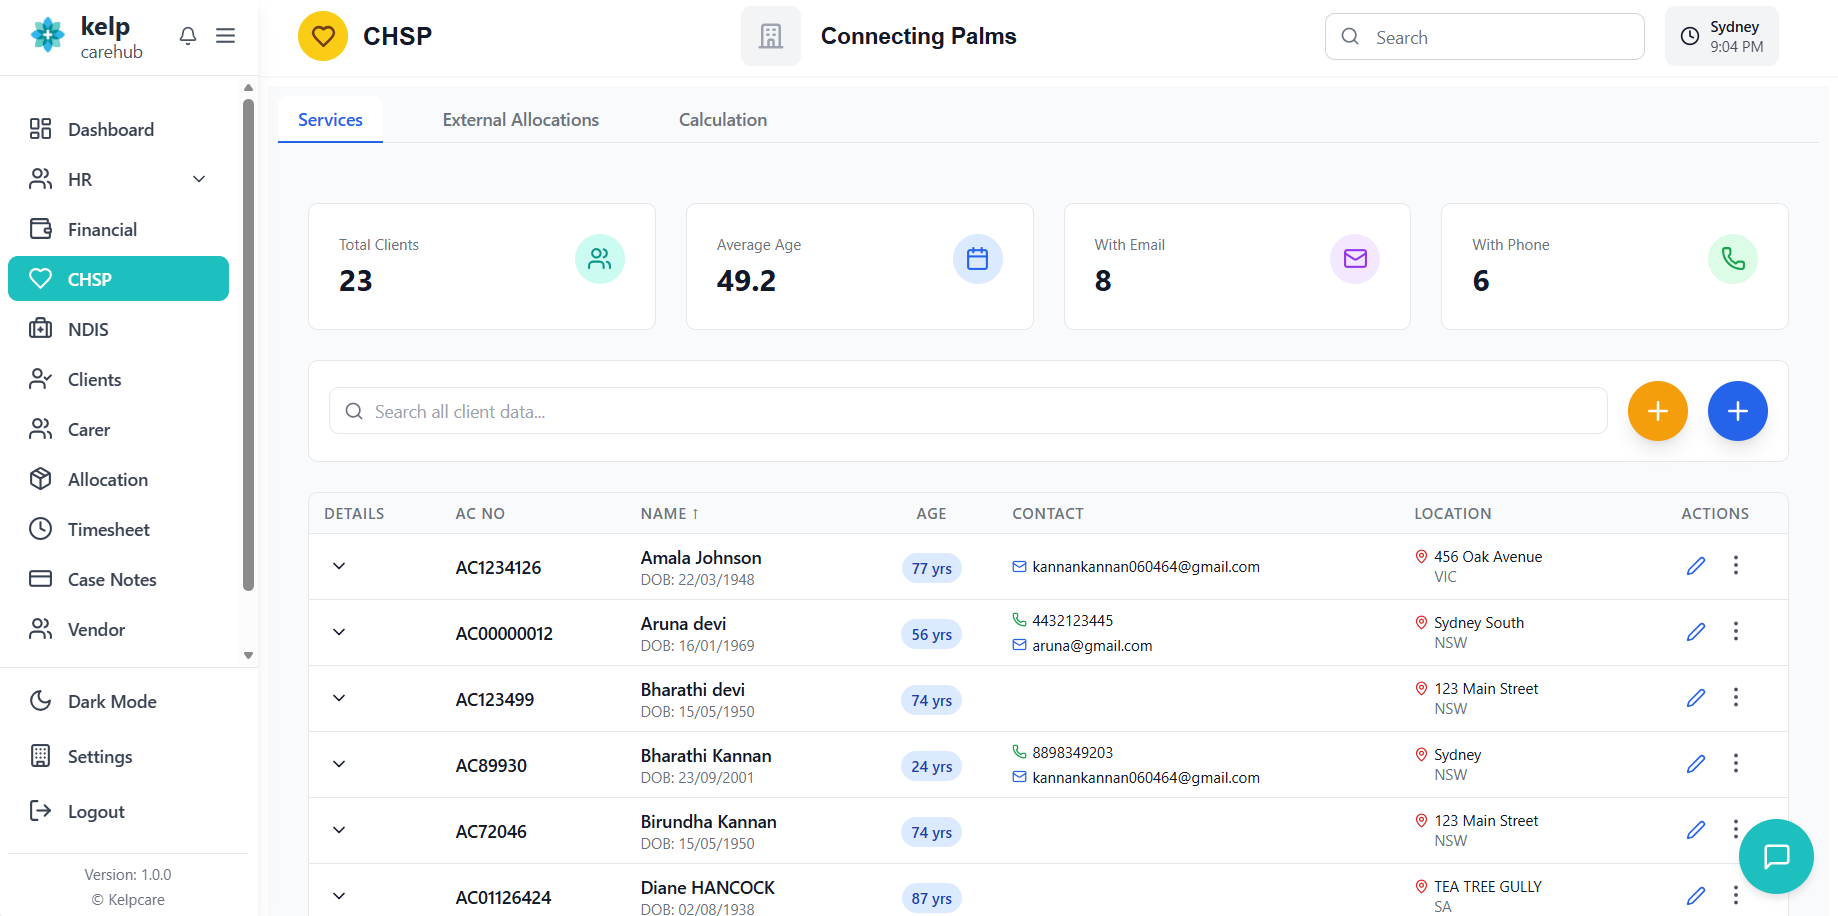
Managing Services
Create and manage CHSP services and rate cards.
Client Management
Add and manage client profiles and information.
Rate Card Management
Create and manage pricing structures for services.
Work Allocations
Assign services to providers and manage allocations.
External Information
Manage external provider contact information.
Invoice Generation
Generate and manage invoices from completed allocations.
DEX File Generation
Create government compliance reporting files.
Agreement Generation
Create service agreements for clients.
Change Tracking
View audit trail of all system changes.
Troubleshooting
Solutions to common issues and problems.
System Overview
The Commonwealth Home Support Programme (CHSP) system is a comprehensive management platform designed to handle all aspects of home support services for elderly and disabled clients in Australia.
What is CHSP?
The Commonwealth Home Support Programme (CHSP) system is a comprehensive management platform designed to handle all aspects of home support services for elderly and disabled clients in Australia.
Key Features
👥 Client Management
Complete client profiles with personal, medical, and contact information
📋 Service Allocation
Assign services to employees, vendors, departments, or external providers
💰 Financial Tracking
Track rates, client contributions, and generate invoices
📄 Documentation
Generate service agreements and DEX compliance files
System Architecture
The CHSP system consists of four main tabs with specific functionalities:
- Services Tab: Manage client information and service assignments
- External Allocations Tab: Handle external provider assignments
- Calculation Tab: Generate and manage invoices
- Scrape Records Tab: Import and manage bulk records (if enabled)
Access Control & Permissions
The CHSP system uses a sophisticated permission-based access control system. Users can only see and access tabs they have permission for.
Permission Levels
| Package | Feature | Description |
|---|---|---|
| CHSP | Service | Access to client and service management tab |
| CHSP | External Allocations | Manage external provider assignments |
| CHSP | Chsp Calculation | Generate and edit invoices |
| CHSP | Chsp Records | Import and manage bulk records |
What Happens Without Permissions?
If you don't have any CHSP permissions, you'll see an "Access Denied" message with instructions to contact your administrator.
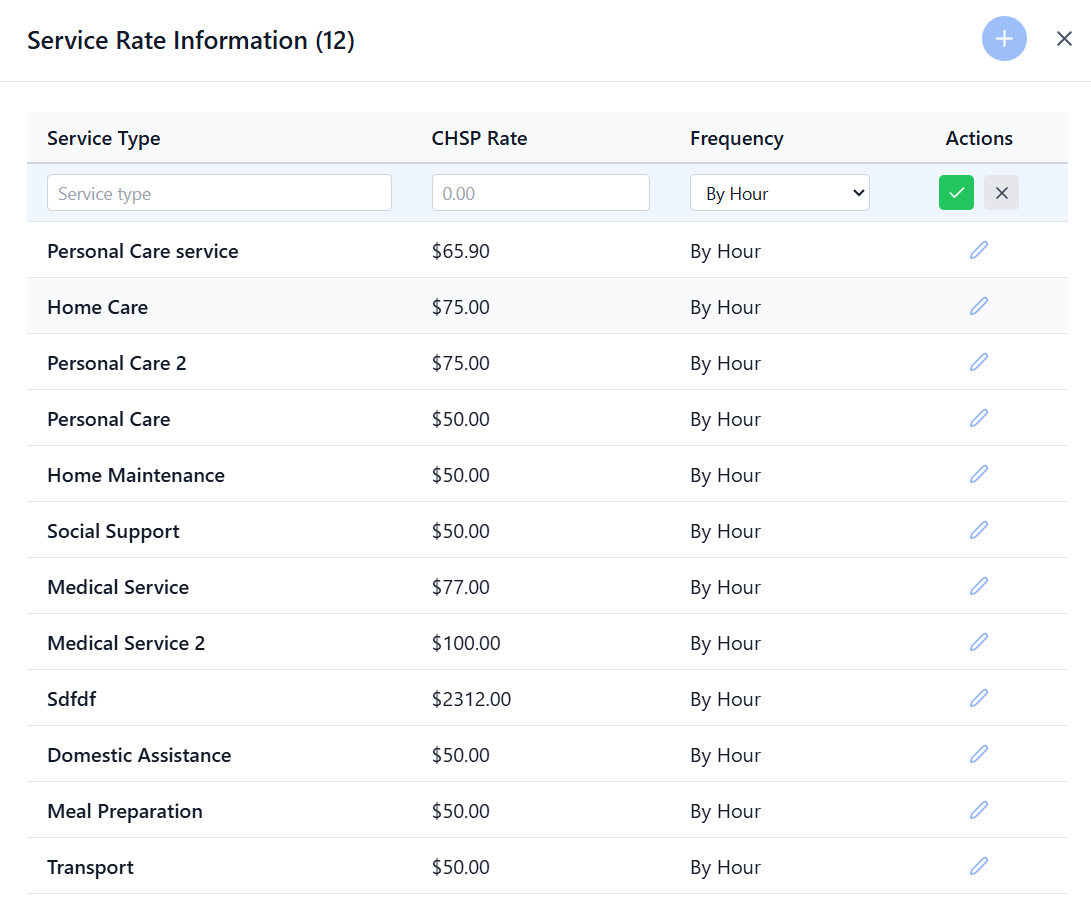
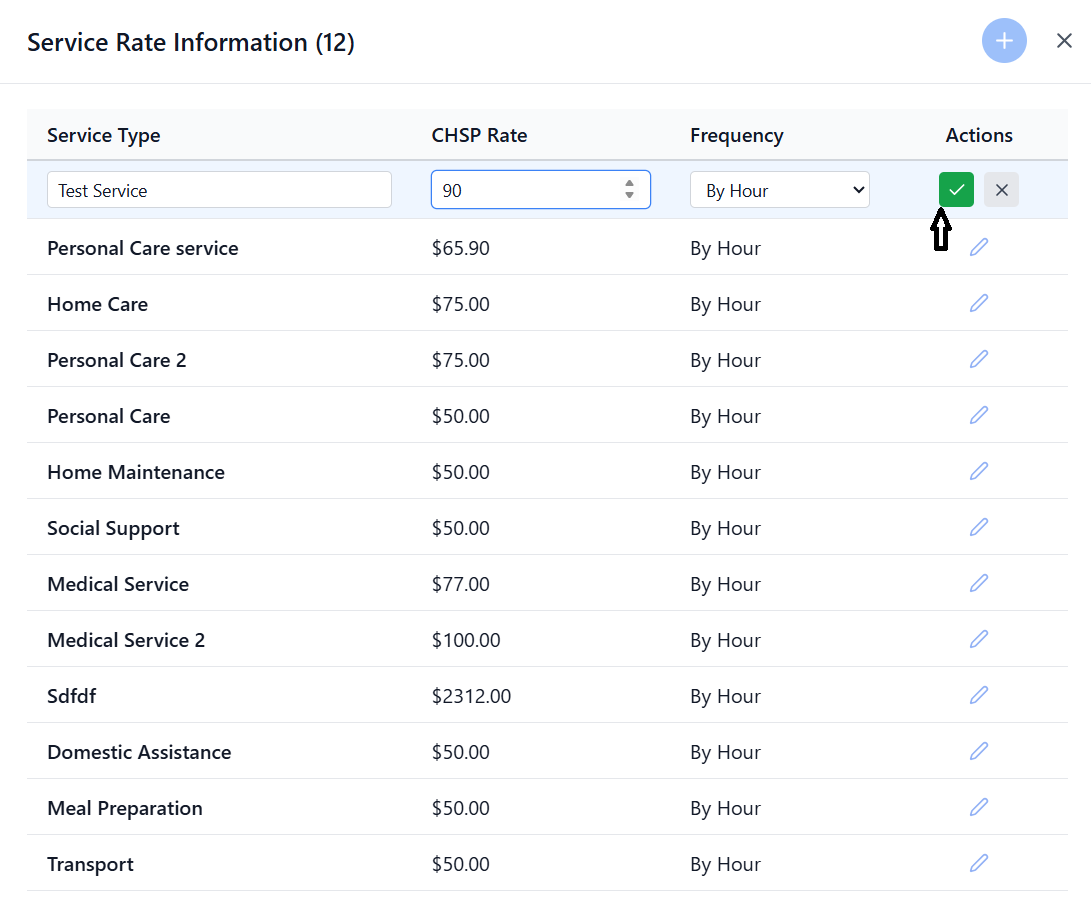
Managing Services & Rates
Create and manage CHSP services and their associated rate cards.
Creating a New Service
Navigate to the Services tab and click the circular blue button with a plus icon in the top-right corner.
- Service Type: Enter service name (e.g., "Home Care", "Personal Care")
- CHSP Rate: Enter the rate amount in dollars (e.g., 45.50)
- Frequency: Select from dropdown (By Hour, By Visit, etc.)
Click the green checkmark button to save. You'll see a success message confirming creation.
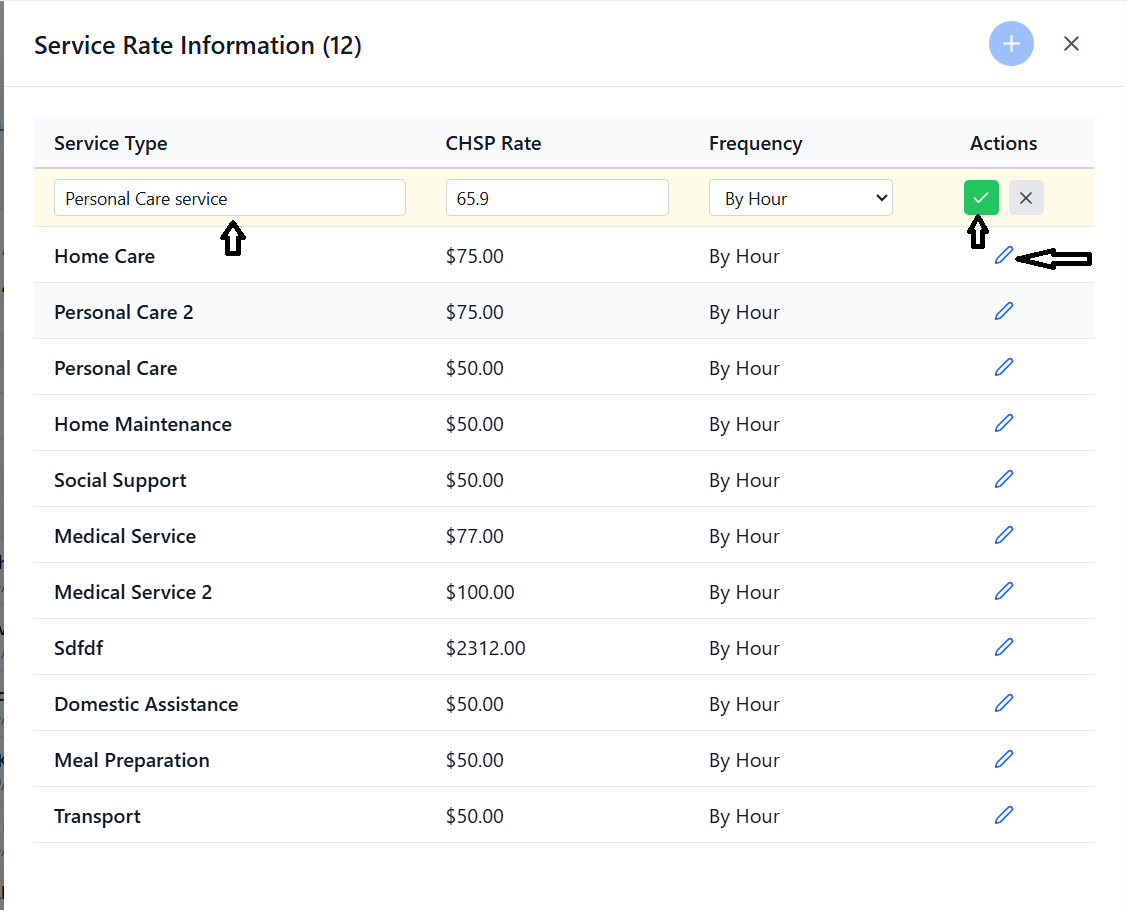
Editing an Existing Service
Find the service you want to edit in the services table.
Click the pencil (Edit) icon in the Actions column.
Update the fields and click the green checkmark to save changes.
Calculation Types
Common calculation types include:
- BY_HOUR: Rate charged per hour of service
- BY_VISIT: Flat rate per visit
- BY_KM: Rate per kilometer traveled
- FIXED: Fixed rate regardless of duration
Client Management
Add and manage client profiles with comprehensive personal, medical, and contact information.
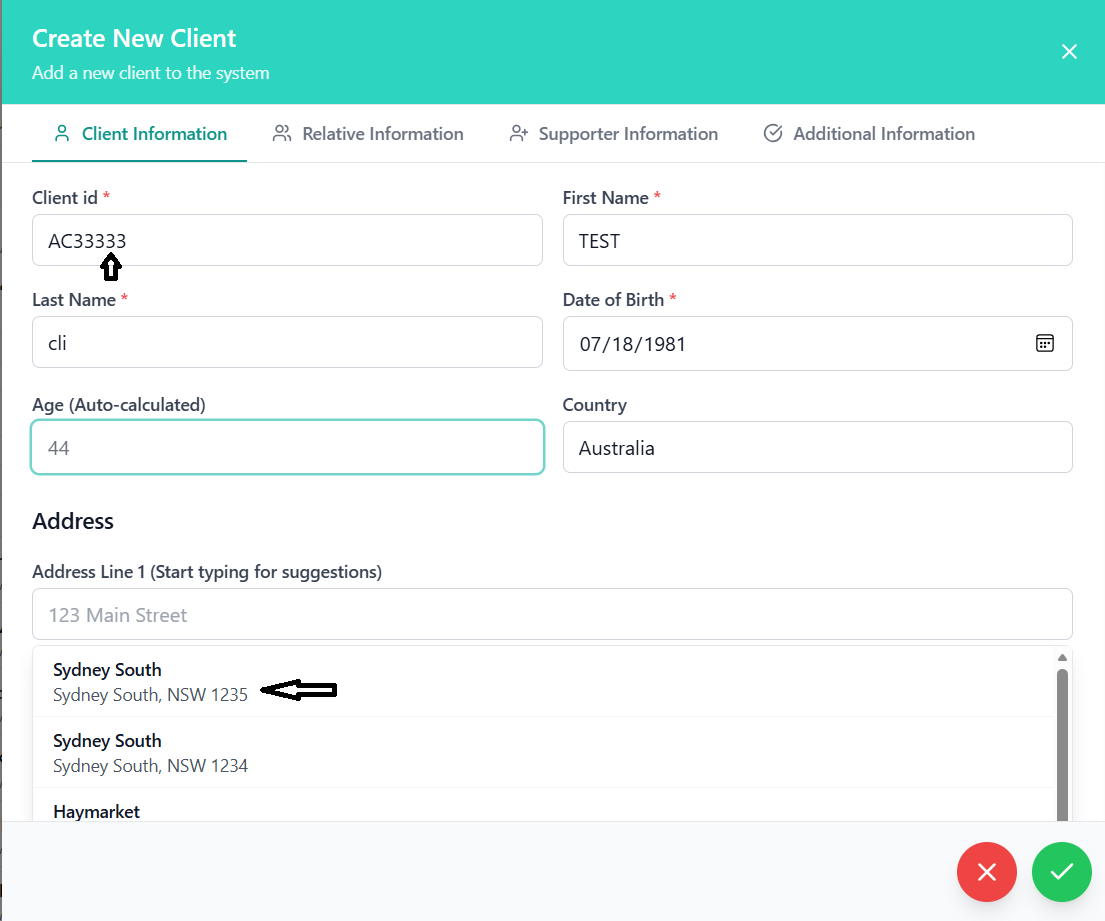
Adding a New Client
Click the yellow circular button with a plus icon to open the client creation form.
- Client ID: Unique identifier (e.g., AC12345) - Required
- First Name: Client's first name - Required
- Last Name: Client's last name - Required
- Date of Birth: Select from calendar - Required
- Age: Auto-calculated from DOB
- Country: Defaults to Australia
The system features Australian address validation:
- Start typing the address in "Address Line 1"
- After 3 characters, suggestions will appear
- Select an address from the dropdown
- State and Postcode will auto-fill
- Phone: Format: +61-412-345-678
- Email: Valid email address
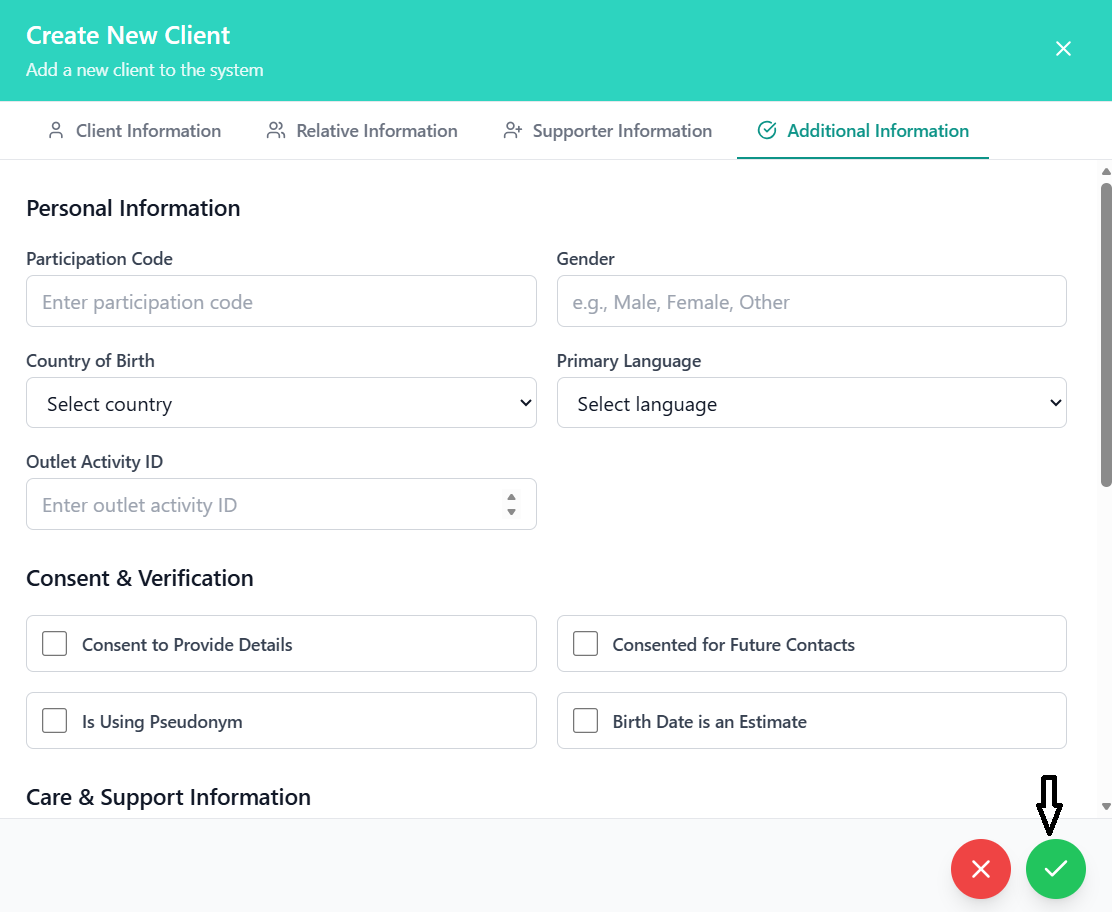
Complete the comprehensive client profile across multiple tabs:
- Relative Information: Emergency contact details
- Supporter Information: Professional supporters or carers
- Additional Details: DEX identifiers, consent checkboxes, care information
Click the green circular checkmark button at the bottom. A success message will confirm creation.
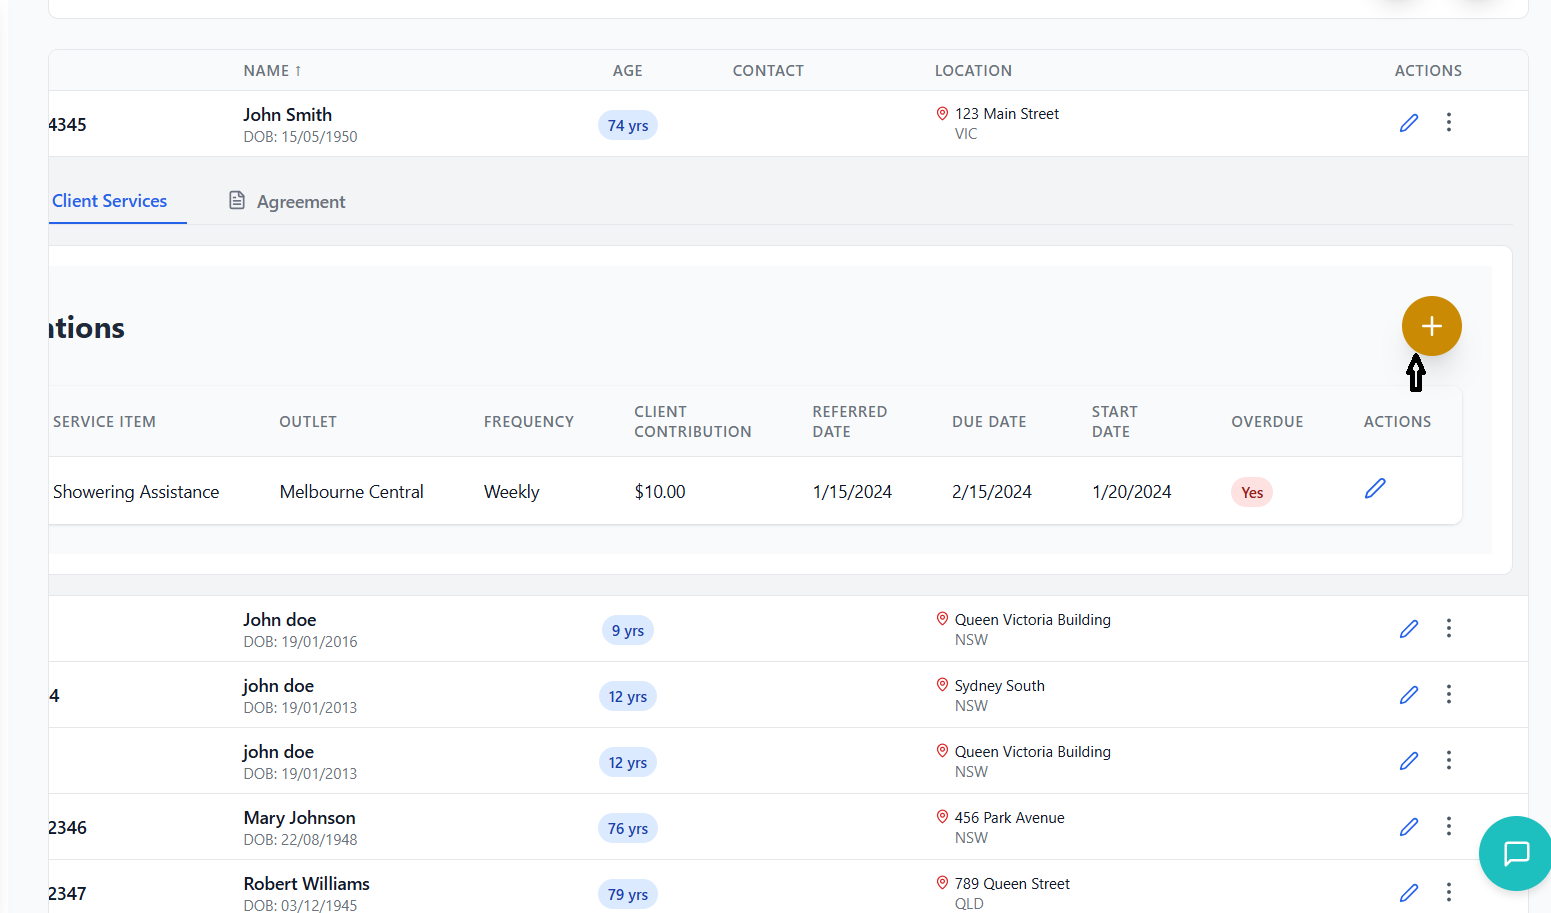
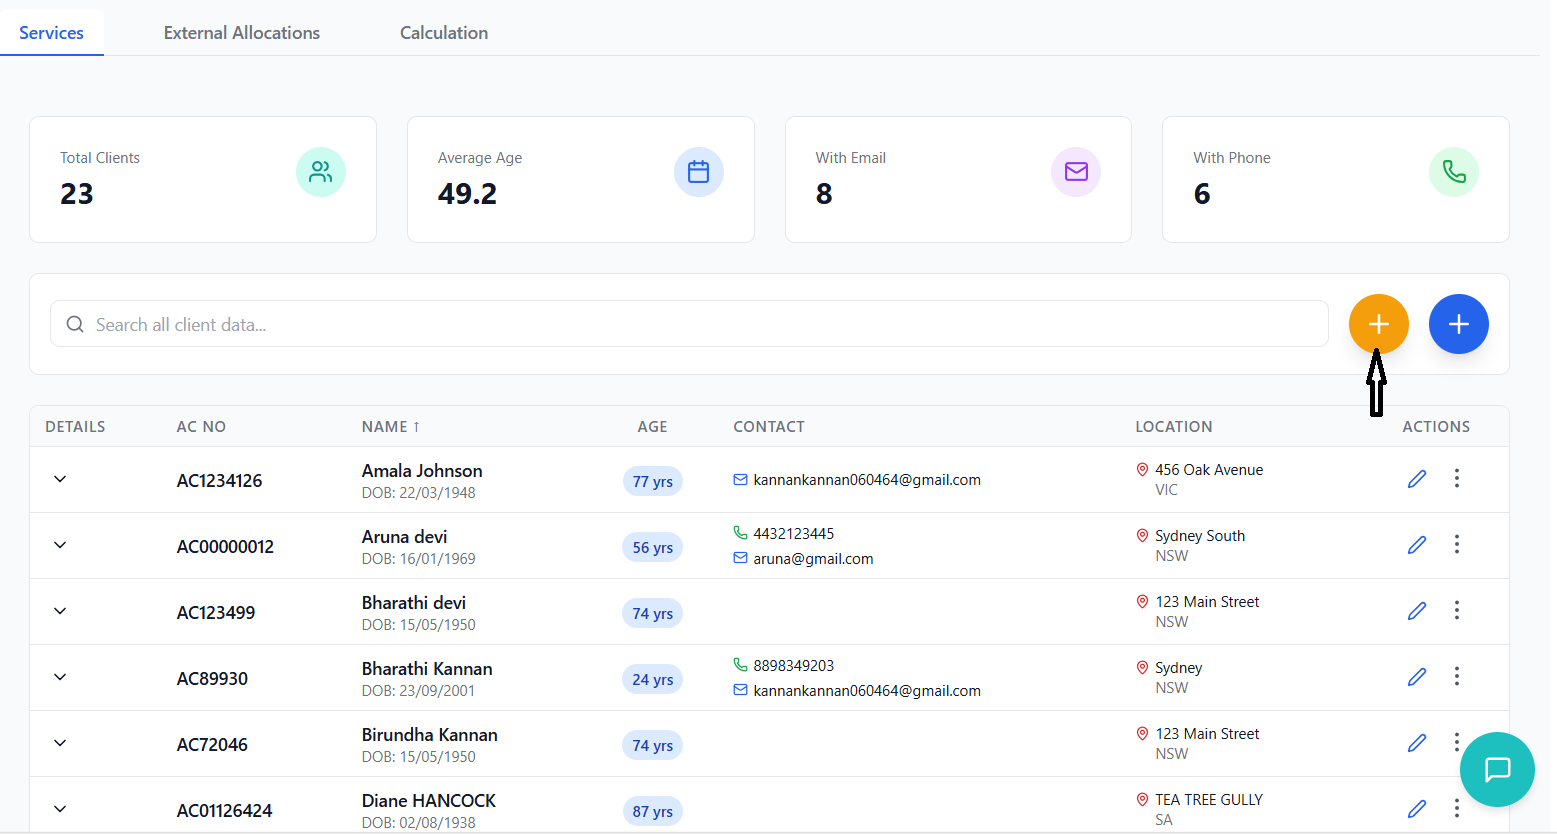
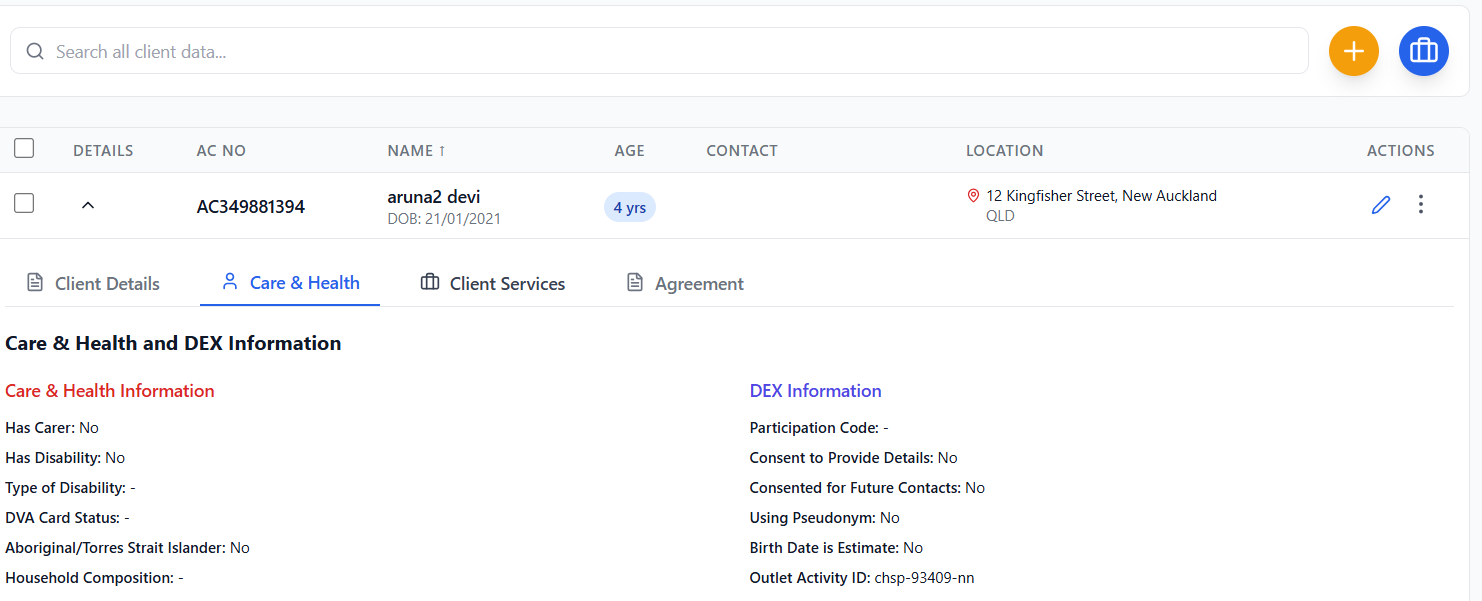
Viewing Client Details
Click the dropdown arrow next to the client's AC Number to expand their details.
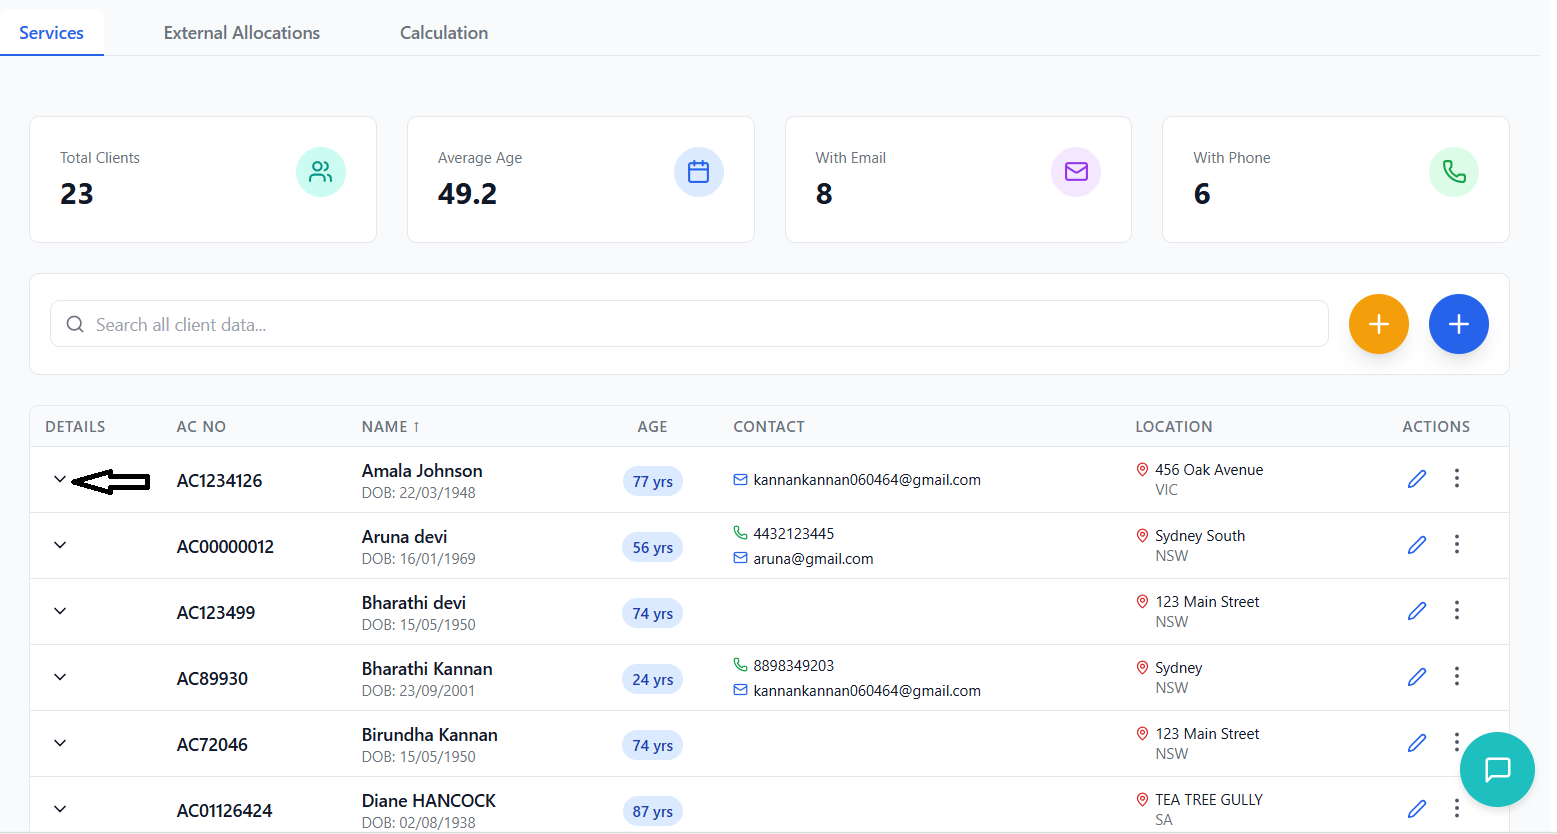
Within the expanded view, you'll find three sub-tabs:
- Client Details: All personal information
- Care & health: All health informations
- Client Services: Assigned services and allocations
- Agreement: Generate service agreements
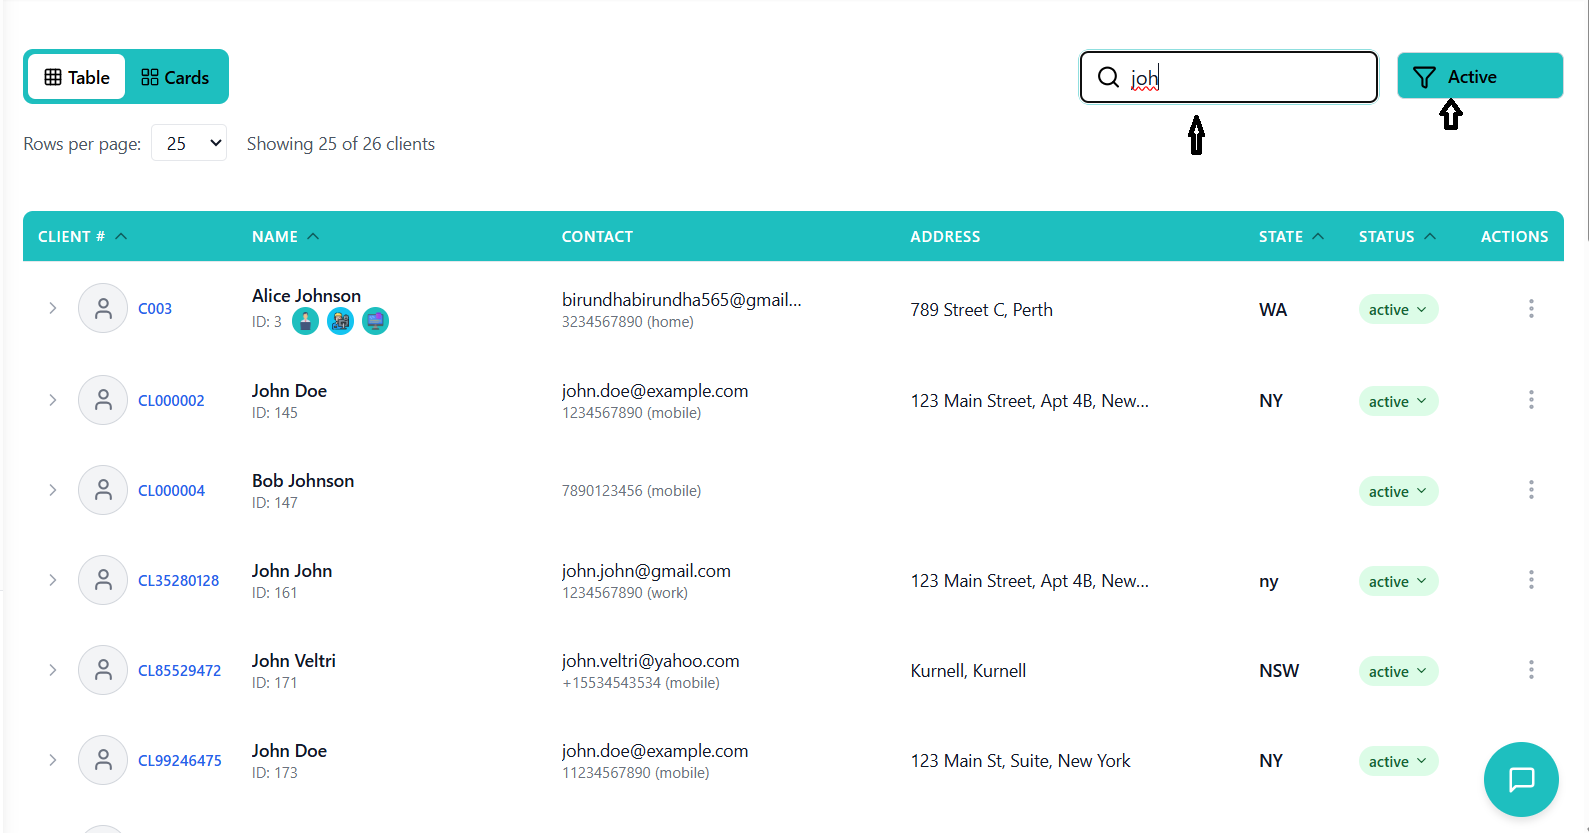
Searching for Clients
The search feature searches across ALL client fields including:
- Client ID and AC Number
- Names (first, last, full)
- Addresses
- Phone and Email
- All other client data
Rate Card Management
Create and manage pricing structures for CHSP services.
Understanding Rate Cards
Rate cards define the pricing structure for CHSP services. Each rate includes:
- Service Type: Name of the service
- Rate Amount: Price charged
- Calculation Type: How the rate is calculated (hourly, per visit, etc.)
- Currency: Usually AUD
- Status: Active or Inactive
Creating a Rate Card
There are two ways to create rates:
- From main dashboard: Click "Create Rate" button
- From record creation: Click "+ Add Rate" within the CHSP record form

- Service Type: Enter service name (auto-formatted to Title Case)
- Calculation Type: Select from dropdown
- Rate ($): Enter amount (max 9999.99)
- Currency: Select currency (default: AUD)
- Active Rate: Check to make immediately available
- Description: Optional notes
Click the green button. The rate will immediately appear in the rate card list.
Editing Rate Cards
In the rate card table, click the pencil icon for the rate you want to modify.
The row will become editable inline. Change the necessary fields.
Click the green checkmark to save or red X to cancel.
Managing Rate Status
Edit the rate and toggle the "Active" checkbox.
- Active Rates: Available for selection in records and allocations
- Inactive Rates: Hidden from dropdowns but existing records retain them
Work Allocations
Assign services to different types of service providers and manage allocations.
Understanding Work Allocations
Work allocations assign services to different types of service providers:
👤 Carer Allocation
Assign to individual employees
🏢 Vendor Allocation
Assign to external vendor companies
👥 Department Allocation
Assign to internal departments
🔗 External Allocation
Assign to external organizations
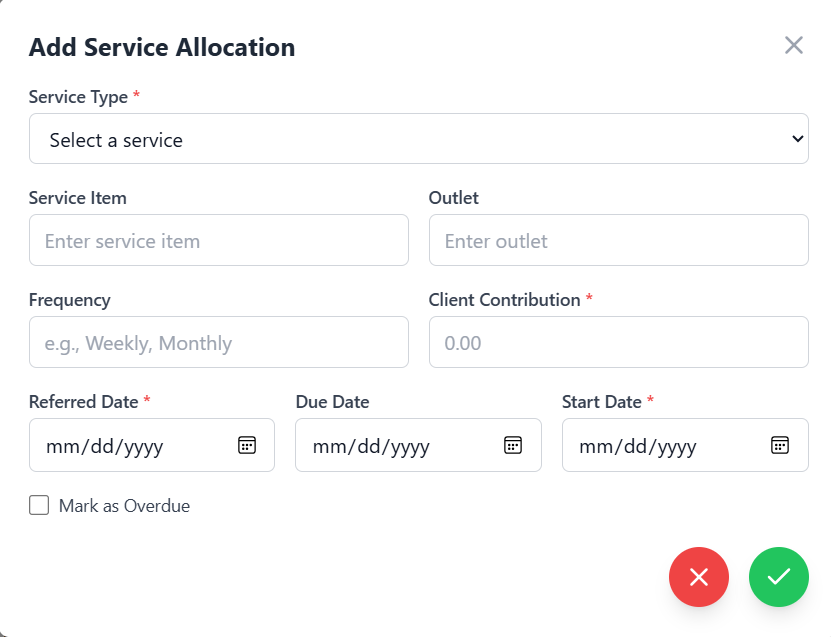
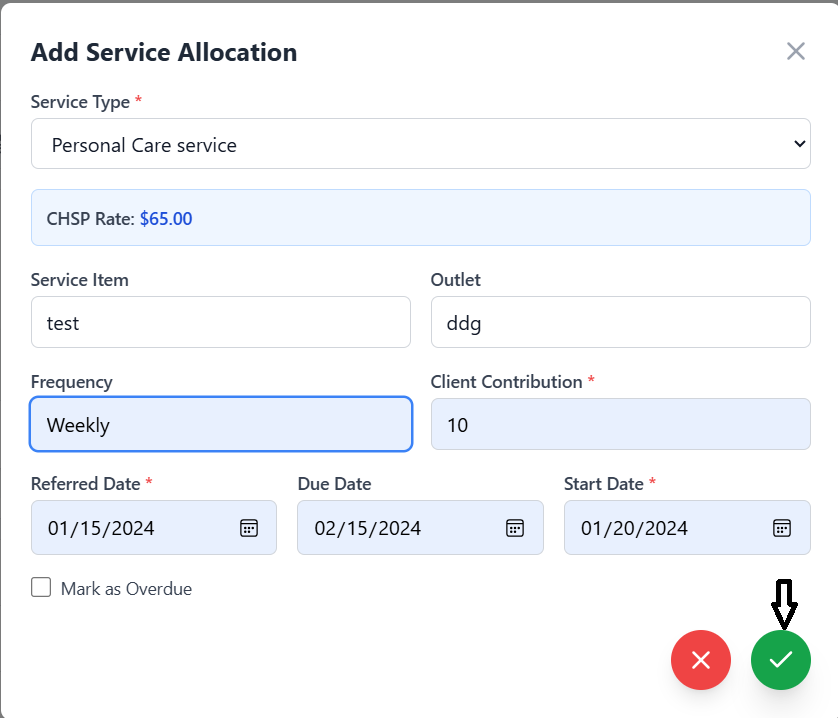
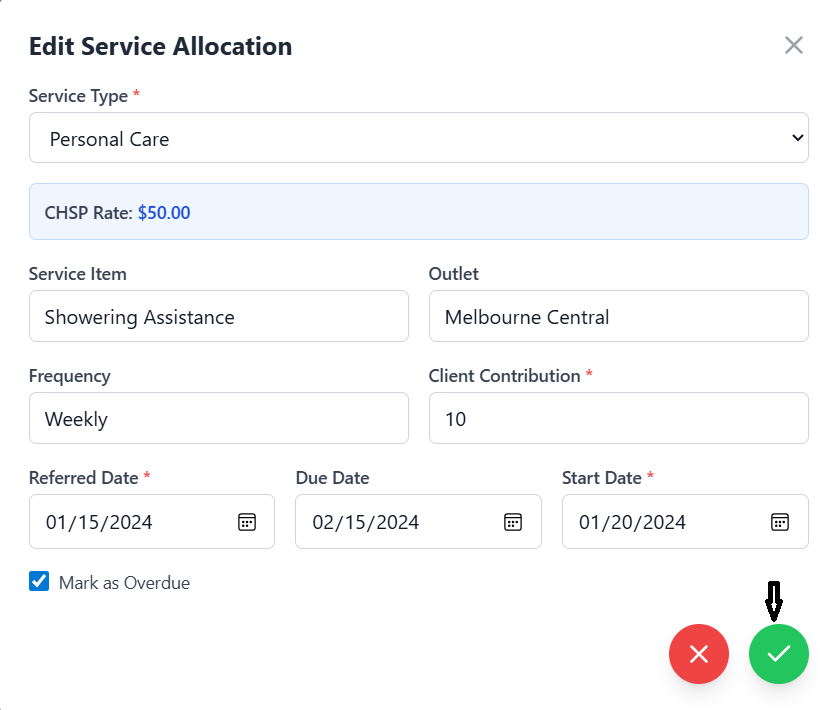
Creating a Work Allocation from Client Services
Go to Services tab → Expand a client → Click "Client Services" sub-tab
Click the yellow plus button to assign a service to the client.
- Service Type: Select from dropdown
- CHSP Rate: Displays automatically based on service
- Service Item: Description
- Outlet: Location
- Frequency: e.g., Weekly, Monthly
- Client Contribution: Amount client pays
- Dates: Referred, Due, and Start dates
Click green checkmark. Service is now assigned to the client.
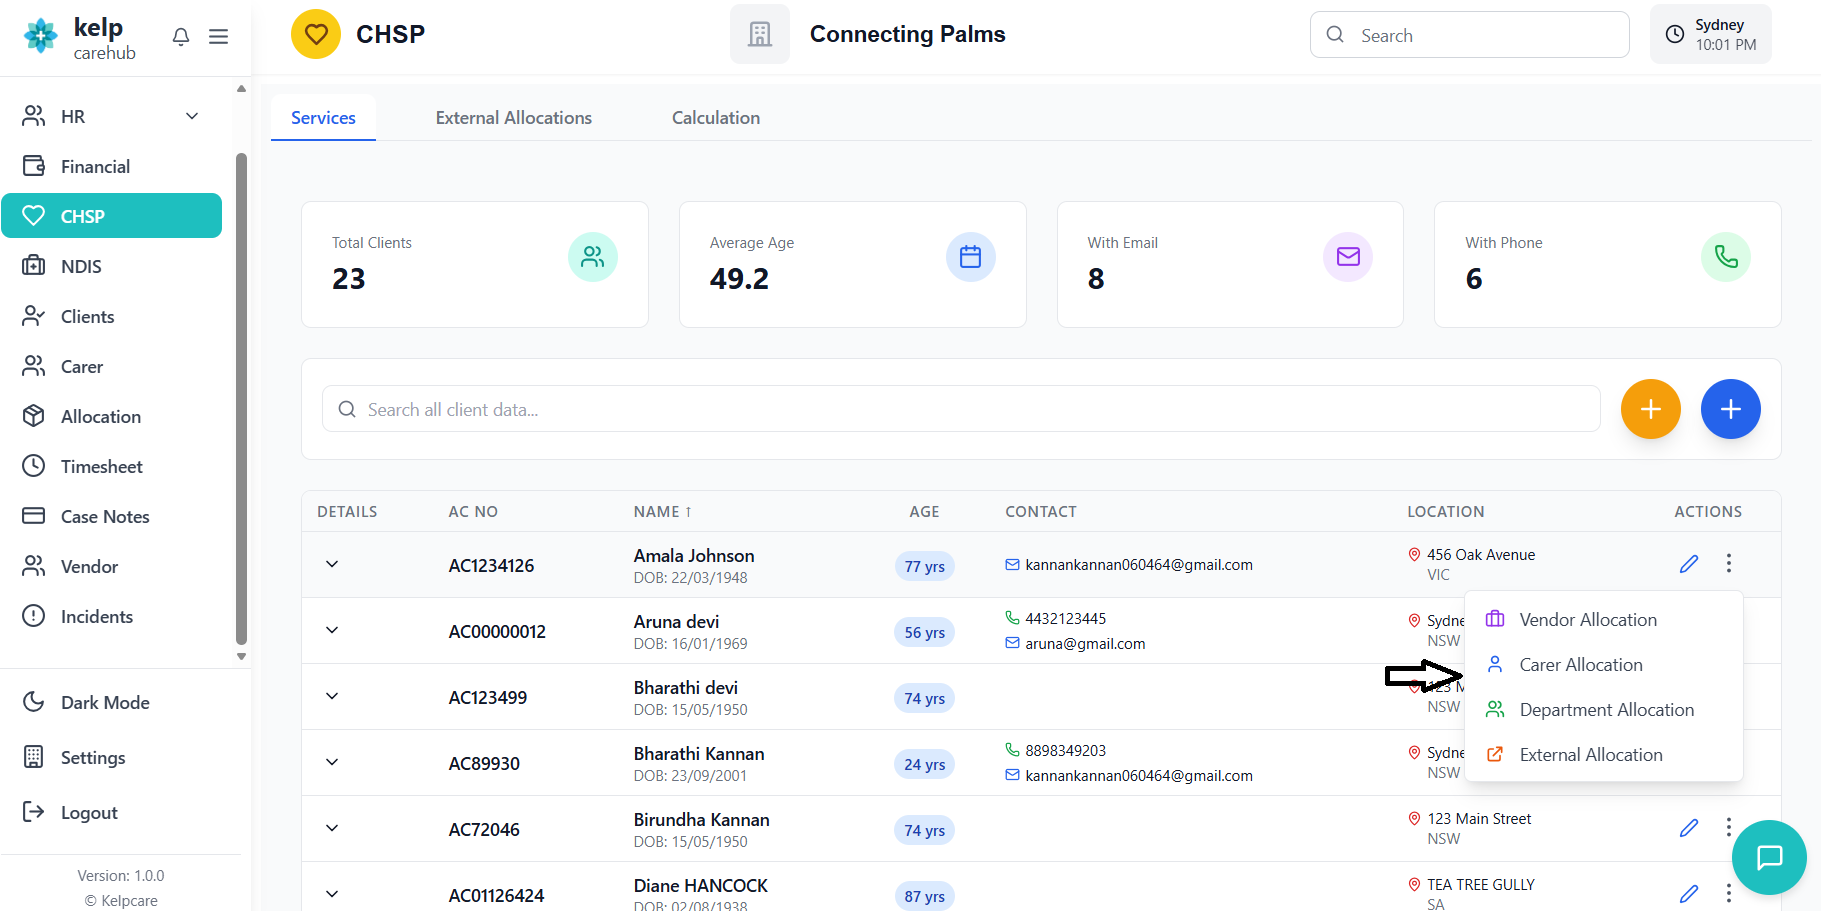
Click the three-dot menu (⋮) next to the client's name, then select allocation type:
- Vendor Allocation
- Carer Allocation
- Department Allocation
- External Allocation
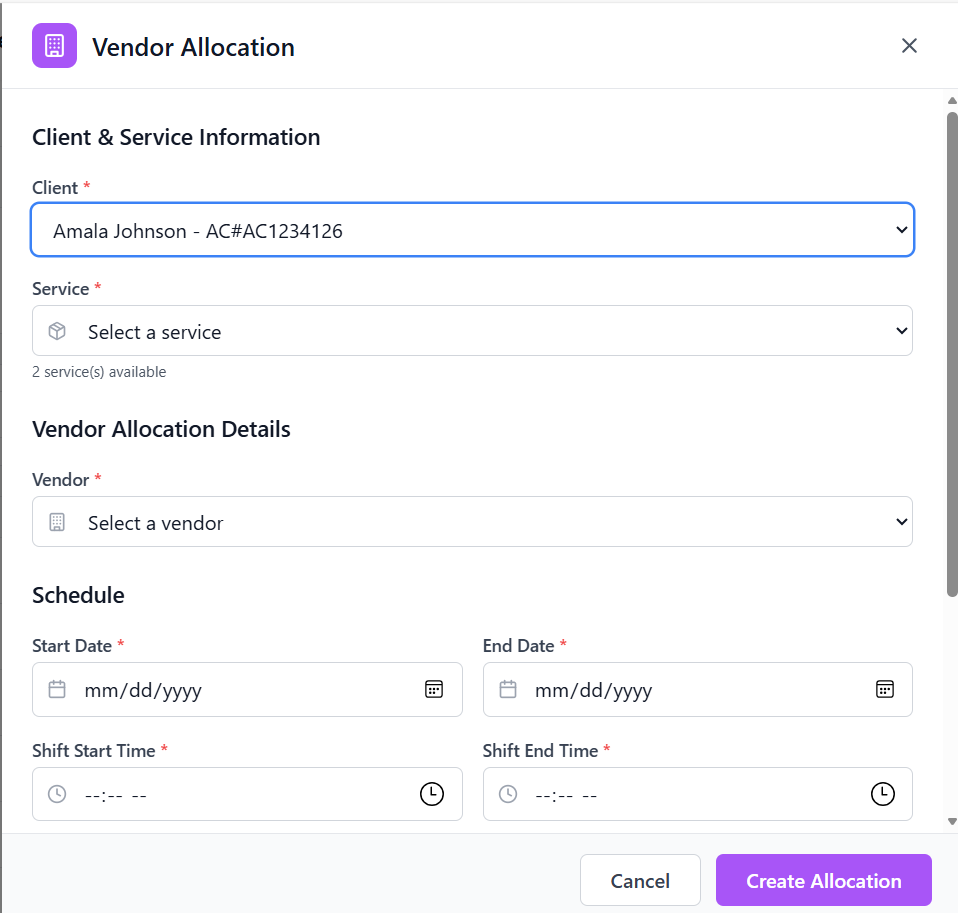
Vendor Allocation
Choose which client service this allocation is for from dropdown.
Choose vendor from dropdown list.
- Start Date: When service begins
- End Date: When service ends
- Shift Start Time: Daily start time
- Shift End Time: Daily end time
- Sleep Over: Check if applicable
Enter any additional information or instructions.
Click "Create Allocation" button. Success message confirms creation.
Carer (Employee) Allocation
Same process as Vendor Allocation, but select an employee instead of a vendor.
Department Allocation
Same process, but select an internal department.
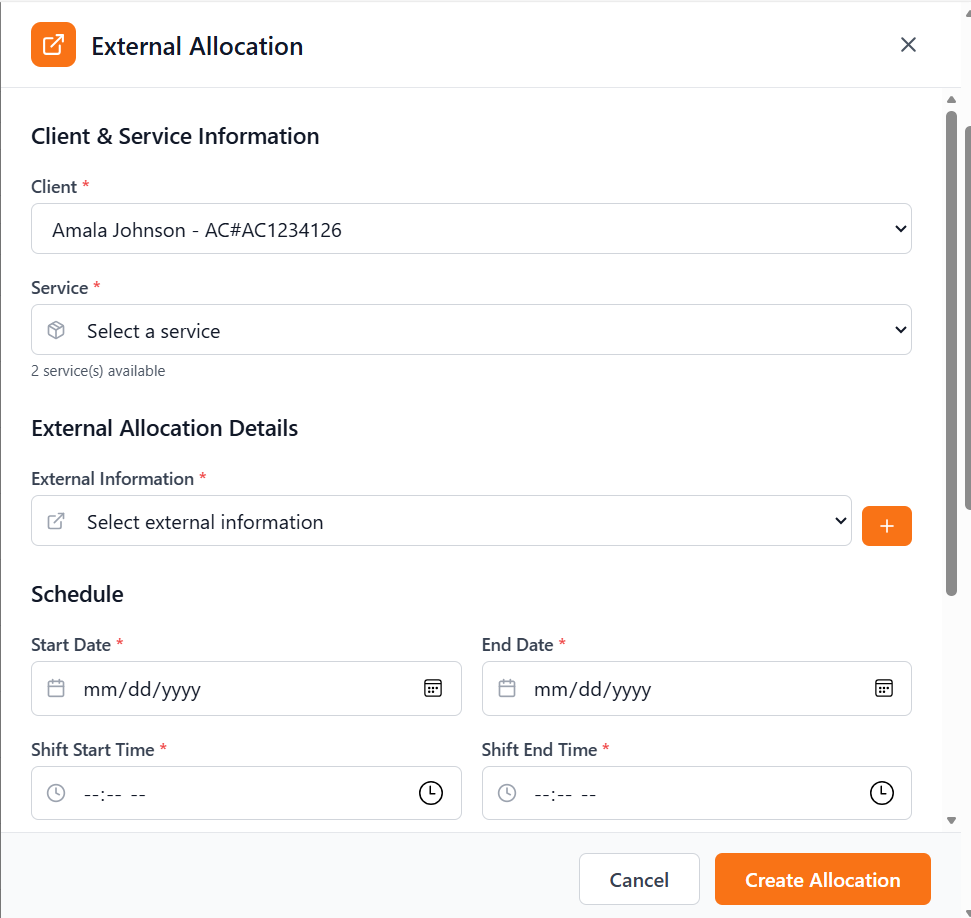
External Allocation
Choose existing external contact or click "+ Create New"
- Name: Organization name
- Organization: Company details
- Email: Contact email
- Phone: Contact number
- Notes: Additional information
Fill schedule details and create allocation as with other types.
Managing External Allocations Tab
Click the "External Allocations" tab in the main navigation.
See comprehensive list of all external provider assignments with:
- Client information
- Service details
- Allocation target
- Quantity and pricing
- Status
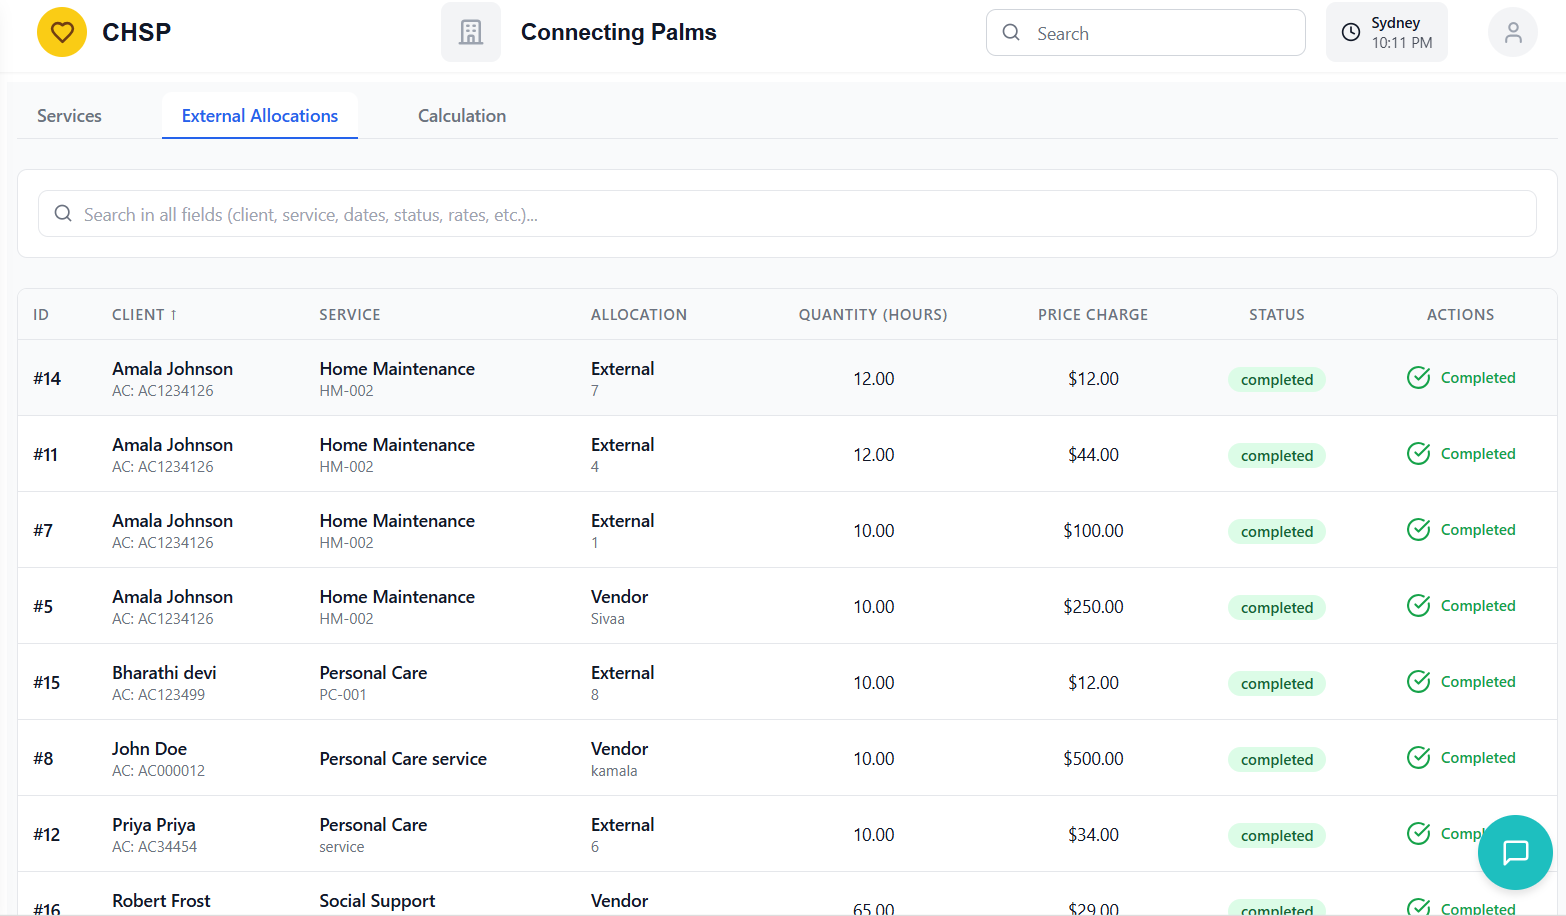
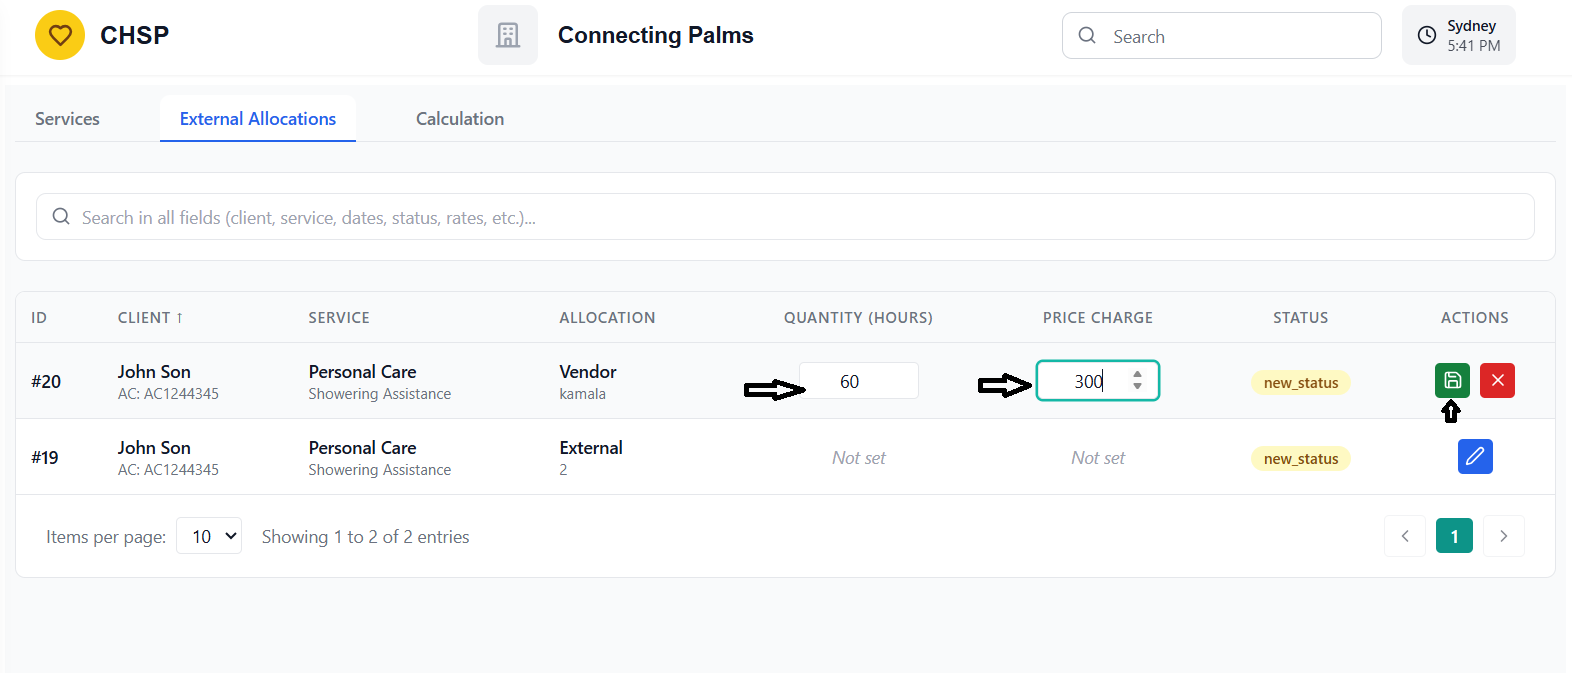
Editing Allocation Quantity and Price
Find allocation with Quantity = 0 or null (shows "Not set")
Click blue Edit icon in Actions column.
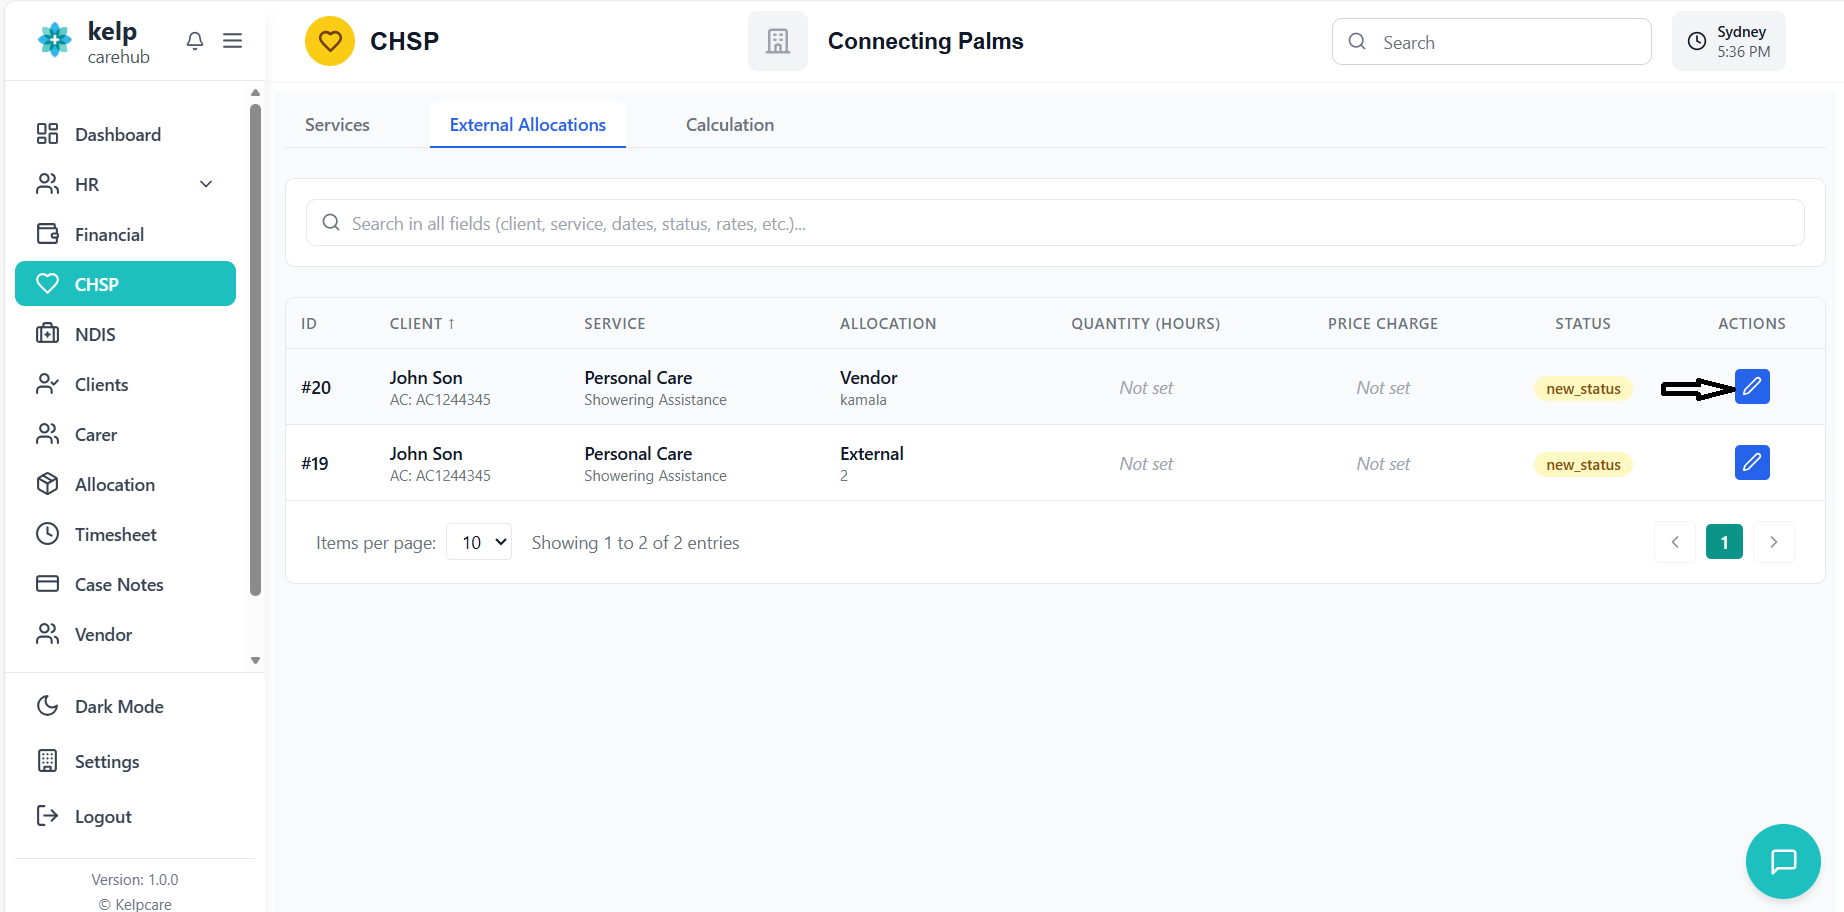
- Quantity (Hours): Number of service hours
- Price Charge: Amount to charge
Click green checkmark. Status changes to show "Complete" button.
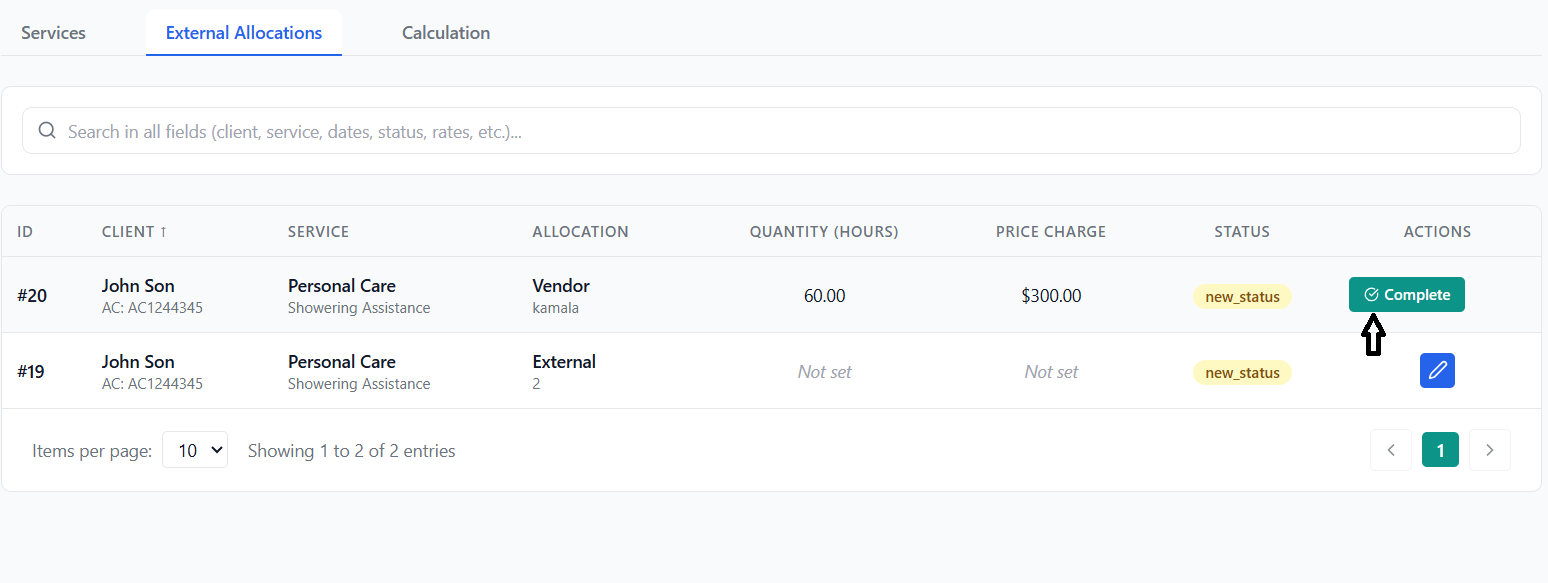
Completing an Allocation
Ensure quantity and price are correct.
Click the teal "Complete" button with checkmark icon.
Status changes to "COMPLETED" with green badge.
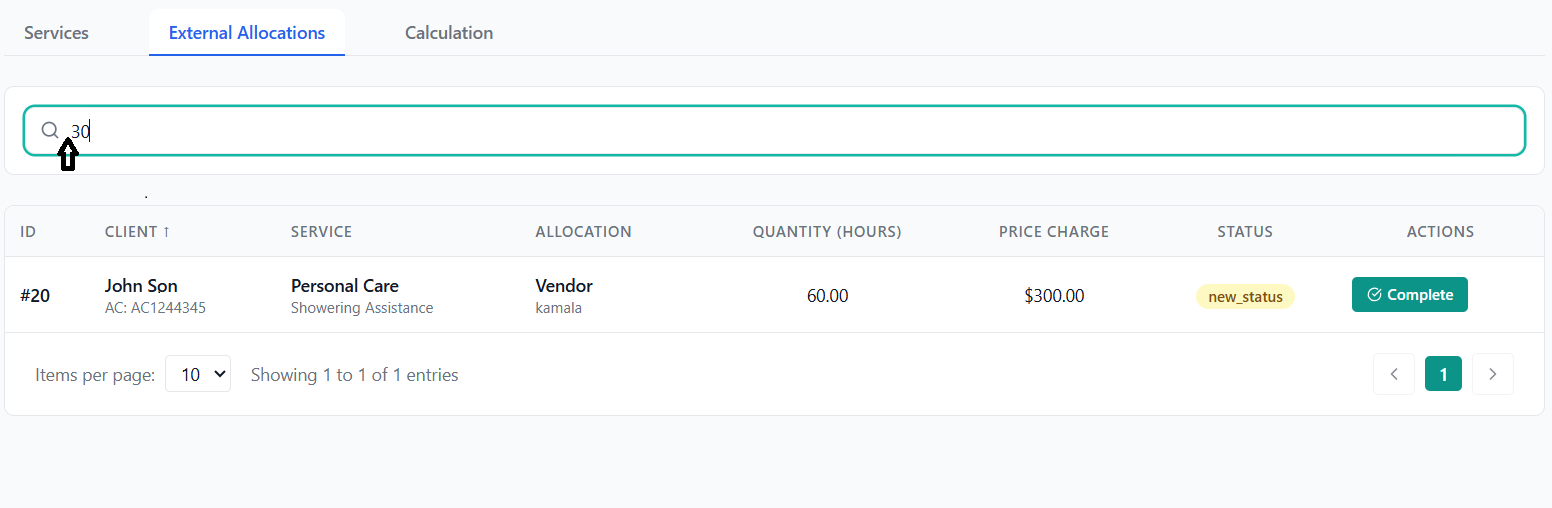
Searching Allocations
Search bar searches ALL fields including:
- Client names and IDs
- Service information
- Vendor/Employee/Department names
- Dates and amounts
- Notes and status
External Information Management
Manage contact details for external service providers who are not employees, vendors, or departments.
What is External Information?
External Information stores contact details for external service providers who are not employees, vendors, or departments. This includes:
- Partner organizations
- Subcontractors
- Allied health professionals
- Community service providers
Creating External Information
Click "+ Create New" in the External Allocation modal or access from system menu.
- Name: Contact person's name (Required)
- Organization: Company/organization name (Required)
- Email: Contact email
- Phone Number: Contact phone
- Notes: Additional information
Click save button. The new external contact immediately becomes available for selection in allocations.
Screenshot Location: External Info Form
Replace this with: Screenshot of external information creation modal
Invoice Generation and Management
Generate and manage invoices from completed work allocations.
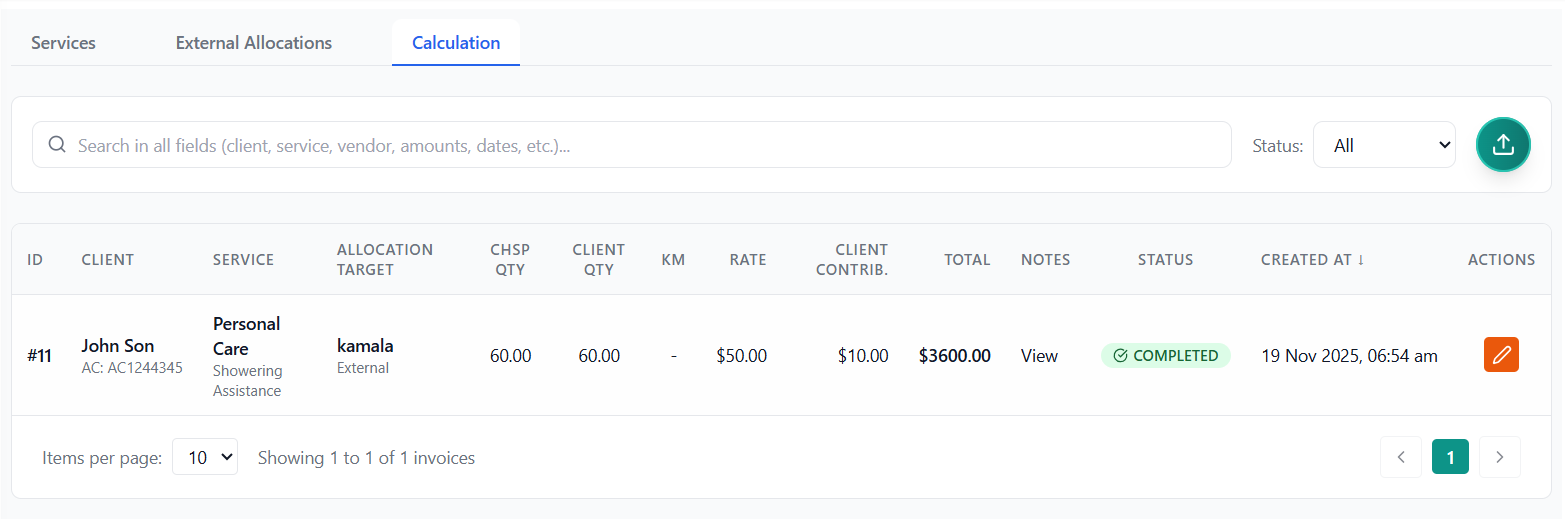
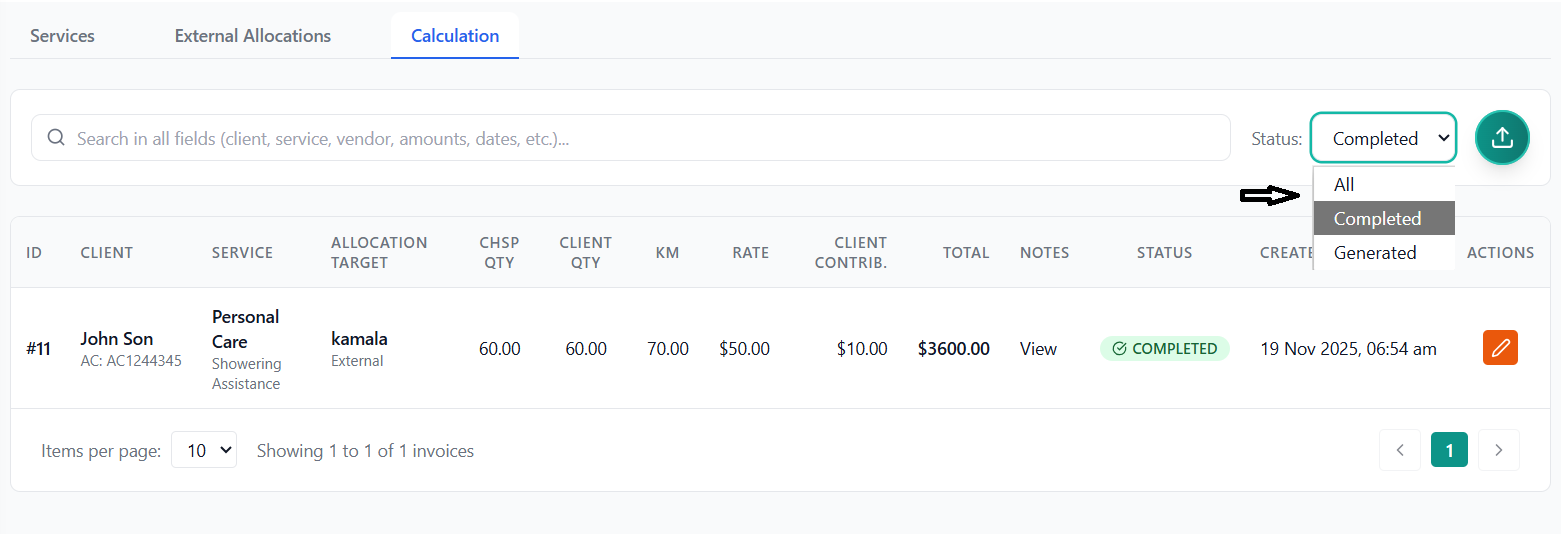
Understanding the Calculation Tab
The Calculation (Invoice) tab displays all invoices generated from completed work allocations. It shows:
- Client and service information
- Allocation target (who provided the service)
- Quantities and pricing
- CHSP rates and client contributions
- Total amounts
- Work allocation notes
- Status (COMPLETED or GENERATED)
How Invoices are Created
When you mark an allocation as "COMPLETED" in the External Allocations tab
System automatically generates invoice record with status "COMPLETED"
Invoice appears in the Calculation tab with all details
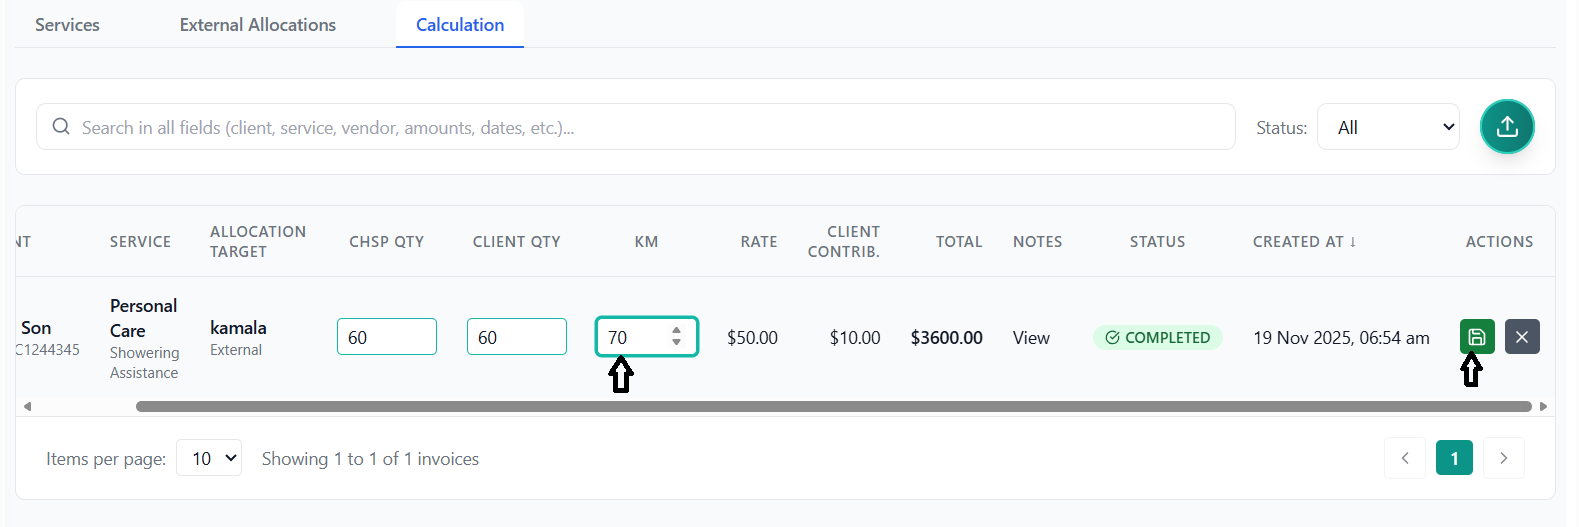
Editing Invoice Details
Find the invoice you want to edit in the Calculation tab.
Click the orange Edit icon in the Actions column.
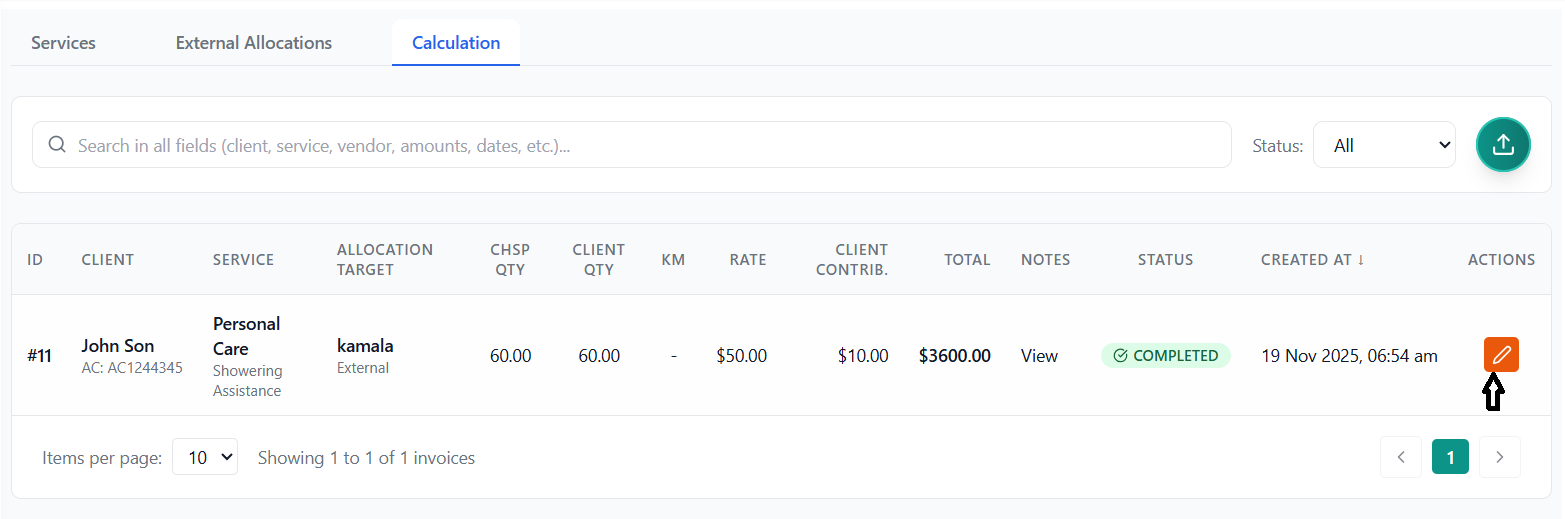
You can edit:
- CHSP Qty: Quantity hours for CHSP billing
- Client Qty: Quantity hours for client billing
- KM: Kilometers traveled
Click green Save button. Success message confirms update.
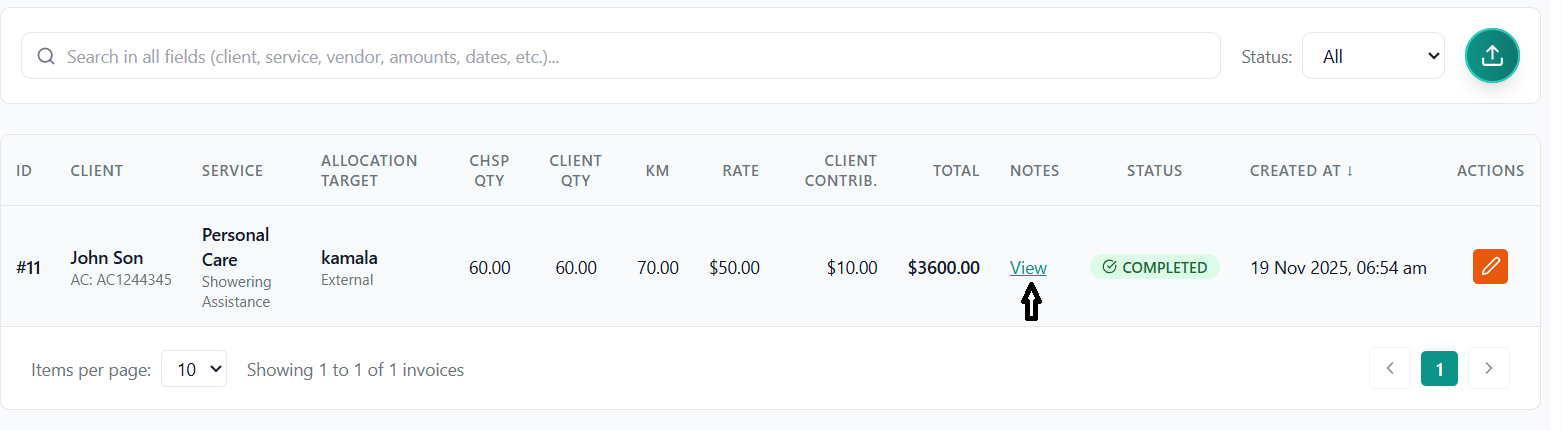
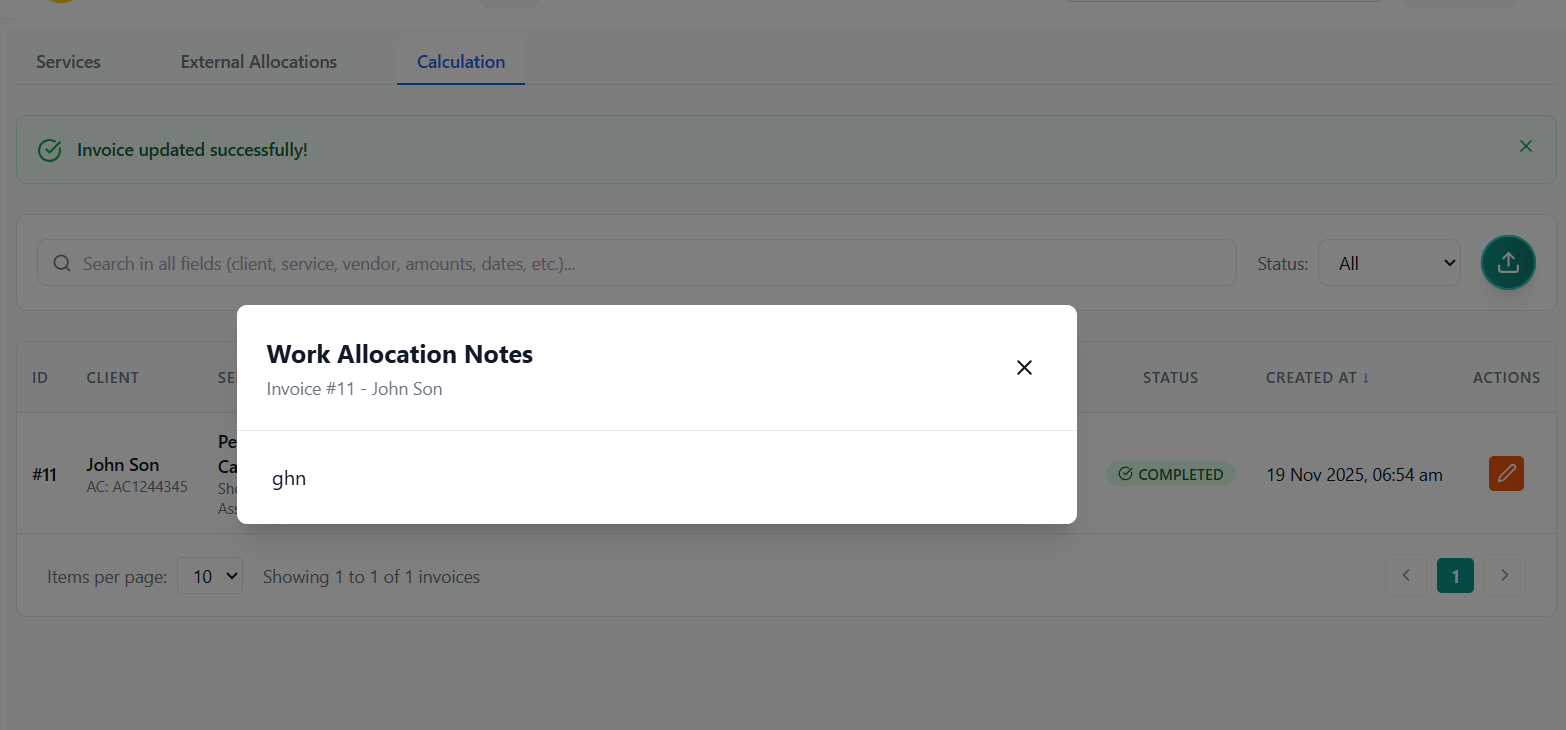
Viewing Invoice Notes
If notes are present, click the "View" link to open the notes popup.
A popup displays the complete work allocation notes including:
- Service instructions
- Special requirements
- Completion notes
Click X or outside the popup to close.
Searching and Filtering Invoices
Search bar searches across ALL invoice fields including:
- Invoice ID and Client information
- Service type and items
- Vendor, Employee, Department, or External names
- All amounts and quantities
- Dates (created, updated)
- Notes content
- Status
Use the status dropdown to filter:
- All
- Completed
- Generated
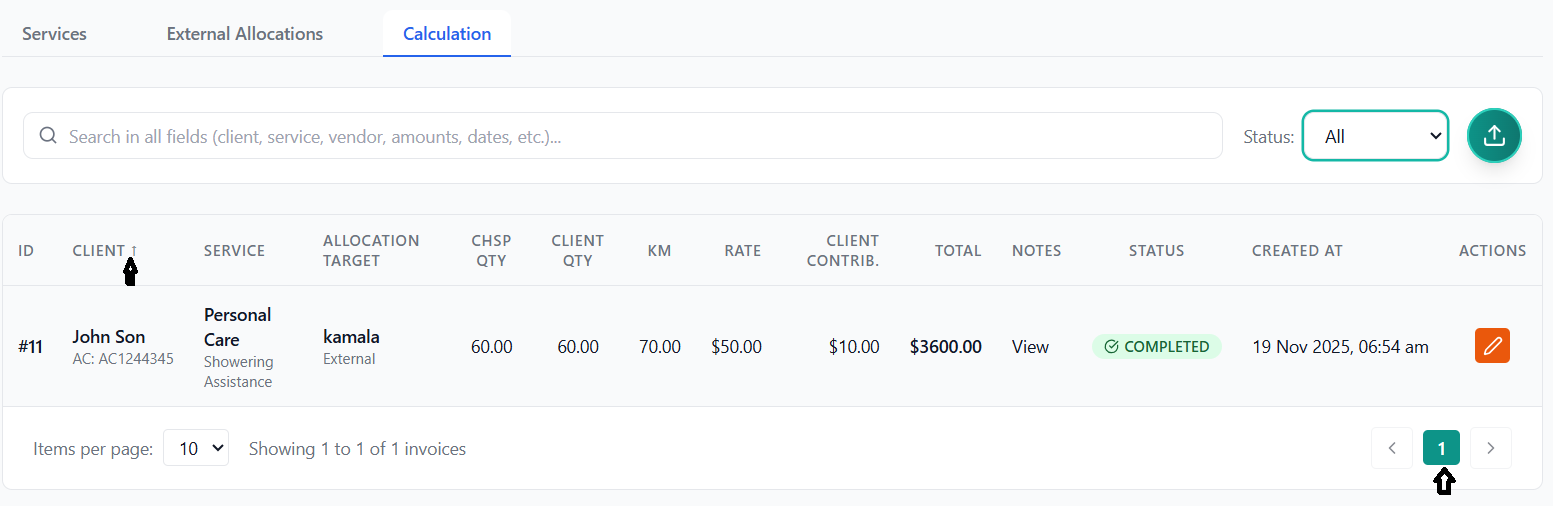
Sorting Invoices
Click any sortable column to sort by that field:
- ID
- Client Name
- Service Type
- Allocation Type
- Quantities
- Amounts
- Created Date
Click again to reverse sort order (ascending ↑ / descending ↓)
Pagination
Select from dropdown: 5, 10, 25, or 50 items per page
Use Previous/Next buttons or click specific page numbers
DEX File Generation
Create government compliance reporting files for Australian Government reporting.
What are DEX Files?
DEX (Data Exchange) files are XML files required for Australian Government reporting compliance. The CHSP system generates three types of DEX files:
- Sessions File: Service delivery sessions
- Clients File: Client demographic information
- Cases File: Case management records
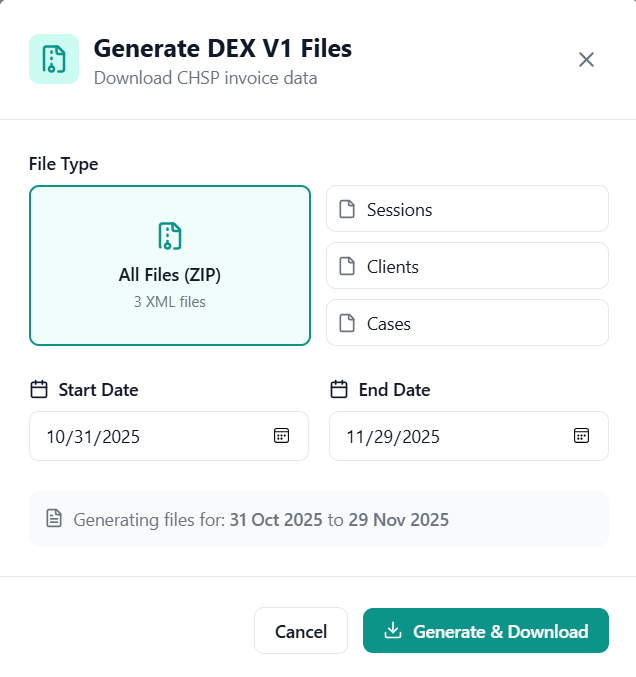
Generating DEX Files
In the Calculation (Invoice) tab, click the circular teal button with upload icon in top-right corner.
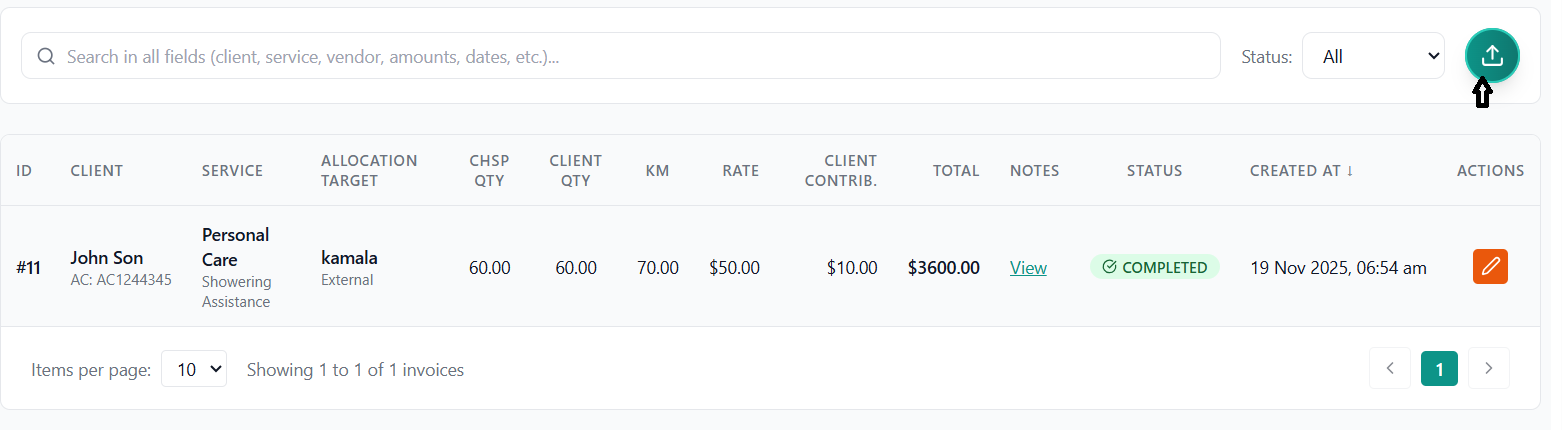
Choose the reporting period:
- Start Date: Beginning of reporting period
- End Date: End of reporting period
- Defaults to current month
Select what to generate:
- All Files (ZIP): Generates all 3 XML files in a single ZIP archive
- Sessions: Only sessions XML file
- Clients: Only clients XML file
- Cases: Only cases XML file
Click "Generate & Download" button.
Watch the progress bar as files are generated and downloaded.
Success message appears and files download automatically to your browser's download folder.
DEX File Contents
Sessions File Contains:
- Service delivery dates and times
- Service types provided
- Duration of services
- Outlet information
- Worker information (anonymized)
Clients File Contains:
- Client demographics (anonymized)
- Date of birth (or estimate)
- Gender
- Indigenous status
- Country of birth
- Language spoken
- Disability information
Cases File Contains:
- Case start and end dates
- Service types
- Referral information
- Case status
Troubleshooting DEX Generation
No Data for Date Range
Problem: No completed invoices in selected date range
Solution: Adjust date range or ensure invoices are marked as COMPLETED
Missing Client Information
Problem: Client records incomplete
Solution: Go to client details and fill required DEX fields (DOB, gender, etc.)
Download Fails
Problem: Browser blocks download
Solution: Allow pop-ups and downloads for this site in browser settings
Service Agreement Generation
Create legally binding service agreements between your organization and clients.
What are Service Agreements?
Service Agreements are legally binding documents between your organization and the client outlining:
- Services to be provided
- Service costs and client contributions
- Terms and conditions
- Rights and responsibilities
- Privacy and complaint procedures
Prerequisites
Generating a Service Agreement
Go to Services → Expand a client → Click "Agreement" sub-tab
System displays:
- Organization ID
- Client ID
- Available templates count
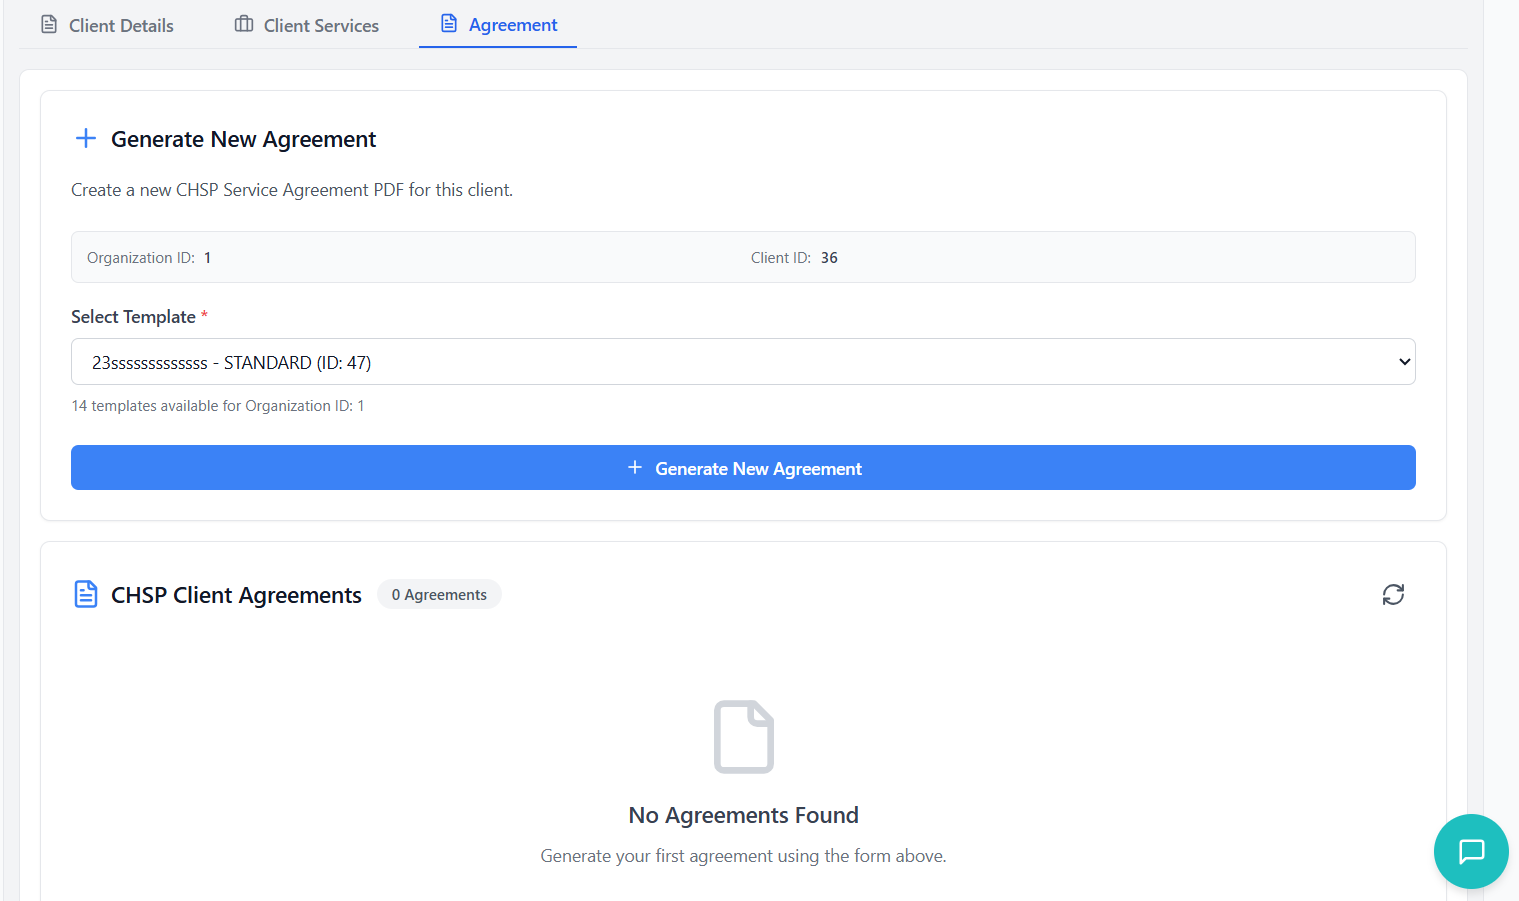
Choose the appropriate template from dropdown. Templates show:
- Template name
- Template type
- Template ID
Click "Generate New Agreement" button.
System processes the request (shows loading indicator).
Green success message appears confirming creation.

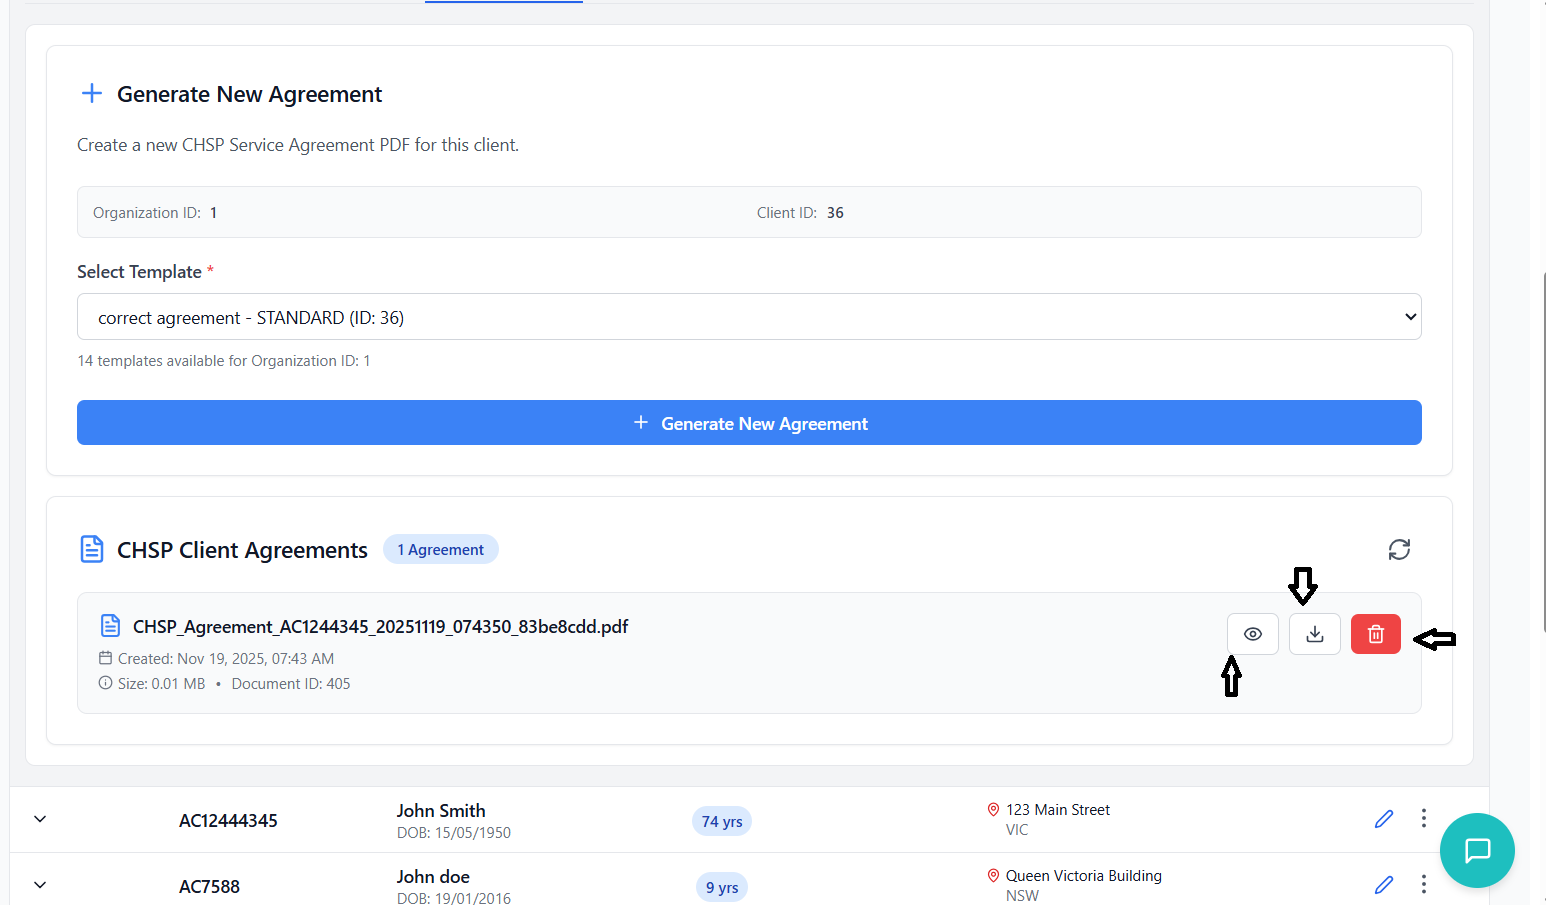
Viewing Generated Agreements
Scroll down to "CHSP Client Agreements" section. You'll see:
- Document name
- Creation date and time
- File size
- Document ID
- Who uploaded it
Click the eye icon (👁️) to view the PDF in full-screen mode.
Click the download icon (⬇️) to save PDF to your computer.
Click the trash icon (🗑️) to permanently remove an agreement.
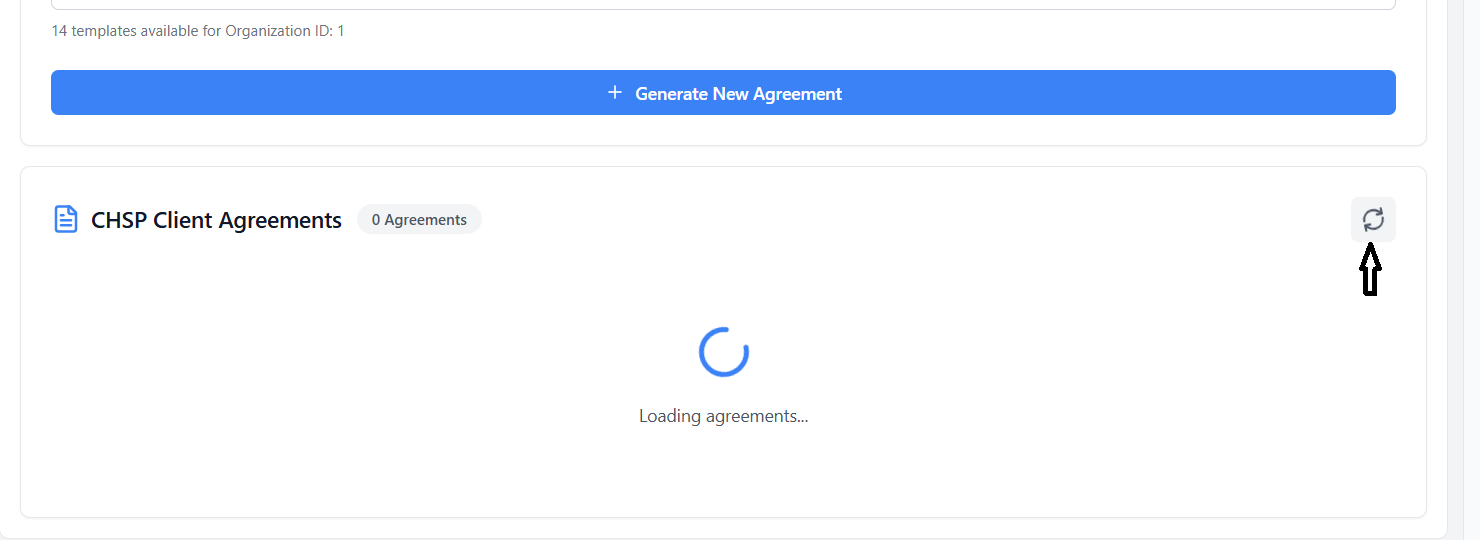
Refreshing Agreement List
Click the circular arrow icon next to "CHSP Client Agreements" header.
Latest agreements from database are loaded.
Agreement Document Contents
Generated agreements automatically include:
- Client name and details
- Organization information
- Service descriptions
- Pricing and payment terms
- Start and end dates
- Signature blocks
- Terms and conditions from template
Change History Tracking
View complete audit trail of all changes made to CHSP records.
Understanding Change Tracking
The system maintains a complete audit trail of all changes made to CHSP records, tracking:
- What was changed (field name)
- Old value → New value
- Who made the change (employee name)
- When it was changed (date and time)
- Which client and service
Accessing Change History
In the main CHSP tab, click the purple circular button with history icon.
A side panel slides in from the right showing all tracked changes.
Screenshot Location: Change History Panel
Replace this with: Screenshot of change history side panel
Filtering Change History
Use the search bar to find changes by:
- Client name or ID
- Employee name
- Field name
- Old or new values
- Service type
Use "All Clients" dropdown to filter changes for specific client.
Use "All Employees" dropdown to see changes made by specific employee.
Screenshot Location: Change History Filters
Replace this with: Screenshot showing filter dropdowns
Understanding Change Records
Each change record displays:
Field Changed
Color-coded badge showing which field was modified
Record Info
Record ID and associated data
Client Details
Client name and ID
Service Type
Which service was affected
Screenshot Location: Change Record Details
Replace this with: Screenshot of a single change record with all details
Change Record Color Coding
Field types are color-coded for easy identification:
- Client ID Fields
- Rate ID Fields
- Personal Info
- Address Fields
- Service Info
- Date Fields
- Status Fields
Viewing Value Changes
Find the change you want to review.
Each record shows:
- Previous Value: What it was before (red text)
- New Value: What it changed to (green text)
Bottom of each record shows:
- Who made the change (employee name)
- When it was changed (date and time)
Screenshot Location: Value Comparison
Replace this with: Screenshot showing before/after values
Troubleshooting Guide
Solutions to common issues and problems you may encounter.
Common Issues
Cause: Missing permissions for that feature
Solution:
- Contact your system administrator
- Request access to specific CHSP feature (Service, External Allocations, Calculation, or Records)
- Wait for administrator to grant permissions
- Log out and log back in
Cause: No CHSP permissions at all
Solution:
- Contact administrator immediately
- Provide your user ID and organization
- Request CHSP package access
Cause: Missing required fields or duplicate Client ID
Solution:
- Ensure all required fields (marked with *) are filled
- Check Client ID is unique
- Verify date of birth is not in future
- Confirm email format is valid
Cause: API key not configured or network issue
Solution:
- You can still manually enter addresses
- Type full address in Address Line 1
- Manually select State from dropdown
- Enter postcode manually
- Report issue to IT if persistent
Cause: Client selected is newly created or incomplete
Solution:
- Manually enter client details in record form
- Or go back and complete client profile first
- Then create record again
Rate and Service Issues
Cause: Service type already exists (by design)
Solution:
- Use the existing service type
- Or edit the existing one to update rate
- Or create with slightly different name (e.g., "Home Care - Extended")
Cause: Rate is marked as inactive
Solution:
- Go to rate card management
- Edit the rate
- Check the "Active" checkbox
- Save changes
Work Allocation Problems
Cause: Missing client service assignment
Solution:
- Go to client's "Client Services" tab
- Add a service to the client first
- Then create work allocation
Cause: Allocation already completed
Solution:
- Completed allocations cannot be edited
- Contact administrator if correction needed
- May need to create new allocation
Cause: Quantity and price not set
Solution:
- Click Edit button on the allocation
- Enter both Quantity and Price Charge
- Save changes
- Complete button will appear
Invoice Issues
Cause: System processing delay or error
Solution:
- Refresh the Calculation tab
- Check if allocation status is truly "COMPLETED"
- Wait 30 seconds and refresh again
- If still missing, contact support
Cause: Some fields are read-only by design
Solution:
- Only CHSP Qty, Client Qty, and KM can be edited
- To change rates, edit the source work allocation
- Contact administrator for other changes
DEX File Generation
Cause: No completed invoices in date range
Solution:
- Verify date range includes completed services
- Check Calculation tab for invoices in that period
- Ensure allocations are marked COMPLETED
- Adjust date range if needed
Cause: Browser security settings
Solution:
- Allow pop-ups for this website
- Check browser download settings
- Try different browser
- Check if file is in Downloads folder (may have downloaded silently)
Agreement Generation
Cause: Organization has no templates created
Solution:
- Contact administrator
- Request template creation
- Wait for template to be configured
- Refresh page after template creation
Cause: PDF viewer issue or file corruption
Solution:
- Try downloading instead of viewing
- Open downloaded file in Adobe Reader
- Clear browser cache
- If still fails, regenerate agreement
Performance Issues
Causes: Large data set, network, or browser issues
Solutions:
- Reduce items per page (try 10 instead of 50)
- Use search to filter results
- Clear browser cache and cookies
- Close other browser tabs
- Check internet connection
- Try different browser
Cause: Typo, incorrect search field, or data issue
Solutions:
- Check spelling
- Try "All Fields" search option
- Search partial terms (e.g., "John" instead of "Johnson")
- Try different search criteria
- Verify record actually exists in system
Getting Help
- System Administrator: For permissions and access issues
- IT Support: For technical problems and bugs
- Training Team: For process questions and best practices
- This SOP: Reference guide for common tasks
When Reporting Issues, Include:
- Your user ID and organization
- Which tab/feature you were using
- What you were trying to do
- Exact error message (screenshot if possible)
- Steps to reproduce the issue
- Browser and version (Chrome, Firefox, etc.)