AI Functionalities
Explore AI-powered features that enhance productivity and streamline workflows. Select a topic below to get started.
System Overview
AI-powered features leverage advanced GPT models to automate tasks, provide insights, and enhance user experience.
Available AI Features
📝 AI Case Note Summary
Automatically generate comprehensive summaries from large volumes of case notes, identifying patterns and key observations.
💬 AI Allocation Chatbot
Create work allocations through natural language conversation, with intelligent validation and conflict detection.
Key Benefits
- Reduce time spent reading through multiple case notes
- Create allocations faster with conversational interface
- Automate repetitive data entry tasks
- Identify patterns and trends across multiple notes
- Detect urgency levels and risk indicators
- Get actionable recommendations based on data
- Natural language interaction with AI chatbot
- Structured, easy-to-read summary reports
- Intelligent validation prevents errors
AI Case Note Summary Generation
The AI Case Note Summary feature helps users quickly understand large volumes of case notes added by carers for a client. This tool provides an efficient, AI-powered solution using advanced GPT models.
Overview
When a user wants a concise, meaningful summary of all relevant notes, this tool:
- Analyzes multiple case notes simultaneously
- Identifies key observations and patterns
- Extracts action items and recommendations
- Detects urgency levels and trends
- Presents insights in structured, easy-to-read format
- Quickly review a client's care history
- Prepare for care planning meetings
- Identify emerging patterns or concerns
- Generate handover summaries
- Support decision-making with data-driven insights
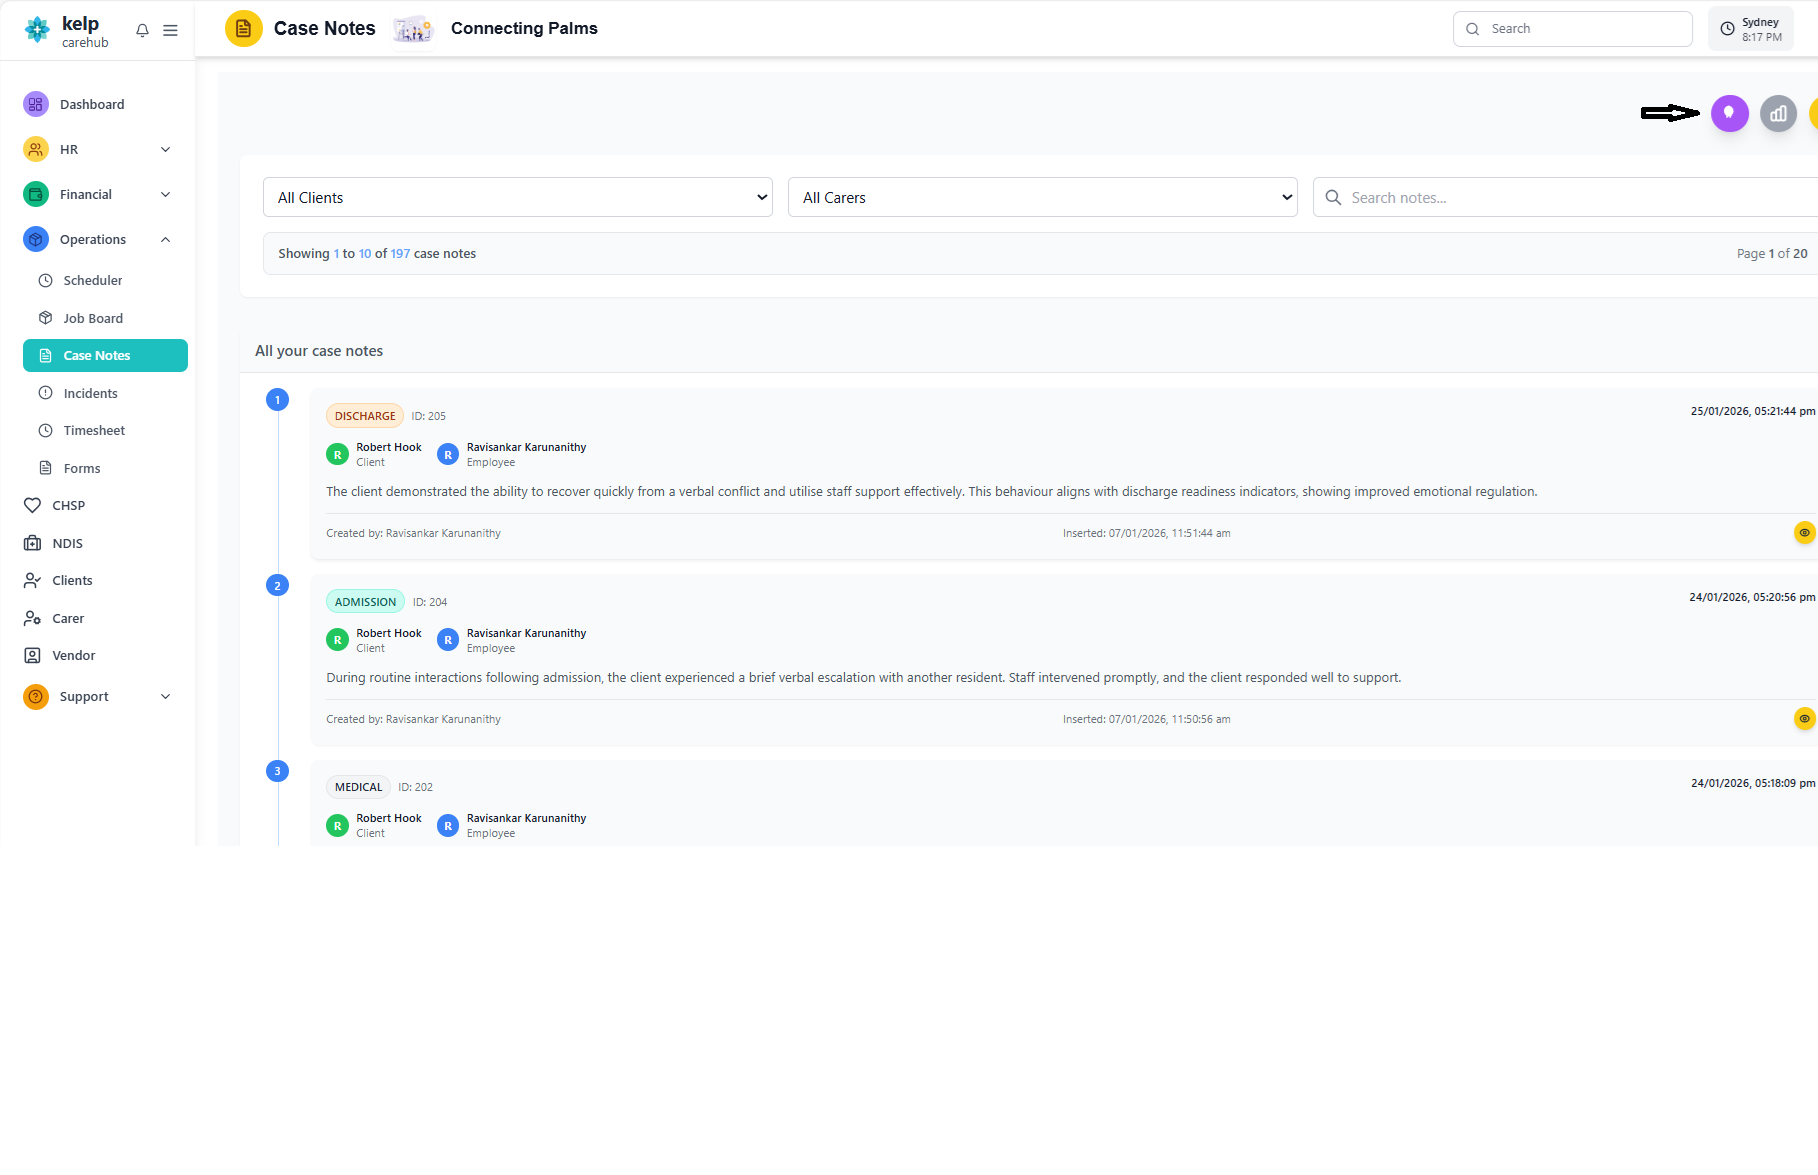
Access AI Case Note Summary
How to access and use the AI summary feature for case notes.
To access the AI summary feature:
- Navigate to the Operations tab
- Open the Case Notes section
- A purple circular button with an AI brain icon appears in the top-right corner
- The button is visible only when case notes exist for summarization
- It becomes disabled during summary generation to prevent duplicate requests
- A loading spinner is shown while the AI processes the notes
The AI summary feature enforces strict permission rules:
- Requires
CaseNote_Viewpermission - Users can only summarize notes they are allowed to view
- If permissions are insufficient, an error message is displayed
- Permission checks happen both on frontend and backend
The summary respects all current filters and settings:
- Users may filter by:
- Carer - Specific employee or all carers
- Client - Specific client or all clients
- Date Range - Custom time period
- Users may also search using the Search field
- Apply desired filters before clicking the AI brain icon
- Only the filtered/visible case notes will be included in the summary
- Once filters are applied, click the AI brain icon
- AI processes all visible case notes based on filters
- Processing time varies based on number of notes (typically 5-15 seconds)
- Loading indicator shows progress
- Summary modal opens automatically when ready
AI Summary Modal
Understanding the AI-generated summary interface and content sections.
Modal Interface
- Title: "Case Notes Summary" styled with a purple theme
- Badge: "Powered by AI" indicator shows AI-generated content
- Close Button: Standard X button to close the modal
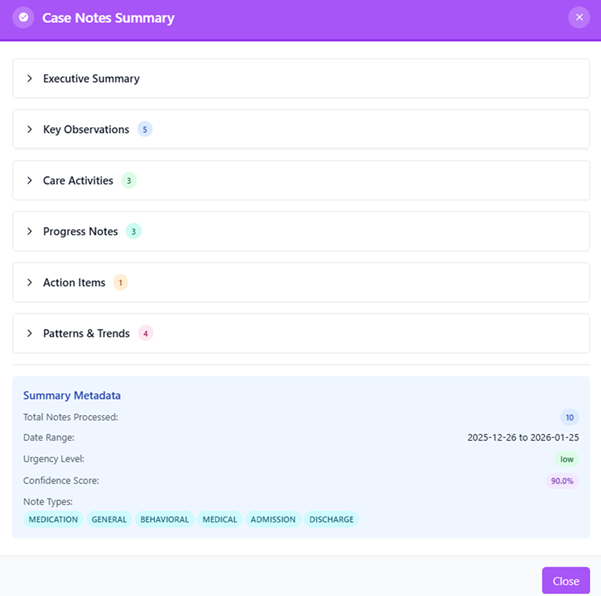
Each section provides structured insights from the analyzed case notes:
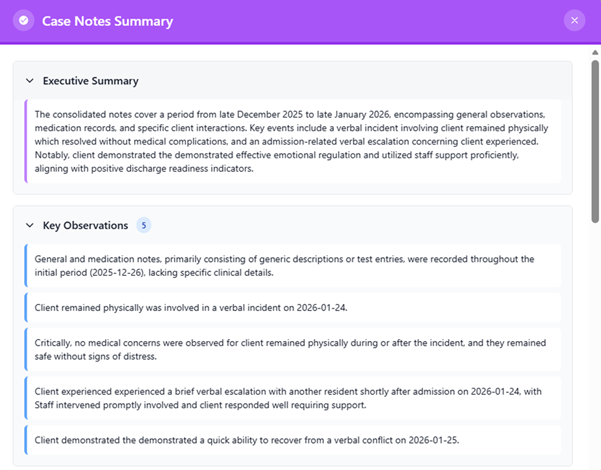
Executive Summary
- High-level overview of all notes
- Major events and milestones
- Overall tone and sentiment of the notes
- Expanded by default for quick access
Key Observations
- Significant findings and patterns
- Behavioral changes noted by carers
- Health concerns or improvements
- Emotional patterns observed
- Notable incidents or events
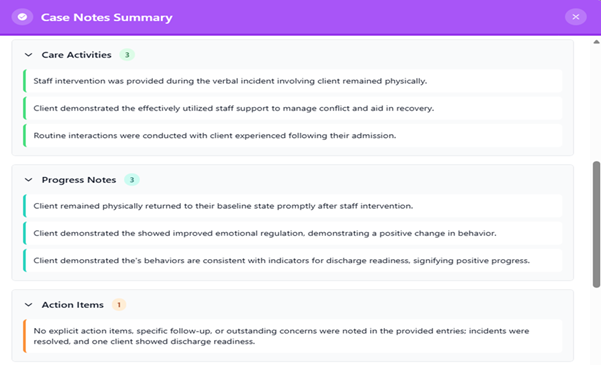
Care Activities
- Summary of care actions performed
- Medication administration records
- Personal care activities
- Mobility support provided
- Other assistance rendered
Progress Notes
- Client improvements or changes over time
- Positive improvements identified
- Areas of regression or concern
- Stability or fluctuations in condition
- Responses to interventions
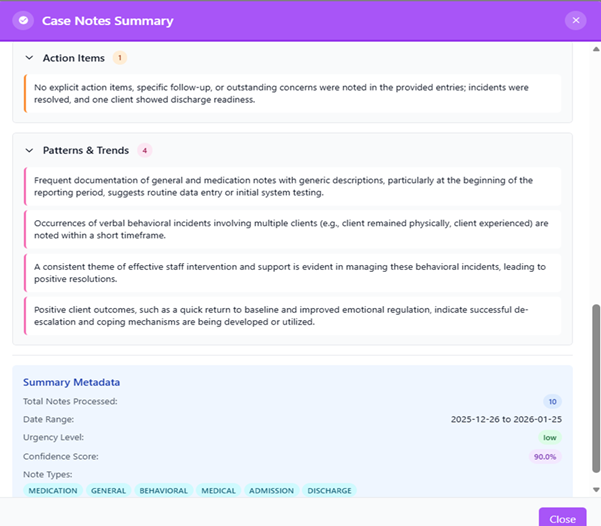
Action Items
- Recommended next steps
- Follow-ups required
- Risk mitigation strategies
- Communication needs
- Additional assessments suggested
- Specific carer instructions
Patterns & Trends
- Recurring themes across notes
- Repeated complaints or concerns
- Frequent incidents of similar nature
- Consistent behaviors observed
- Ongoing challenges identified
- Daily routines and preferences
Displays important context about the generated summary:
- Total Notes Processed: Helps users understand how much data the AI analyzed
- Date Range: Shows the time period covered by the summary
- Urgency Level: AI detects if the notes indicate low, medium, or high concern
- Confidence Score: Indicates how confident the AI is in its interpretation
- Note Types: Categories of notes included (Incident, Medication, General, Discharge, etc.)
Interactive Features
📂 Expandable/Collapsible Sections
Users can toggle each section by clicking the header. Executive Summary is expanded by default.
🎨 Color-Coded Categories
Each section uses a distinct color for visual clarity and easy identification.
🔢 Item Count Badges
Shows the number of items in each list, helping prioritize which sections to review.
📭 Empty States
Clear messages appear when a section has no data or relevant information.
Features
Understanding the AI processing workflow and capabilities behind case note summarization.
AI Processing Workflow
Detailed Processing Steps
- Based on current filters (Carer, Client, date range, search text, pagination)
- Only includes notes the user has permission to view
- Respects role-based access controls
- Maintains data security throughout process
The AI model performs sophisticated analysis:
- Reads every note in the filtered set
- Identifies patterns, themes, concerns, and care activities
- Extracts important details and context
- Organizes information into structured sections
- Applies natural language understanding to interpret meaning
The AI creates a comprehensive report:
- Output is a multi-section report with clear organization
- Each section focuses on a different aspect of the client's care journey
- Content is written in natural, professional language
- Summaries are concise yet comprehensive
AI calculates important summary metrics:
- Number of notes processed: Total count of analyzed notes
- Time period covered: Date range of included notes
- Urgency indicators: Risk level assessment (low/medium/high)
- Confidence score: How certain the AI is about its analysis
- Types of notes: Categories included in summary
AI Capabilities
🧠 Natural Language Understanding
Interprets meaning, context, and intent from carer-written notes, understanding medical terminology and care contexts.
🔍 Pattern Recognition
Identifies recurring themes, behaviors, and trends across multiple notes spanning different dates and carers.
📊 Trend Analysis
Analyzes changes over time, identifying improvements, deteriorations, or stable conditions in client care.
⚠️ Risk Assessment
Flags potential risks, urgent situations, or concerns that need immediate attention from care team.
✅ Action Item Extraction
Identifies and extracts concrete action items, follow-ups, and recommendations from narrative notes.
🎯 Contextual Understanding
Understands relationships between events, symptoms, interventions, and outcomes across notes.
AI Limitations & Considerations
- AI Supplement, Not Replacement: AI summaries should complement, not replace, professional judgment and detailed note review
- Accuracy Depends on Input: Summary quality depends on the clarity and completeness of original case notes
- Review Recommendations: Always review AI recommendations before taking action
- Potential Biases: Be aware that AI may have inherent biases in interpretation
- Confidence Scores: Pay attention to confidence levels - lower scores indicate uncertainty
- Data Privacy: All processing respects data privacy rules and access controls
- Use specific filters to focus AI on relevant time periods or carers
- Review original notes for critical decisions
- Cross-reference AI findings with other documentation
- Use summaries as starting points for deeper investigation
- Provide feedback when AI misses important details
AI Allocation Chatbot
The AI Allocation Chatbot allows users to create work allocations through a guided, step-by-step conversational experience. Instead of manually filling forms, users can simply type instructions in natural language.
Overview
The chatbot makes allocation creation faster, more interactive, and more intuitive by:
- Understanding natural language instructions
- Asking for missing details intelligently
- Validating employee and client availability
- Handling repeat schedules automatically
- Preventing overlapping allocations
- Providing real-time validation and feedback
Allocation Creation Methods
📝 Manual Creation
Traditional form-based allocation creation through the Scheduler interface with dropdowns and date pickers.
💬 AI Chatbot
Conversational interface that understands natural language and guides you through the allocation process.
- Faster than filling out forms
- Natural language input (e.g., "next Monday 9 to 5")
- Automatic conflict detection
- Intelligent repeat schedule handling
- Guided step-by-step process
- Real-time validation and corrections
Types of Allocations
The chatbot supports two types of work allocations, each designed for different scheduling scenarios.
The Work Allocation System is used to schedule carers for NDIS (National Disability Insurance Scheme) and CHSP (Commonwealth Home Support Programme).
Creates Allocation Between:
- Employee (Carer) → Client
- With defined start date/time and end date/time
Use Cases:
- When you know exactly which carer will provide the service
- Scheduled client visits with specific carers
- Regular recurring care schedules
- Personal care, medication support, mobility assistance
Example:
Employee: James Anderson
Client: Alice Johnson
Schedule: Every Monday 9:00 AM - 5:00 PM for 3 months
The Department Allocation System assigns entire departments to clients. This is useful when the specific carer is not yet known or when the department will choose the appropriate staff member later.
Creates Allocation Between:
- Department → Client
- With defined start date/time and end date/time
- A carer can be assigned later by the department
Use Cases:
- When the specific carer is not yet determined
- Department-level resource planning
- Flexible staffing arrangements
- Pool allocation where any qualified staff can be assigned
Example:
Department: Home Care Services
Client: Robert Smith
Schedule: Next Thursday 2:00 PM - 6:00 PM (one-time)
Department will assign specific carer later
Comparison Table
| Feature | Employee Allocation | Department Allocation |
|---|---|---|
| Specific Carer Required | Yes | No |
| Immediate Assignment | Yes | Deferred |
| Conflict Detection | Employee-level | Department-level |
| Repeat Schedules | Supported | Supported |
| Best For | Regular care schedules | Flexible staffing needs |
Access AI Allocation Chatbot
How to access and start using the AI allocation chatbot interface.
To open the chatbot:
- Navigate to the Operations tab
- Open the Scheduler section
- This page displays all existing work allocations
- A purple AI button with a spark icon appears in the top-right corner
- The button is visible only if the user has permission to create allocations
The chatbot enforces strict permission rules:
- Users must have
Work Allocation - Createpermission - Only authorized users can create employee or department allocations
- If permissions are missing, the chatbot displays an appropriate error message
- Permission validation happens before the chat interface opens
- Click the purple AI button to open the chat panel
- Chat panel slides in from the right side of the screen
- Chatbot greets you and asks for allocation type
- You can close the panel at any time using the X button
After creating allocations, users can filter the list by:
- Client: Filter by specific client
- Carer: Filter by specific employee
- Status: Active, completed, cancelled
- Type: Employee or department allocation
- Notes: Search in allocation notes
- Dates: Filter by date range
These filters help users quickly locate and review specific allocations after creation.
AI Chatbot Model
Understanding the conversational AI workflow and interactive features of the allocation chatbot.
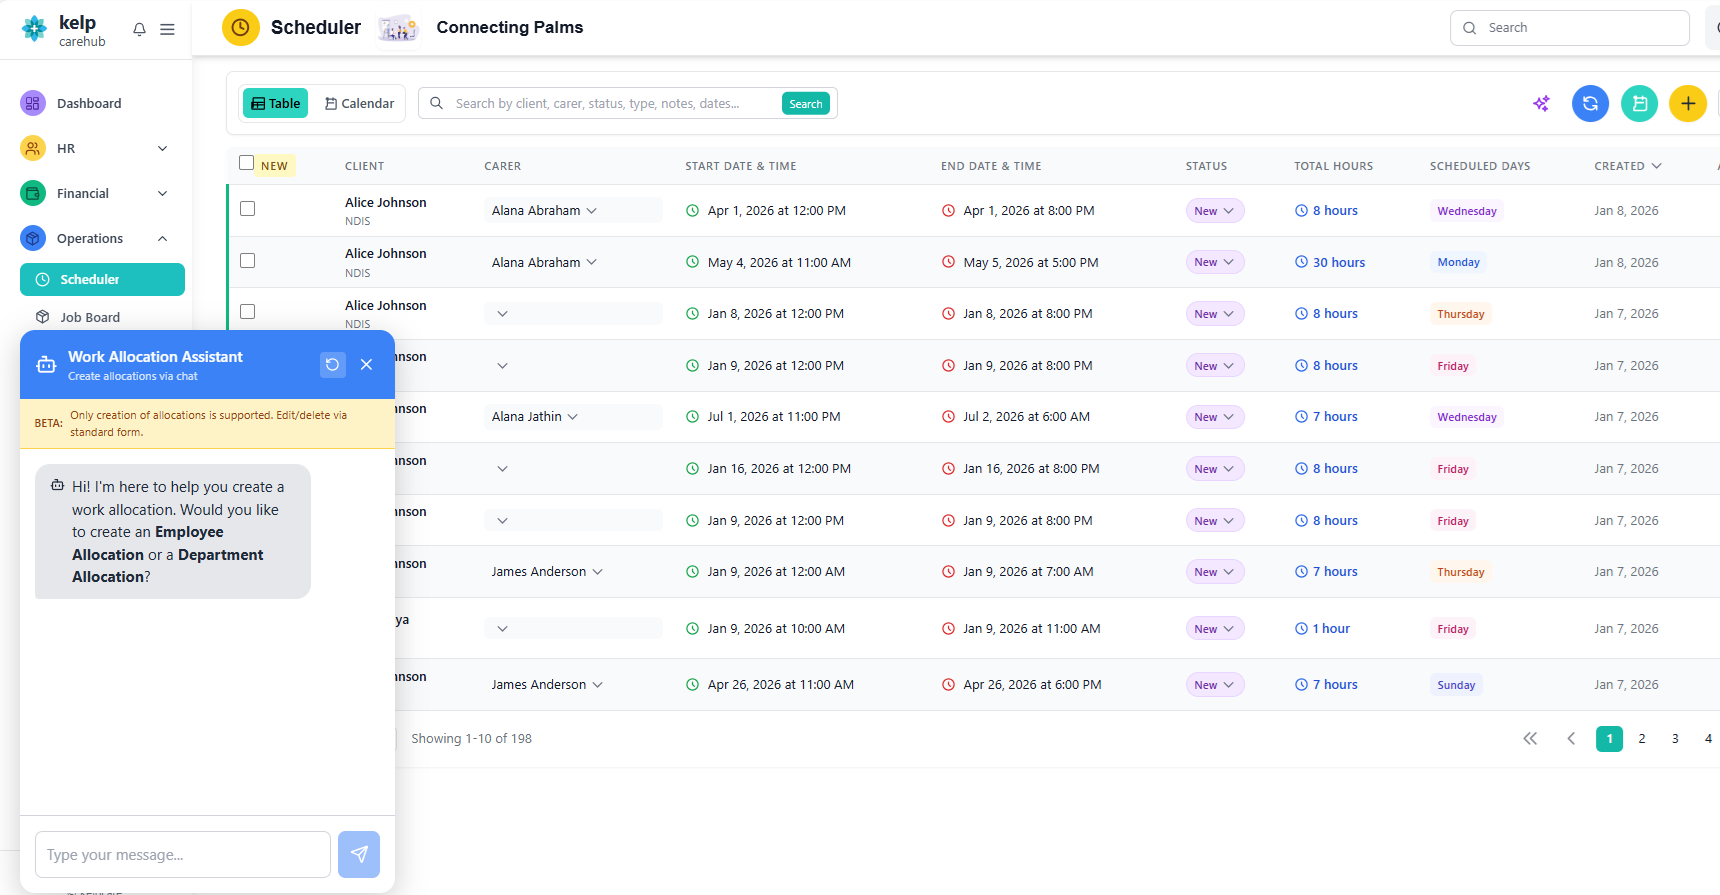
Chatbot Interface
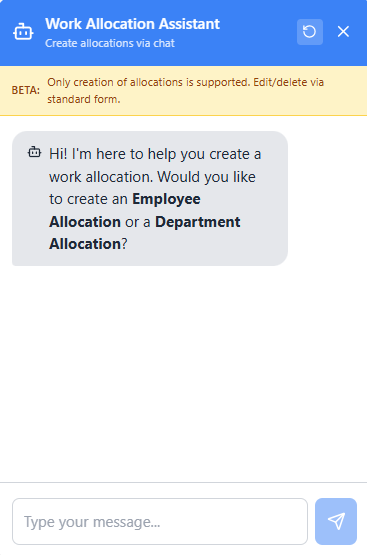
- Title: "Work Allocation Assistant"
- Subheading: "Create allocation via chatbot"
- Refresh Button: Restart the conversation
- Close Button: Close the chat popup
Conversation Flow
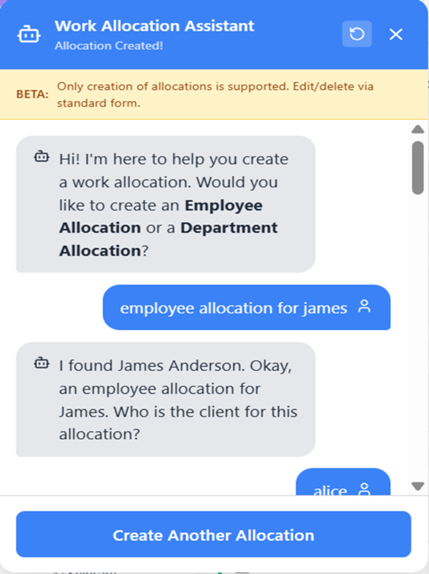
- Chatbot prompts: "What type of allocation would you like to create?"
- User types either "Employee" or "Department"
- Chatbot waits for correct input and confirms selection
- Example: "I need an employee allocation"
When a user types an employee name (e.g., "james"), the assistant:
- Searches for matching employees in the system
- Displays a numbered list if multiple matches exist
- Waits for the user to choose the correct one by number
- After selection, confirms: "Got it. I've selected James Anderson."
Example:
User: james
Chatbot: I found 3 employees matching "james":
1. James Anderson (ID: EMP001)
2. James Wilson (ID: EMP045)
3. Jamie Stevens (ID: EMP102)
User: 1
Chatbot: Got it. I've selected James Anderson.
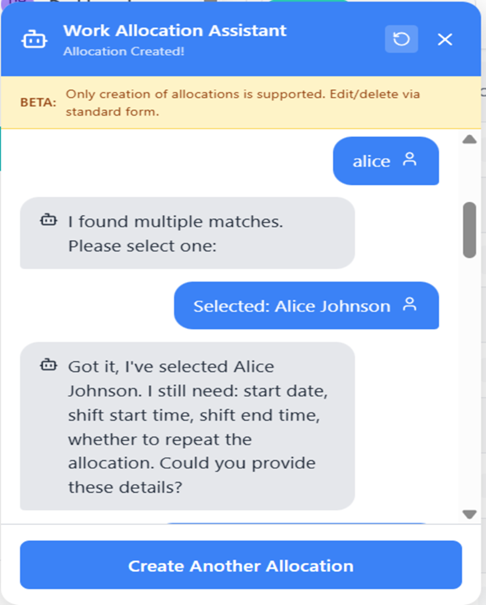
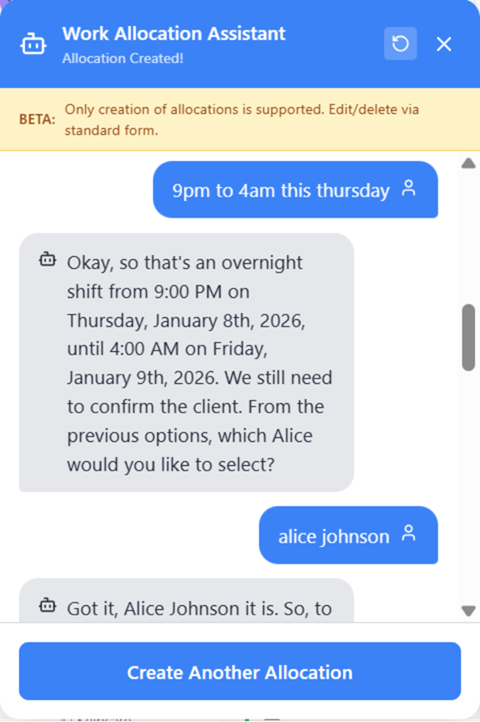
When a user types a client name (e.g., "alice"), the assistant:
- Searches for matching clients in the system
- Displays a numbered list if multiple matches exist
- Waits for the user to choose the correct one
- After selection, confirms: "Got it. I've selected Alice Johnson A."
Example:
User: alice
Chatbot: I found 2 clients matching "alice":
1. Alice Johnson A. (ID: CLT001)
2. Alice Brown (ID: CLT089)
User: 1
Chatbot: Got it. I've selected Alice Johnson A.
Once the client is selected, the assistant asks for:
- Start date: When the allocation begins
- Shift start time: Time of day the shift starts
- Shift end time: Time of day the shift ends
- Repeat pattern: Whether the allocation should repeat
This ensures all essential scheduling data is captured before proceeding.
Users can enter time and date in natural language, such as:
- "5pm to 4am this Thursday"
- "Next Monday 9 to 5"
- "Tomorrow evening"
- "Starting Friday 8am until 2pm"
The assistant interprets this into structured data:
User Input: "5pm to 4am this Thursday"
Interpreted As:
• Start: Thursday, Jan 19, 2023, 5:00 PM
• End: Friday, Jan 20, 2023, 4:00 AM
It then confirms the interpretation before moving forward.
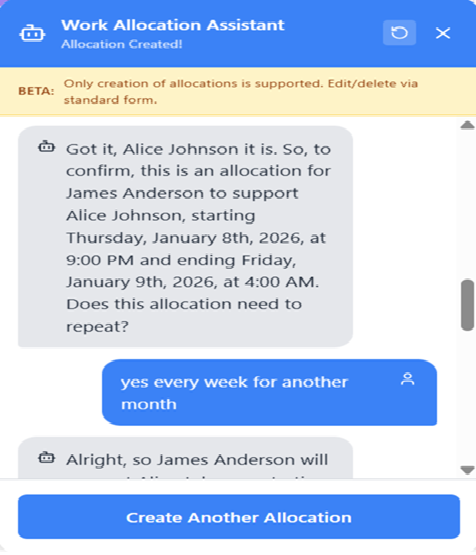
Users can specify repeat patterns naturally:
- "Yes every week for another 3 months"
- "Repeat daily for 2 weeks"
- "No repeat" or "Just once"
- "Every Monday and Wednesday for 6 weeks"
The assistant converts this into:
- Frequency: Daily, weekly, specific days
- End date: Calculated from the duration (e.g., 3 months from start)
It then confirms: "This allocation will repeat weekly until May 12th, 2023."
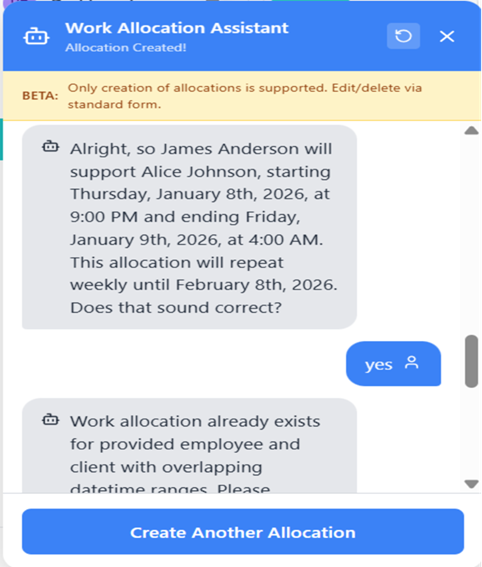
Before creating the allocation, the assistant summarizes:
- Client: Name and ID
- Employee: Name and ID (or Department)
- Start & End Time: Complete datetime range
- Repeat Pattern: Frequency and end date (if applicable)
It asks for a final "yes" to proceed with creation.
Summary Example:
📋 Allocation Summary
• Client: Alice Johnson A.
• Employee: James Anderson
• Start: Thursday, Jan 19, 2023 at 5:00 PM
• End: Friday, Jan 20, 2023 at 4:00 AM
• Repeat: Weekly until May 12, 2023
Type "yes" to create this allocation.
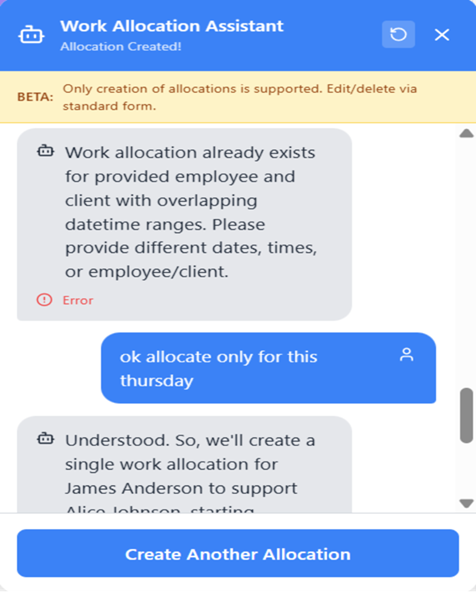
If an overlapping allocation exists, the assistant alerts the user:
⚠️ Conflict Detected
"Work allocation already exists for this employee and client with overlapping datetime span."
The user can then adjust:
- Dates or times to avoid overlap
- Choose a different employee
- Choose a one-time allocation instead of repeat
Example user correction: "Ok allocate only for this Thursday"
The assistant re-confirms the updated details and checks for conflicts again.

Once confirmed and validated:
- The assistant creates the allocation in the system
- Displays a success message: "✅ Allocation creation completed."
- Shows allocation details for reference
- Offers a shortcut button: "Create Another Allocation"
Users can either:
- Click "Create Another Allocation" to start fresh
- Close the chat panel
- View the new allocation in the Scheduler list
Interactive Features
🗣️ Natural Language Parsing
Users can type details conversationally; the assistant handles interpretation and structure.
✅ Smart Validation
Detects conflicts, missing fields, ambiguous inputs, and overlapping shifts automatically.
🔄 Guided Confirmation
Every major step includes a confirmation to prevent errors and ensure accuracy.
🛠️ Error Recovery
If something goes wrong (e.g., conflict), the assistant guides users to correct it.
📅 Flexible Date/Time Input
Accepts various natural language formats for dates and times.
🔁 Repeat Schedule Intelligence
Understands and configures complex repeat patterns from natural language.